NOTE: This is a legacy payment gateway, which you can continue to use, but please note that any changes made to the gateway by the service provider could disrupt your online payment system. The new gateway integration platform is designed to avoid these disruptions and seamlessly update as required.
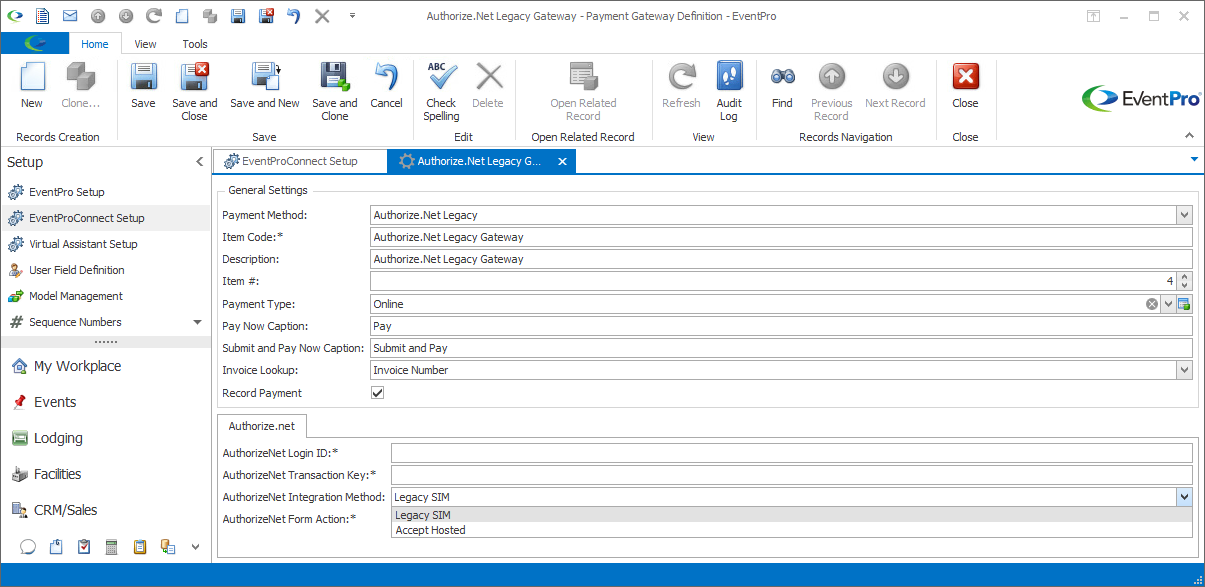
1.Authorize.Net Login ID: Obtain this value from your Authorize.Net account page.
2.Authorize.Net Transaction Key: Obtain this value from your Authorize.Net account page.
3.Authorize.Net Integration Method: Select the integration method that you are using: Legacy SIM or Accept Hosted.
These different options have different configuration requirements.
i.Authorize.Net requires EPConnect to be accessible over the internet in order to post the payment back to EventPro. Otherwise, an error will occur at the end of the process.
ii.The payment information will NOT be passed to EventPro automatically. Instead, the person who makes the payment must click a link in the Authorize.Net gateway to return to EPConnect, which causes the payment to be posted to EventPro. In order to allow for payment posting, you must adjust your Authorize.Net settings accordingly.
iii.In your Authorize.Net account, go to Settings > Transaction Format Settings > Transaction Response Settings > Response/Receipt URL.
Add your URL in this format: [Your EPConnect page]/Payments/AuthorizeNetSuccess.aspx
iv.Under Settings > Transaction Format Settings > Transaction Response Settings > Receipt Page > Receipt Method, change the Receipt Method to POST, in order to send information back to the EPConnect page and transfer to EventPro.
v.Still under Receipt Page > Receipt Method, in the Receipt Link Text field, enter text that will be obvious to the User, e.g. “Click here to complete payment”. It is important that the User knows to click the link since, as noted above, the User needs to click this link in order to post the payment back to EventPro.
Alternatively, you could keep the Receipt Link Text very short, and put an explanatory message in the Receipt Page Header or Footer (defined under the Receipt Page settings), e.g. “Payment is not complete until you click the above/below link. Please click the link to proceed.”
i.The Accept Hosted method uses webhook notifications in order to process transaction details for EventPro. In order for notifications to be received correctly, EPConnect must be accessible over the internet, and hosted on a secure website with an SSL certificate. Otherwise, transactions will only be recorded in Authorize.Net's merchant interface.
ii.You must also create a signature key in the merchant interface. Enter this signature key into Signature Key field of your EPConnect Payment Settings. This key is used to ensure that transaction details are secure when received from a webhook notification.
4.Authorize.Net Form Action: This field will appear if you are using the Legacy SIM method. Enter the form action URL supplied by Authorize.Net.
5.Authorize.Net Signature Key: This field will appear if you are using the Accept Hosted method. You can obtain the Signature Key from the Authorize.Net merchant interface.
6.For further information about Authorize.Net setup, please refer to your Authorize.Net support documentation.
7.When you have completed the payment settings for this Payment Gateway Definition, refer back to the topic Define Legacy Payment Gateways to save your changes.

Payment Gateway Definition for Legacy Authorize.net