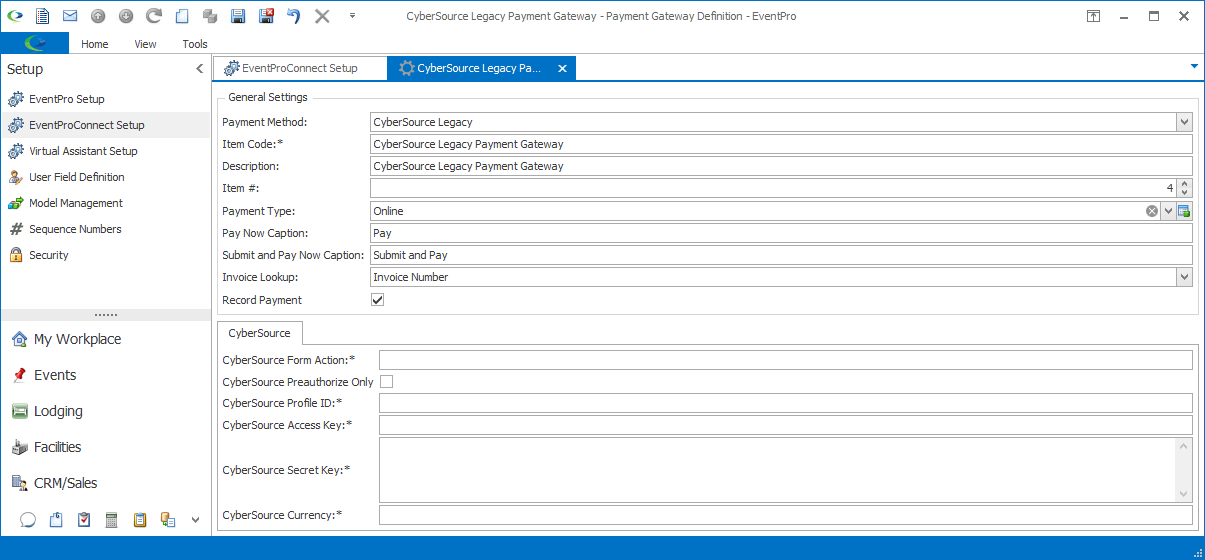
NOTE: This is a legacy payment gateway, which you can continue to use, but please note that any changes made to the gateway by the service provider could disrupt your online payment system. The new gateway integration platform is designed to avoid these disruptions and seamlessly update as required.
This integration uses the Secure Acceptance Web/Mobile API. The previous Hosted Order Page has been discontinued.
1.CyberSource Form Action: Enter the form action URL supplied by CyberSource.
2.CyberSource Preauthorize Only: If you select this Preauthorize Only option, review the General Settings of your CyberSource Profile to ensure that "Payment Tokenization" is checked, and the Integration Method is set to Web/Mobile.
3.You can obtain the following information from your CyberSource Secure Acceptance profile:
a.CyberSource Profile ID
b.CyberSource Access Key
c.CyberSource Secret Key
4.CyberSource Currency: Enter the currency in which you will be billing and accepting payments. Ensure this currency is set up in your CyberSource profile.
5.When you have entered the information you need under Payment Settings, ensure that you click Save or Save and Close in the navigation ribbon above.
6.Next, in order to record payments back into EventPro, you need to set up the CyberSource payment notifications to point back to EPConnect.
In your CyberSource Profile Notifications, specify the Merchant POST URL.
a.If using the Preauthorization Only option, set the Merchant POST URL to the CyberSource preauthorization success page:
http://server.com/EventProConnect/payments/cybersourcepreauthsuccess.aspx
b.If you are not using the Preauthorization Only option, set the Merchant POST URL to the CyberSource regular success page:
http://server.com/EventProConnect/payments/cybersourcesuccess.aspx
7.In CyberSource, configuration is done through a profile.
a.A list of your profiles can be found under Tools & Settings > Secure Acceptance items. Note that you cannot edit active profiles, so you will need to deactivate the profile or create a new one if you need to make modifications.
b.General Settings: If you are using the Preauthorzation Only option, you need to make sure the Payment Tokenization is checked. The Integration Method should be set to Web/Mobile.
c.Payments Settings: Ensure all credit cards and currencies you accept are set up here.
d.Security: This is where the security keys (Access Key and Secret Key) are created and activated.
e.Payment Form: Set up the information to be shown on the payment form.
f.Notifications: This is where you provide CyberSource with the URL to notify if a payment is successful using the Merchant POST URL.
If using Preauthorization, you will need to set this to the CyberSource preauthorization success page (http://server.com/EventProConnect/payments/cybersourcepreauthsuccess.aspx).
If you are not using Preauthorization, you will need to set this to the CyberSource regular success page (http://server.com/EventProConnect/payments/cybersourcesuccess.aspx).
g.Customer Response Pages: These response pages are automatically passed from EPConnect. The Retry Limit sets how many times a user can retry a payment due to a decline. After the retry limit, the page returns to the payment success page.
8.For further information about CyberSource setup, please refer to your CyberSource support documentation.
9.When you have completed the payment settings for this Payment Gateway Definition, refer back to the topic Define Legacy Payment Gateways to save your changes.

Payment Gateway Definition for Legacy CyberSource