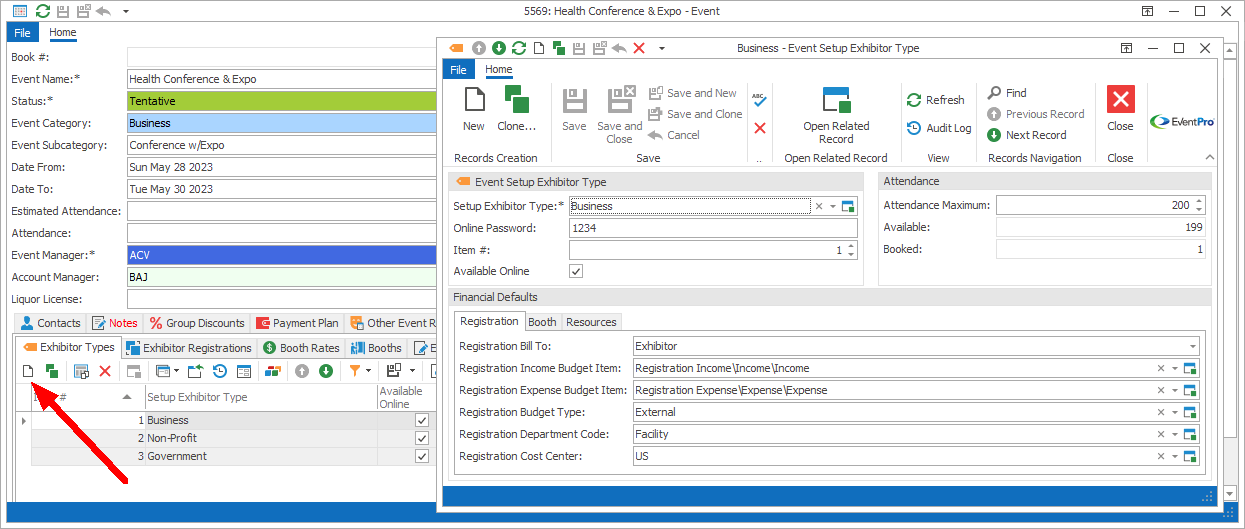
Start a New record under the Exhibitor Types tab.
The Event Setup Exhibitor Type edit form opens.

Figure 161: Adding Exhibitor Type
Event Setup Exhibitor Type
Setup Exhibitor Type
Select the Exhibitor Type from the drop-down list, which is populated by the records you defined under EventPro Setup / Exhibitors / Exhibitor Types.
Much of the information defined for the Exhibitor Type back in Setup will be pulled into the fields below, but you can edit the Exhibitor Type information for the purposes of this particular event.
Online Password
If Exhibitors of this Type will be accessing online registration, you can set their Online Password here.
If a new Exhibitor uses this Type-specific password, their Exhibitor Type will initially be set to the corresponding type.
In comparison, if a new Exhibitor uses the password from Online Exhibitor Settings, their Exhibitor Type will initially be set to the EPConnect Default Exhibitor Type.
Item #
The Item Number determines a record's position relative to other records in a list sorted by Item #.
Change the Item # to change the record's position in the sort order.
Available Online
Select the Available Online checkbox if you want this Event Exhibitor Type to be available online.
The Available Online checkbox may already be selected by default, depending on the Setup Exhibitor Type you selected.
Attendance
Attendance Maximum
Enter the maximum number of this Type of Exhibitor permitted to attend.
Available and Booked
These read-only fields will update to indicate how many spots are available for Exhibitors of this Type, and how many have registered so far.
Financial Defaults
These Financial Defaults under the Registration, Booth, and Resources tabs will be set to the selections made back in Setup for the Setup Exhibitor Type, but you can change them here.
When you are done with the Event Setup Exhibitor Type edit form, click Save and Close to return to the Exhibitor Types tab, or click Save and New to add another Exhibitor Type.
When you are done adding Exhibitor Types, make sure that you click Save at the top of the Edit Event window, as well.