•These color-coded Event Statuses have two important functions:
oThey allow you to quickly and easily identify the current status of events in EventPro.
oThey can used to trigger automated occurrences such as task creation and notifications.
•Therefore, it is important to think carefully about how event statuses will work for your organization.
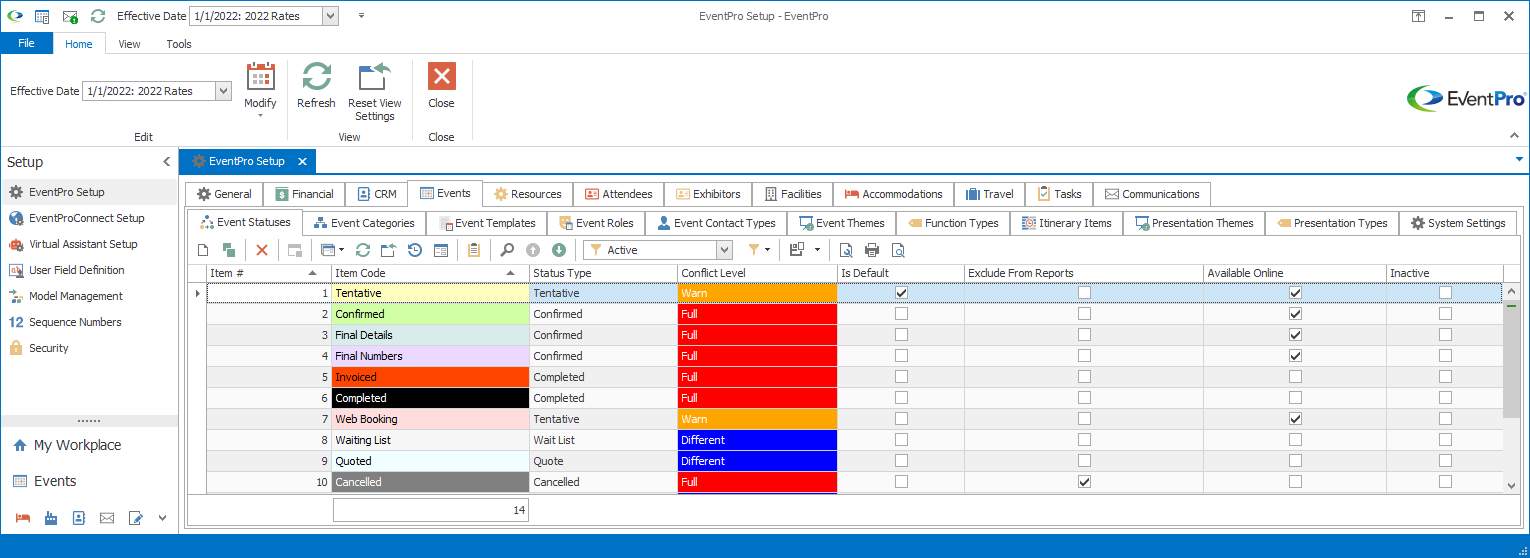
1.To create Event Statuses, start a New record under the EventPro Setup > Events > Event Statuses tab.
2.The Setup Event Status edit form appears.
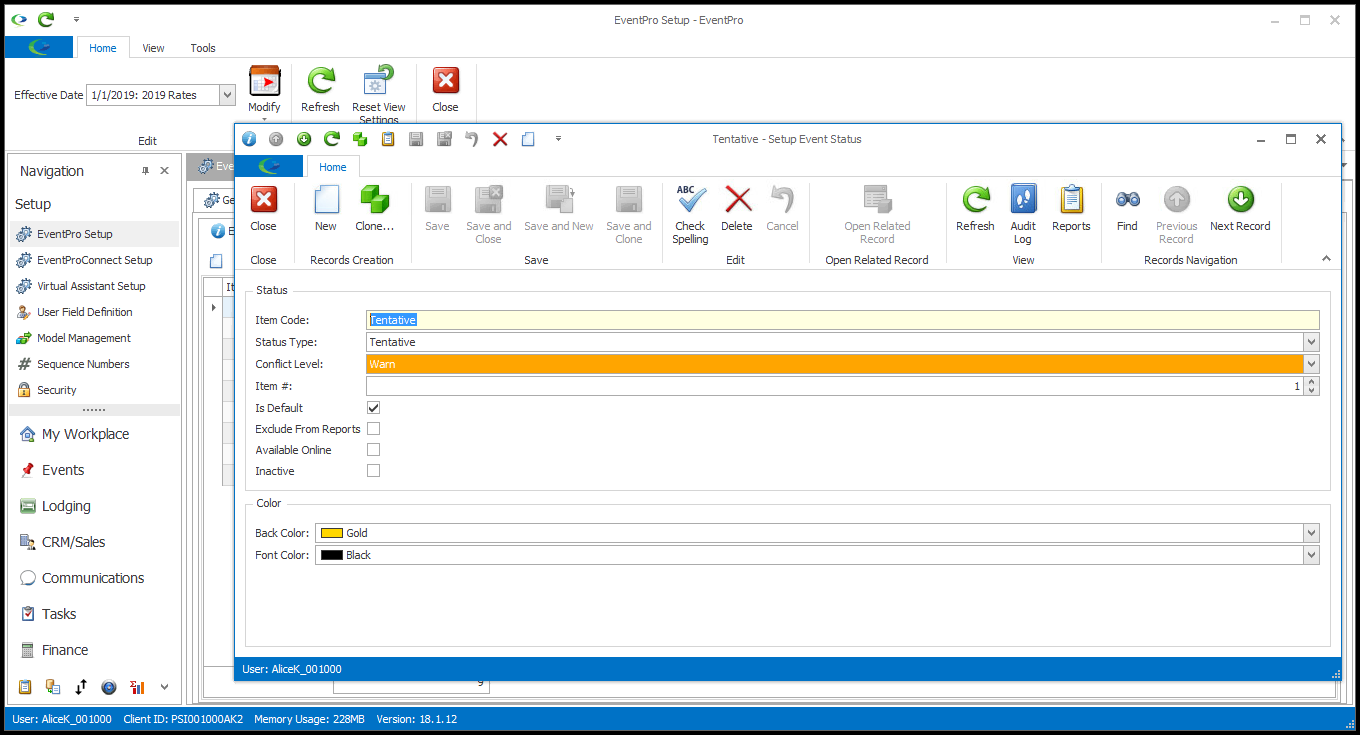
3.Item Code: Enter the name of the Event Status.
4.Status Type (Event): Select the type of status from the drop-down list. From highest to lowest, the status type options are Completed, Confirmed, Tentative, Wait List, Quote, Other, and Cancelled.
a.Note about "Confirmed": Confirmed is the highest level of status.
b.Note about "Cancelled": Cancelled is the lowest level of status.
Setting an event to a “Cancelled”-type status will cause the event details to be removed. Therefore, if you want to retain information about certain cancelled events, you may want to create another status named “Cancelled: Keep Records” that actually has the status type defined as “Other”.
If you cancel an Event that has a linked Quote, there is a system setting that controls what happens to the Quote. Review the topic Events System Settings to learn more about the "Quote Action After Cancelling an Event" setting.
c.Creating Multiple Statuses of One Type: You can create multiple statuses of the same Status Type if that helps display useful information about the progress of an event.
i.For example, in addition to a "Confirmed" event status, you could also have "Detail Final" and "Catering Final" statuses, with the Status Type of "Confirmed" for all three.
ii.Likewise, you could have several "Cancelled"-type statuses to indicate why the booking was cancelled. For example, you could have "Cancelled Competitor", "Cancelled Compassion", and "Cancelled Other", with the Status Type of "Cancelled" for all three.
5.Status Type (Quote): If you are planning to use EventPro's quoting function, you need to define a Status for each of these Quote Status Types: Quote, Quote Approved, and Quote Rejected.
6.Conflict Level: This field tells EventPro how to handle conflicts.
For each status you have named, choose one of the following options: Full, Different, Warn, or Ignore.
a.Full: If an event conflict level is set as “Full”, you will not be able to book a conflicting event. Once an event with a “Full” conflict level setting is in a time slot, nothing else can use that time slot (except for an event with the “Ignore” conflict level – see below).
This is a very restrictive setting, so you may want to consider using “Full” for confirmed events only.
b.Different: If an event conflict level is set as “Different”, you can book a conflicting event if the conflict level of that second event is also “Different”, and it has a different status code. For instance, you would be able to book a First Hold/Different event that conflicts with a Second Hold/Different event. EventPro would still trigger a conflict warning but you would be able to ignore it. Remember, however, that an event with a conflict level of “Different” cannot be booked in conflict with a “Full” event.
c.Warn: If an event conflict level is set as “Warn”, EventPro will warn you of any booking conflict, but will not prevent the booking.
This conflict level is often used for statuses indicating tentative bookings or bookings in progress.
d.Ignore: Events with the "Ignore" conflict level do not conflict with any other event and will not be considered when EventPro performs a conflict check.
This conflict level is usually used for cancelled events. This way, you can book a new event over the cancelled event without triggering a warning.
7.Item #: The Item Number determines a record's position relative to other records in a list sorted by Item #. Change the Item # to change the record's position in the sort order.
8.Is Default: You can set one of your Event Statuses to be the default Status for all new event bookings. Select the Is Default checkbox if you want this particular Status to be the default.
9.Exclude from Reports: Select this checkbox if you want events of this status excluded from reports.
10.Available Online: Select the Available Online checkbox if you want this event status to be visible online.
This field is relevant to the EPConnect Suite, a collection of separately available modules. If you have not purchased the relevant module, you will not see the related tabs and screens.
11.Back Color and Font Color: Select the color to represent this event status elsewhere in EventPro, particularly graphical calendars.
Select the background color from the Back Color drop down, and the text color from the Font Color drop down.
12.When you're done creating or editing the record, click Save and Close.