In these system settings, you will set several defaults for events booked in EventPro.
The purpose of setting defaults is to reduce repetitive data entry by having EventPro automatically pull in the most common answer for the given field. However, defaults from setup can usually be overridden for individual events by users with the relevant security rights.
There are several tabs under which you can adjust your Events System Settings:
If you make any changes to the Events System Settings, under any of the tabs, ensure that you click Save.

Figure 505: Saving Events System Settings
Dates/Times
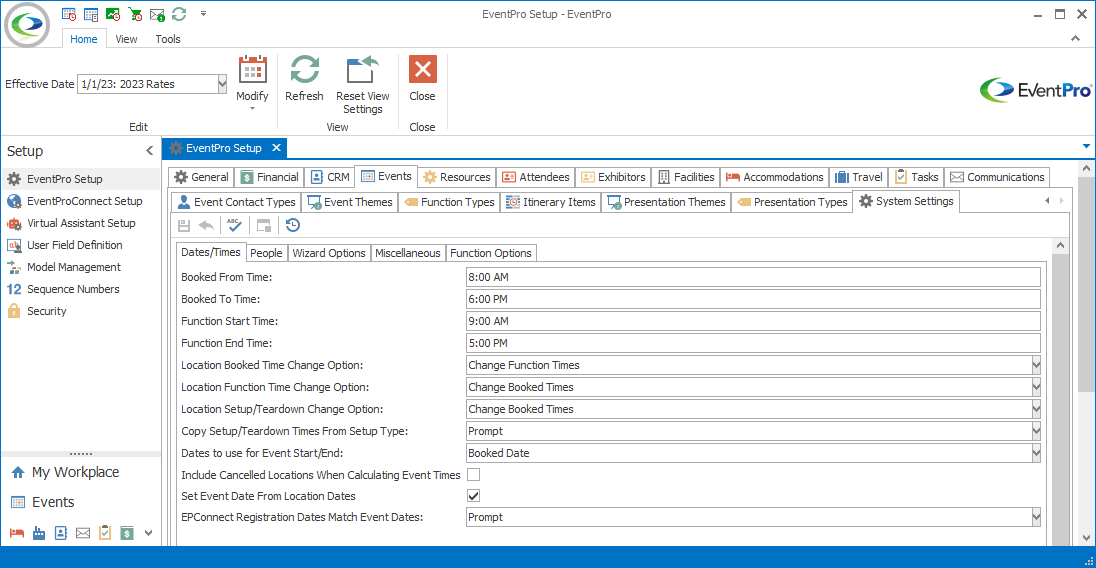
Figure 506: Event System Settings, Dates/Times
Booked From Time and Booked To Time
Set the default times you want EventPro to use for a new location booking.
Function Start Time and Function End Time
Set the event function times you want EventPro to use as defaults when creating new events.
These are the start and end times of the actual event function, not the booked location. In other words, the location booking may start before, and end after, the actual event, leaving time for setup and teardown.
To review the difference between Booked Times and Function Times, see the topic Terminology: Events, Booked Locations & Functions.
The next three "Change Option" settings determine how an Event Location’s Booked Times, Function Times, and Setup/Teardown Times automatically adjust in relation to each other when one of those times is changed.
Location Booked Time Change Option
From the drop-down, choose what should happen when an Event Booked Location's Booked From or Booked To time is changed:
•Change Setup/Teardown
•Change Function Times
To illustrate the difference between those two options, let's look at an example. Let's say that an event initially has the following times:
•Booked From Time: 8:00 AM
•Setup Hours: 1
•Function Start Time: 9:00 AM
•Function End Time: 5:00 PM
•Tear Down Hours: 1
•Booked To Time: 6:00 PM
Then, we changed the Booked From Time to 7:00 AM and the Booked To Time to 7:00 PM.
Now, either the Setup/Teardown Hours or Function Times have to change in order to accommodate the longer Booked Time. This depends on the selection you made for the Location Booked Time Change Option setting:
•Change Setup/Teardown selected: The Function times will remain as they are, while the Setup Hours and Tear Down Hours will automatically change to 2 hours each, in order to fill in that extra hour at the beginning and end of the event's Booked Times.
•Change Function Times selected: The Setup/Teardown Hours will remain the same, while the Function Start Time will automatically change to 8:00 AM and the Function End Time will automatically change to 6:00 PM, again to fill in the two extra hours added when the Booked Times were changed.
Location Function Time Change Option
From the drop-down, choose what should happen when an Event Booked Location's Function Start Time or Function End Time is changed:
•Change Booked Times
•Change Setup/Teardown
To illustrate the difference between those two options, let's look at an example.
Let's say that an event initially has the following times:
•Booked From Time: 8:00 AM
•Setup Hours: 1
•Function Start Time: 9:00 AM
•Function End Time: 5:00 PM
•Tear Down Hours: 1
•Booked To Time: 6:00 PM
Then, we change the Function Start Time to 1:00 PM and the Function End Time to 4:00 PM.
Now, either the Setup/Teardown Hours or Booked Times have to change in order to adjust to the shorter Function Time. This depends on the selection you made for the Location Function Time Change Option setting:
•Change Booked Times selected: The Setup/Teardown hours will remain as they are, while the Booked From Time will automatically change to 12:00 PM and the Booked To Time will automatically change to 5:00 PM.
•Change Setup/Teardown selected: The Booked From/To Times will remain as they are, while the Setup Hours will automatically change to 5 and Tear Down Hours will automatically change to 2.
Location Setup/Teardown Change Option
From the drop-down, choose what should happen when an Event Booked Location's Setup Hours or Teardown Hours are changed:
•Change Booked Times
•Change Function Times
To illustrate the difference between those two options, let's look at an example.
Let's say that an event initially has the following times:
•Booked From Time: 8:00 AM
•Setup Hours: 1
•Function Start Time: 9:00 AM
•Function End Time: 5:00 PM
•Tear Down Hours: 1
•Booked To Time: 6:00 PM
Then, we change the Setup Hours to 2.5 and the Teardown Hours to 2.5.
Now, either the Function Times or Booked Times have to change in order to adjust to the longer Setup/Teardown times. This depends on the selection you made for the Location Setup/Teardown Change Option setting:
•Change Booked Times selected: The Function Times will remain as they are, while the Booked From Time will automatically change to 6:30 AM and the Booked To Time will automatically change to 7:30 PM.
•Change Function Times selected: The Booked Times will remain as they are, while the Function Start Time will automatically change to 10:30 AM and the Function End Time will automatically change to 3:30 PM.
Copy Setup/Teardown Times from Setup Type
This system setting determines what happens to a booked location's Setup/Teardown Hours when you change its Setup Type in the Event Location edit form (in the Event Screen or from the Event Creation Wizard). Remember that different Setup Types may have been set up with different numbers of Setup/Teardown Hours.
Choose an option from the drop-down list, depending on what you want to occur when the Event Location's Setup Type is changed:
•Prompt: A prompt will ask: "Would you like to copy the setup/teardown times from the selected setup type?" You can then choose Yes or No.
•Always: The Event Location's Setup/Teardown Hours will automatically be changed to match the Setup/Teardown Hours from the newly selected Setup Type.
•Never: The Event Location's Setup/Teardown Hours will stay as they are, even if the newly selected Setup Type has a different number of Setup/Teardown Hours.
Dates to Use for Event Start/End
This system setting determines which dates are used for the Event Start and Event End Dates.
Choose an option from the drop-down list:
•Booked Date
•Booked From/To
•Function Start/End
This setting is particularly relevant if you have events that run overnight.
Let's say, for example, you have an event with these Booked From/To and Function Start/End times:
•Booked From: October 1, 5:00 pm
•Function Start: October 1, 7:00 pm
•Function End: October 1, 11:00 pm
•Booked To: October 2, 1:00 am
This Dates to Use for Event Start/End setting will determine whether the Event Start and End Dates will both be October 1, or if the Event Start Date is October 1 and the Event End Date is October 2.
•If you selected the Booked Date option, the Event Start Date would be October 1 and the Event End Date would also be October 1. Because the event ends before noon of its second day, EventPro assumes you are treating it as all one day.
•If you selected the Function Start/End option, the Event Start Date would be October 1 and the Event End Date would also be October 1. While the "Booked To" time has gone into the second day, the "Function End" time is still over on October 1. (If the Function End had gone past midnight, e.g. to October 2 at 1:00 am, the Event End Date would be October 2.)
•If you selected the Booked From/To option, the Event Start Date would be October 1 and the Event End Date would be October 2. In this case, EventPro acknowledges the event has gone into a second day once it is past midnight. The times used in this situation are the Booked From and Booked To times (the entire time the location is booked for the event, including setup and teardown hours).
Include Cancelled Locations When Calculating Event Times
Select this checkbox if you want Booked Locations of "Cancelled" status included when calculating an event's date range.
When you change this setting, the Confirmation dialog will ask if you want to update all future event date ranges. Click Yes or No, depending on your preference.
To understand this setting, let's look at an example event that has 3 booked locations:
•October 1, Booked From: 9:00 AM, Booked To: 5:00 PM, Status: Confirmed
•October 2, Booked From: 9:00 AM, Booked To: 5:00 PM, Status: Confirmed
•October 3, Booked From: 9:00 AM, Booked To: 5:00 PM, Status: Cancelled
The Booked To/From Times are not particularly important except that the Booked Locations don't run over midnight.
The Date Range of the event will depend on whether you selected or unselected the Include Cancelled Locations When Calculating Event Times checkbox:
•Selected checkbox (setting on): The Date Range of the event will appear as "October 1 to October 3", since it includes the cancelled location.
•Unselected checkbox (setting off): The Date Range of the event will appear as "October 1 to October 2", because it ignores the cancelled location.
Set Event Date from Location Dates
You will only see this setting if you have a specific Planner Module. The functionality is mainly intended for event planners.
This setting determines whether the Event Date Range is updated with changes to the event's Booked Location dates.
•Selected checkbox (setting on): If you make changes to an event's Booked Location dates, the event's Date Range will automatically update to match.
•Unselected checkbox (setting off): Changes to the event's Booked Location dates will not change the event's Date Range. You would need to edit the Date Range manually in the event's Edit Event window.
EPConnect Registration Dates Match Event Dates
This setting affects the EPConnect Date From and EPConnect Date To fields in an Event's Online Registration Settings. Normally, those dates default to the Event's Date Range when first booked. However, if you edit the Event in a way that changes its Date Range, e.g. adding/deleting/moving locations, the Event Dates and the EPConnect From/To Dates will no longer be the same.
This setting determines what happens in that situation:
•Always: EventPro will always automatically update the EPConnect From/To Dates to match changes made to the Event Dates.
•Prompt: Any time you make a change to Event Dates, you will receive a prompt asking, "Would you like to update the EPConnect Dates to match the Event Dates?"
•Never: EventPro will never automatically update the EPConnect From/To Dates to match changes made to the Event Dates.
People
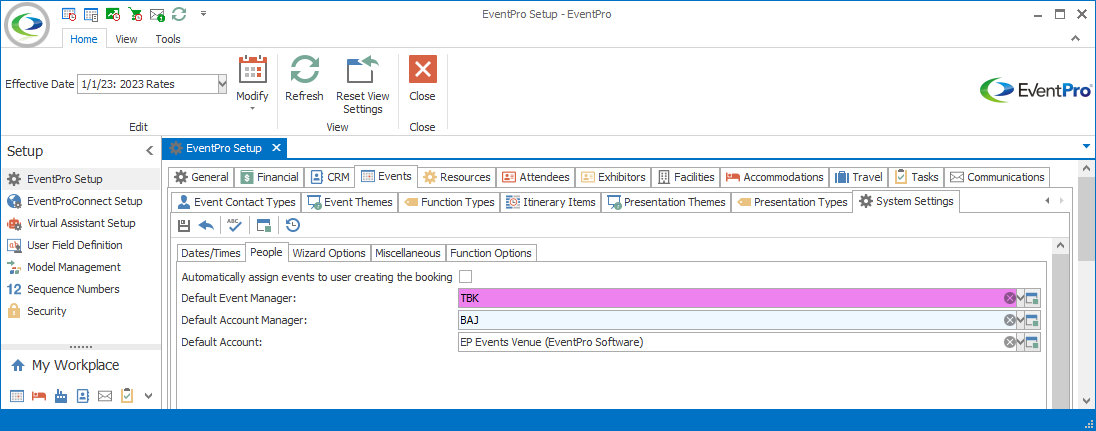
Figure 507: Events Systems Settings, People
Automatically Assign Events to User Creating the Booking
Each event in EventPro is assigned a main Event Manager.
Check this box if you want EventPro to automatically assign the user who booked the event as its Event Manager by default.
In order for the user to be assigned as Event Manager, though, he or she will require the suitable security rights to access and work with events.
Default Event Manager
If you do not choose to automatically assign events to the User making the booking (i.e. the setting above), you can select a Default Event Manager from this drop-down of system Users. Review how to create Users under the topic Users in Security Setup.
Default Account Manager
You can assign an Account Manager for each Account (review the topics Company and Contact) in EventPro, but you can also set a separate Account Manager for an Event.
If you set the Default Account Manager here, that User will be set as the default Account Manager each time you start a booking, unless the Event Client Account already has an Account Manager assigned, in which case, the Event Client's Account Manager will default in first.
Default Account
If a Default Account is set here, EventPro will use that selected Company or Contact as the Event Client by default each time you start an event booking.
To set a Default Account, Find and select the applicable Company or Contact from the Default Account drop-down.
You would most likely want to set a default account if, for example, you use EventPro to plan internal organization events. Then, when you book events, you will not need to find and select your own organization every time you create a booking.
If your organization has multiple event clients, none of which hold the majority of your events, you probably do not need to set a Default Account.
Wizard Options
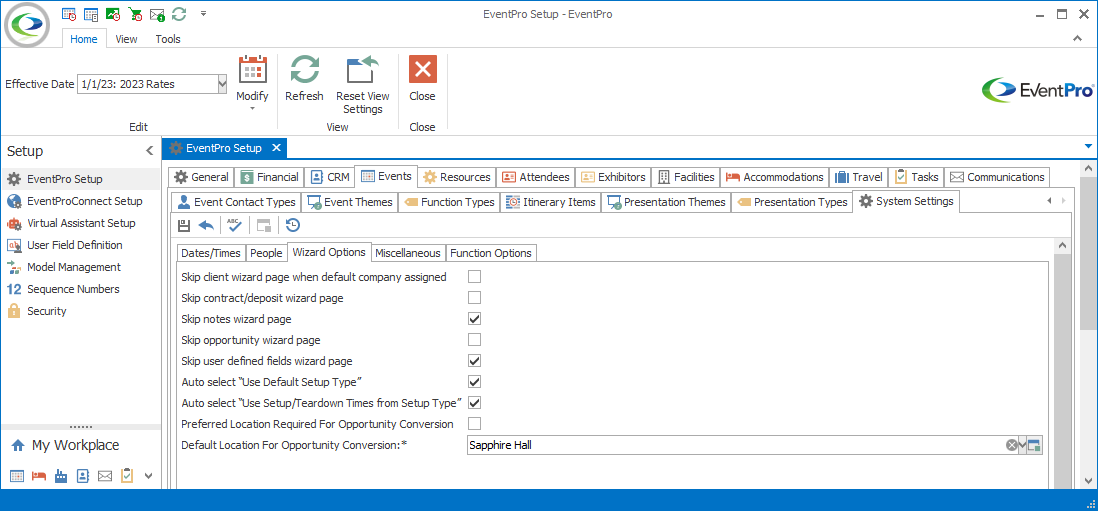
Figure 508: Event System Settings, Wizard Options
Skip client wizard page when default company assigned
If you have a Default Account set, you can choose to skip the Event Client & Contact Information page in the Event Creation Wizard.
If you select this checkbox, the Event Creation Wizard will assign the Default Account as the Event Client, and skip over the Event Client & Contact Information page altogether.
Skip contract/deposit wizard page
Check this checkbox if you want the Event Creation Wizard to skip over the Contract Information/Deposit Information page when booking events.
Skip notes wizard page
Check this checkbox if you want the Event Creation Wizard to skip over the Notes page when booking events.
Skip opportunity wizard page
Check this checkbox if you want the Event Creation Wizard to skip over the Opportunities page when booking events.
Skip user defined fields wizard page
Normally, if you have User Fields defined for the Data Type "Event", the Event Creation Wizard will include a special User Fields page for those Event User Fields.
If you want the Event Creation Wizard to skip that User Fields page, select the "Skip user defined fields wizard page" checkbox.
Note, however, that the User Fields page will not be skipped if one of the User Fields is marked as "Required".
Auto select "Use Default Setup Type"
During the Event Creation Wizard, there is a "Use Default Setup Type" checkbox that you can choose to select or unselect. If you want that checkbox in the Event Creation Wizard to be selected by default, select this Auto select "Use Default Setup Type" checkbox here.
Auto select "Use Setup/Teardown Times from Setup Type"
Also during the Event Creation Wizard, there is a "Use Setup/Teardown Times from Setup Type" checkbox that becomes available if you select the aforementioned "Use Default Setup Type" checkbox.
If you want that checkbox in the Event Creation Wizard to be selected by default, select this Auto select "Use Setup/Teardown Times from Setup Type" checkbox here.
Note that you will only be able to select this Auto select "Use Setup/Teardown Times from Setup Type" checkbox if you already selected the Auto select "Use Default Setup Type" checkbox above.
Preferred Location Required for Opportunity Conversion
If this checkbox is selected, there must be at least one valid selection of Preferred Dates with a Preferred Location set on an Opportunity before it can be converted to an event booking. When you later convert an Opportunity, you will need to select a Preferred Dates/Location choice in order to proceed with the Event Creation Wizard. If you attempt to select a set of Preferred Dates without a location, you will not be able to proceed.
If you want to allow Opportunities to be converted into bookings without a selected Preferred Location, uncheck this "Preferred Location Required for Opportunity Conversion" checkbox.
NOTE: If you unselect this checkbox, you need to select a Default Location for Opportunity Conversion in the field below.
Default Location for Opportunity Conversion
If you unselected the "Preferred Dates with a Preferred Location" checkbox above, select a default Location from this drop-down. If an Opportunity doesn't have a Preferred Location set, this default Location will be pulled into the First Choice Preferred Location.
This setting is primarily relevant for Opportunities in EventPro's online EPConnect. If an online Opportunity has not be assigned a particular location, this system setting will place the converted booking in the default location.
If the Preferred Location Required for Opportunity Conversion checkbox is selected above, this Default Location for Opportunity Conversion field will not be available.
Miscellaneous
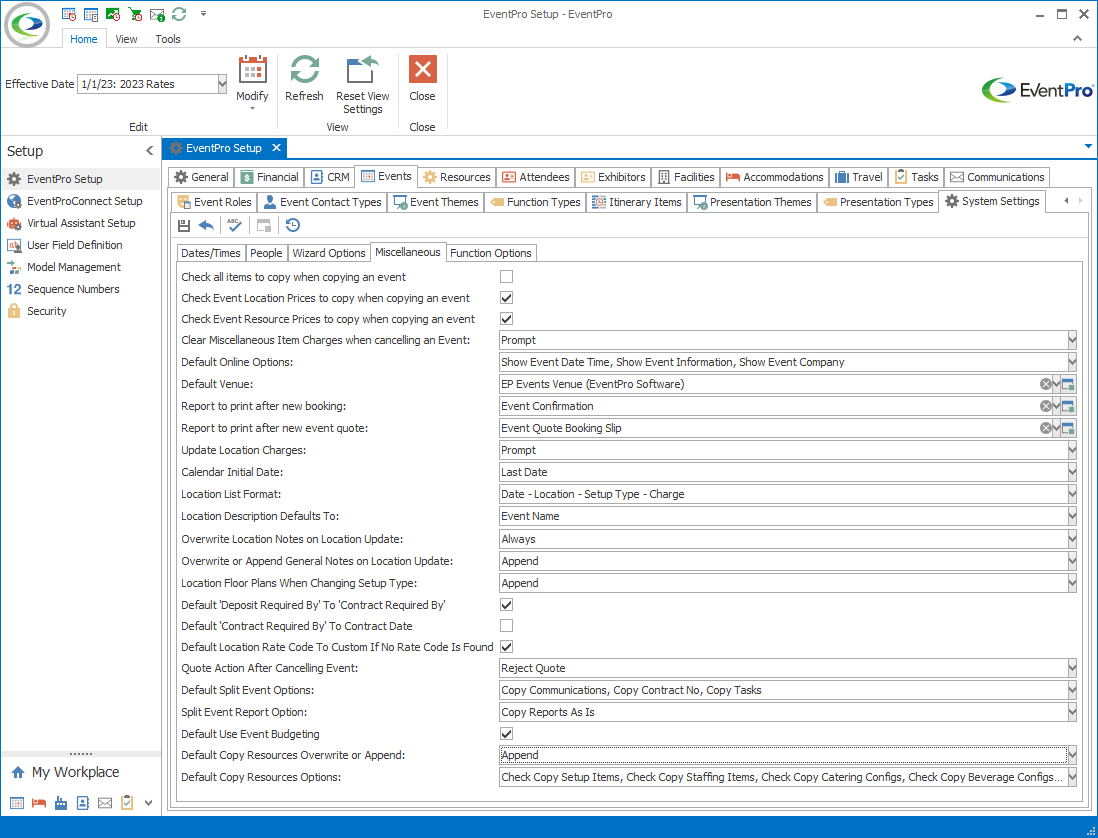
Figure 509: Events System Settings, Miscellaneous
Check All Items to Copy when Copying an Event
When booking events, you can use the "New from Past Event" option to copy an event, including details from that event. On the Select Past Event & Copy Options page of the Event Creation Wizard, there is a list of items you can choose to copy from the old event to the new event, including comments, letter templates, event detail, locations prices, resource prices, attendees, exhibitors, and more. If you want to copy a certain type of item, you select the checkbox next to that item type. Review the topic Select Past Event & Copy Options.
This "Check All Items to Copy when Copying an Event" system setting determines whether those copy-item checkboxes are selected by default when you first start the Event Creation Wizard.
Note that "All Items" does not quite mean "All" items. There are two exceptions, Event Location Prices and Event Resource Prices, which are controlled by separate system settings, "Check Event Location Prices to Copy when Copying an Event" and "Check Event Resource Prices to Copy when Copying an Event", described below.
Choose whether you want to turn the "Check All Items to Copy when Copying an Event" setting on or off:
•Checkbox selected (setting on): When you start the New from Past Event Creation Wizard, all of the item types on the Select Past Event & Copy Options page will be selected by default, EXCEPT for Event Location Prices and Event Resource Prices, possibly. Remember, Event Location Prices and Event Resource Prices have their own system settings to determine whether they are selected by default.
•Checkbox unselected (setting off): When you start the New from Past Event Creation Wizard, none of the item types on the Select Past Event & Copy Options page will be selected by default, EXCEPT for Event Detail, and - possibly - Event Location Prices and Event Resource Prices.
As noted earlier, whether Event Location Prices and Event Resource Prices are selected by default depends on their own system settings.
Event Detail is always selected in the event copy wizard by default; if you don't select Event Detail, the new event will not have any booked locations.
Check Event Location Prices to Copy when Copying an Event
This system setting determines whether the copy Event Location Prices checkbox is selected by default when you first start the New from Past Event Creation Wizard. Review the topic Select Past Event & Copy Options.
Check Event Resource Prices to Copy when Copying an Event
This system setting determines whether the copy Event Resource Prices checkbox is selected by default when you first start the New from Past Event Creation Wizard. Review the topic Select Past Event & Copy Options.
Clear Miscellaneous Item Charges when Cancelling an Event
Choose how you want EventPro to deal with an event's miscellaneous charges upon event cancellation:
•Prompt: The user cancelling the event receives a prompt asking what to do with the charges.
•Always: The event's miscellaneous charges are automatically cleared upon event cancellation.
•Never: The miscellaneous charges remain in effect even after the event is cancelled.
Default Online Options
If you have purchased EPConnect, select the default setting for what event information will be visible online:
•Locked Registrations
•Accept Attendee Registrations
•Show Event Date Time
•Show Event Information
•Show Event Company
•Show Event Company Contact
•Accept Exhibitor Registrations
Note that these are only the default Online Options for events, and you can select the visible online information for each event individually in the Edit Event window. Review the topic Edit Event / Description.
Default Venue
If your organization is an event venue, or you typically work in one specific venue, you can set the Default Venue here.
However, note that you can set a Default Venue at the User level. When the User creates bookings, the User-specific Default Venue will override this global Default Venue.
In the drop-down list, Find and select the applicable venue.
These are the Venues you create under EventPro Setup > Facilities > Create Facility.
Report to Print after New Booking
From the drop-down list, Find and select the report you want to run by default after you have finished the Event Creation Wizard.
A common choice is the Event Confirmation report. Review the topic Email Confirmation to Client under Event Creation Wizard.
Report to Print after New Event Quote
From the drop-down list, Find and select the report you want to run by default after you have finished the Event Quote Creation Wizard. Review the topic Review/Edit/Finish under Quote Creation Wizard.
Update Location Charges
From this drop-down, select the option that determines what happens when you update a location in an event (the "Location Update" function).
•Prompt: When you update an event location, you will receive a prompt asking whether you want to Update Location Charges. You can choose yes or no each time you update an event location.
•Always: When you update an event location, the location charges will automatically update.
•Never: When you update an event location, the location charges will not change. The charges will stay set at whatever was previously set.
Calendar Initial Date
This setting determines the date that the Event Calendar and Venue Calendar will open to by default.
Choose whether you want the calendars to open to the:
•Last Date (the date viewed when the calendar was last open)
•Last Event Date (the date of the most recently viewed event)
•Current Date
•First Day of Current Week
Location List Format
This setting determines the columns that appears for the table returned by the Event > Location List merge field.
•Date - Location
•Date - Location - Setup Type
•Date - Location - Charge
•Date - Location - Setup Type - Charge
To review how to use merge fields, including the Location List field, see the topic Document Management / Letter Templates / Content & Merge Fields.

Figure 510: Location List merge examples
Location Description Defaults To
Choose the default option for a Booked Location's Description when creating an event:
•Event Name: The Booked Locations' Descriptions will default to match the Event Name.
•None: The Booked Locations' Descriptions will be blank by default.
Show Event Resource Financial Fields
This setting provides the ability to record charge/cost information for individual event resources.
•If this setting is turned on, you will be able to view and enter information under the Charges, Cost, and Financial tabs in an Event Resource record.
•If this setting is turned off, or not available in your application, the Charges, Cost, and Financial tabs will not be visible in an Event Resource record.
Note: You will only see this setting if you have a specific Planner module. The functionality is mainly intended for event planners who want the ability to record charge/cost information against individual event locations and resources.
Overwrite Location Notes on Location Update
This setting allows you to choose what happens to the Booked Location's Notes when you change the Venue Location of the Booked Location.
This setting will be particularly relevant if you often manually record notes for Event Booked Locations, and you do not want to lose those notes when moving an Event from one Location to another.
From the drop-down, you can select Always, Never, or Prompt:
•Always: If you select this option, the current Booked Location's Notes will always be overwritten by the newly selected Location's Notes, which could be blank or using default content from setup.
•Never: If you select this option, the current Booked Location's Notes will never be overwritten by the newly selected Location's Notes. In other words, the Notes from the current Booked Location will be transferred over to the new Location.
•Prompt: If you select this option, you will receive a prompt when changing a Booked Location, asking if you would like to overwrite the current location's notes with the new location's notes.
Overwrite or Append General Notes on Location Update
Choose an option from the drop-down list: Append or Overwrite.
This setting determines whether the new General Notes entered in the Update Location window will append to or overwrite the existing General Notes of the selected Event Locations.
Review the Update Location General Notes option in the Update Location window.
Location Floor Plans when Changing Setup Type
If you recall from setting up Venue Locations, you can assign a Default Floor Plan to each Setup Type available for a Venue Location. Review the topic Add Location under Venue Information.
In an event, the Booked Location's Floor Plans tab will pull in the Default Floor Plan for the linked Setup Type in use.
This "Location Floor Plans when Changing Setup Type" system setting determines what will happen to a Booked Location's Floor Plans if you change the Setup Type.
Select an option from the drop-down list:
•Leave As Is: The Booked Location's Floor Plans don't change.
•Append: The Default Floor Plan for the newly selected Setup Type will be added to any Floor Plans currently under the tab, so that there may be multiple floor plans under the tab.
•Overwrite: The Default Floor Plan for the newly selected Setup Type will overwrite any Floor Plans, which means any other Floor Plans under the tab will be removed, and replaced with only the current Default Floor Plan.
Default 'Deposit Required By' to 'Contract Required By'
Select this checkbox if you want the Deposit Required By date to default to the same date as the Contract Required By date. Review the topic Contract/Deposit Information under Event Creation Wizard.
Default 'Contract Required By' to Contract Date
Select this checkbox if you want the Contract Required By date to default to the same date as the Contract Date. Review the topic Contract/Deposit Information under Event Creation Wizard.
Default Location Rate Code to Custom if No Rate Code is Found
This setting determines which Rate Code Type a booked location will revert to if that booked location does not have any applicable auto-lookup rate codes for the circumstances.
•On (checkbox selected): The booked location's Rate Code Type will default to "Custom".
•Off (checkbox not selected): The booked location's Rate Code Type will default to "Default".
Review the topic Event Location Charge under Event Management.
Quote Action After Cancelling Event
This setting determines what happens to a Quote when its linked Event is cancelled.
Select an option from the drop-down list:
•Reject Quote: The Quote remains linked to the cancelled Event, and is set to a "Quote Rejected" status.
•Unlink Quote: The Quote remains in its current status, and is unlinked from the cancelled Event.
•Do Nothing: The Quote remains in its current status and remains linked to the cancelled Event.
Default Split Event Options
This setting determines whether certain items from the original Event are copied over to the newly created Events when you Split an Event.
From the drop-down checklist, indicate whether you want split events to:
•Copy Communications
•Copy Contract No (all split-out events will have the same Contract Number as the original event)
•Copy Tasks
Split Event Report Option
If you choose to copy over Communications when splitting an Event (see setting above), this setting determines whether or not the Communications' attached Reports (if any) are copied over.
From the drop-down list, choose which option you prefer:
•Copy Reports As Is: The Communications' attached reports will be copied over to the split Events, but "as is" - i.e. the information in the reports still reflects the original Event.
•Don't Copy Reports: The Communications' attached reports will not be copied over. The Communications will be copied, but if they had attached Reports, the reports will simply be removed.
Default Use Event Budgeting
Select this checkbox if you want Event Budgeting activated by default when Events are first created.
If you turn this system setting on, the Use Event Budgeting checkbox under the event's Financial Setup / Budgeting will be selected by default when the event is created.
Default Copy Resources Overwrite or Append
This setting determines whether the Copy Resources Type field in the Copy Resources Window defaults to Append or Overwrite.
Select Append or Overwrite from the drop-down list.
Default Copy Resources Options
This setting determines which Location Options and Resource Options are selected by default in the Copy Resources Window.
Select the checkboxes next to the options you want checked by default:
•Check Copy Location Comments
•Check Copy General Comments
•Check Copy Location Images
•Check Copy Location Floor Plans
•Check Copy Setup Items
•Check Copy Staffing Items
•Check Copy Catering Configs
•Check Copy Beverage Configs
•Check Copy Packages
Function Options
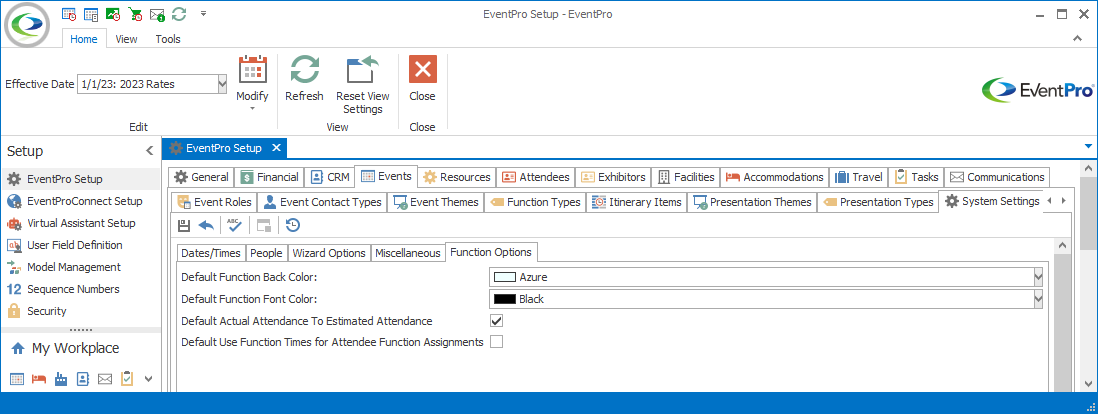
Figure 511: Event System Settings, Function Options
Default Function Back & Font Colors
From the drop-downs, select the Default Function Back Color and Default Function Font Color.
Default Actual Attendance to Estimated Attendance
Select this checkbox if you want the Event's Attendance to default to the Estimated Attendance (in the Event Creation Wizard and Edit Event Window).
If this setting is turned on, and you enter a number in the Event's Estimated Attendance field, the Attendance field will default to match the Estimated Attendance number (as long as there wasn't already a number entered in the Attendance field). You can later edit the Attendance number to reflect the actual attendance at the Event.
Default Use Function Times for Attendee Function Assignments
Select this checkbox if you want the "Use Function Times" checkbox already selected by default when assigning an Attendee to an Event Function. Review the topic Attendee Assignments under Event Management.