In the Security User edit form, the Options tab is further subdivided into other tabs:
Appearance
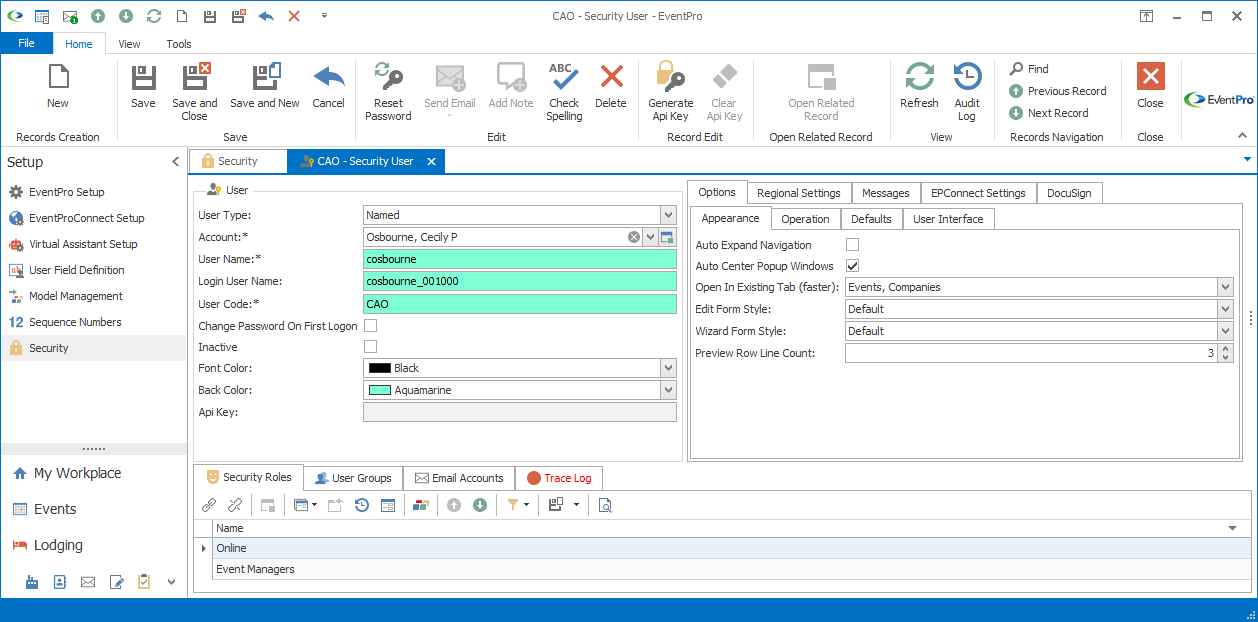
Figure 1047: Security User Appearance
Auto Expand Navigation
Select this checkbox if the User wants the menu tree in the navigation panel to automatically expand as soon as the menu button is selected. You can review the menu tree in the topic Navigation Panel.
Auto Center Popup Windows
Selecting this checkbox forces all pop-up windows to be centered on the main application window.
Also, if a window is created partially off-screen for whatever reason, this setting will re-center the window back on the main application window.
Open in Existing Tab (faster)
This setting determines whether a record of a given type will open in a new tab or an existing tab (replacing the record that was previously displayed in that tab).
Typically, records will open faster when opening in an existing tab, rather than starting a new tab
From the drop-down list, select the checkboxes next to the types of records you want to open in existing tabs:
•Events
•Companies
•Contacts
•Leads
•Opportunities
•Tasks
•Invoices
•Payments
When you are done selecting checkboxes, click OK at the bottom of the drop-down.
As an example, let's say you are looking at the Event List.
When you double-click an Event record in the Event List selection grid, the Event Screen tab will open, displaying that Event.
If you now return to the Event List, and double-click a second Event record, the result will vary, depending on the Open in Existing Tab setting:
•If the Open in Existing Tab setting is on, the second Event will open in the existing Event Screen tab, replacing the previously opened event. If you continue opening Event records, the most recently opened Event will keep replacing the previously opened event, so that there is only one Event Screen tab open at once.
•If the Open in Existing Tab setting is off, the second Event will open in a new Event Screen tab. If you continue opening Event records, a new Event Screen tab will appear for each newly opened Event. You will have as many Event Screen tabs as number of Event records opened, until you start closing the tabs individually.
Edit Form Style
This setting determines what happens when the User opens an edit form for a record, e.g. double-clicks on a record to edit it.
•Default: The default setting causes the edit form to open in a separate tab alongside the other tabs opened in EventPro. You can have multiple tabs open simultaneously and switch between different areas of EventPro.
•Modal Popup: The modal popup setting causes the edit form to open in a new window that pops up. "Modal" means that as long as you have the edit form window open, you can't work in other areas of EventPro. When you close the edit form window, you can then continue working in other areas of the EventPro application.
•Non Modal Popup: The non modal popup setting also causes the edit form to open in a new window that pops up, but "non modal" means that you can still work in other areas of EventPro while the edit form window is open.
Wizard Form Style
This setting determines how a wizard form opens for this User. The choices are similar to those for Edit Form Style above.
•Default: The default setting causes the wizard to open in a separate tab alongside the other tabs opened in EventPro.
•Modal Popup: The modal popup setting causes the wizard to open in a new window that pops up. "Modal" means that as long as you have the wizard window open, you can't work in other areas of EventPro. When you close the wizard window, you can then continue working in other areas of the EventPro application.
•Non Modal Popup: The non modal popup setting also causes the wizard to open in a new window that pops up, but "non modal" means that you can still work in other areas of EventPro while the wizard window is open.
Preview Row Line Count
If your Communication Email selection grids are set to display email previews in grid rows, this setting determines the number of lines displayed from each email's content.
Operation
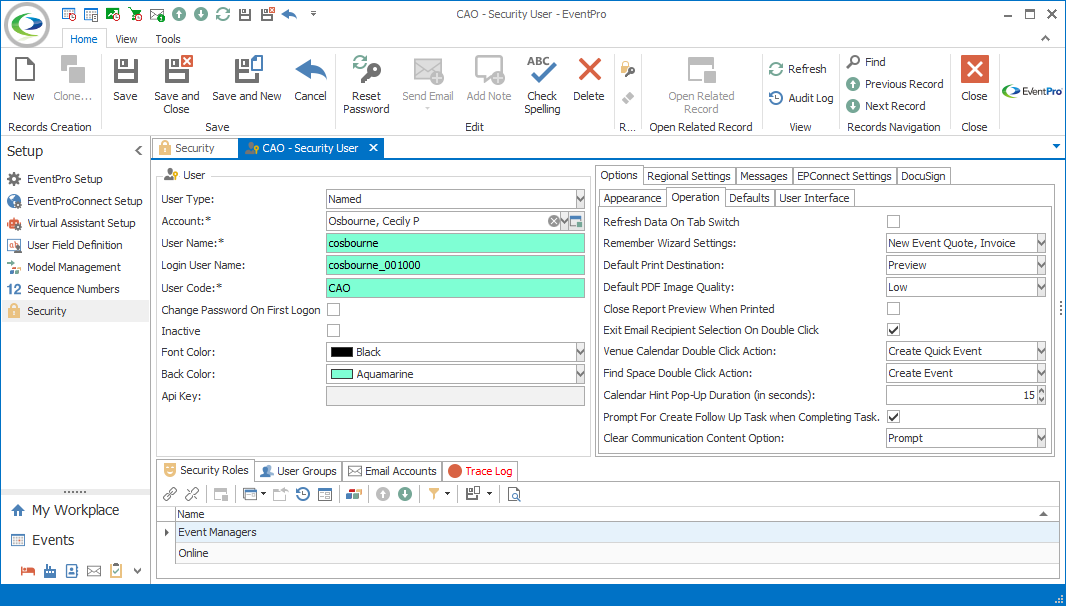
Figure 1048: Security User Operation
Refresh Data on Tab Switch
Select this checkbox if the User wants data automatically refreshed when switching from one main tab to another in EventPro.
Remember Wizard Settings
This setting determines whether different wizards will retain certain selections from one use to the next.
From the Remember Wizard Settings drop-down list, select the checkboxes next to the wizards for which you want selections remembered.
When you have selected the checkboxes you want, click OK at the bottom of the drop-down list.
Lead Conversion
This option will remember your last selections for these fields on the Update Lead & Options page in the Lead to Account Conversion Wizard:
•Move Lead Communications
•Move Lead Tasks
•Move Lead Documents
New Event
This option will remember your last selections for these fields on the Repetitive Location/Date Options page of the Event Creation Wizard:
•Repetitive Type
•Move Non-Working Days
This New Event option will also remember your last selections in the Copy Options page of the New from Past Event Wizard, except for the Event Location Prices and Event Resource Prices. Whether those two checkboxes are selected by default depends on Event System Settings in Setup ("Check Event Location Prices to Copy when Copying an Event" and "Check Event Resource Prices to Copy when Copying an Event," respectively).
New Event Quote
This option will remember your last selections for these fields on the repetitive booking page of the Event Quote Creation Wizard:
•Repetitive Type
•Move Non-Working Days
Review the topic Location/Date Booking Selection.
Accom Group Booking
This option will remember your last selection for this field in the Accommodation Group Booking Creation Wizard:
• Group Booking Type
Review the topic Group Booking Type under Group Booking Wizard.
Invoice
This option will remember your last selections for these fields in the Invoice Wizard:
•Create Invoice For
•Exclude Taxes from Event Charges
Batch Invoice
This option will remember your last selections for these fields in the Batch Invoice Wizard:
•Create Invoices For
•Include No Charge Invoice
•Exclude Taxes from Event Charges
•Deduct Outstanding Payments
•Prefix Consolidated Invoice Detail Descriptions with BookNo
•Process Accounts Marked for Consolidated Billing Only
Default Print Destination
This setting is related to the printing options in the Report filter dialog.
When you run a Report, the Report filter dialog appears. There are four print destination options:
•the Default Printer
•the Print Dialog
•a Communication Email (as an attachment)
•the Preview window
At the bottom of the Report filter dialog, there is a button displaying a default print destination.
If you click that button, the report will go directly to that print destination.
If you click the drop-down arrow, you can select from any of the four print destinations.
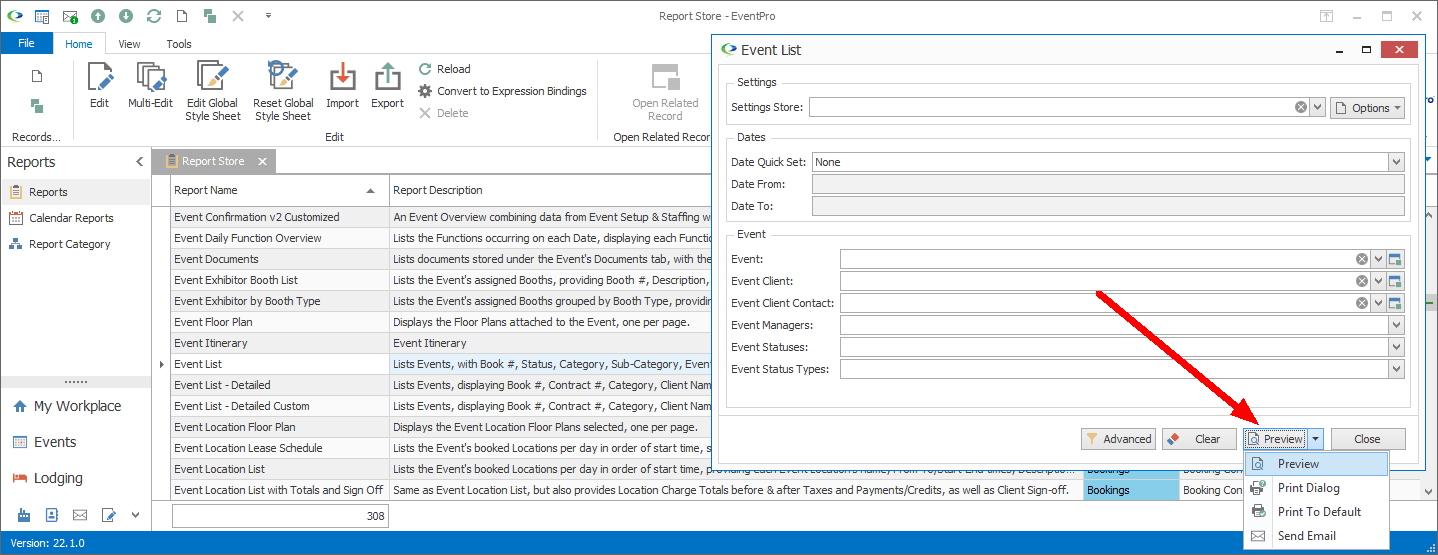
Figure 1049: Default Print Destination
This Default Print Destination setting allows the User to determine which option appears as the default on the printing button in the Report filter dialog. In Figure 1049, the button's default setting is Preview.
Select an option from the Default Print Destination drop-down list:
•Default sets the button default to Print To Default (Printer)
•Dialog sets the button default to Print Dialog
•Email sets the button default to Send Email
•Preview sets the button default to Preview
•Unspecified will use Preview as a default
Default PDF Image Quality
This setting determines the default image quality when exporting reports to PDF. This setting will affect all reports exported to PDF from the Report View, and when attached to an email.
Select an option from the drop-down list:
•Lowest
•Low
•Medium
•High
•Highest
Close Report Preview When Printed
Select this checkbox if the User wants the Report Preview window to automatically close after printing from it.
Exit Email Recipient Selection on Double Click
This setting determines what happens after you add an email recipient by double-clicking in the recipient selection dialog.
When creating a communication email, you can open the Email Recipient Selection dialog by clicking the To, Cc, or Bcc button, and choosing the type of recipient list you want to view.
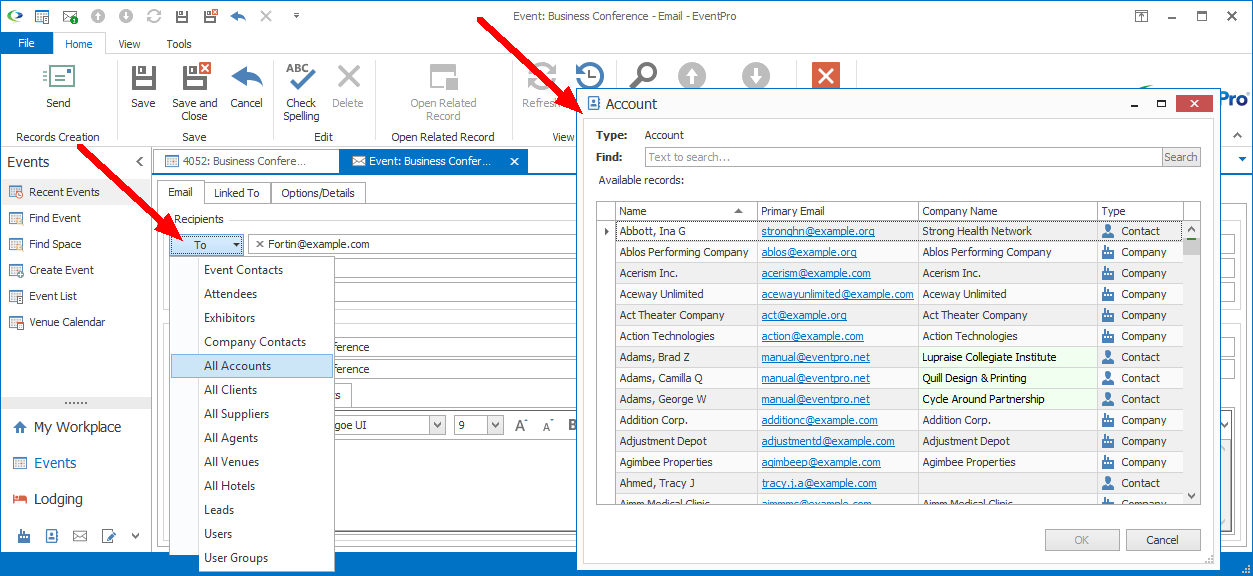
Figure 1050: Exiting Email Recipient Selection Dialog
Select this "Exit Email Recipient Selection on Double Click" checkbox if you want the Email Recipient Selection dialog to close after you've double-clicked the chosen recipient. You would most likely select this option if you typically only add one recipient to an email, and want the dialog to close quickly without an extra click.
Unselect this checkbox if you want the Email Recipient Selection dialog to stay open after you double-click a record to add a recipient. This option makes it easier to add multiple recipients to an email, because you don't need to re-open the dialog for each additional recipient. The dialog will stay open and you can continue double-clicking to add as many recipients as you require. When you are ready to close the Email Recipient Selection Dialog, you can click the "x" in the upper right corner, or clicking OK will add the last-selected recipient and close the dialog.
Event Calendar Double Click Action
Select the action you want to occur when you double-click a cell in the Venue Calendar or Event Calendar:
•Create Event, which starts the Event Creation Wizard.
•Create Quick Event, which opens the Quick Event Entry form.
•Create Event Quote, which starts the Event Quote Creation Wizard.
•Create Quick Event Quote, which opens the Quick Event Quote Entry form.
Find Space Double Click Action
Select the action you want to occur when you double-click an Available Location/Date result in the Find Space screen:
•Create Event, which starts the Event Creation Wizard.
•Create Quick Event, which opens the Quick Event Entry form.
•Create Event Quote, which starts the Event Quote Creation Wizard.
•Create Quick Event Quote, which opens the Quick Event Quote Entry form.
Calendar Hint Pop-Up Duration (in seconds)
Enter the number of seconds you want the pop-up Calendar Hint to remain visible so long as the mouse remains hovering over the given calendar cell.
Prompt for Create Follow Up Task when Completing Task
If you select this checkbox, each time you complete a Task, you will receive a pop-up asking, "Do you want to create a follow-up task?".
Review the topic Complete Task under Task Management.
Clear Communication Content Option
This setting determines whether an email communication's contents are automatically cleared if you select a different Email Account after entering content.
There are three options:
•Always: Email content is always cleared as soon as you select a different Email Account.
•Never: Email content is never cleared when you select a different Email Account
•Prompt: When you select a different Email Account, you will receive a prompt asking whether you want to clear the email's contents.
Defaults
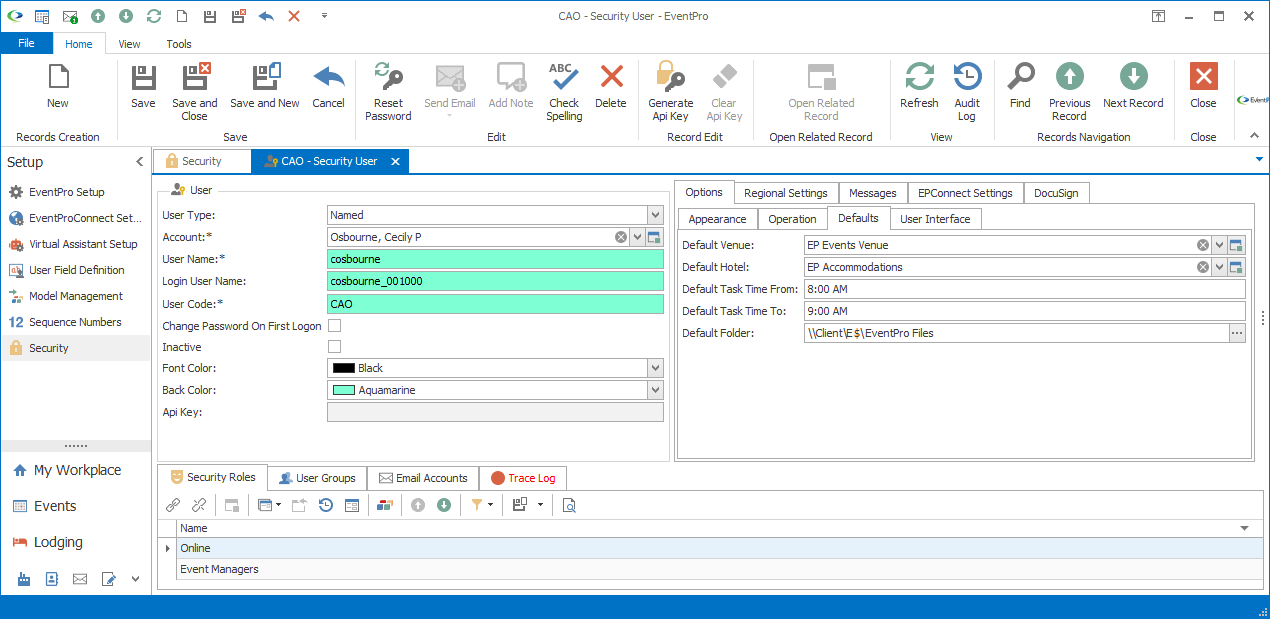
Figure 1051: Security User Defaults
Default Venue
This setting determines which Venue will be selected by default when this User starts an event booking.
In the Default Venue drop-down list, find and select the applicable venue.
The drop-down list is populated by Venues, i.e. CRM Accounts that have been set as Relationship Type = Venue, which were created under Facility Setup. See the topic Create Facility under EventPro Setup / Facilities.
This is a User-specific setting. When creating bookings, the User's personal Default Venue will override the global Default Venue selected in Events System Settings.
Default Hotel
This setting determines the Hotel that will be selected by default when this User starts an accommodation booking.
In the Default Hotel drop-down list, find and select the applicable hotel.
The drop-down list is populated by Hotels, i.e. CRM Accounts that have been set as Relationship Type = Hotel, which were created under Facility Setup. See the topic Create Facility under EventPro Setup / Facilities.
This is a User-specific setting. When creating bookings, the User's personal Default Hotel will override the global Default Hotel selected in Accommodations System Settings.
Default Task Time From and To
Enter the default Start Time and End Time for Tasks created by this User. Review the topic Scheduled under Create Task.
Default Folder
To set a user-specific default Documents folder for this User, click the ellipsis to the right of the Default Folder field.
The Browse For Folder dialog opens.
Select the applicable folder and click OK.
User Interface
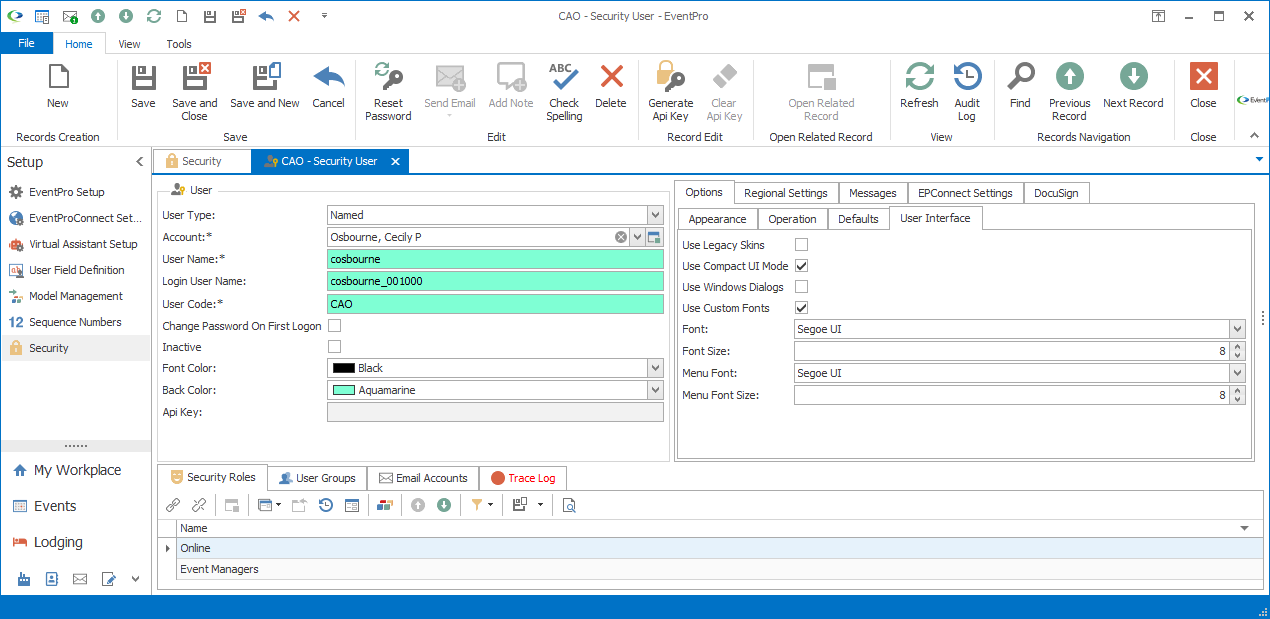
Figure 1052: User Interface Settings
Use Legacy Skins
We highly recommend that you unselect the Use Legacy Skins checkbox, and use one of the new vector-based Bezier or Office 2019 skins.
However, if necessary, the Use Legacy Skins setting allows you to continue using the old skins.
If you change the Use Legacy Skins setting, note that the User has to log out and log back in for the changes to take effect.
Use Compact UI Mode
Select this checkbox to use the Compact UI Mode, which reduces control paddings and margins to display more information on screen.
Use Window Dialogs
Select this checkbox if you want to use Windows dialogs instead of EventPro dialogs when saving and exporting grids, reports, etc.
Use Custom Fonts
If you want to define the font and font size used for screens and menus in EventPro, select this Use Custom Fonts checkbox.
You can then select your preferred options from the following drop-down lists:
•Font
•Font Size
•Menu Font
•Menu Font Size