Now that you have added Location Groups and possibly Location Subgroups to the Venue, you can add Locations.
As with many processes in EventPro, there are several different ways you can go about adding a Location, all ending up at the same Venue Location edit form.
These instructions demonstrate one method of adding a Location, but as you become more familiar with EventPro, you will find there are other paths to the same result, and you can choose the way that is most convenient to you.
•Start New (Venue Location Edit Form)
Start New (Venue Location Edit Form)
1.Under the Venue Locations tab, click on the Location Group or Subgroup to which you want to add a Location. Don't open the Location Group or Subgroup's edit form.
2.Click the New drop-down and select Add Location. Alternatively, you can right-click on the Group or Subgroup record in the selection grid and select New / Add Location from the speed menu.
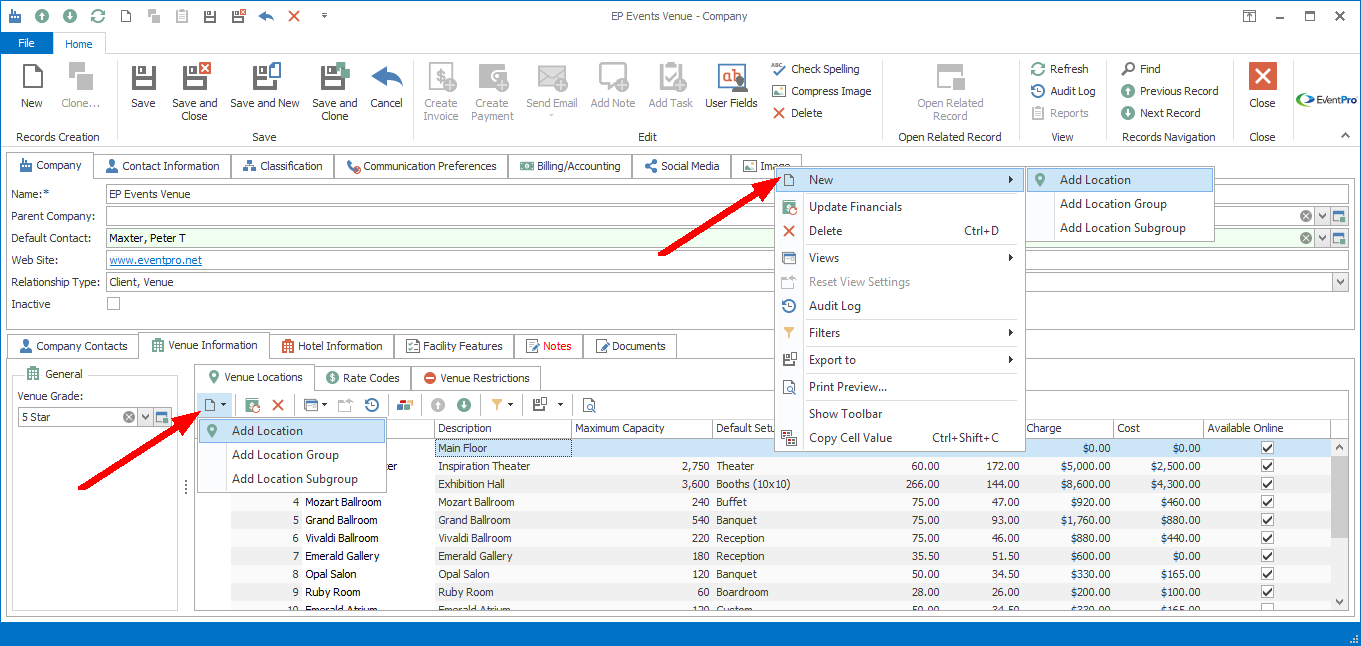
Figure 529: Add Location
3.The Venue Location edit form appears.
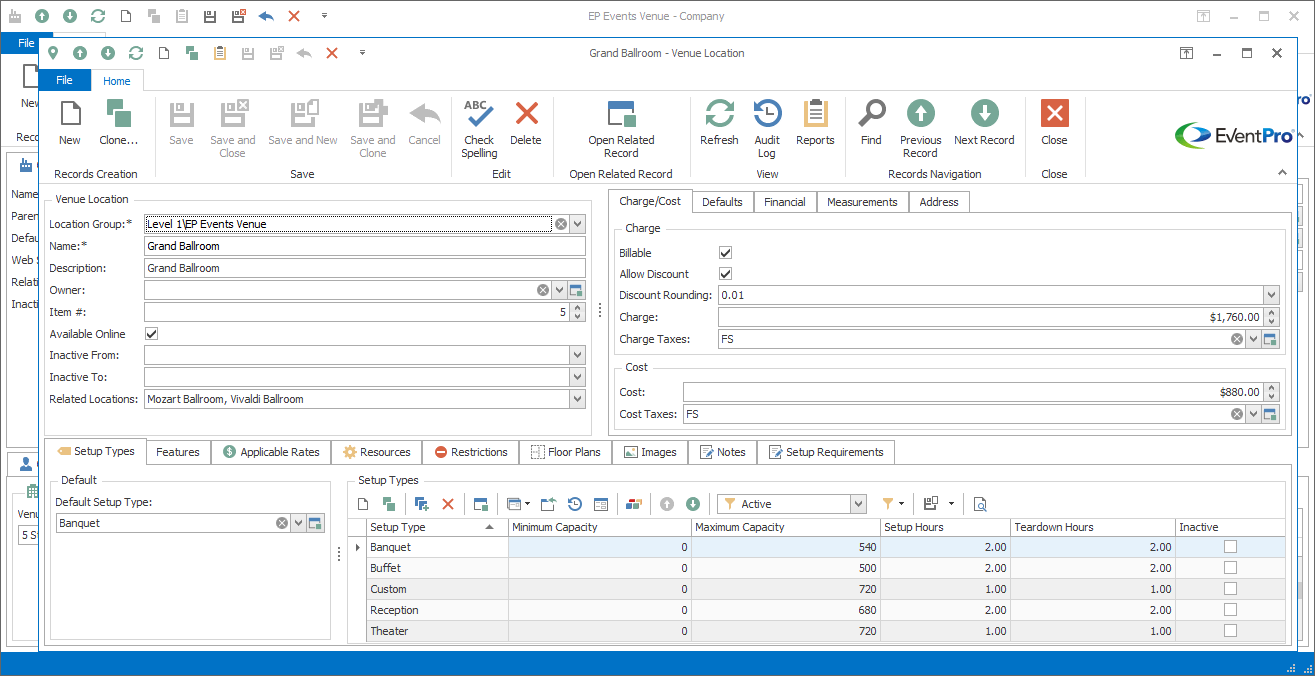
Figure 530: Venue Location edit form
There are several areas and tabs in the Venue Location edit form in which you can enter information. Follow the instructions under the headings in this topic.
Venue Location
Location Group
Check this Location Group field to ensure that your Location is grouped under the appropriate Location Group or Location Subgroup. If not, select the correct Location Group or Location Subgroup from the drop-down list.
Name & Description
Enter a name and description for this Location.
Owner
If applicable, you can use this field to indicate that a location belongs to a specific company. An example of this situation would be corporate boxes at a stadium, with each box/location being assigned to a different company owner.
To select the Owner Company, use the Find in the drop-down to search and select the correct company from your CRM.
Item #
An Item # will default in, but you can change it. Item numbers allow you to determine a sort order for the Locations within the Location Group on the Venue Calendar. If you don't enter Item numbers for Locations and leave them all as 0, the Locations will be positioned alphabetically within the Group on the Venue Calendar.
Available Online
Select the Available Online checkbox if you want this Location to be available online in EPConnect Suite. Remember that EPConnect Suite is a collection of separately available modules, and you will not see the related tabs and screens if you have not purchased the modules. For a preview or more information about EPConnect, contact your nearest EventPro Solutions Consultant.
Inactive From and Inactive To
If the Location will be inactive for a period of time, select the Inactive From and Inactive To dates from the drop-down calendars. When customizing calendar views, you can determine whether currently Inactive Locations are displayed or hidden.
Related Locations
If you are able to divide some of your Locations into smaller separate Locations, the Related Locations field will help prevent accidental double booking of joined rooms.
1.To select the related locations for the current Location, click the arrow next to the Related Locations field to view the drop-down.
2.Select the checkbox(es) next to the Location(s) related to the current Location, and click OK.
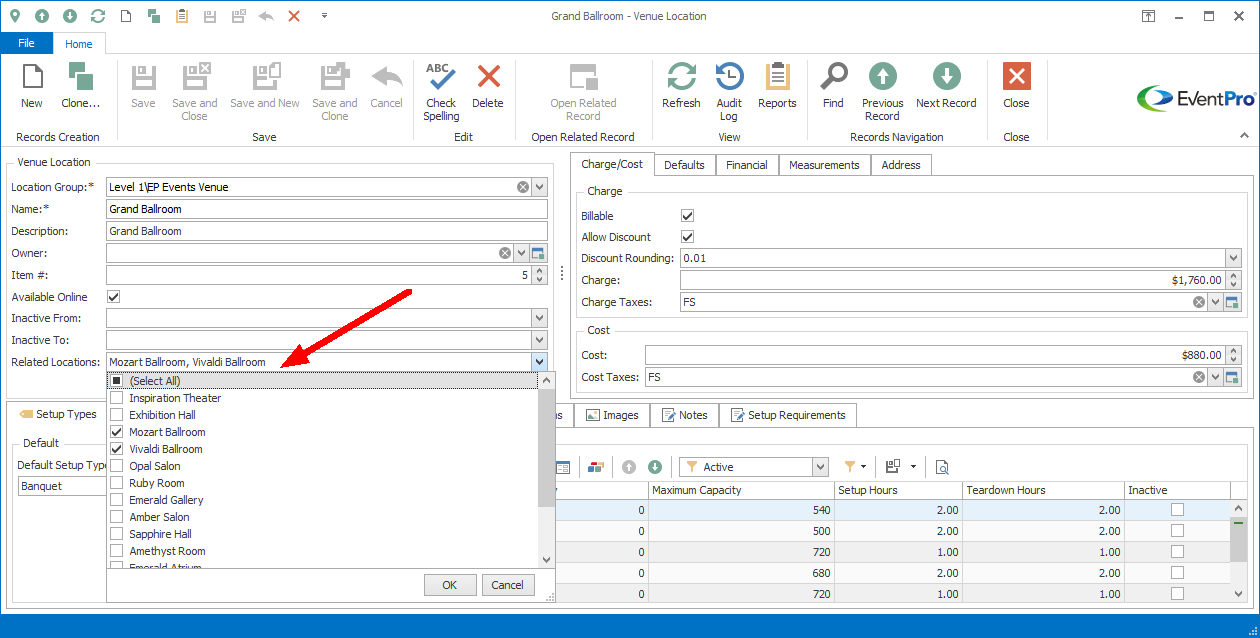
Figure 531: Selecting Related Locations
Important! Before you link related locations, take note of these two important factors:
•Ensure that all of the relevant Locations have been created before you link them.
•The Locations need to be linked in a certain way to work properly.
When linking related locations, you should think of the smallest divisible rooms as the "component" locations, which when joined together, form one big "whole" location. You want to link the component locations to the whole location, and the whole location to each component location, but you do not want to link the component locations to each other, because each of those component rooms can still be used separately.
Let's look at an example of a location called the “Grand Ballroom”, which can be divided into “Ballroom A” and “Ballroom B.”
•If Ballroom A is booked, the Grand Ballroom is no longer available, although Ballroom B would still be open.
•If Ballroom B is booked, the Grand Ballroom is no longer available, although Ballroom A would still be open
•If the Grand Ballroom is booked, neither Ballroom A nor Ballroom B will be available as individual locations.
By linking these ballroom locations as Related Locations, we can clearly communicate the availability of the locations to anyone using the Venue Calendar for booking. However, we have to ensure we link them together correctly so that location bookings are prevented in the right circumstances. Remember that Ballroom A and Ballroom B are the "component" locations, and the Grand Ballroom is the "whole" location.
•In the Grand Ballroom's edit form, we select Ballroom A and Ballroom B as Related Locations.
•In the Ballroom A edit form, we only select the Grand Ballroom as the Related Location.
•In the Ballroom B edit form, we only select the Grand Ballroom as the Related Location.
•We DO NOT make Ballroom A a Related Location for Ballroom B, or vice versa. Remember, we are able to book Ballroom A and Ballroom B as separate rooms, so we do not want a booking in Ballroom A to block off use of Ballroom B, and vice versa.
Charge/Cost
Charge
Billable
Select this checkbox to indicate that the Location is billable. Non-billable items will not show up in invoices.
Allow Discount
Select this checkbox if you want to allow Users to discount the Location charge.
Charge
Enter the default base charge for the Location.
Note: At this point, you are only defining the default cost and charge for the Location. You can later add variable rates to this Location; see the heading Applicable Rates later in this topic.
Charge Taxes
Select the Tax configuration that will apply to the Location charge by default. Review how you set up these Tax configurations in the topic Taxes under EventPro Setup / Financial.
Cost
Cost
Enter the default cost for the Location.
Cost Taxes
Select the Tax configuration that will apply to the Location cost by default.
Defaults
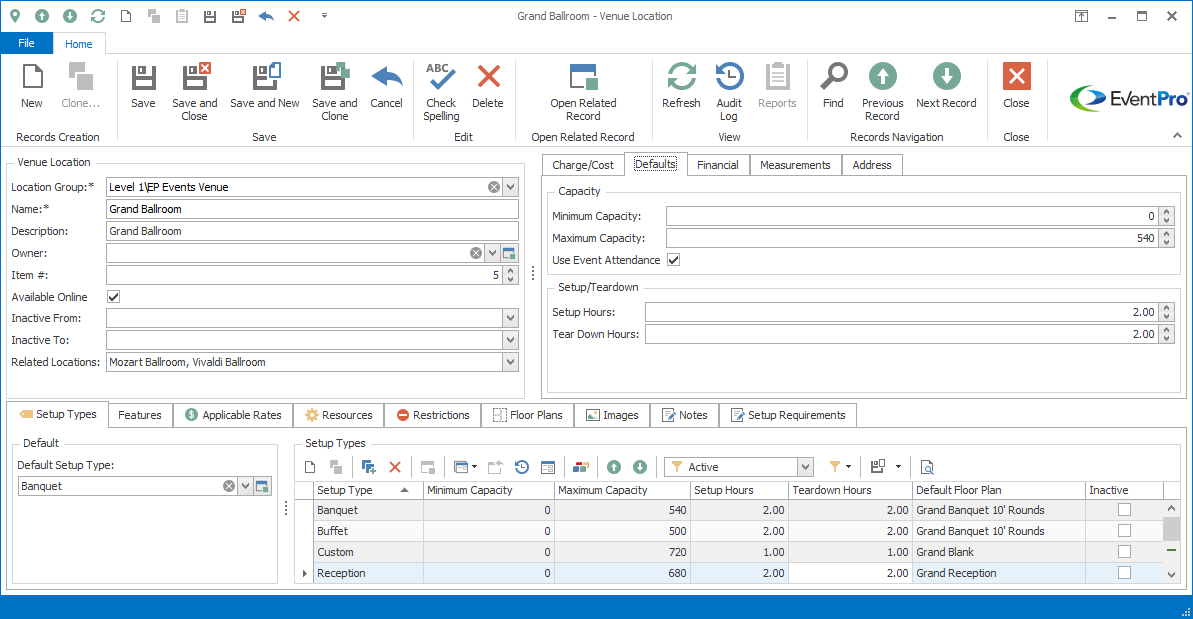
Figure 532: Venue Location Defaults
Capacity
These minimum and maximum capacities are only the defaults for the Location when no Setup Type is specified.
You will later be able to assign Setup Types to this location with specific minimum/maximum capacities for each.
Minimum Capacity
Enter the default Minimum Capacity for this Location.
Maximum Capacity
Enter the default Maximum Capacity for this Location.
Use Event Attendance
Select this checkbox if you want this Location to Use Event Attendance by default when it is booked for an Event (i.e. the same checkbox in the Event Booked Location will be selected by default).
Setup/Teardown
As with capacities, these Setup/Teardown hours are only the generic defaults for the Location. When you later assign Setup Types to this location, you can specify Setup/Teardown hours for each.
Setup Hours
Enter the default number of hours required for Setup in this Location.
Tear Down Hours
Enter the default number of hours required for Teardown in this Location.
Financial
Under the Financial tab, you determine where the Location will be grouped by default for financial reporting purposes when it is booked for an event.
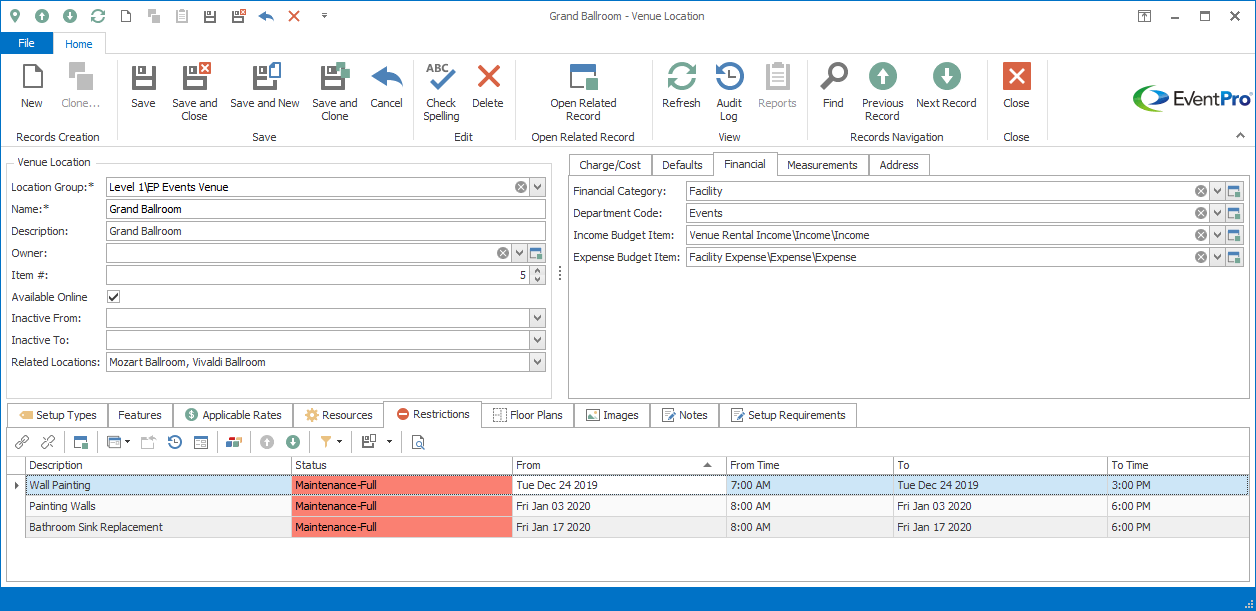
Figure 533: Venue Location Financials
Financial Category
If applicable, select the default Financial Category that applies to this Location. You created Financial Categories earlier under EventPro Setup; see the topic Financial Categories.
Department Code
If applicable, choose the Location's default Department Code from the drop-down. You created department codes under EventPro Setup; see the topic Department Codes.
Income Budget Item & Expense Budget Item
If you intend to track budgets for events, select the default Income Budget Item and/or Expense Budget Item for this Location. You set up your budget items earlier under EventPro Setup; see the topic Budget Configuration.
Measurements
These measurement numbers can represent whatever unit of measurement you prefer.
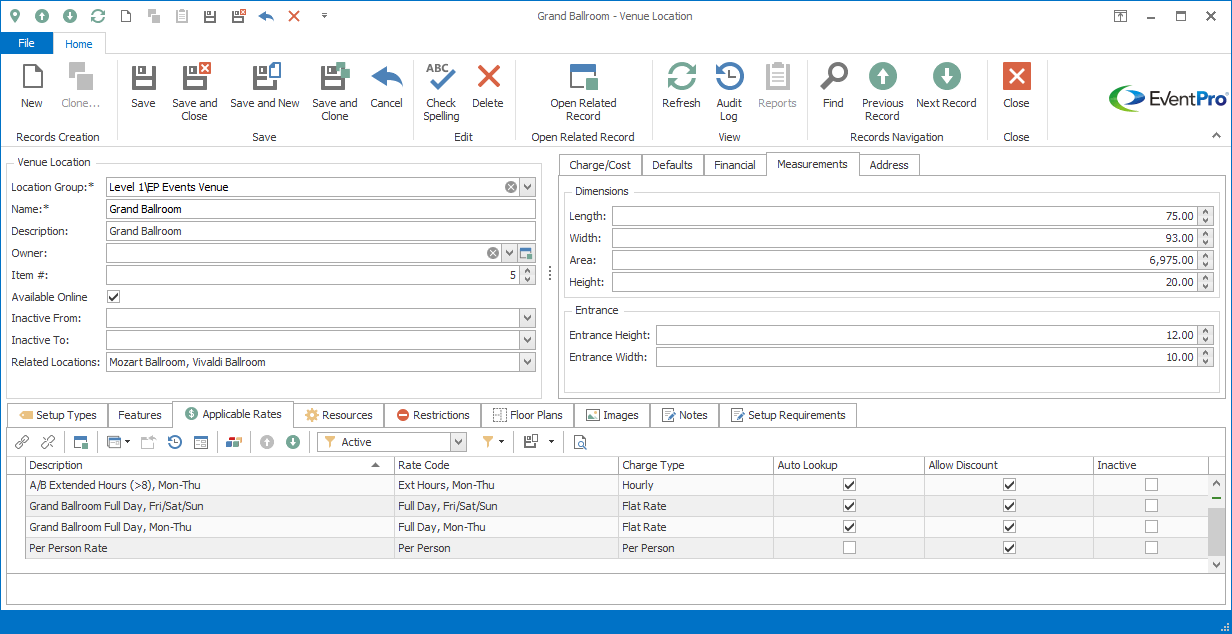
Figure 534: Venue Location Measurements
Dimensions
Enter the location's Length, Width, and Height.
The Area will automatically calculate from the Length and Width. However, you can manually enter a number for Area if the location is irregularly shaped.
Entrance
Enter the location's Entrance Height and Entrance Width.
Address
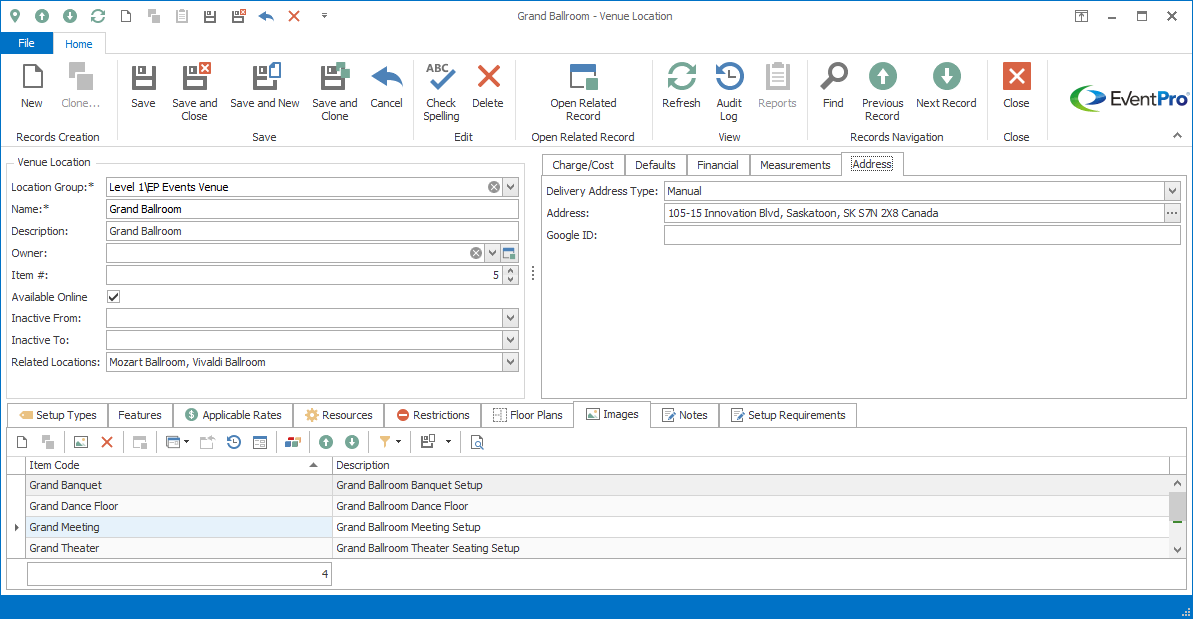
Figure 535: Venue Location Delivery Address
Delivery Address Type
If this Location has a Delivery Address that is different from the Venue's address, select the default Delivery Address Type from this drop-down:
•None
•Location Owner
•Event Deliver To
•Event Deliver to Contact
•Manual
When events are booked in this location, the default type will be pulled into the Booked Locations' Delivery tab. Review the topic Event Location Delivery under Event Management / Edit Event Locations.
None
No additional address is required. The Location uses the Venue's address.
Location Owner
Defaults to the address of the company you chose as the Location's Owner. Review the Owner field earlier in this topic.
Event Deliver To & Event Deliver To Contact
To explain this setting, we will first note that you can assign a "Deliver To" Account and "Deliver To" Contact to an Event.
•The Deliver To Account can be a Company or Contact.
•If the Deliver To Account is a Company, you can select one of the Company's Contacts as the Deliver To Contact.
•If the Deliver To Account is a Contact, then the Deliver To Contact will be the same entity.
You can then choose to use the address of the event's Deliver To Account or Deliver To Contact as the Delivery Address for Booked Locations within the event.
These system settings determine whether the Booked Location's Delivery Address will default to the Deliver To Account's address or Deliver To Contact's address, which may not actually be different, depending on the circumstances.
•Event Deliver To: Defaults the Booked Location Delivery Address to the address of the Deliver To Account, which may be a company or contact.
•Event Deliver to Contact: Defaults the Booked Location Delivery Address to the address of the Deliver To Contact, which - as noted above - could be a contact of the Deliver to Account (company), or the same entity as the Deliver to Account (contact).
Manual
You will enter the Booked Location's Delivery Address address manually.
Address
If you selected Manual as the Location Address Type, click the ellipsis next to the Address field to open the Address dialog.
Enter the address information and click OK.
Setup Types
Elsewhere in Setup, you created a list of general event space Setup Types, Setup Venue Location Setup Types. Review the topic Venue Location Setup Type.
You can now indicate which of those Setup Types can be used in the current Venue Location.

Figure 536: Venue Location Setup Types
Adding Setup Types to Location
1.Under the Setup Types tab, just above the selection grid, click the New button.
2.The Venue Location Setup Type edit form appears.
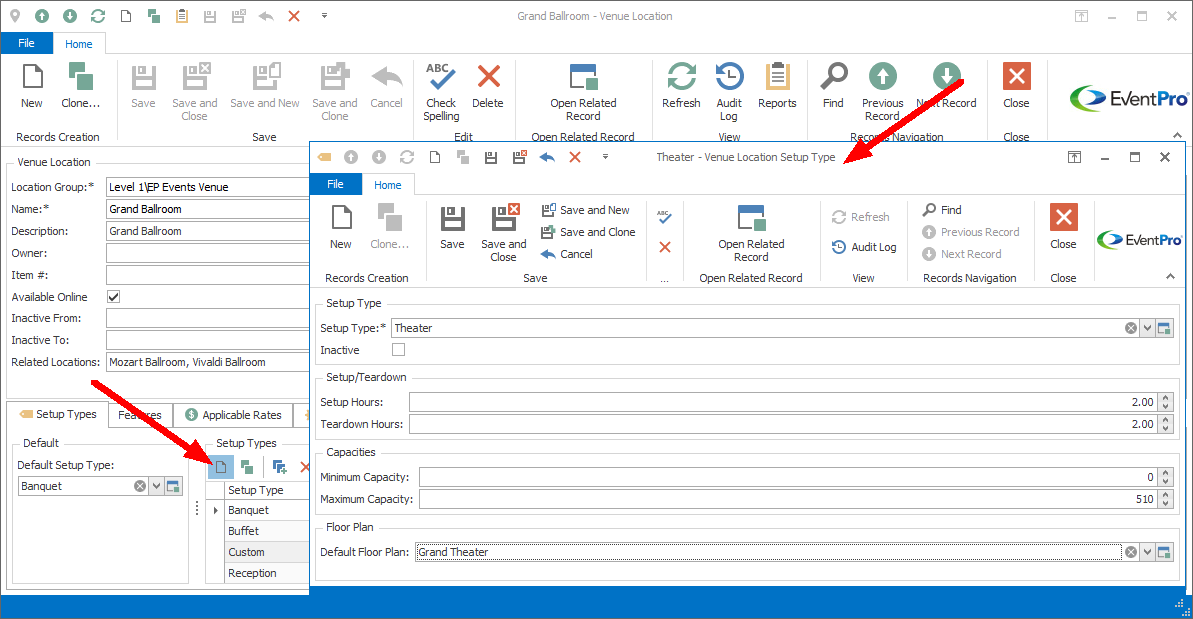
Figure 537: Adding Setup Type to Venue Location
3.Setup Type: From the Setup Type drop-down list, select a Setup Venue Location Setup Type.
4.Setup/Teardown: If time is required to set up and teardown this particular type of room configuration in this Location, enter the number of Setup Hours and Teardown Hours.
5.Capacities: Enter the number of people for the Maximum Capacity, and, if applicable, Minimum Capacity of the Location in this particular Setup Type.
6.Default Floor Plan: If applicable, select the Floor Plan that should be used by default for this Location when booked for an Event and set to this Setup Type.
a.Later, if this Location is booked for an Event in this Setup Type, the corresponding Floor Plan will be automatically pulled into the Event Location's Floor Plans tab. Review the topic Event Location Floor Plans under Event Management.
b.Note: If that automatically added Floor Plan contains Floor Plan Objects linked to Setup Resource Items, those Setup Items will also be added to the Event Location's Setup details. See the topics Add Setup Resources via Floor Plan under Event Management, and Floor Plan Object Library under Facilities Setup.
c.See the heading Floor Plans later in this topic to review how Floor Plans are added to a Venue Location.
7.When done with the Venue Location Setup Type edit form, click Save and Close.
8.Continue adding as many other Venue Location Setup Types to this Location as you require.
Setting Location's Default Setup Type
When you are done adding all the applicable Setup Types to this Location, go to the Default Setup Type drop-down list next to the Setup Type selection grid.
From the drop-down list, select the Default Setup Type for this Location. You can choose from any of the Venue Location Setup Types you just added to the Location.
The Default Setup Type you select will default in when booking this Location for an event, although you will be able to change the selected Setup Type when actually booking an Event Location.
Features
Under the Features tab, you can indicate which of the Venue Location Features are available in this particular Location, and how many are available for each.
The master list of Features was created elsewhere in Facilities Setup. See the topic Venue Location Features.
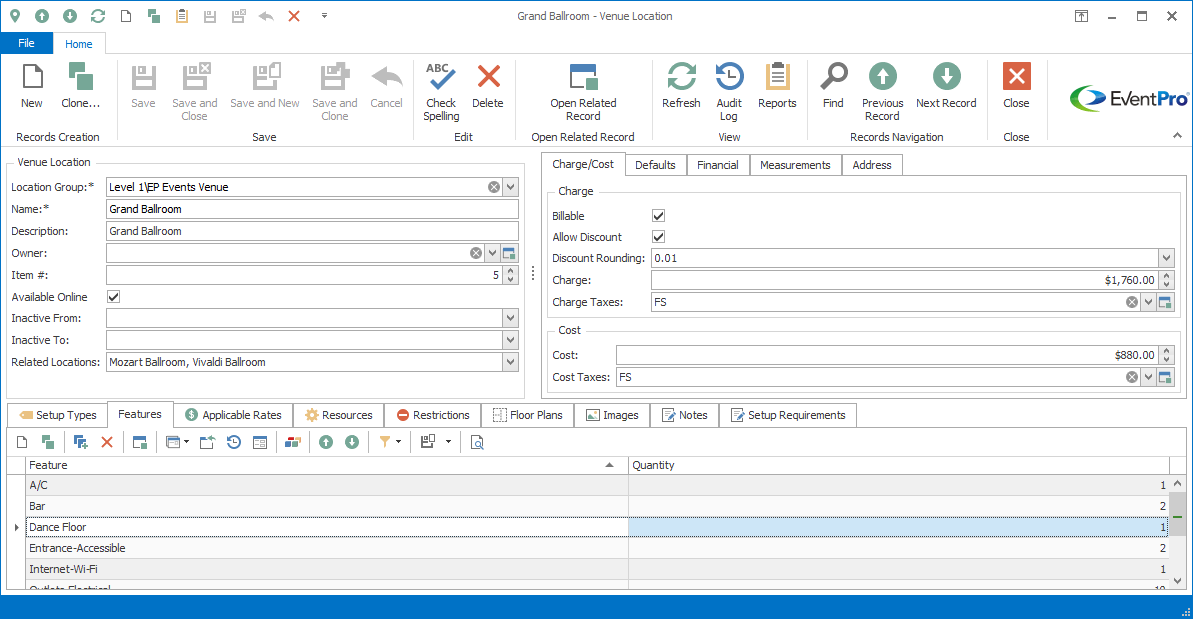
Figure 538: Venue Location Features
Adding Features to Location
1.Under the Features tab, click the New button.
2.The Venue Location Feature edit form appears.
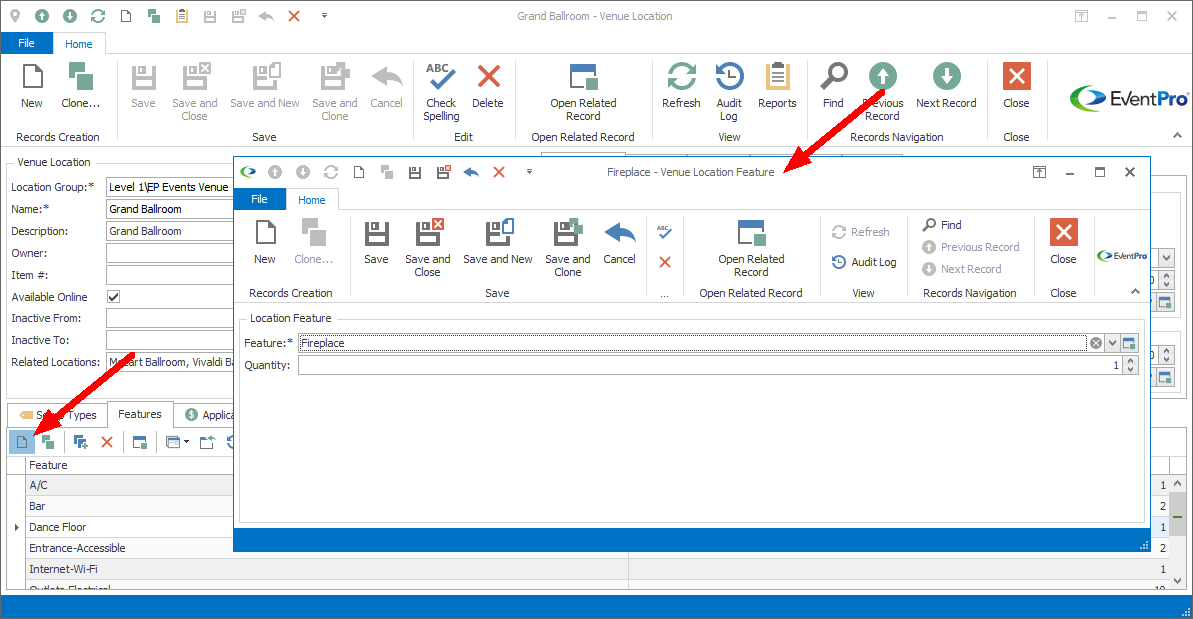
Figure 539: Adding Feature to Venue Location
3.Feature: Select the Venue Location Features that exists in this Location.
4.Quantity: Enter the number indicating how many of those features are in this Location.
5.When done with the record, click Save and Close.
6.Continue adding all applicable features to the Location.
Applicable Rates
You would have created a master list of potential Rate Codes elsewhere in Facilities Setup. Review how you created Setup Venue Rate Codes in the topic Venue Location Rates.
You then added Rate Codes to this Venue, defining the Cost/Charge for each Rate and customizing any details for this specific Venue. Review how you added Venue Rate Codes under the Venue Information tab in the topic Rate Codes.
You can now select which of those Venue Rate Codes are applicable this specific Location.

Figure 540: Venue Location Applicable Rates
Linking Rates to Location
1.Click the Link button under the Applicable Rates tab.
2.The Venue Rate Code window appears.
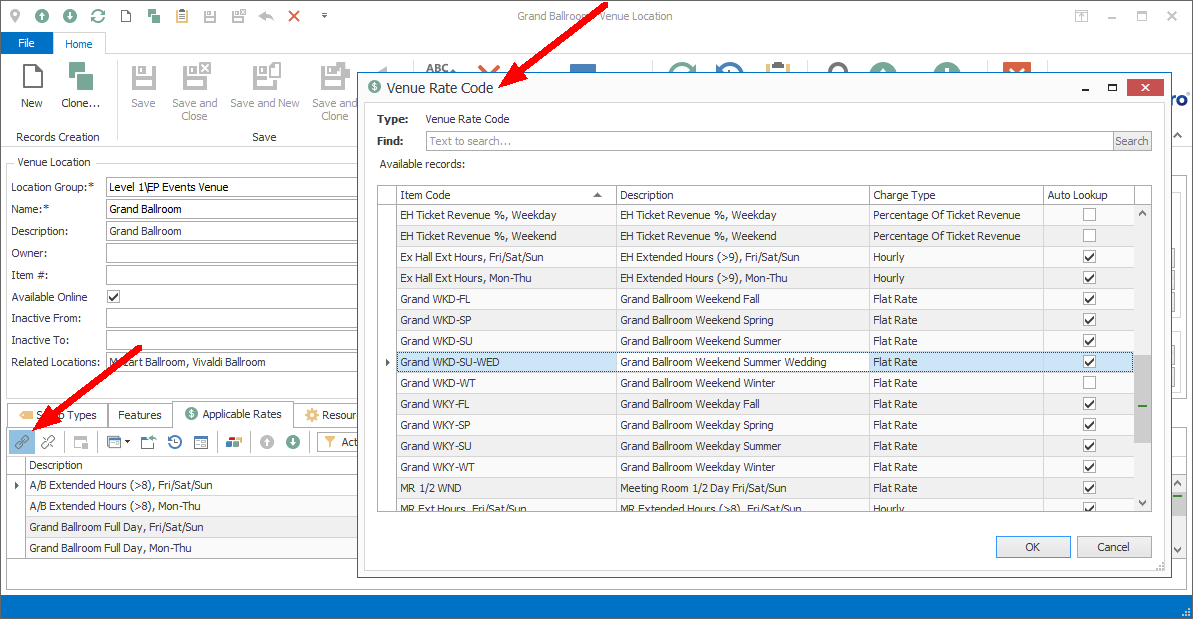
Figure 541: Linking Rate Code to Location
3.Select the Rate you want to link to this Location, and click OK.
4.If you want to link multiple Rates at once, hold down the Ctrl key and select all of the relevant rate records. Click OK.
5.The Rate(s) will be linked to the Location. Continue linking other Rates to this Location as required.
Restrictions
Under the Location's Restrictions tab, you can link a Restriction that applies to this individual Location.
Before you can link Restrictions to a Location, you need to add the Restrictions to the Venue. See the topic Venue Restrictions.
Remember that you can also apply higher-level Restrictions. If you want the Restriction to apply to Group levels above this Location, see the topics Add Location Group or Add Location Subgroup. You can also apply a Restriction to the entire Venue.

Figure 542: Venue Location Restrictions
Linking Restrictions to Location
1.Click the Link button under the Location's Restrictions tab.
2.The Venue Restriction window appears. This window contains the Venue Restrictions that were added under the Venue Restrictions tab.
3.Select the Restriction you want to apply to this Location, and click OK.
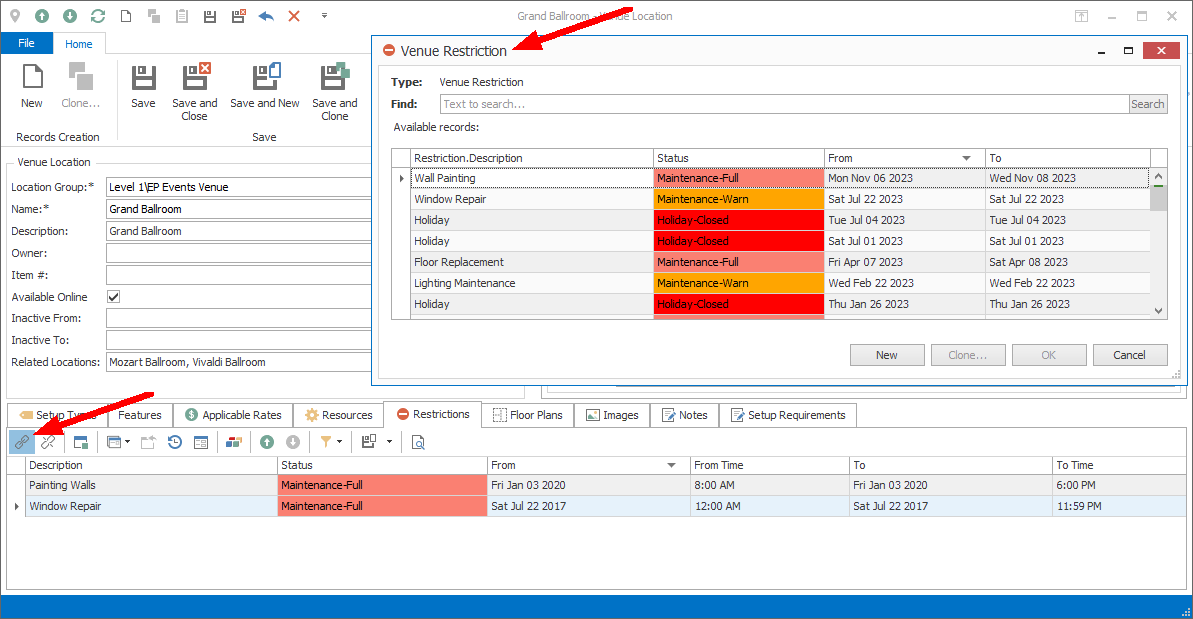
Figure 543: Linking Restriction to Location
4.You will return to the Venue Location edit form. You can link additional Restrictions as required.
Floor Plans
Under this tab, you can create to-scale Floor Plans specific to this Venue Location. The "Venue Location Floor Plans" you create here will act as the templates upon which you will build Floor Plans for the Location when it is booked for Events ("Event Location Floor Plans"). You can review how to add Floor Plans to Event Locations in the topic Event Location Floor Plans under Event Management.
The Venue Location Floor Plans you create here can be as simple or detailed as you require. You may want to have one Floor Plan that is a simple outline of the room's walls, doors, and windows, but otherwise blank so that it can be customized for unique circumstances. You may want other Floor Plans to include objects such as chairs, tables, decorations, and various equipment set up in specific layouts. For example, if a Venue Location is often used for a certain kind of event, you can set up a Venue Location Floor Plan with the objects typically used in that situation; when the Location is booked for an event, you can select this Floor Plan as a template, and the objects will be automatically pulled in. It will most likely be faster and easier to adjust the existing objects than start over from a blank floor plan.
If you frequently use the same Venue Location Floor Plan for a Location in a certain Setup Type or room configuration, you can assign a default Floor Plan to each Setup Type added to this Location. Review the heading Adding Setup Types to Location earlier in this topic. When a booked Event Location is set to the Setup Type, the corresponding Floor Plan will be automatically added to the Event Location's Floor Plans tab.
One other important aspect to note about Floor Plans is the option to link Floor Plan Objects to Setup Resource Items. Review the topic Floor Plan Object Library. If you add linked Setup Items/Floor Plans Objects to a Venue Location Floor Plan here in Facilities Setup, and later use the Floor Plan for an Event Location (or if the Floor Plan is automatically pulled in by the Setup Type), the presence of the linked Objects will pull the corresponding Setup Items, including quantities and charges, into the Event Location's Setup tab. You will also be able to manually add and remove the linked Setup Items/Floor Plan Objects in the Event Location Floor Plan. Review the topic Add Setup Resources via Floor Plan under Event Management.
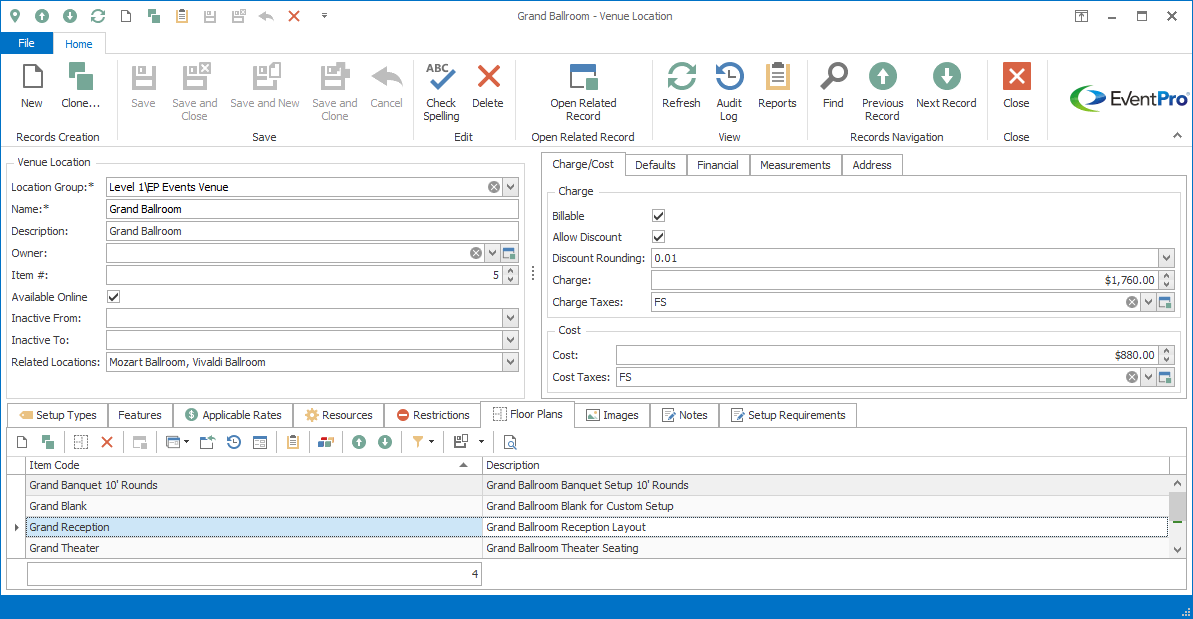
Figure 544: Location Floor Plans
Adding Location Floor Plans
1.Click the New button under the Floor Plans tab.
2.The Venue Location Floor Plan edit form opens.
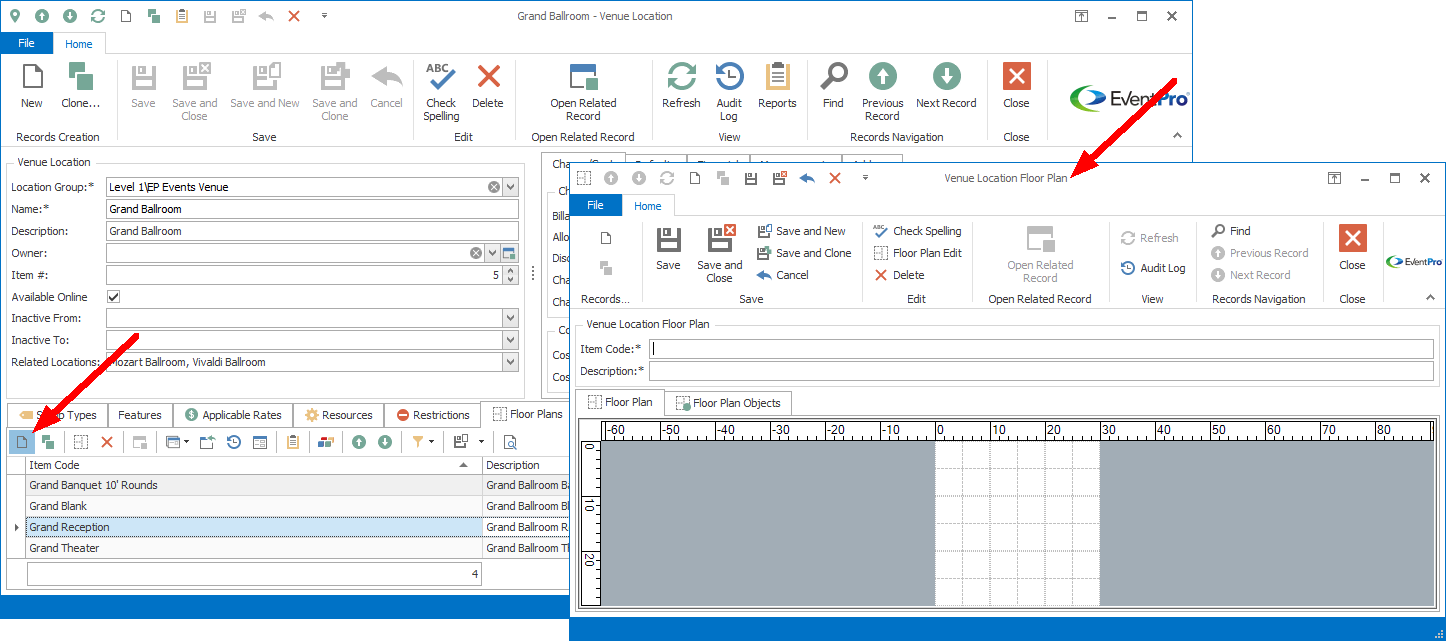
Figure 545: Adding new Location Floor Plan
3.Item Code: Enter a name for the Floor Plan.
4.Description: This will default to the Item Code name, but you can enter a different description.
5.You will now open the Floor Plan Designer and manipulate the floor plan's details there. In order to explain the Floor Plan Designer's many features in more detail, the complete instructions are contained in a separate topic: Floor Plan Designer.
6.If you add Floor Plan Objects (e.g. tables, chairs, A/V equipment, etc.) to your design here, take note whether they are linked to Setup Resource Items. If you add linked Setup Items/Floor Plans Objects this Venue Location Floor Plan, and later use the Floor Plan for an Event Location, the linked Objects in the Floor Plan will pull the corresponding Setup Items (including quantities and charges) into the Event Location.
7.When your Floor Plan is complete, click Save and Close in the Venue Location Floor Plan edit form to return to the Venue Location.
8.Continue adding as many Floor Plans as you require for this Location.
9.Remember that you can assign a default Floor Plan to each Setup Type added to this Location. See Adding Setup Types to Location earlier in this topic.
Images
You may find it useful to attach Images to the Venue Location, in order to demonstrate different setup and decoration options to clients and staff.

Figure 546: Adding Images to Location
Adding Location Images
1.Under the Images tab, start a New record.
2.The Venue Location Image edit form appears.
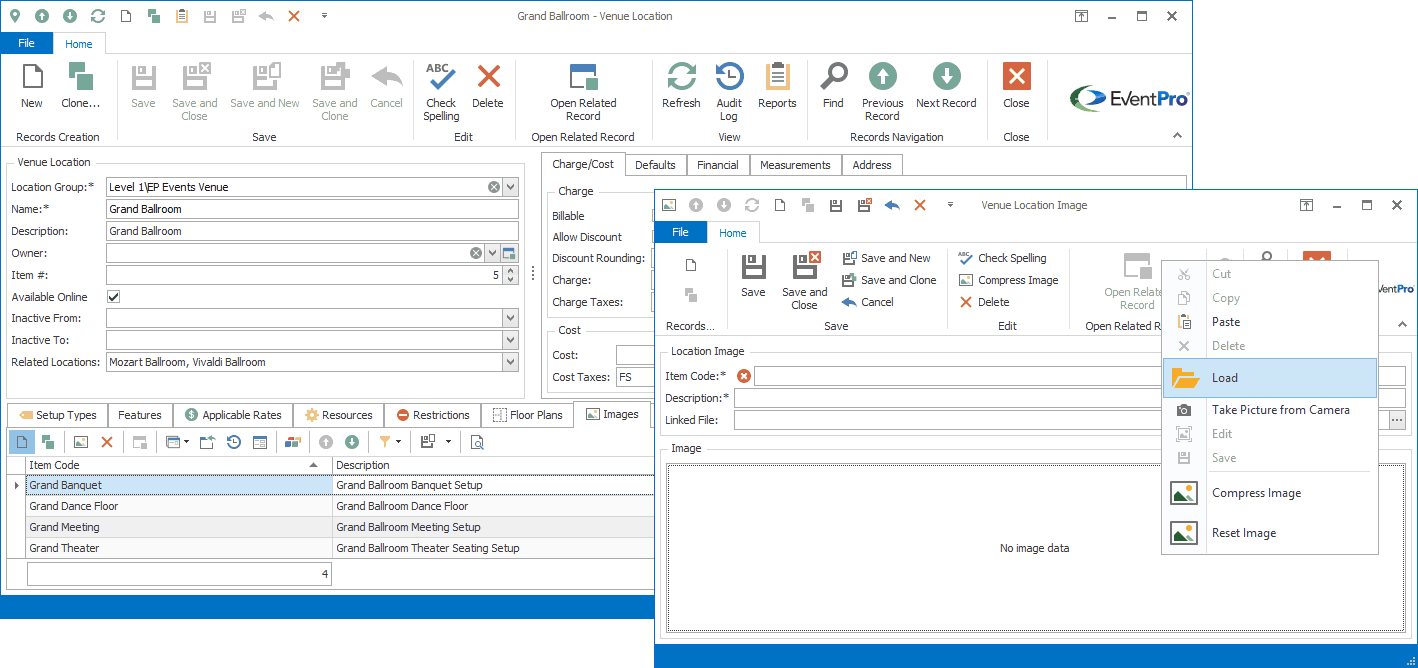
Figure 547: Adding Image to Location
3.Item Code: Enter the name of the image.
4.Description: This will default to the Item Code, but you can add a longer Description if you like.
5.Linked File: If you want to link to a file, click the ellipsis next to this field. In the Open window, select the image file you want and click Open.
6.Embedded File: Instead of linking a file, you can embed the image by loading it in the Image area. Right-click in the Image area at the bottom of the edit form so that the speed menu appears.
a.Load: Load a image for the Location. In the Open window that appears, select the image file you want to use and click Open.
b.Cut, Copy & Paste: Allows you to cut, copy and paste the image within EventPro, or into an outside program.
c.Delete: Clears the image from the Image tab.
d.Save: Save a copy of the image outside EventPro to a folder you select.
7.When you have entered all the information you need for this Venue Location Image, click Save and Close.
8.You will return to the Venue Location edit form. Continue adding any other Images you need for this Venue Location.
Notes & Setup Requirements
Under the Venue Location Notes tab, enter any general notes you have about the Location.
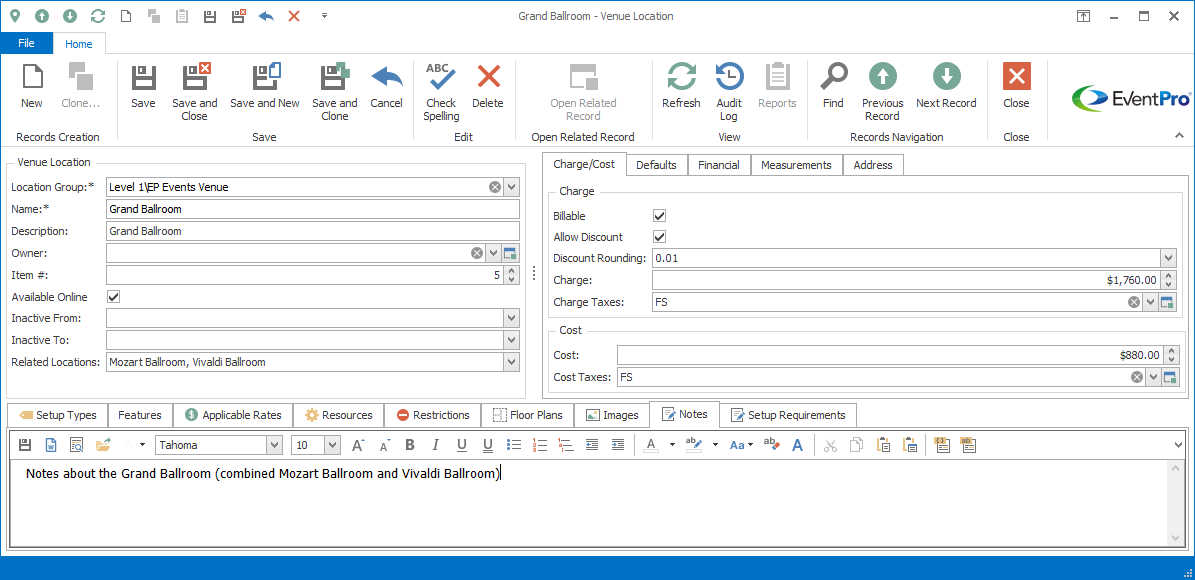
Figure 548: Venue Location Notes
Under the Setup Requirements tab, add any notes or special information about the Location that would be useful to setup and/or event staff.
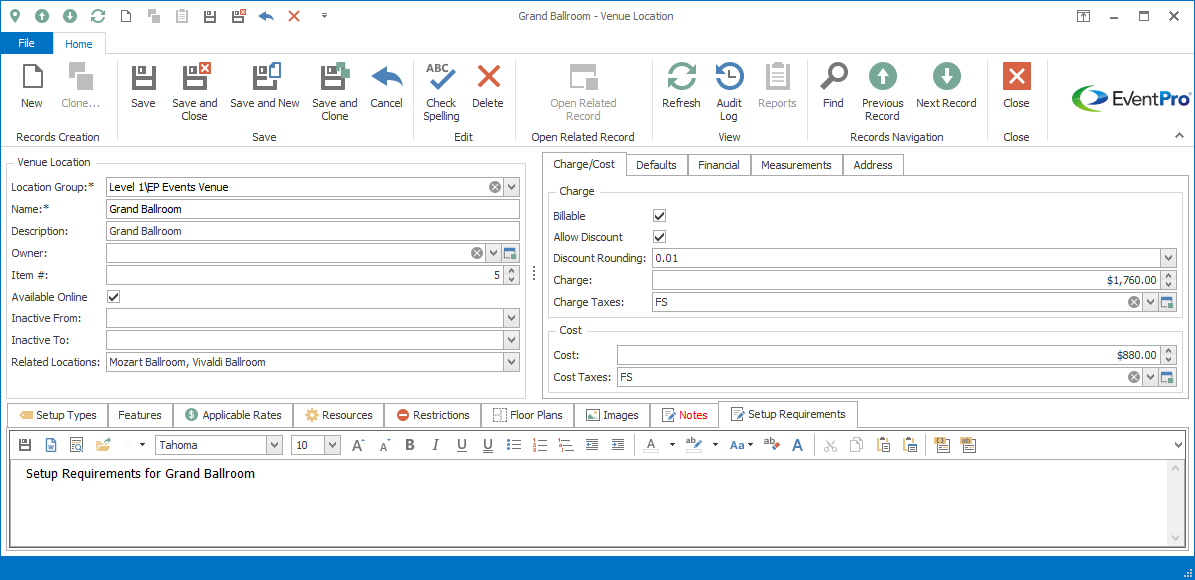
Figure 549: Location Setup Requirements
For both Notes and Setup Requirements, you can simply type directly into the memo field in the tab, or if you want to add more sophisticated formatting, you can open the Word Processor and work on your document there.
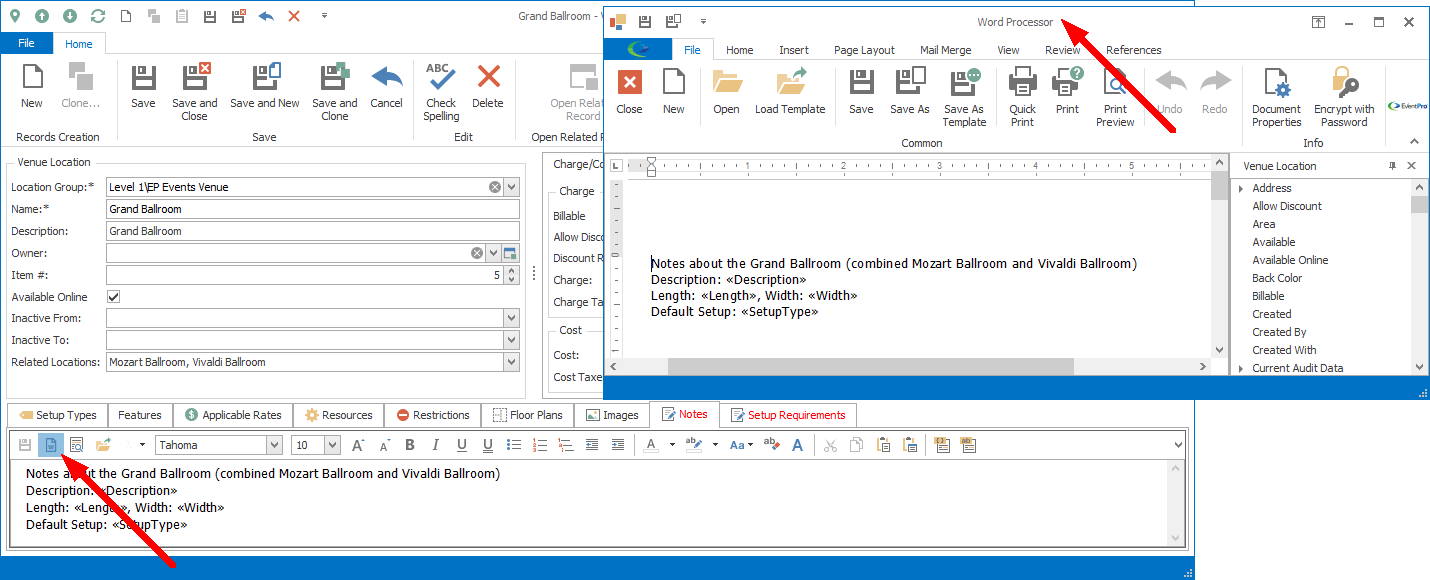
Figure 550: Location Notes in Word Processor
Save, Close, Next Steps
When you have added all the information you need for this Venue Location, click Save and Close in the Venue Location edit form.
You will end up back in the Venue Information tab of the Company/Venue edit form.
Your new Location will appear under its Location Group or Subgroup in the selection grid. If you can't see the new Location you added, make sure that you click the arrows in the left column to open up the Location Groups/Subgroups and display all Locations below.
From here, you can continue Venue Setup. Follow the links to the instructions you require:
If you are done setting up the Locations in this Venue altogether, click Save and Close in the Company Venue edit form to return to EventPro Setup.