•If you make any changes under Setup > CRM > System Settings, ensure that you click the Save ![]() icon at the top of the tab.
icon at the top of the tab.
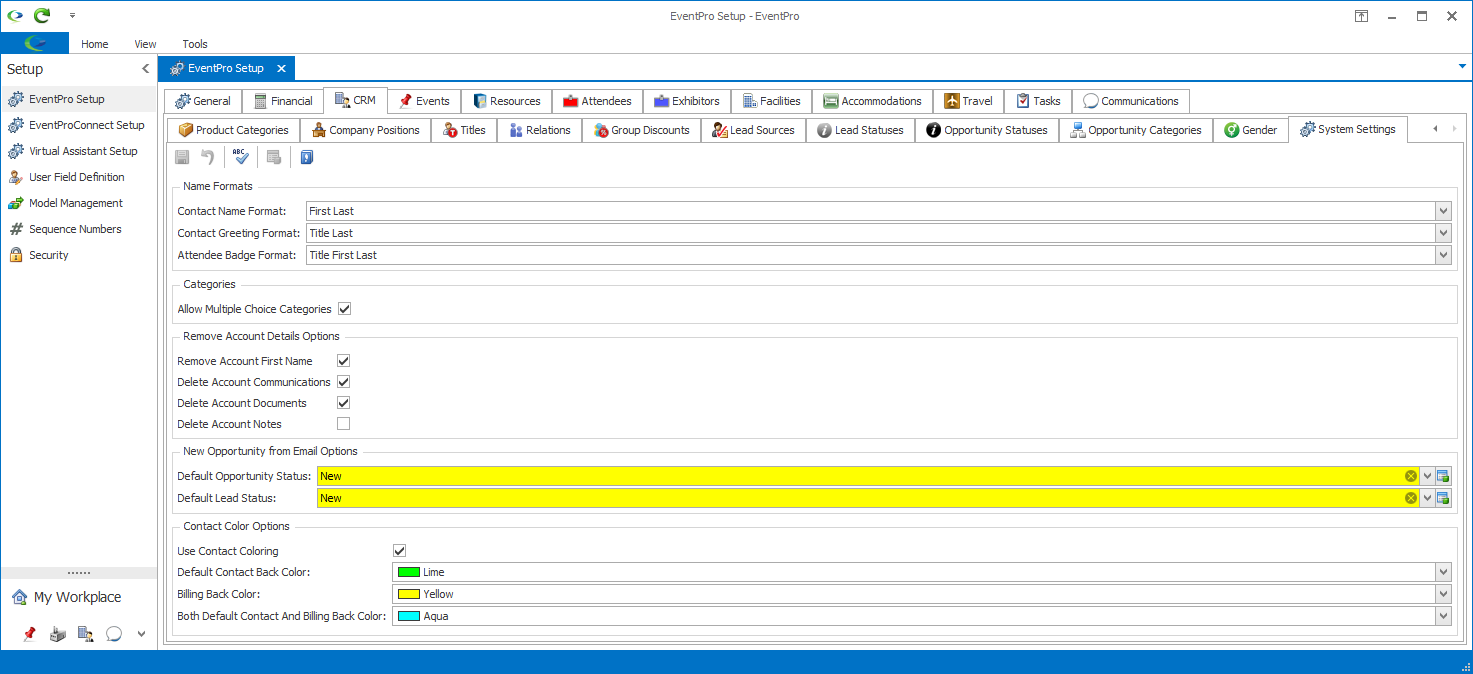
1.Name Formats:
a.Contact Name Format: From the drop-down lists, choose the order in which you want the Title, First and Last names of contacts to appear.
b.Contact Greeting Format: From the drop-down list, choose how you want contact names to appear in greetings, e.g. “Mr. Smith” (Title Last) or “Mr. Bob Smith” (Title First Last), etc..
c.Attendee Badge Format: From the drop-down list, choose how you want attendee names to appear on name badges, e.g. “Ms. Brown” (Title Last) or “Ms. Julia Brown” (Title First Last), etc..
2.Categories - Allow Multiple Choice Categories:
a.If this checkbox is selected, you will be able to select multiple categories under the Account Categories (1, 2, 3), Contact Categories (1, 2, 3), and Product Categories (1, 2) for each Account, Company, and Contact.
b.If this checkbox is not selected, you will only be able to select one of each of the Categories for each Account, Company, and Contact.
c.IMPORTANT: Note that if this "Allow Multiple Choice Categories" setting has been turned on, and there are already Accounts/Contacts/Companies with multiple category selections, you will not be able to turn the setting back off again.
3.Remove Account Details Options: These options are related to the Remove Account Details command in CRM, which allows you to remove an account's personal data without deleting the account entirely.
The Remove Account Details command deletes certain, defined personal information, but for these particular items indicated by the checkboxes, you can determine whether you want to keep or delete them.
Select the checkboxes to indicate which items you want removed from the account, along with the other information non-optionally deleted upon clicking the Remove Account Details command.
a.Remove Account First Name
b.Delete Account Communications
c.Delete Account Documents
d.Delete Account Notes
4.New Opportunity from Email Options: These options are related to the ability to create an opportunity from an email. From the drop-downs, select the Default Opportunity Status and Default Lead Status for incoming email opportunities. The drop-downs are populated by the setup statuses you would have created under Opportunity Statuses and Lead Statuses.
a.Use Contact Coloring:
i.Select this checkbox if you want the applicable CRM Contacts (Default, Billing, Both) to display the background colors you select below. (See, for example, Company/Contact Management (CRM) > View & Find Accounts > Contact List.)
ii.Unselect the checkbox if you do not want Contact records to be color-coded.
b.Default Contact Back Color: Select the background color for CRM Contacts assigned as the Default Contacts of their Companies. (Note that this is different than the background color used if the Contact is both the Default and Billing Contact for a Company.)
c.Billing Back Color: Select the background color for CRM Contacts assigned as the Billing Contacts for their Companies. (Note that this is different than the background color used if the Contact is both the Billing and Default Contact for a Company.)
d.Both Default Contact and Billing Back Color: Select the background color for CRM Contacts assigned as both the Default Contacts and Billing Contacts for their Companies.
•Remember to save changes by clicking the Save ![]() icon at the top of the tab.
icon at the top of the tab.