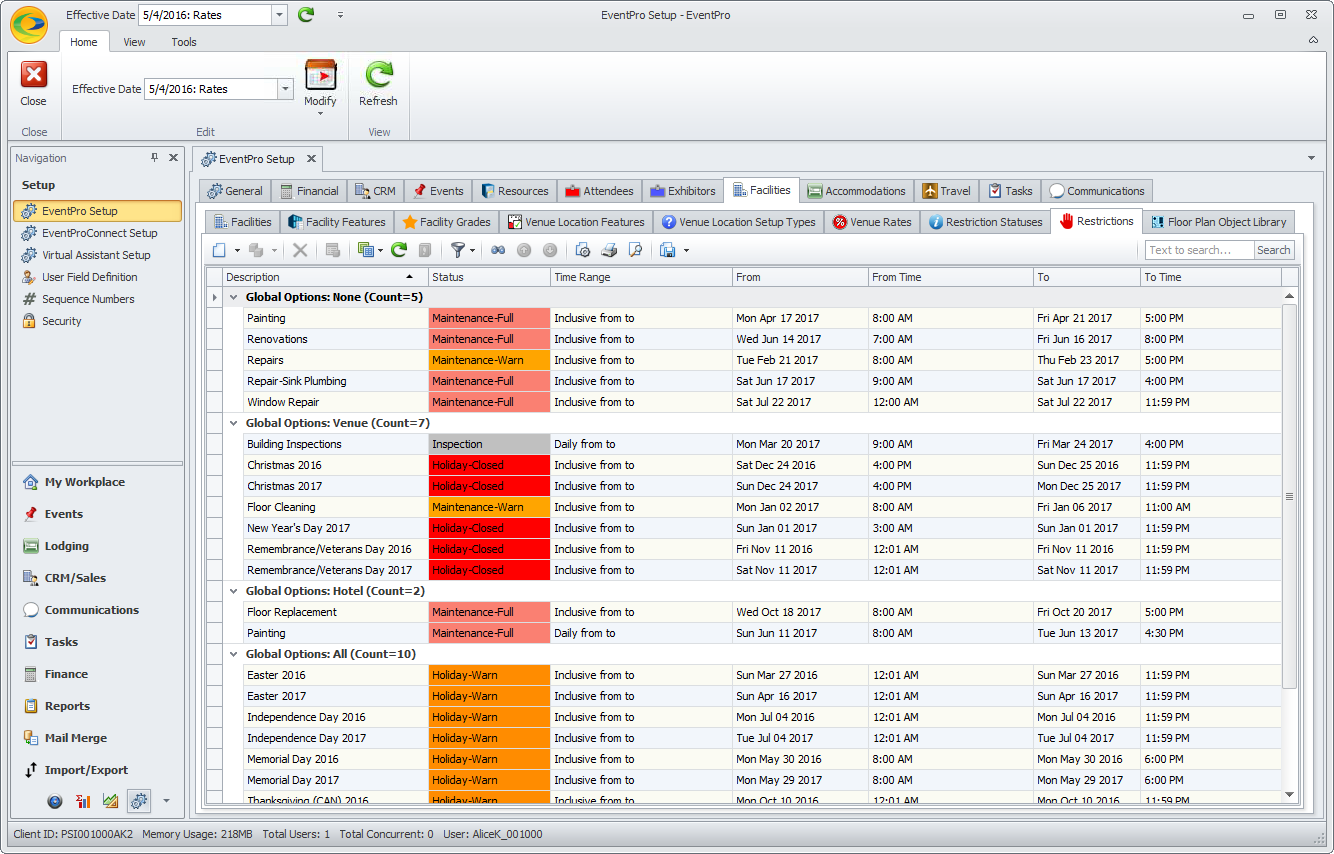
•Restrictions are non-Event activities that occur in your Venues spaces and Lodging rooms. Some examples would be cleaning, maintenance, renovations, inspections, holidays, and so on. Like Events, these Restrictions can be set to provide warnings when you attempt to create a conflicting booking.
•Under Restrictions, you will create a master list of Restrictions that can be applied in a variety of ways: globally across all Facilities, across all Venues, across all Hotels, to an entire Venue or Hotel, to a Venue Location Group, or to individual Venue Locations.
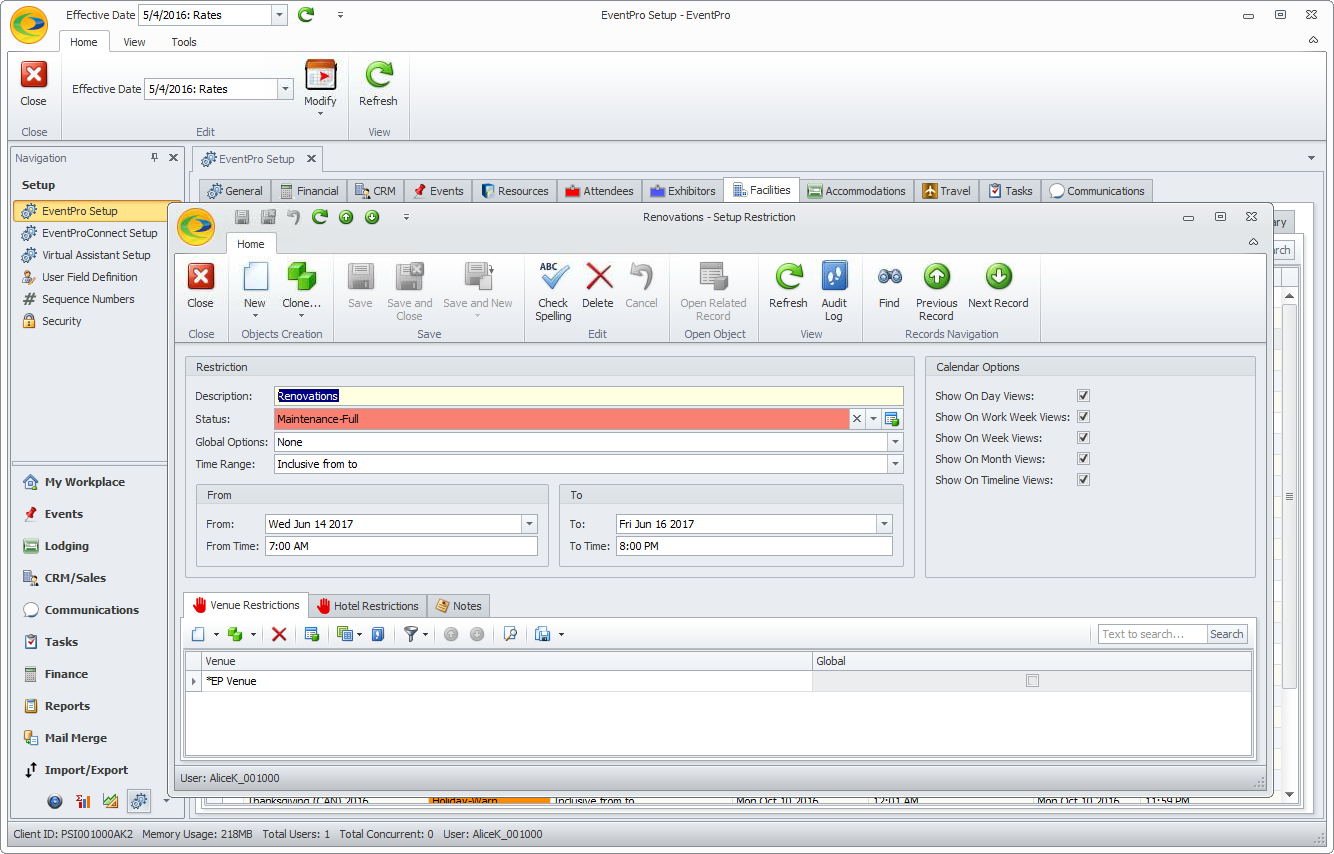
1.Start a New record under the EventPro Setup > Facilities > Restrictions tab.
2.The Setup Restriction edit form appears.
3.Description: Enter a Description of the Restriction, e.g. the reason for closing off the space.
4.Status: If you defined a default Restriction Status earlier, that Status will appear here. If not, or if you want to use a different one, select a Status from the drop-down list. These Statuses were created under EventPro Setup > Facilities > Restriction Statuses.
5.Global Options: Choose All, Venue, Hotel, or None.
a.All: Select All if you want the Restriction to apply globally across all Facilities - Venues and Hotels - that appear under EventPro Setup > Facilities. You will not need to specify Venues or Hotels under the Venue Restrictions or Hotel Restrictions tabs because the Restriction is already applied to all of them.
b.Venue: Select Venue if you want the Restriction to apply across all Venues under EventPro Setup > Facilities. You are not able to specify Venues under the Venue Restrictions tab, because the Restriction has already been applied to all Venues, including all of their Location Groups, Subgroups and Locations.
c.Hotel: Select Hotel if you want the Restriction to apply across all Hotels under EventPro Setup > Facilities. You are not able to specify Hotels under the Hotel Restrictions tab, because the Restriction has already been applied to all Hotels, including all of their Room Groups, Subgroups and Rooms.
d.None: Select None if you want to be able to apply the Restriction to an individual Venue, Hotel, Group, Subgroup, Location or Room.
6.Time Range: From the Time Range drop-down, choose whether you want the times to be Inclusive From To or Daily From To.
a.Inclusive From To: The restriction runs from the From Date/From Time all the way through to the To Date/To Time.
b.Daily From To: The restriction runs between the From Time and To Time each day for the dates in the From Date - To Date range.
7.From and To: Select the From and To dates from the drop-down calendars, and enter the From Time and To Time of the Restriction.
8.Calendar Options: Select the appropriate checkboxes to indicate on which Calendar Views you want this Restriction to appear.
9.Venue Restrictions and Hotel Restrictions: These tabs display the individual Venues, Hotels, Groups, Subgroups, Locations and/or Rooms to which the Restriction has been applied, if the Restriction Global Options are set to "None".
If your Venues and Hotel are not yet set up, you can return to this area to apply restrictions later, or you can apply the Restrictions directly from the Venue or Hotel record. For Venues, see Venue Information > Venue Restrictions.
If your Venues and Hotels are already set up, you can apply the Restriction here. You may want to Save your Restriction before proceeding.
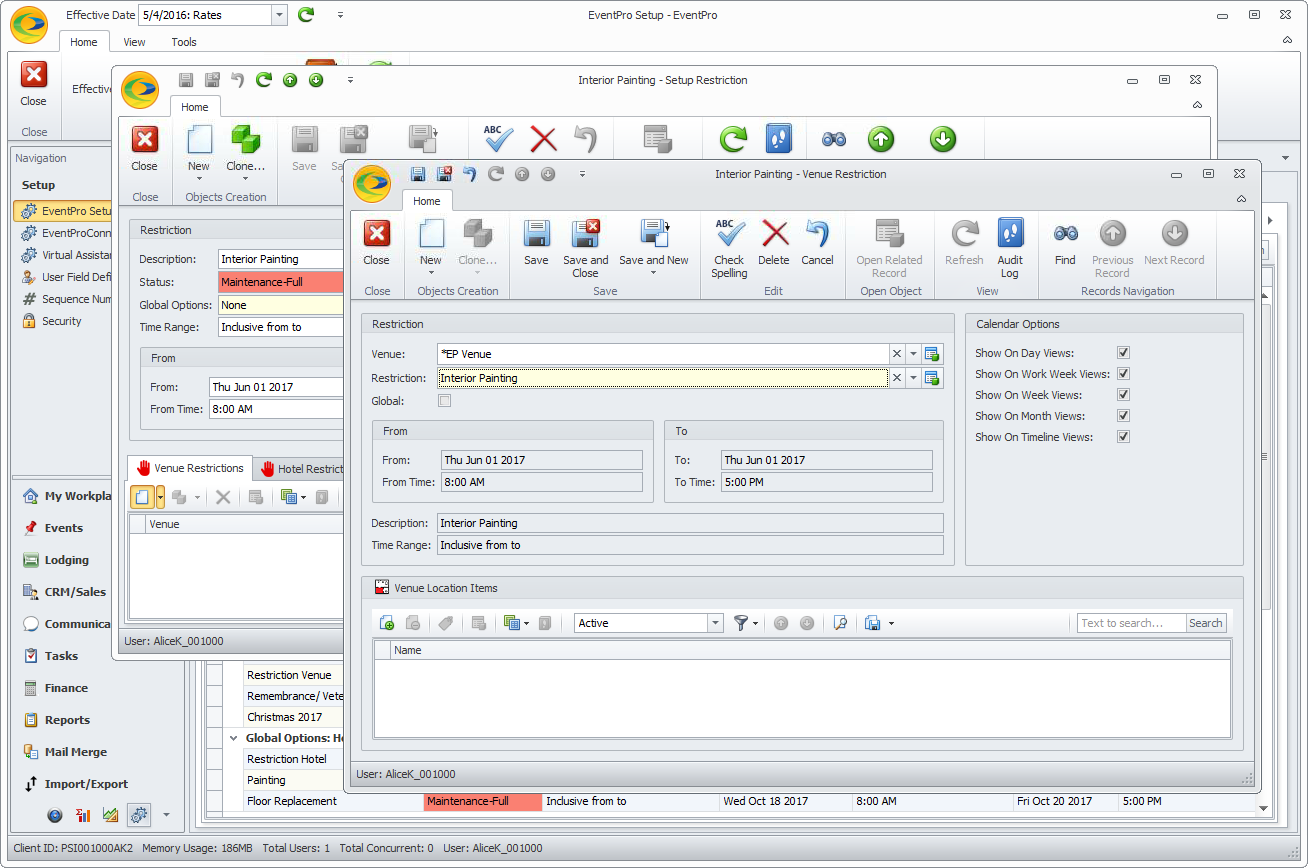
1)Start a new record under the Venue Restrictions tab.
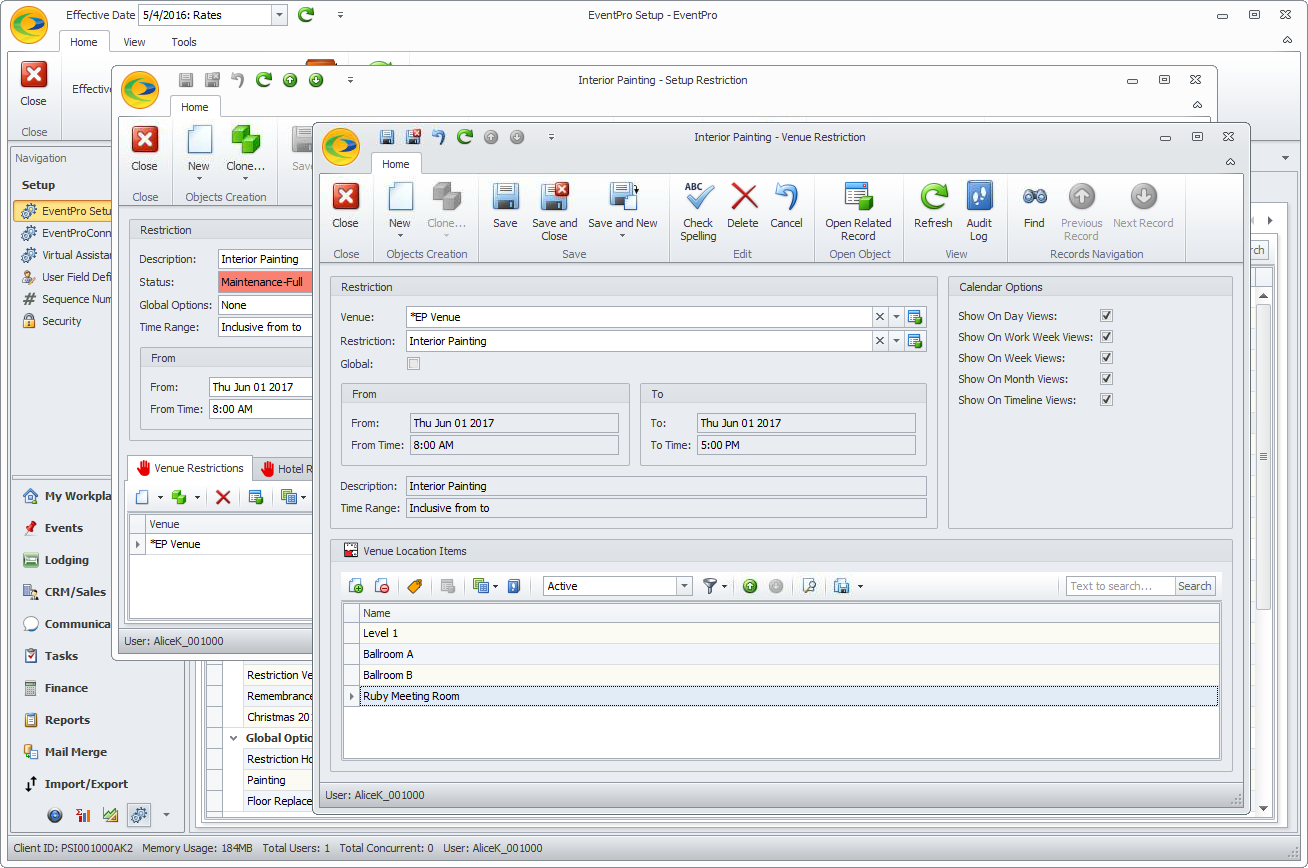
2)The Venue Restriction edit form appears.
3)Select the relevant Venue from the drop-down. Remember, these are your Venues set up under EventPro Setup > Facilities.
4)The Restriction will already be selected, as you are working from the Restriction record. When you tab down from this field, the other information for the Restriction will be filled in automatically.
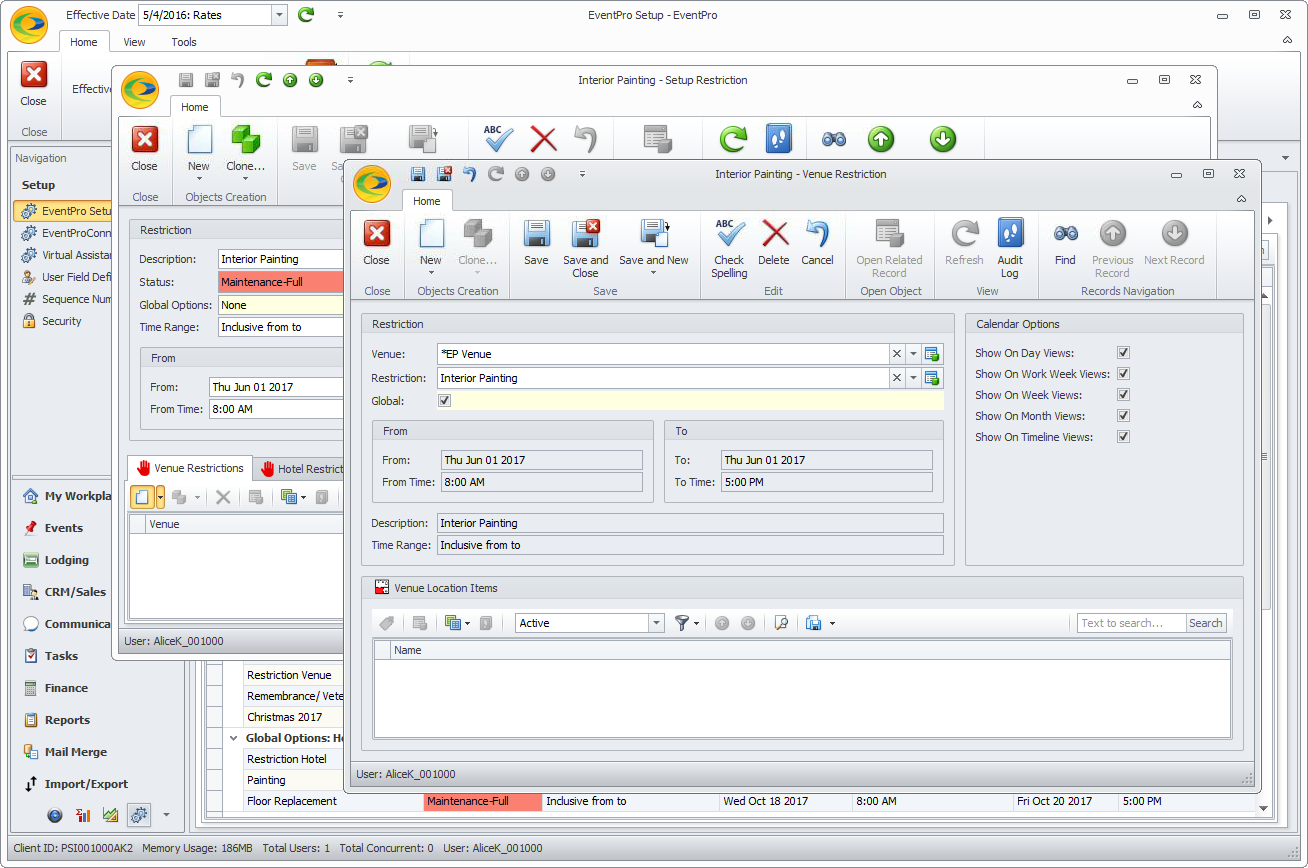
5)Select the Global checkbox if you want the Restriction to apply to the entire Venue. (This is different from the "Venue" selection in Global Options above. The Venue Global Option meant that the Restriction applied to ALL Venues. This Global option means the Restriction will apply to the one Venue you selected.)
6)Venue Location Items: If you select the Global checkbox, this area will be deactivated, since the Restriction is already applied to the entire Venue.
If the Global checkbox is not selected, you can apply the Restriction to specific Location Groups, Subgroups and/or Locations.
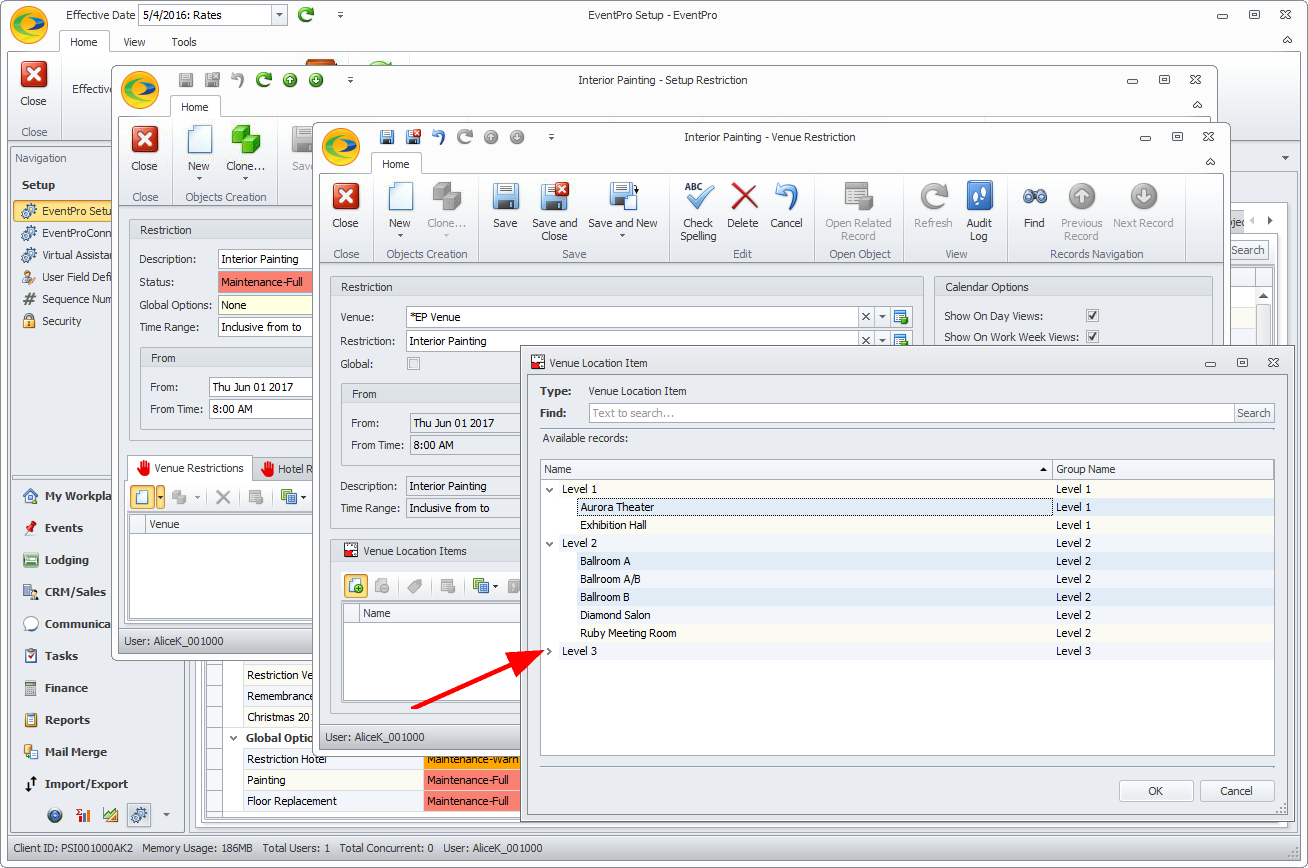
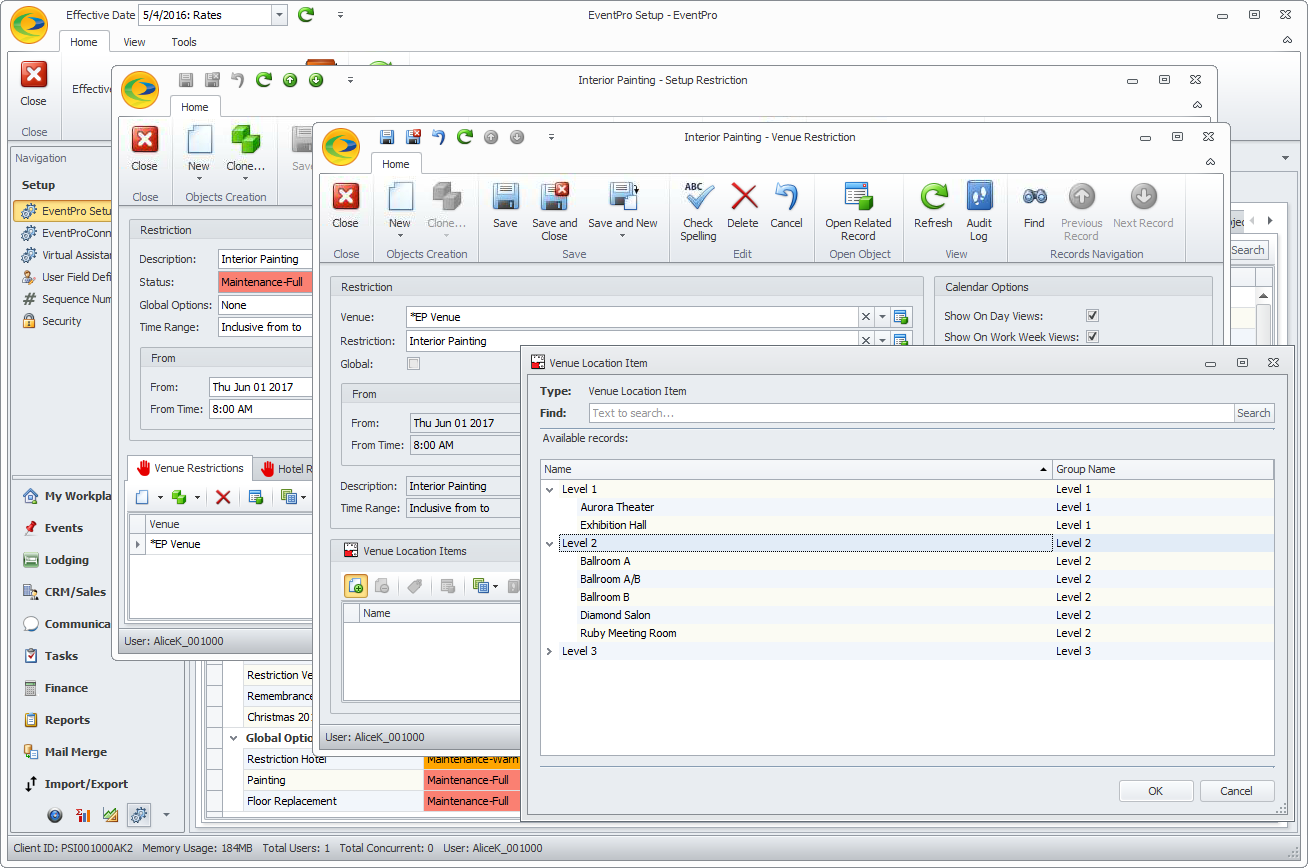
a)Click the Link button  under Venue Location Items. under Venue Location Items.
The Venue Location Item window appears. Search for the Location Groups, Subgroups or Locations you want to use. To view all available Locations, click the left toggle arrows to expand all Groups and Subgroups.
b)You can select one Location Group, Subgroup or Location, or multiple items.
c)To multi-select individual Groups, Subgroups or Locations (even across different Groups), hold down the Ctrl key and click on all the items you want to include in the selection.
d)If you want the Restriction to apply to all Locations under a Location Group or Subgroup, select the record representing that Group or Subgroup.
e)When you are done selecting items, click OK.
7)The selected Location Groups, Subgroups and Locations will be added to the Venue Location Item selection grid in the Venue Restriction edit form.
Save and Close the Venue Restriction edit form to return to the Setup Restriction.
8)You can continue working on your Setup Restriction, but it's a good idea to Save your record after linking Venues and Locations. |
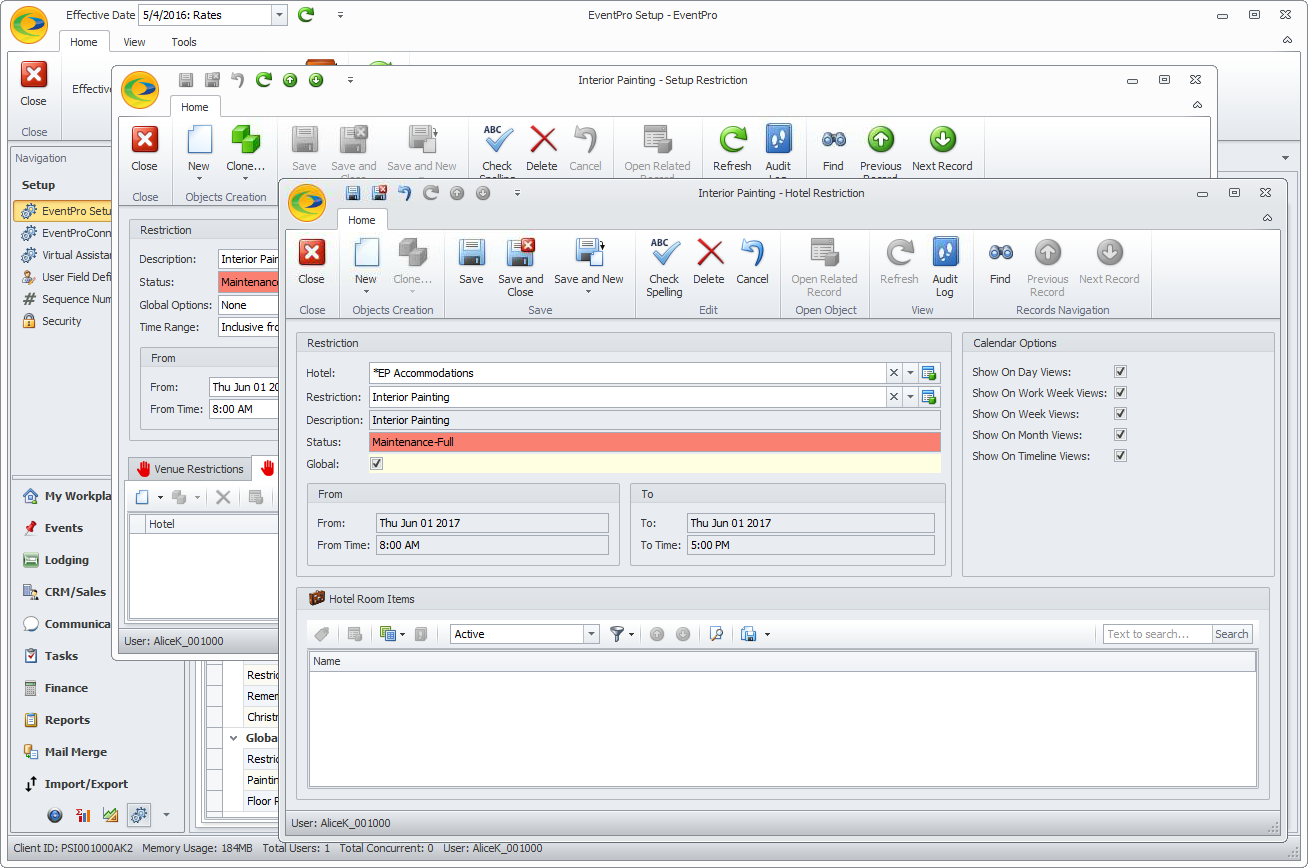
1)Start a new record under the Hotel Restrictions tab.
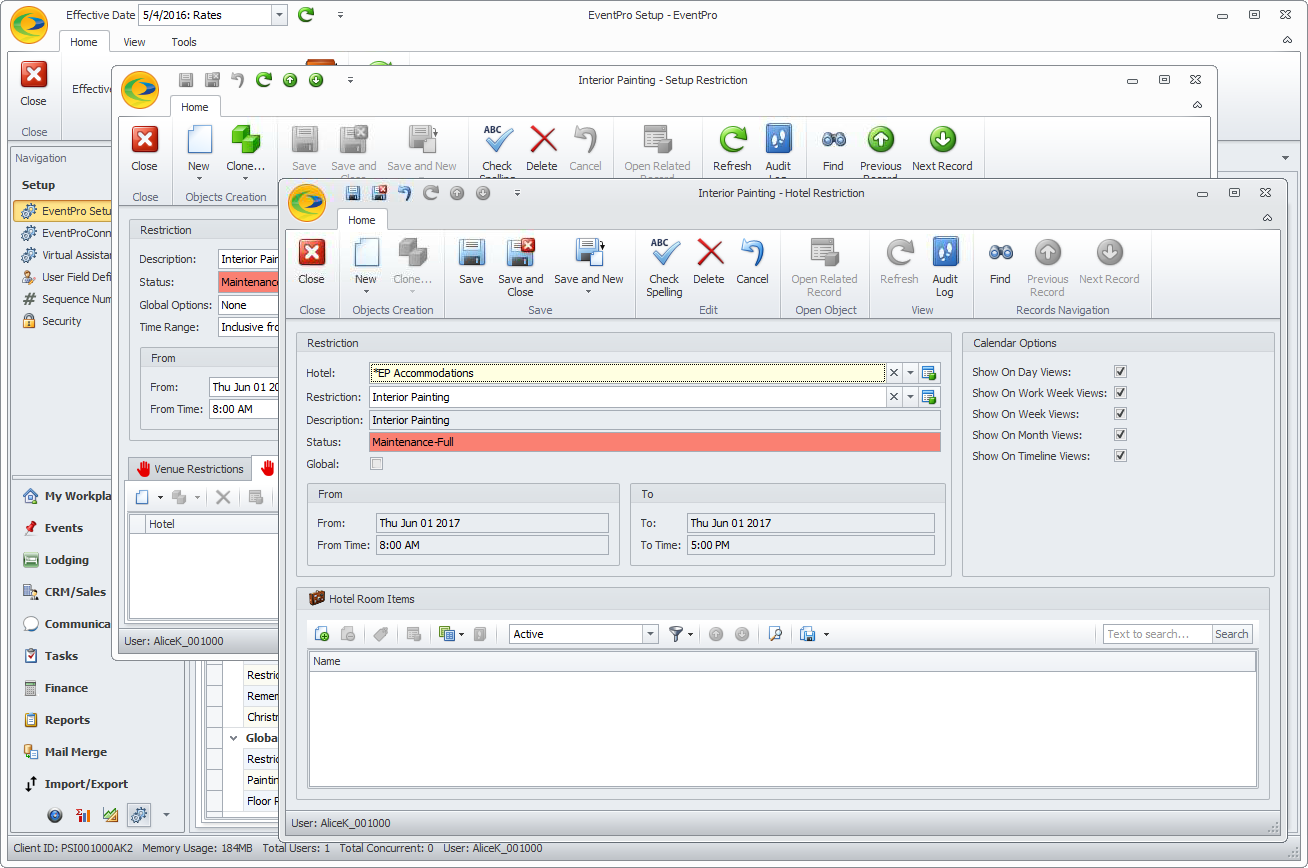
2)The Hotel Restriction edit form appears.
3)Select the relevant Hotel from the drop-down. Remember, these are your Hotels set up under EventPro Setup > Facilities.
4)The Restriction will already be selected, as you are working from the Restriction record. When you tab down from this field, the other information for the Restriction will be filled in automatically.
5)Select the Global checkbox if you want the Restriction to apply to the entire Hotel. (This is different from the "Hotel" selection in Global Options above. The Hotel Global Option meant that the Restriction applied to ALL Hotels. This Global option means the Restriction will apply to the one Hotel you selected.)
6)Hotel Room Items: If you select the Global checkbox, this area will be deactivated, since the Restriction is already applied to the entire Hotel.
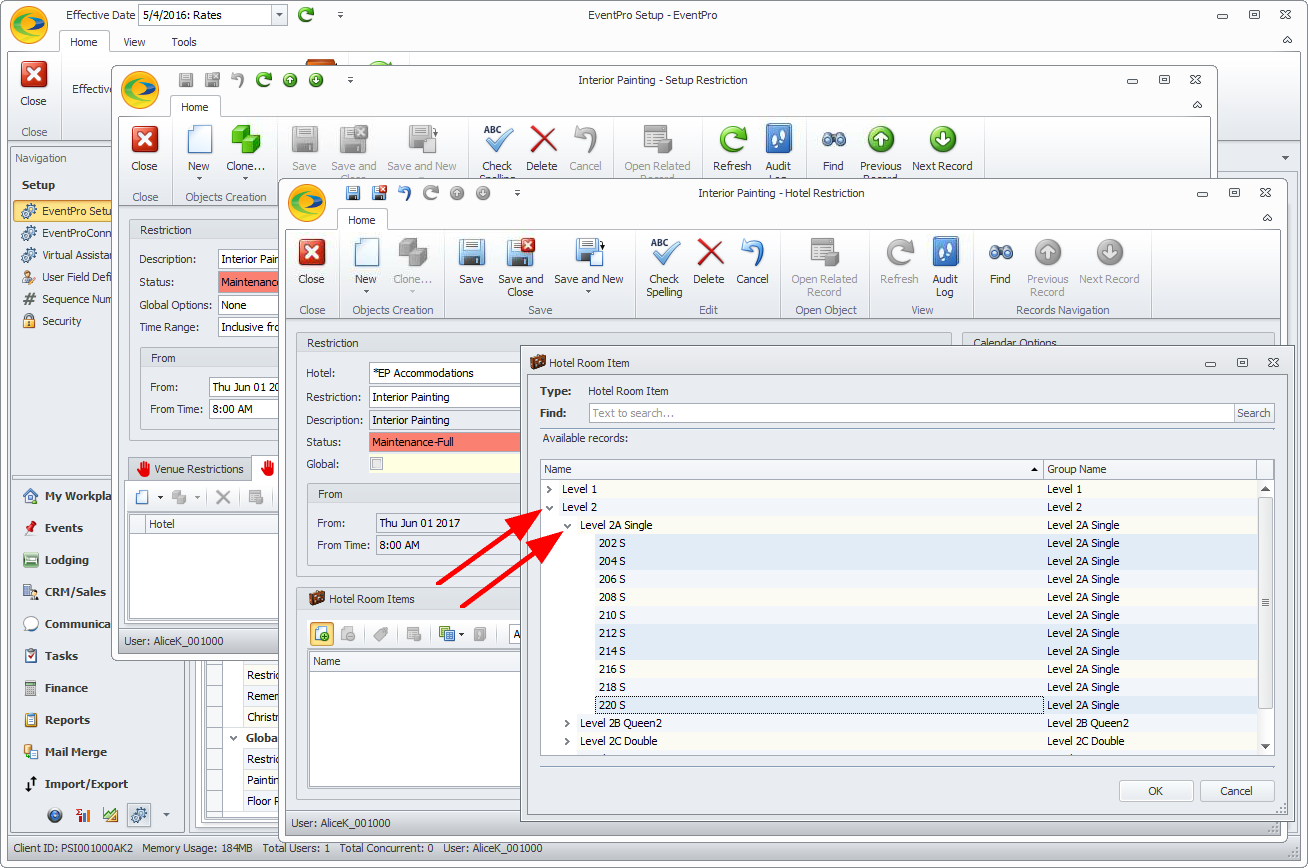
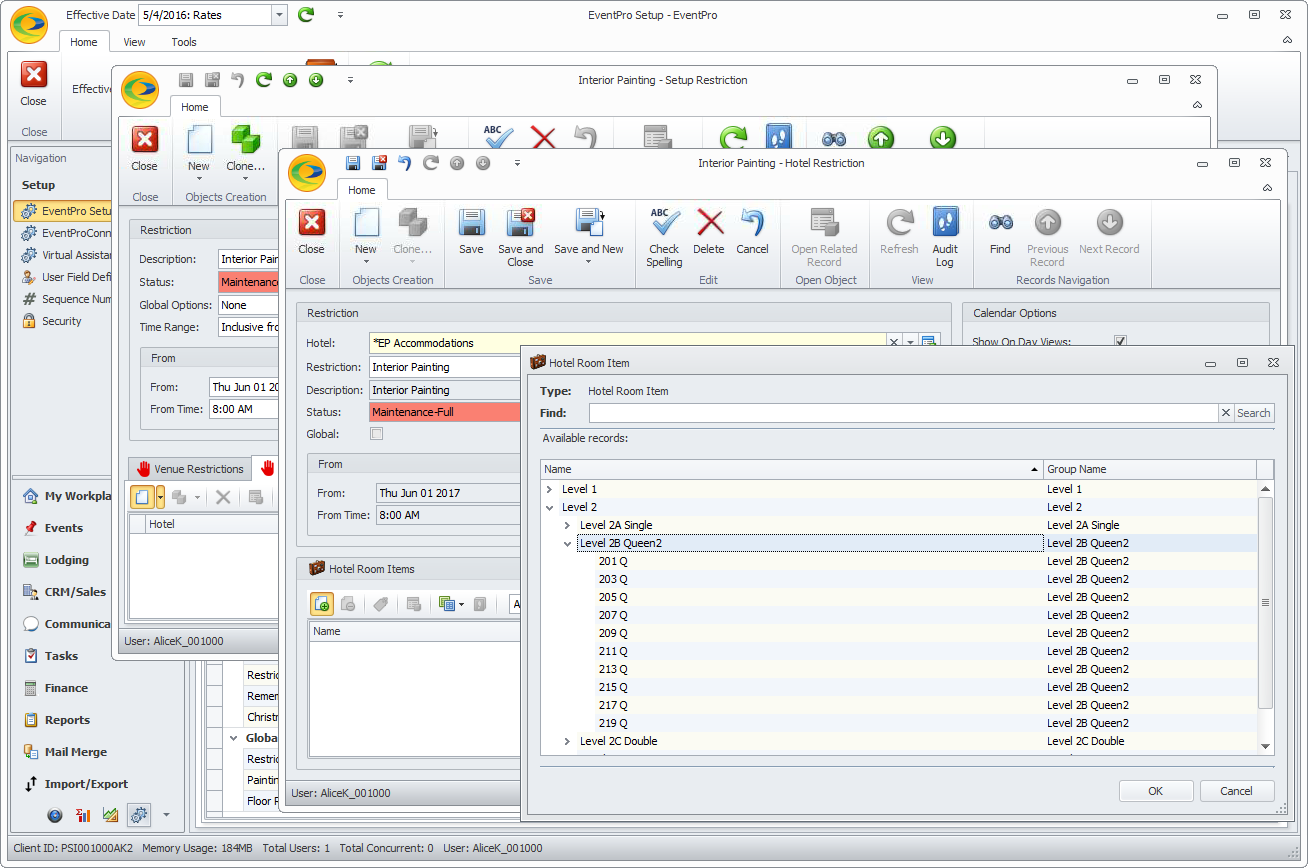
7)If the Global checkbox is not selected, you can apply the Restriction to specific Room Groups, Subgroups and/or Rooms.
a)Click the Link button under Hotel Room Items.
b)The Hotel Room Item window appears. Search for the Room Groups, Subgroups and Rooms you want to use. To view all available Rooms, click the left toggle arrows to expand all Groups and Subgroups.
c)You can select one Room Group, Subgroup or Room, or multiple items.
d)To multi-select individual Groups, Subgroups or Rooms (even across different Groups), hold down the Ctrl key and click on all the items you want to include in the selection.
e)If you want the Restriction to apply to all Rooms under a Room Group or Subgroup, select the record representing that Group or Subgroup.
f)When you are done selecting items, click OK.
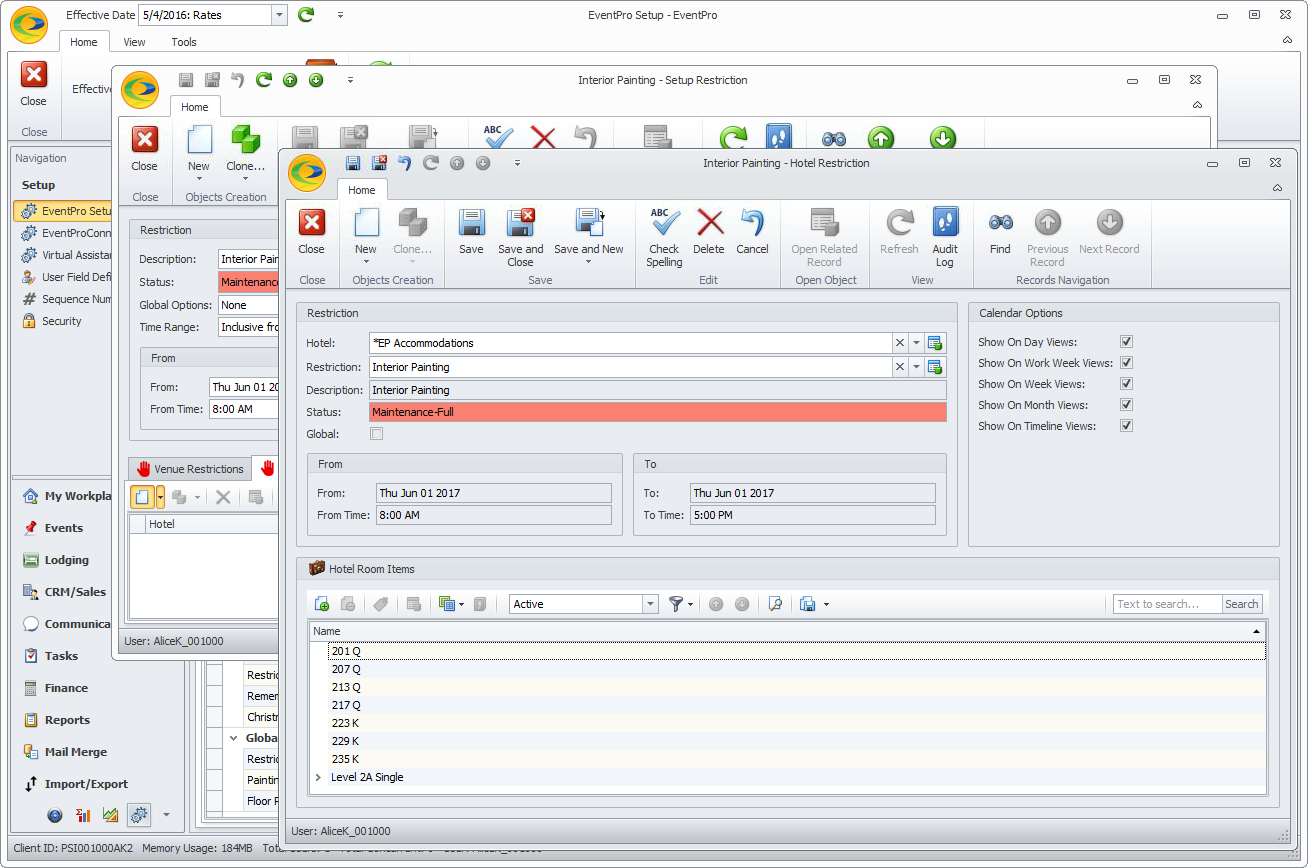
8)The selected Room Groups, Subgroups and Rooms will be added to the Hotel Room Item selection grid in the Hotel Restriction edit form.
Save and Close the Hotel Restriction edit form to return to the Setup Restriction.
9)You can continue working on your Setup Restriction, but it's a good idea to Save your record after linking Hotels and Rooms. |
10.Notes: Enter any other important information about the Restriction under the Notes tab.
11.When you have entered all the information you need for this Restriction, click Save and Close.
12.Continue adding as many Setup Restrictions as you require.
Remember, once your Venues and Hotel are set up, you can return to this area to apply restrictions later, or you can apply the Restrictions directly from the Venue or Hotel record. For Venues, see Venue Information > Venue Restrictions.