1.Import Options:
a.Import Attendees From: You have selected File.
b.Import File: Click the ellipsis in the Import File field.
The Open window appears. Navigate to the folder that contains the import file you want to use.
Select the file and click Open.
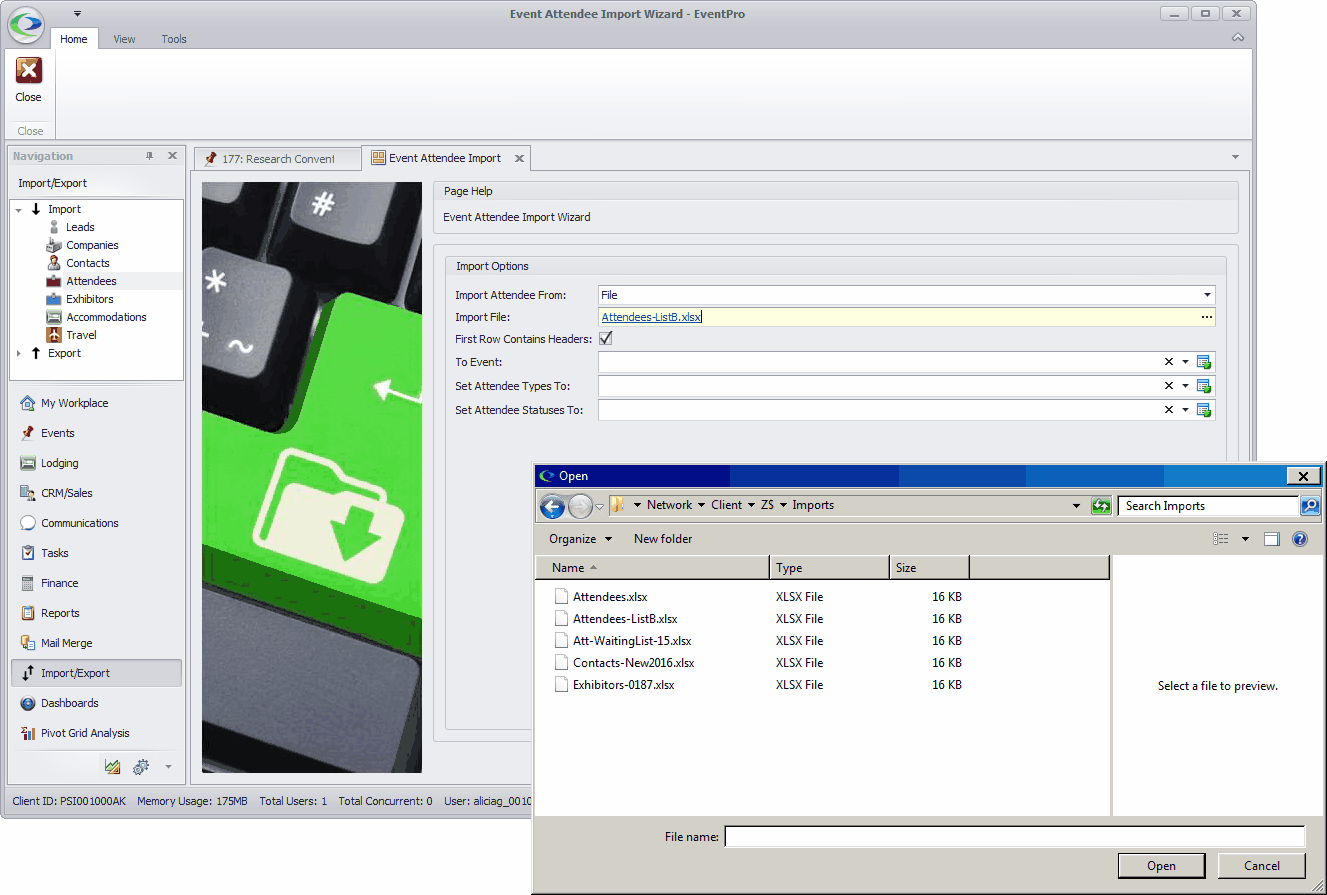
c.First Row Contains Headers: If the import file contains headers (i.e. Column Titles) in the first row, select this checkbox.
If the first row of the file starts directly with attendee data, leave the First Row Contains Headers checkbox unselected.
d.To Event: From the drop-down, select the Event into which you are importing Attendees.
e.Set Attendee Types To: From the drop-down, choose the default Attendee Type to which all the imported Attendees will be set initially. You will be able to edit individual Attendees later.
The drop-down is populated by the Attendee Types from Edit Event of the selected "To" Event. (Review Event Management > Edit Event Window > Attendee Setup > Attendee Types.) If you don't have any Attendee Types set up in the Event, this drop-down will be blank.
f.Set Attendee Statuses To: From the drop-down, choose the default Attendee Status to which all the imported Attendees will be set initially. You will be able to edit individual Attendees later.
The drop-down is populated by the Statuses created under EventPro Setup > Attendees > Attendee Statuses.
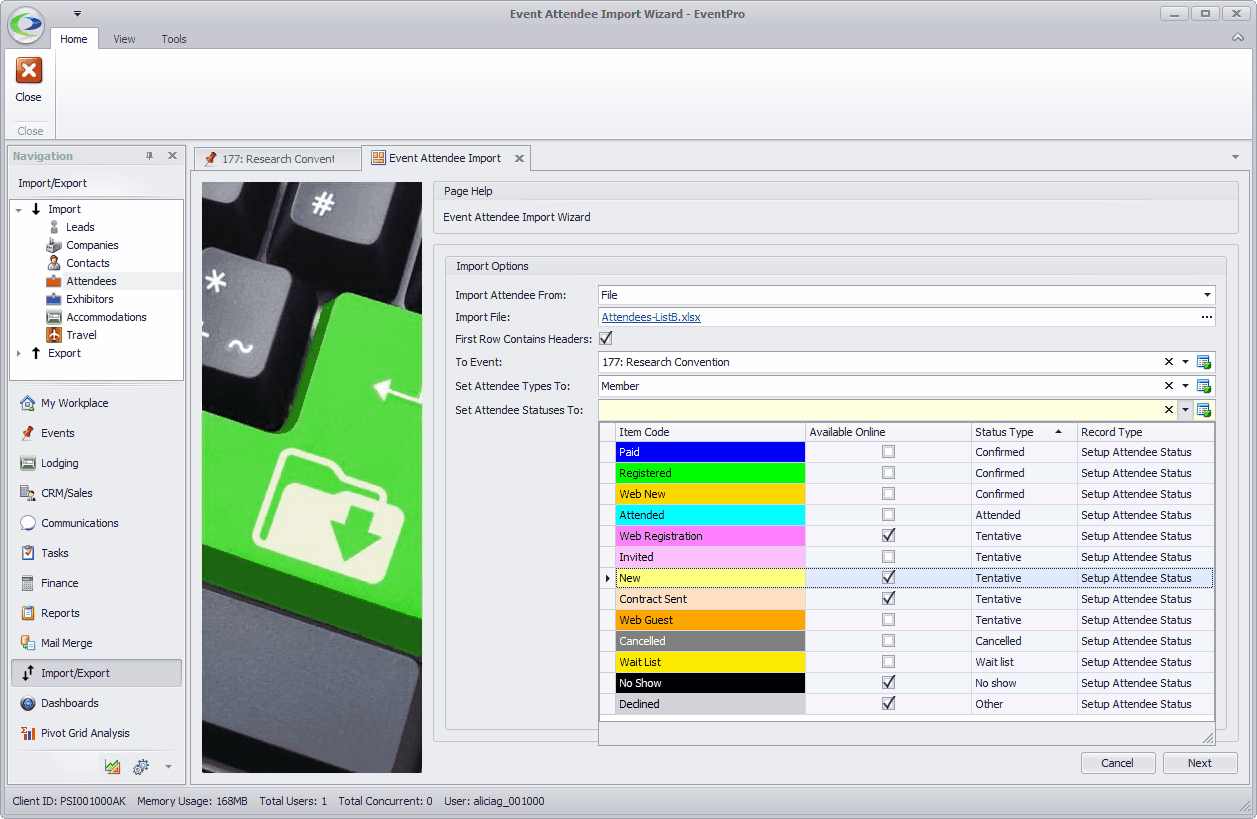
g.When you are done adjusting import options, click Next.
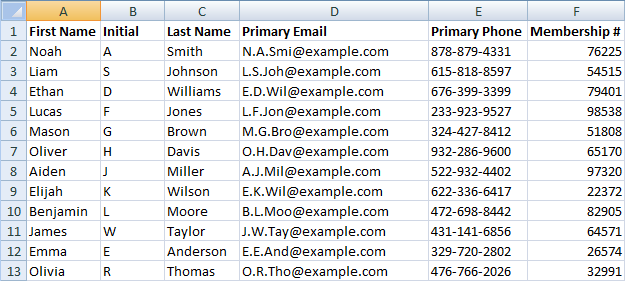
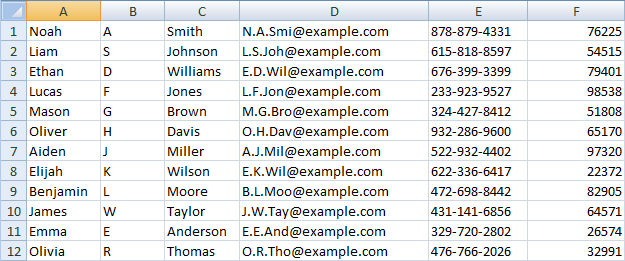
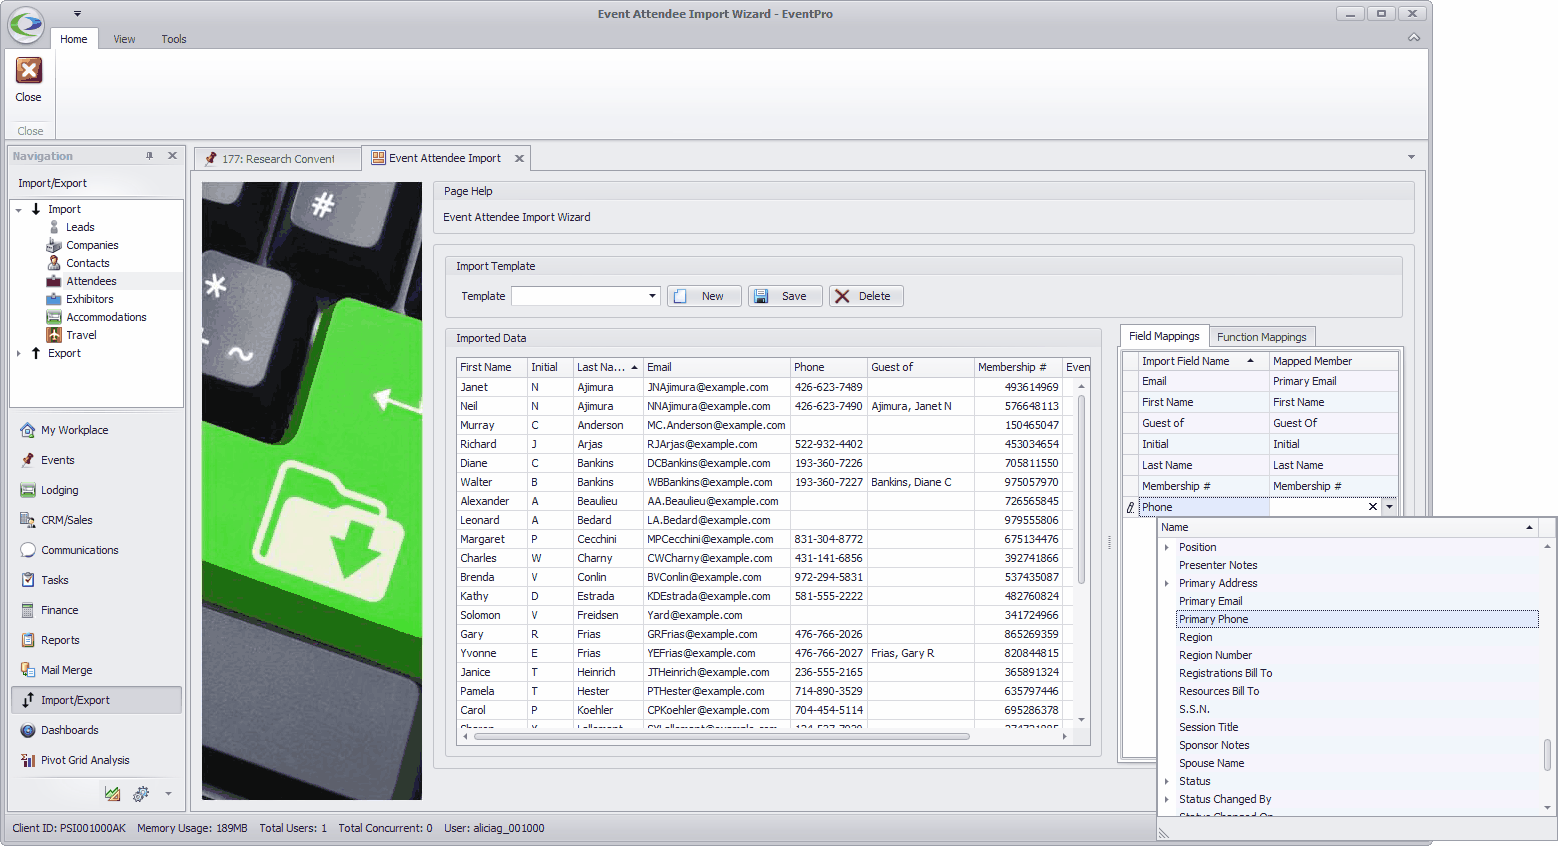
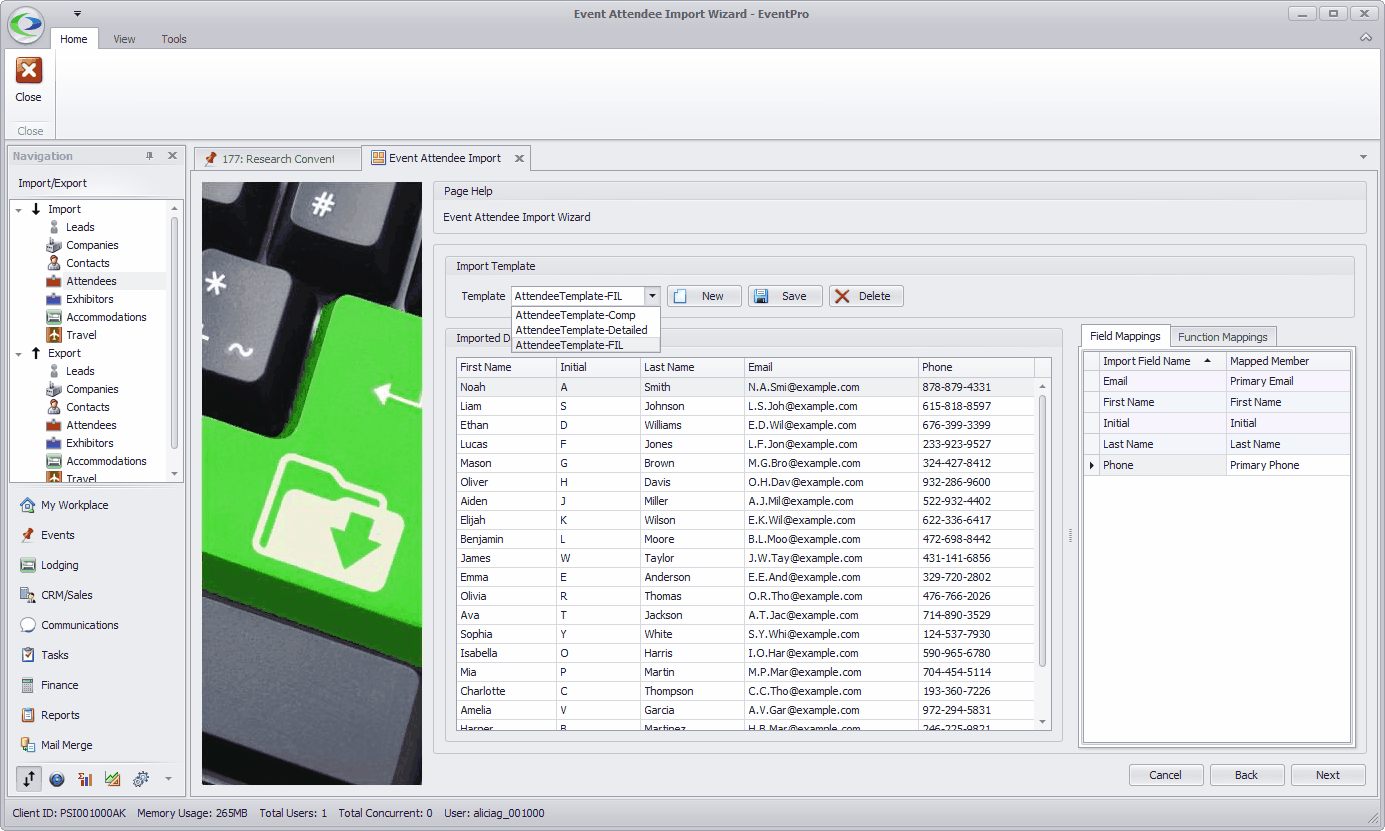
2.Import Template & Imported Data: On this page, the Attendee information from the import file will appear in the main selection grid, Imported Data.
If the first row of the import file contained headers, those headers will appear at the top of the columns in the Imported Data grid.
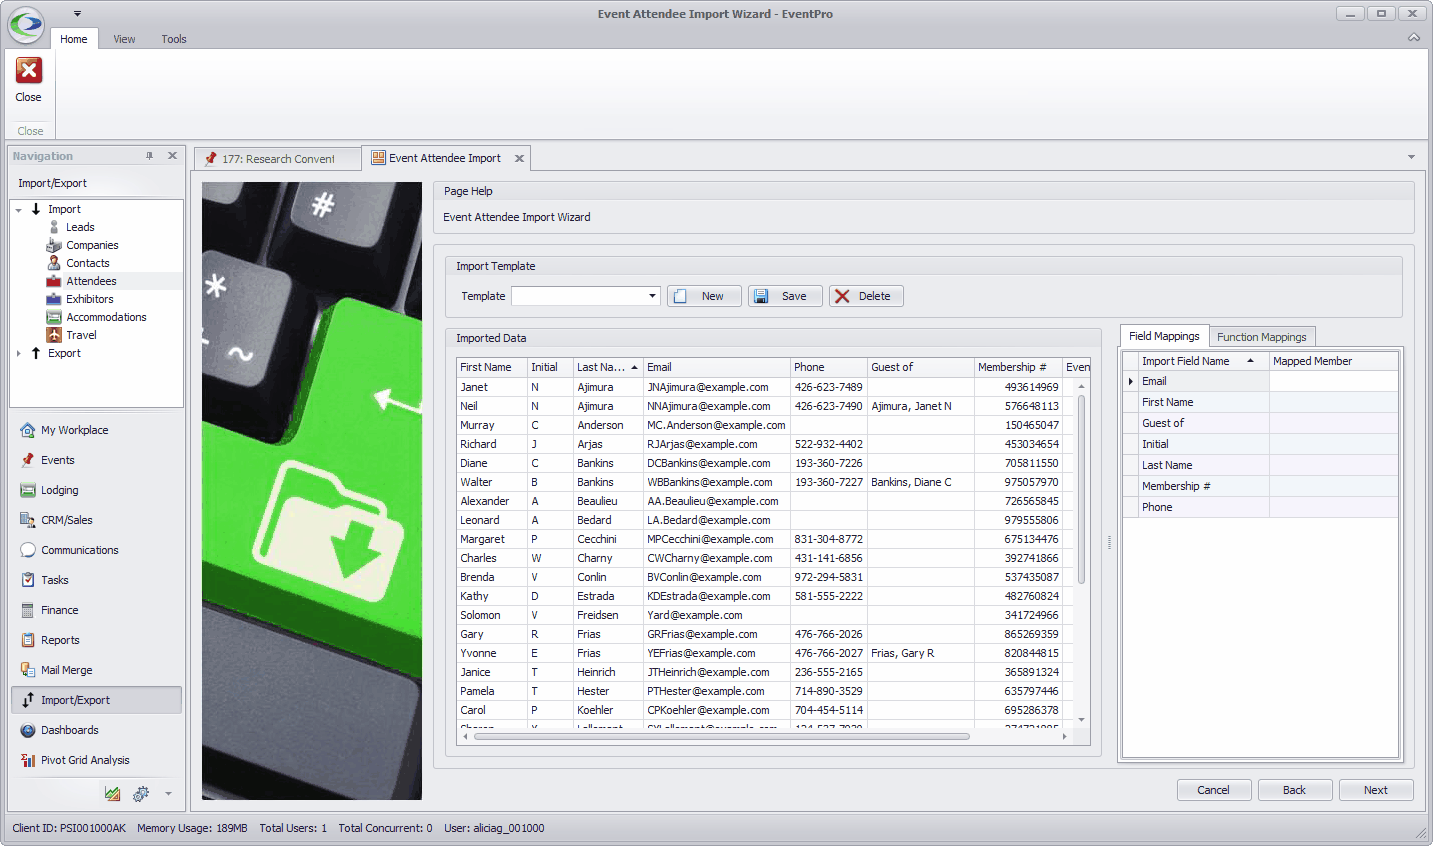
If the import file did not have first-row headers, the columns will be titled Column 1, Column 2, etc.
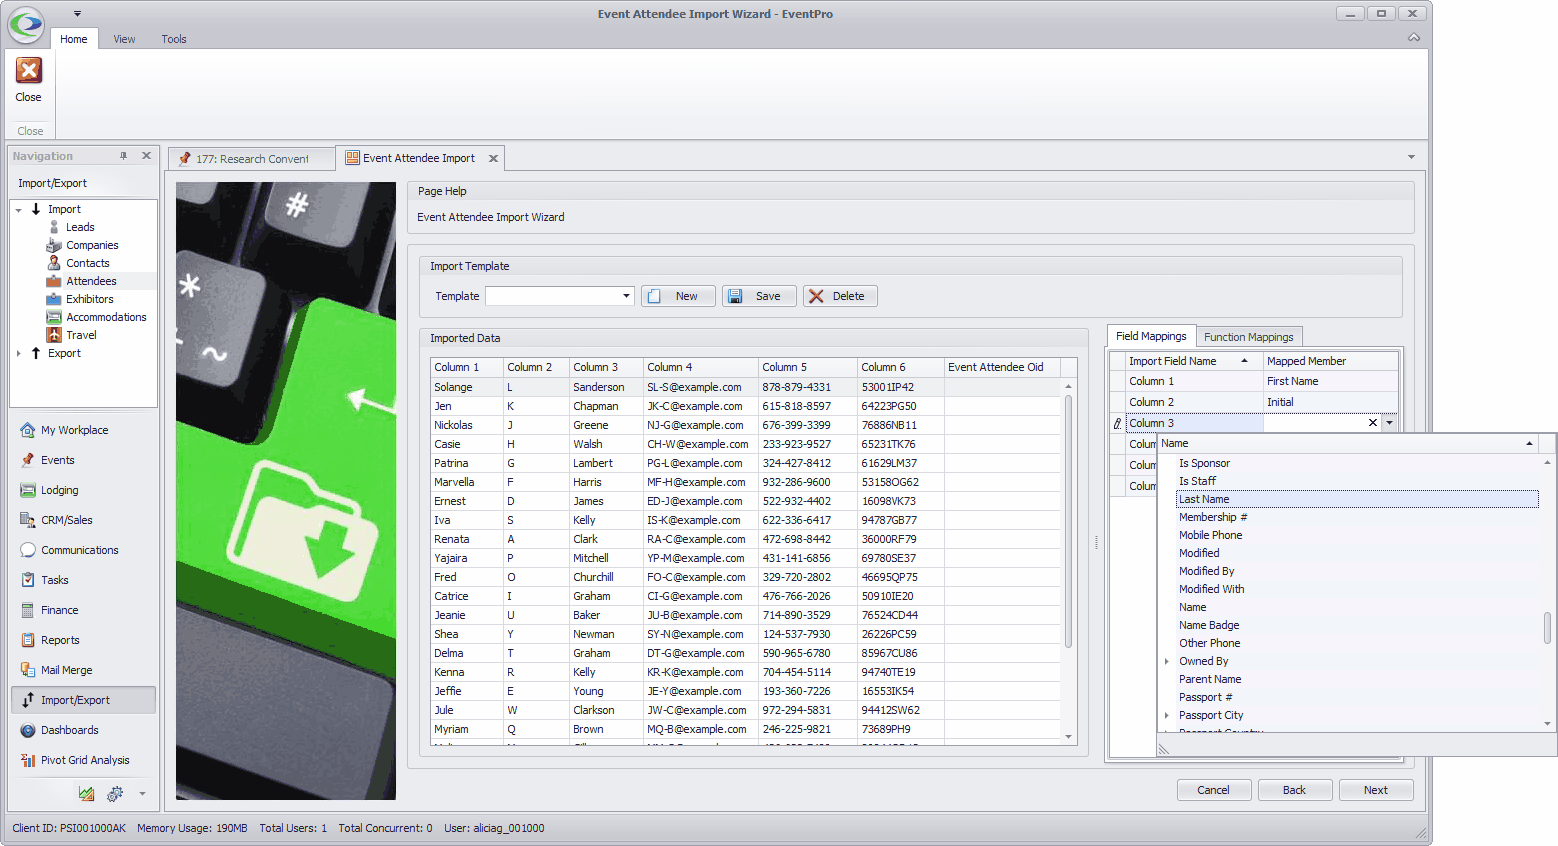
a.To the right of the Imported Data grid, there is a Field Mappings tab, where you will assign the columns of data to fields in EventPro.
The headers from Imported Data appear under Import Field Name - either the first-row header names from the import file, or Column 1, Column 2, etc.
For each Import Field you want imported, click the drop-down arrow to scroll through the available Mapped Member fields, and select the EventPro field into which that imported data should go.
b.If you have imported Attendee data before, you may already have an Import Template in which Import Fields are mapped to EventPro Fields.
If so, you can select a Template from the drop-down, and the fields will be mapped as specified in the saved template.
If you make any changes under the Field Mappings tab, and you want to save those edits to the selected template, click Save next to the Template field.
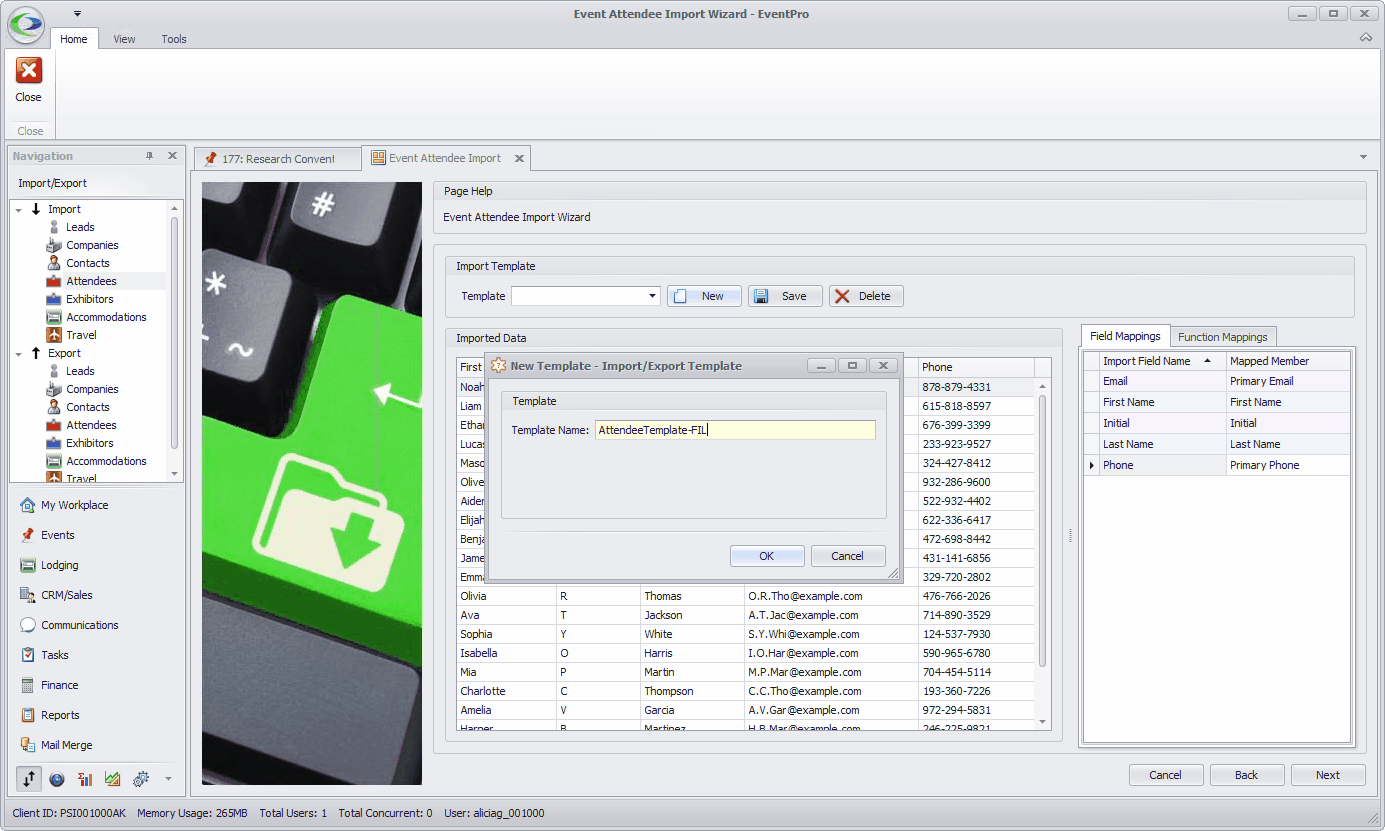
c.If you plan to import Attendees again in the same format, you may want to create an Import Template.
Click New. In the New Template edit form, enter a Template Name, and click OK. The new template name will appear in the Template field.
Map the fields to your specifications, and click Save. Now, your Import Template is saved in the drop-down list for future use.
d.If you want to delete one of the Import Templates, select it in the Template drop-down, and click Delete.
e.When you are done mapping the fields to your specifications, click Next.
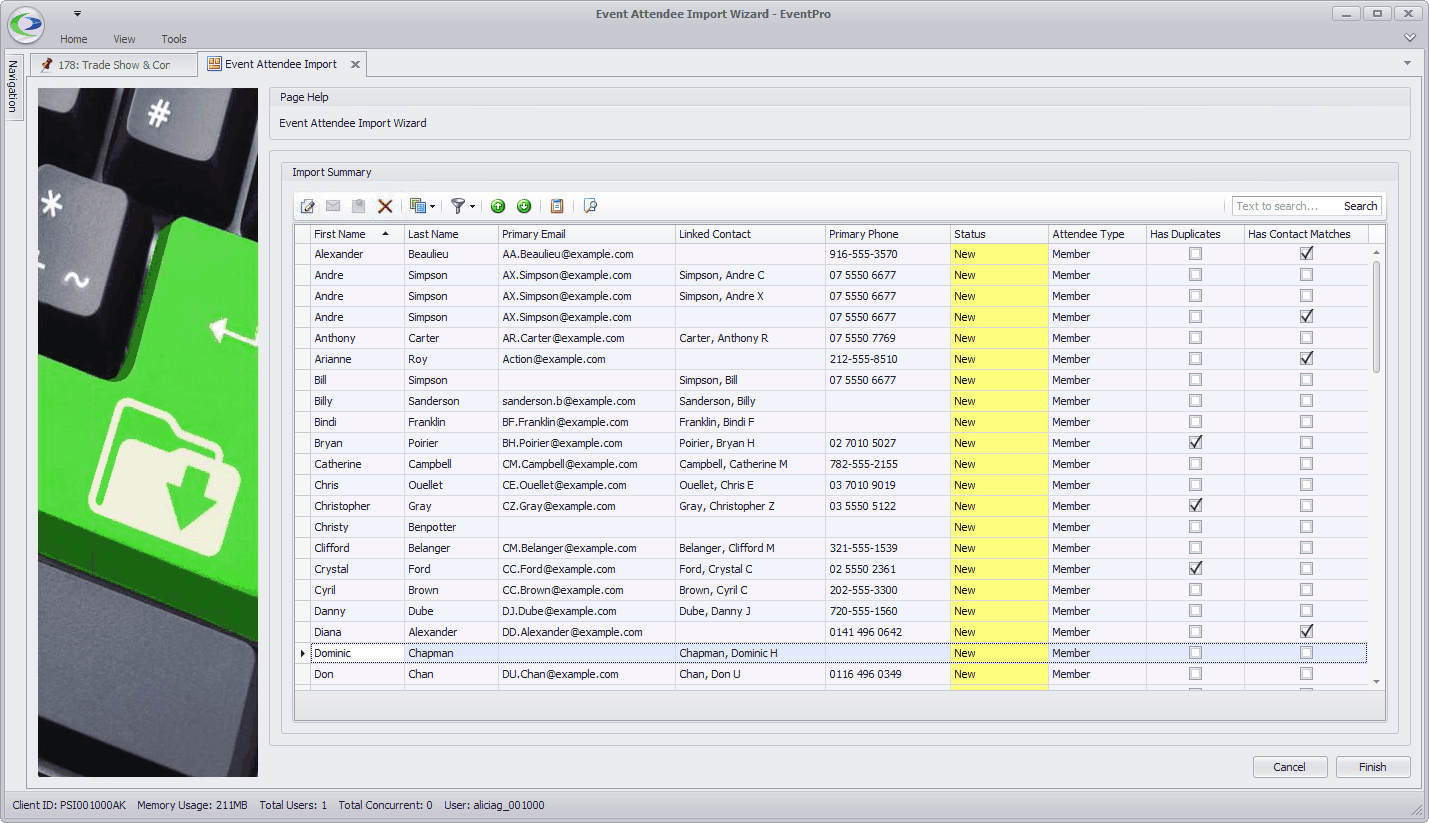
3.Import Summary: This page displays the Attendees that are about to be imported into the Event.
You can review the information, and make changes before completing the import. If necessary, you can edit individual Attendees, multi-edit several Attendees at once, and remove Attendees you don't want to import.
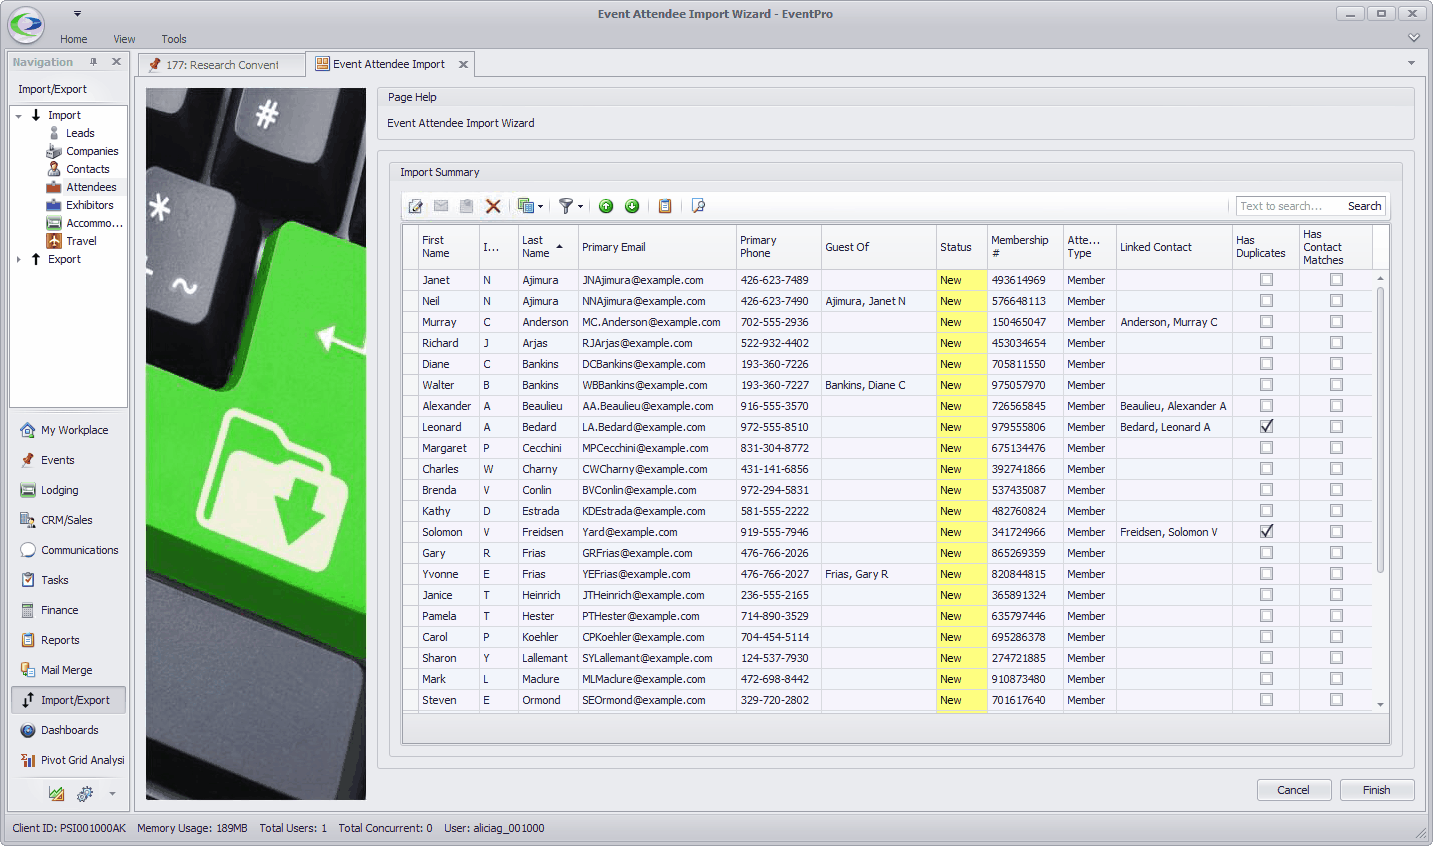
a.Has Duplicates: The Has Duplicates column will be selected for an imported Attendee if there are possible duplicate Attendees already in the Event. You can edit the imported Attendee and determine whether or not to use one of the existing duplicate Attendees.
b.Linked Contact: If an imported Attendee matches with an existing CRM Contact in EventPro - based on First Name and Last Name, plus one of Primary Email, Primary Phone, S.S.N., Membership #, or Passport # - it will automatically be assigned to the Attendee as the Linked Contact.
The automatic linking occurs whether or not the Event has the "Require Linked Contact" setting turned on (review the "Require Linked Contact" setting in Event Attendee Setup). If the Event does not require Linked Contacts, you can remove the Linked Contact from the Attendee if you want, although Attendees can still have Linked Contacts even if not required. If the Event does require Linked Contacts, you can remove the automatically selected Linked Contact, but you will need to select or create a different Linked Contact for the Attendee before you can complete the import.
If the "Require Linked Contact" setting is turned on for the Event, and no matching Contacts are found for an imported Attendee, the import process will create a new CRM Contact and assign it as the Attendee's Linked Contact.
c.Has Contact Matches: If there is more than one potential CRM Contact match for an Attendee, based on the fields mentioned above, none of them will be automatically assigned as the Attendee's Linked Contact. The "Has Contact Matches" checkbox will be flagged, and the Linked Contact field will remain blank, since each Attendee can only be linked to one Contact.
If the Event requires Linked Contacts (the "Require Linked Contact" setting is on), you will need to edit the imported Attendee, and manually select the correct Linked Contact. You will not be able to complete the import until the Contact Match issue is resolved.
If you attempt to finish the import without assigning a Linked Contact to each Attendee (for an Event that requires Linked Contacts, remember), you will receive an error warning:

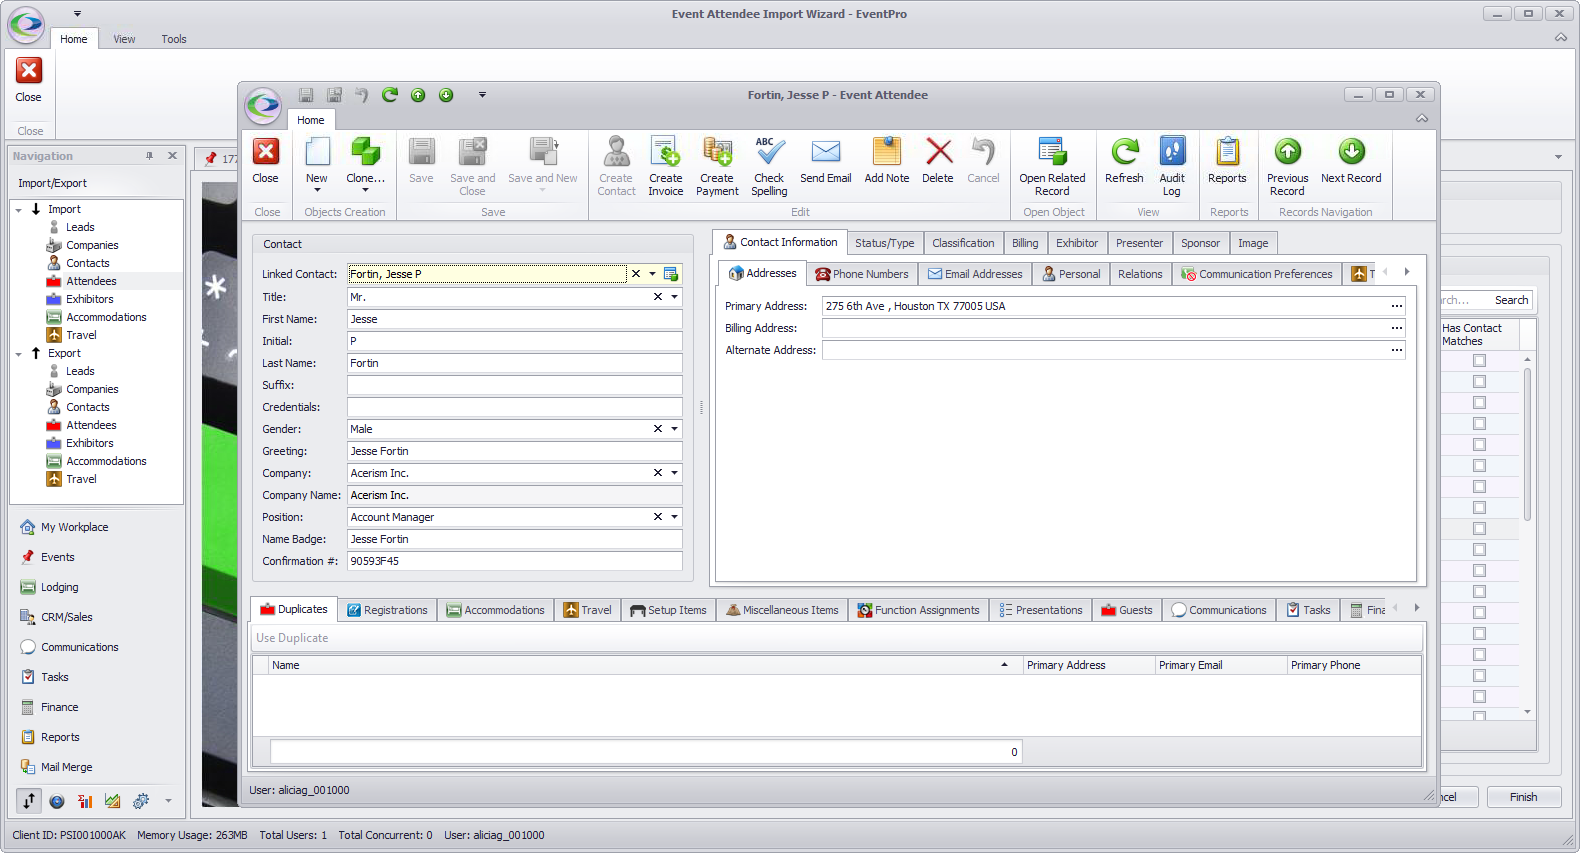
d.Edit: Double-click the Attendee record you want to edit.
Make any changes you require in the Event Attendee edit form, and click Save and Close to return to the Import Summary.
This edit form is very similar to the Event Attendee edit form covered under Add Attendee to Event, above. In particular, if you need to deal with Duplicates, Contact Matches and/or Linked Contacts, you may want to review the following topics: Contact (incl. Linked or Create), Duplicates, and Contact Matches.
e.Multi-Edit: Hold down the Ctrl key, select the Attendees you want to edit, and click the Multi-Edit button  .
.
The Event Attendee multi-edit form appears. Make the edits you require, and click OK to return to the Import Summary.
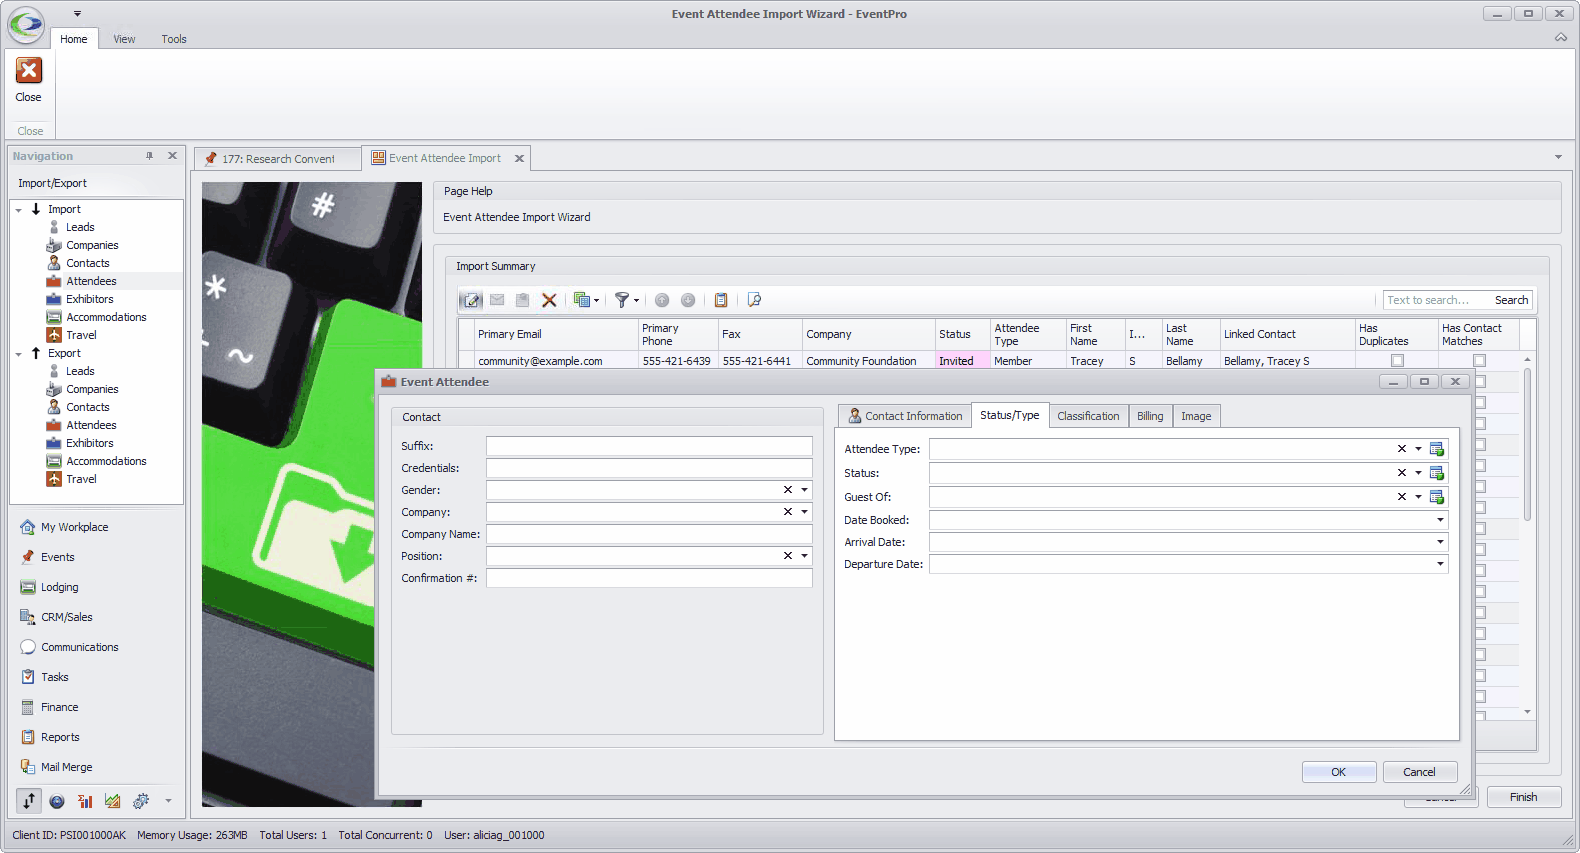
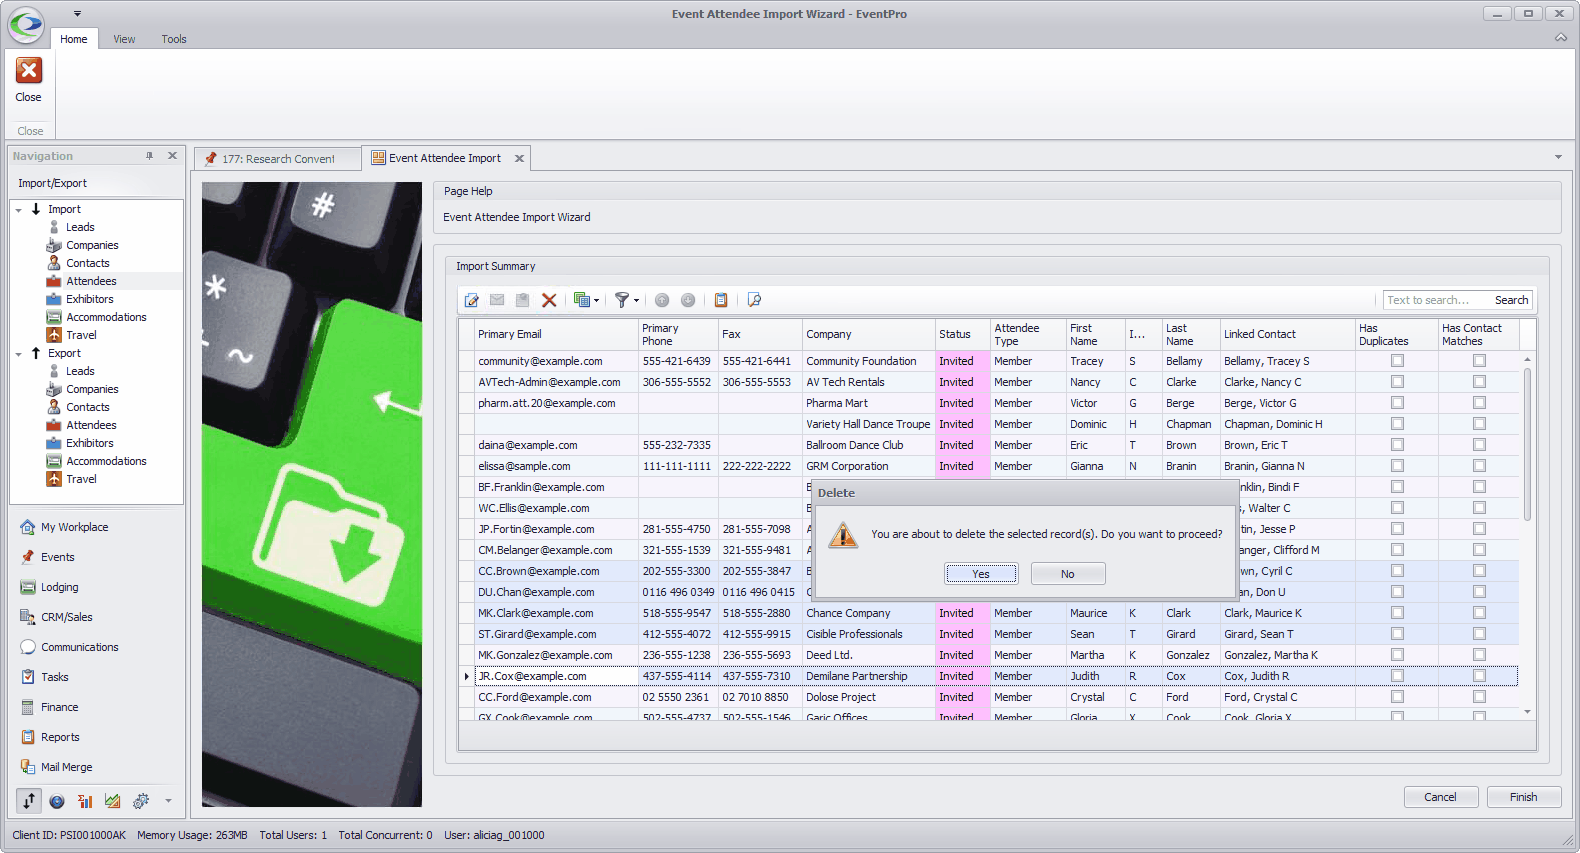
f.Delete: Select an Attendee or multi-select the Attendees you want to delete. Click the Delete button above  .
.
The Delete dialog asks if you want to proceed with deleting the selected record(s). Click Yes to continue.
4.When you are done making adjustments in the Import Summary page, click Finish.
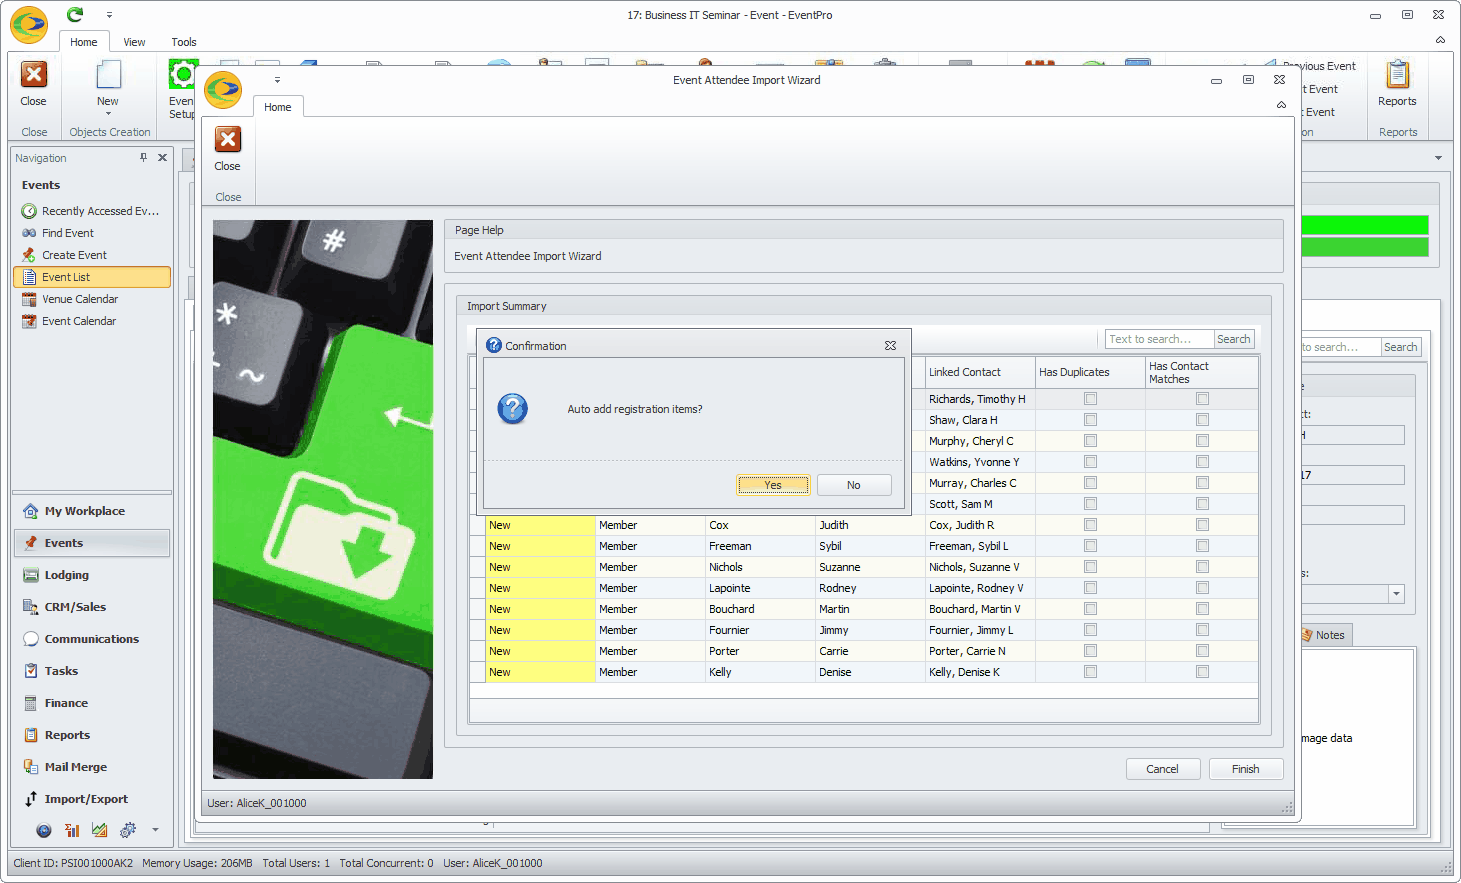
5.If you have Auto-Add Attendee Registrations set up for the event (review Event Management > Edit Event Window > Attendee Registrations), the Confirmation dialog will ask if you want to Auto Add Registration Items.
Click Yes or No. The import will proceed whether you click Yes or No, but if you click Yes, the Auto-Add Registrations (if they exist) will be added to any applicable Attendees (depending on Attendee Type).
6.The imported Attendees will appear in the Attendees tab of the selected "To" Event.
If you don't see the newly imported Attendees in the grid immediately, click the Refresh  button to refresh the screen.