This Page Definition controls the Summary page of the "Adding Exhibitor" and "Editing Exhibitor" online registration wizard.
In this topic:
Page Overview
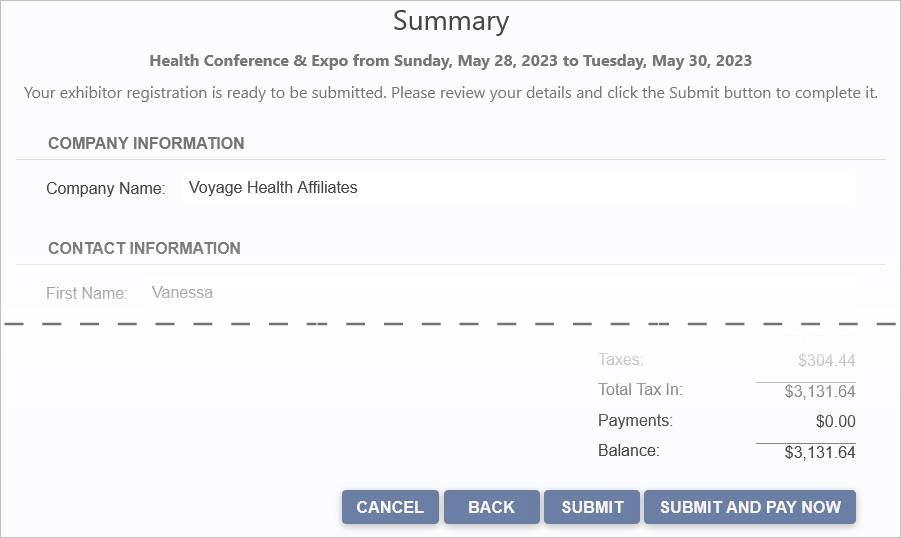
The Summary page lists all of the information entered on previous wizard pages, divided under headings, e.g. Company Information, Registration Details, Booths, Requirements, etc.
Under each heading, there is a grid displaying the corresponding information. The grids are hard-coded, and do not need to be added or edited in the Page Definition.
If the exhibitor did not enter any information on a page, the corresponding section will not appear in the summary.

Figure 887: Viewing a Sample Exhibitor Summary Page
If the exhibitor needs to change anything, they can use the "Back" button to return to previous pages and correct the information.
The hard-coded page header will be "Adding Exhibitor" or "Editing Exhibitor", depending on whether the Exhibitor is creating a new registration or editing an existing registration.
Page Definition & Settings

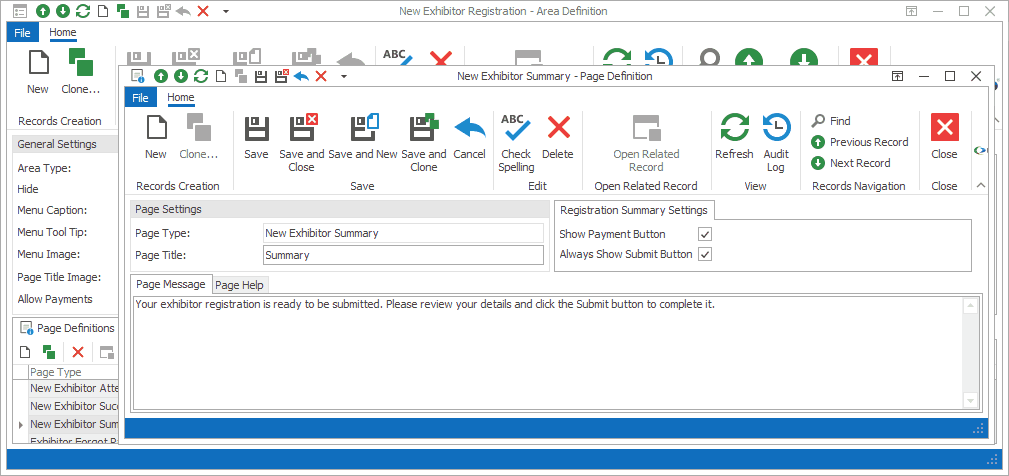
Figure 888: Exhibitor Summary Page Definition
Page Settings
Page Type
Once selected, the Page Type is fixed, and you will not be able to change it.
The default settings and fields for the Page Type will already be pulled into the edit form.
Page Title
A Page Title will default in, but you can also type in a title of your choice.
On your EPConnect website, the Page Title appears just below the main menu. (The Page Title Image that appears next to the Page Title online would have been defined for the Area Definition containing this Page Definition.)
Registration Summary Settings
Show Payment Button
Select this Show Payment Button checkbox if you want to see the "Submit and Pay Now" button on this page.
If you do not select this checkbox, the page will display the "Submit" button (along with the "Cancel" and "Back" buttons).
Always Show Submit Button
This setting is only relevant if you selected the Show Payment Button checkbox above.
If you select this Always Show Submit Button, the page will display both the "Submit" and "Submit and Pay Now" buttons.
If you do not select this checkbox, the page will only display the "Submit and Pay Now" button (along with the "Cancel" and "Back" buttons).
Page Message
A default message will appear in this Page Message tab, but you can type in any message you want to use.
On your EPConnect website, the Page Message will appear under the Page Title.
Page Help
If you want to add instructions to a page to assist the online user, enter the text under this Page Help tab.
If you define Page Help text here, the Help icon will appear in the corresponding EPConnect web page. When a viewer clicks the Help icon, it displays the Page Help text in a pop-up.
Ensure that you Save this page definition, as well as the area definition containing it.
Next topic: New Exhibitor Success