This topic demonstrates a sample New Exhibitor Registration process as viewed by a user in an internet browser.
A typical registration process will work through the pages described below, although not every Exhibitor will necessarily visit all pages in every situation.
•Start New Registration (From Home Page)
•Booths - Booth Details - Booth Requirements
•Success (Registration Completed)
The screenshots below provide examples of what the web pages could look like, but remember that your pages will look different for several reasons:
•You customized the logo, icons, color scheme, and other components.
•You selected different options (e.g. showing/hiding components, changing caption/message text, etc.) for the New Exhibitor Registration Area Definition and the Page Definitions within.
•Your web pages will display the registration groups, booths, requirements, etc. from your EventPro data.
Start New Registration (From Home Page)
On your EPConnect home page, the Exhibitor selects New Exhibitor Registration from the Exhibitors Menu.
(Note that a new Exhibitor will not start the registration wizard at this point if you send them an EPConnect New Exhibitor Link.)
The Exhibitors caption and image are defined in the Exhibitors Area Definition, and the New Exhibitor Registration caption and image are defined in the General Settings in the New Exhibitor Registration Area Definition.
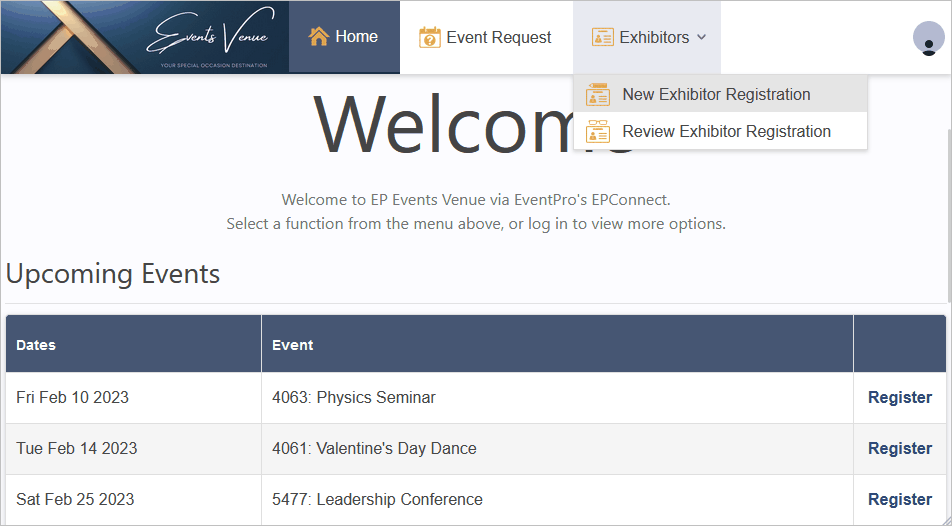
Figure 797: Start a New Exhibitor Registration
Select Event
On the Select Event page, the Exhibitor enters the relevant Booking # and Password, and clicks Continue.
They will proceed to the Welcome page of the Adding Exhibitor wizard.
Again, note that a new Exhibitor will not start the registration wizard at this point if you send them an EPConnect New Exhibitor Link.
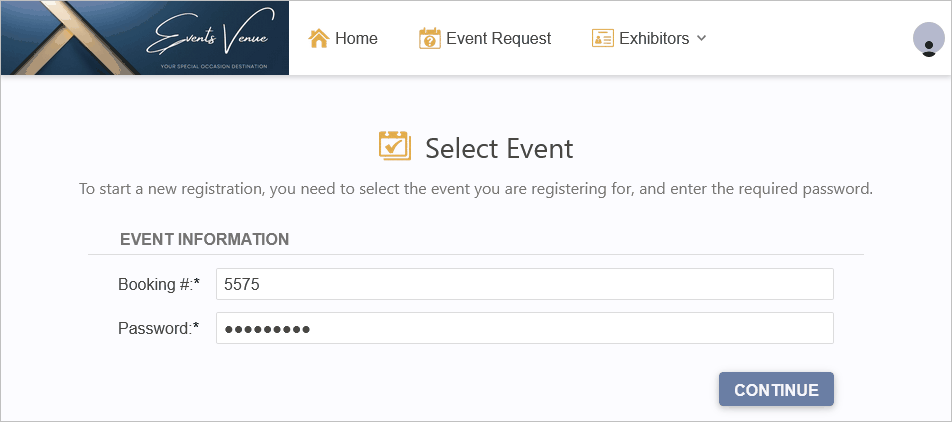
Figure 798: Select the Event to Register For
Welcome (Adding Exhibitor Wizard)
Page Definition: New Exhibitor Welcome
This is where a new Exhibitor will begin the registration process if you provided an EPConnect New Exhibitor Link.
The Exhibitor clicks Next to begin the online registration wizard, which takes them to the Exhibitor Type page.
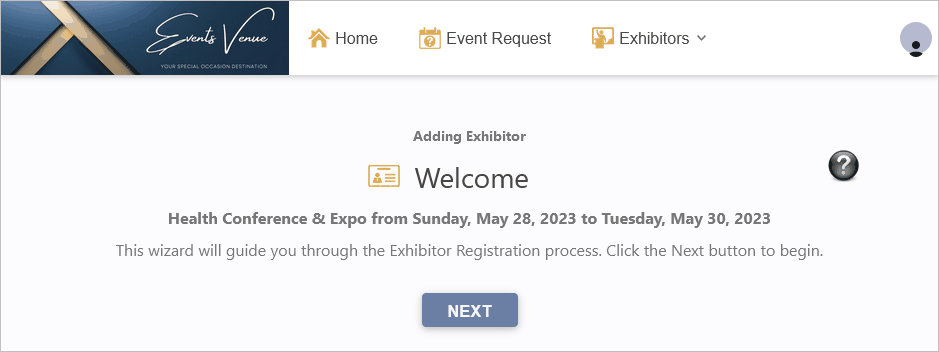
Figure 799: Begin the Adding Exhibitor Wizard
Exhibitor Type
Page Definition: New Exhibitor Type
The Exhibitor selects the relevant Exhibitor Type from the drop-down list and clicks Next.
The Exhibitor Type will have a default selection, depending on the event's Online Registration Settings, and whether the new Exhibitor was provided with an EPConnect New Exhibitor Link.
Selecting an Exhibitor Type is an important step of the registration process, since the Exhibitor Type can be used to determine prices and availability of Registrations and Booths.
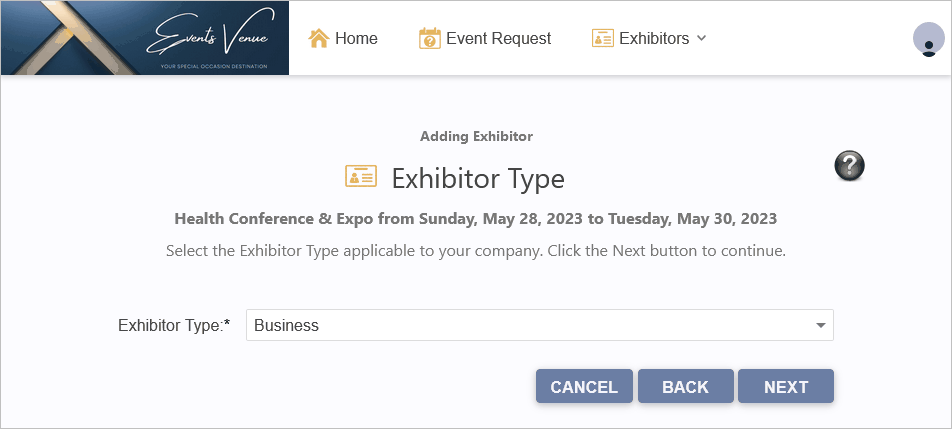
Figure 800: Select an Exhibitor Type
Exhibitor Sign In
All Exhibitors in EventPro require a CRM Account record. If you look at an Event Exhibitor's record in EventPro, you will see that they always have a linked CRM Account.
If an Exhibitor does not have a CRM account, they can create one through the Exhibitor Portal while registering as an Exhibitor.
These Exhibitor logins only work for the Exhibitor Portal. This process does not create a security user account or an EPConnect login account.
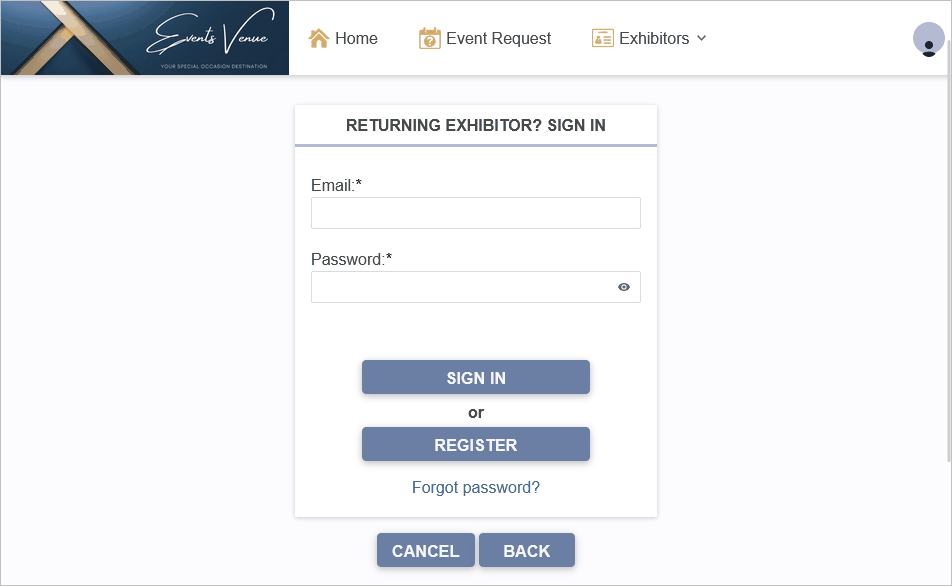
Figure 801: Sign into EPConnect Registration Account
New Exhibitor
If an Exhibitor is registering for the first time, and they do not have a CRM account yet, they need to click the Register button.
The Register button takes them to the Account Information page, where they need to enter their new account information.
Returning Exhibitor
If the Exhibitor already has a CRM Account and login credentials for the Exhibitor Portal, they can enter their Email and Password, and log in with the Sign In button.
The Sign In button takes the Exhibitor to the Account Information page, where they can review and edit their information, if necessary.
If the Exhibitor has forgotten their password, they can click the Forgot Password link, which takes the Exhibitor to the Forgot Password page.
Forgot Password
If the Exhibitor clicks the Forgot Password link, they will arrive at this page.
Page Definition: Exhibitor Forgot Password
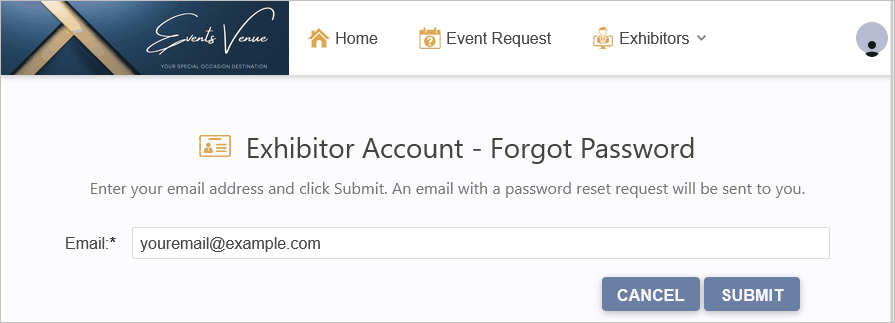
Figure 802: Submit Email in Forgot Password Page
After submitting their email address, the Exhibitor arrives at the Password Reset Request Sent page.
Page Definition: Exhibitor Reset Password Sent

Figure 803: View Password Reset Request Sent Page
The Exhibitor receives a notification email with a reset password link.
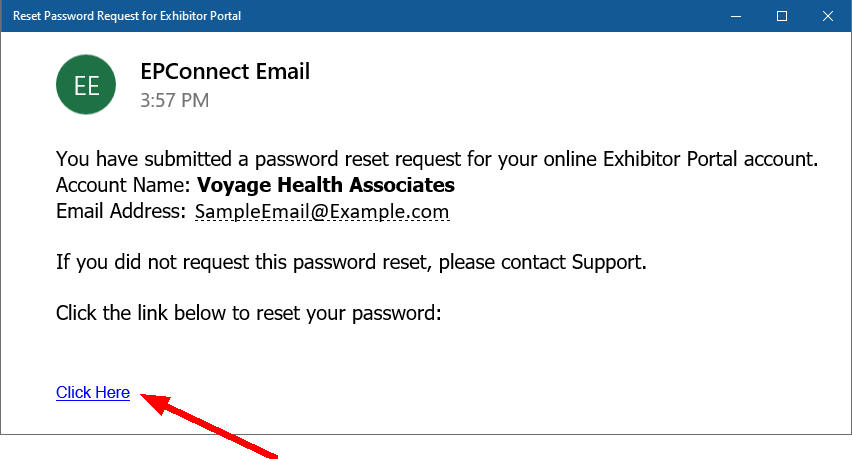
Figure 804: Receiving Email with Reset Password Link
Upon clicking the link, the Exhibitor is taken to the Reset Password page.
Page Definition: Exhibitor Reset Password
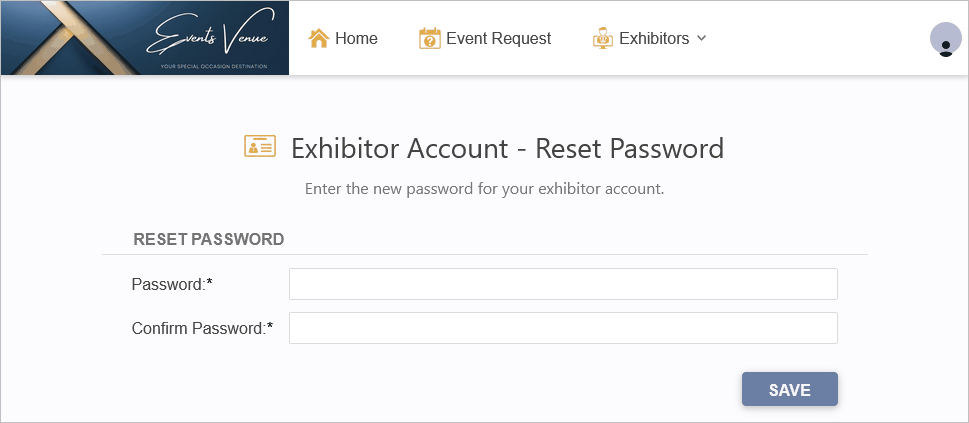
Figure 805: Reset and Confirm Password
After resetting their password, the Exhibitor is taken to the Account Information page.
Account Information
Page Definition: New Exhibitor Account Info
The Exhibitor will arrive at the Account Information page after clicking the Sign In or Register button from the Sign In page, or if they had a link that bypassed login.
The Account Information page will be slightly different, depending on whether this is a New or Returning Exhibitor.
New Exhibitor
For a new Exhibitor, the Login Information section will be visible, and the fields on the page will initially be blank.
To create their Exhibitor Portal login/CRM Account, a new Exhibitor needs to fill in the required fields on this page.
This information will be used to create their EventPro CRM Account, which at the same time will be added as an Exhibitor to the relevant Event.
When done, the Exhibitor clicks Next to continue, and will go to the Registrations page.
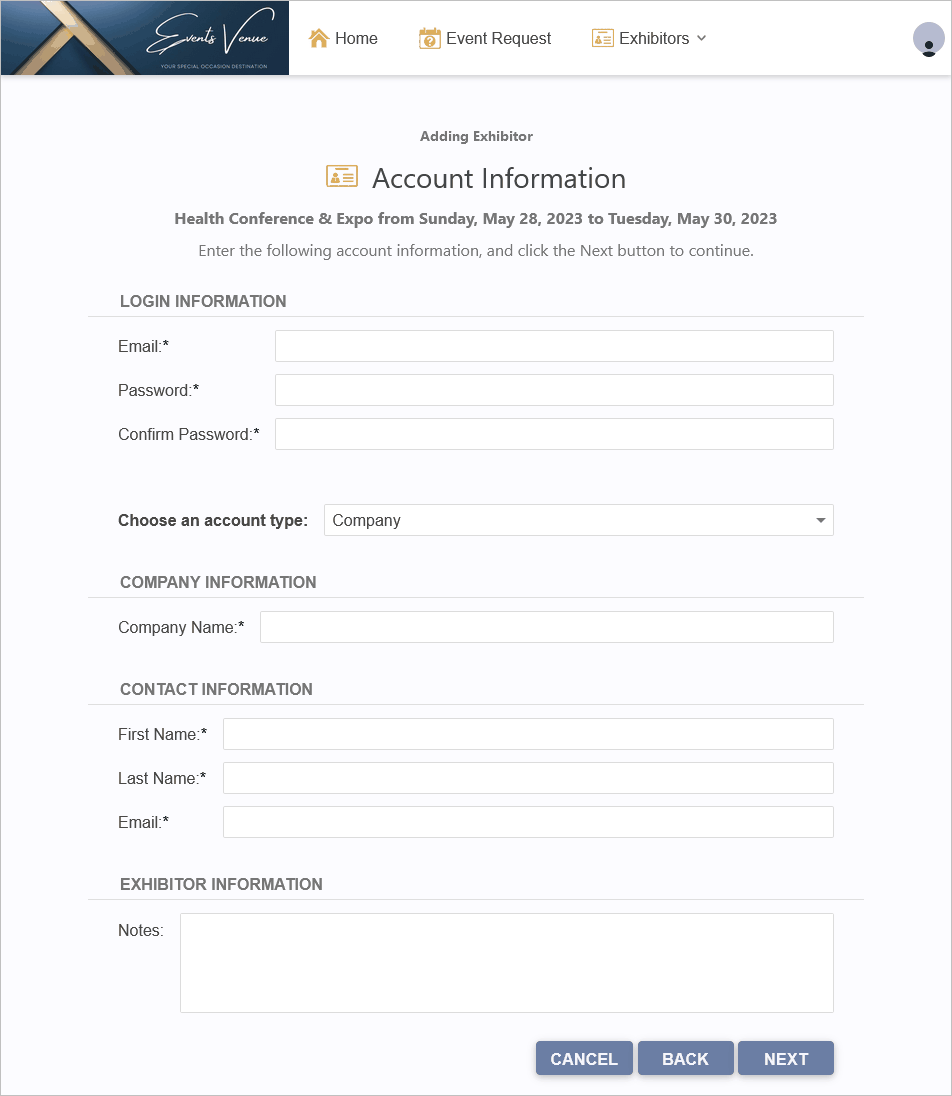
Figure 806: Add Account Information
Returning Exhibitor
A returning Exhibitor's information will already be filled in on this page, and they will not see the Login Information section.
The Exhibitor can edit their information, if required, and click Next to continue. They will be taken to the Registrations page.
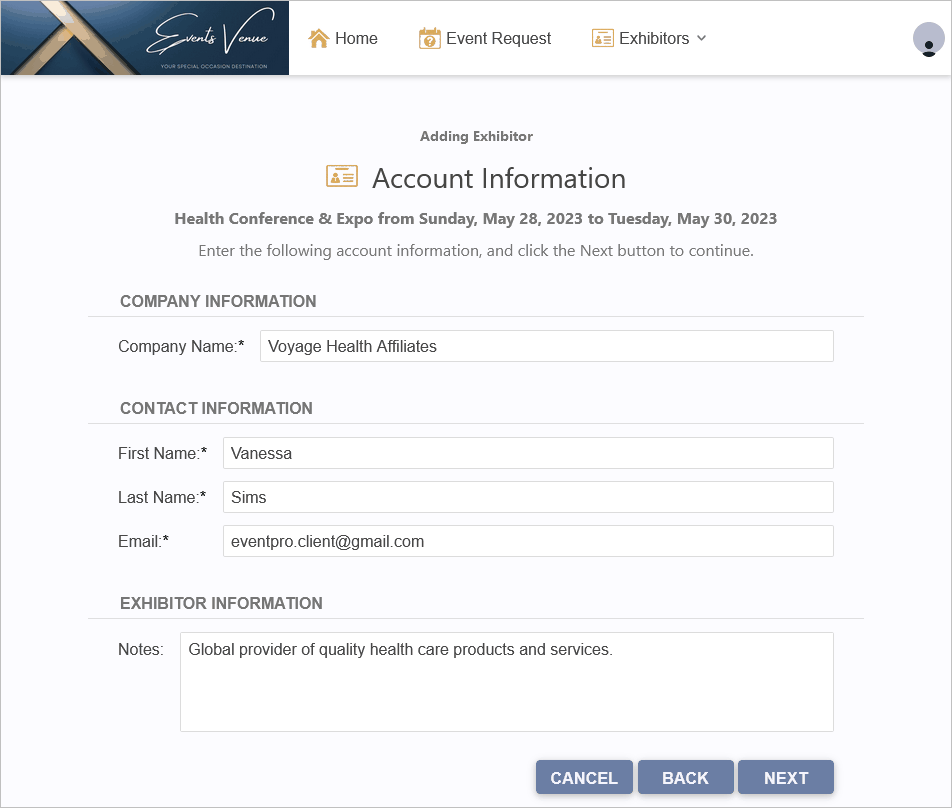
Figure 807: Edit Account Information
Registrations
Page Definition: New Exhibitor Registrations
The Exhibitor selects the checkboxes next to the Items they want to register for.
If the Quantity column is visible, the Exhibitor can enter quantities for each Item.
When the Exhibitor is done with this page, they click Next to proceed to the Booths page.
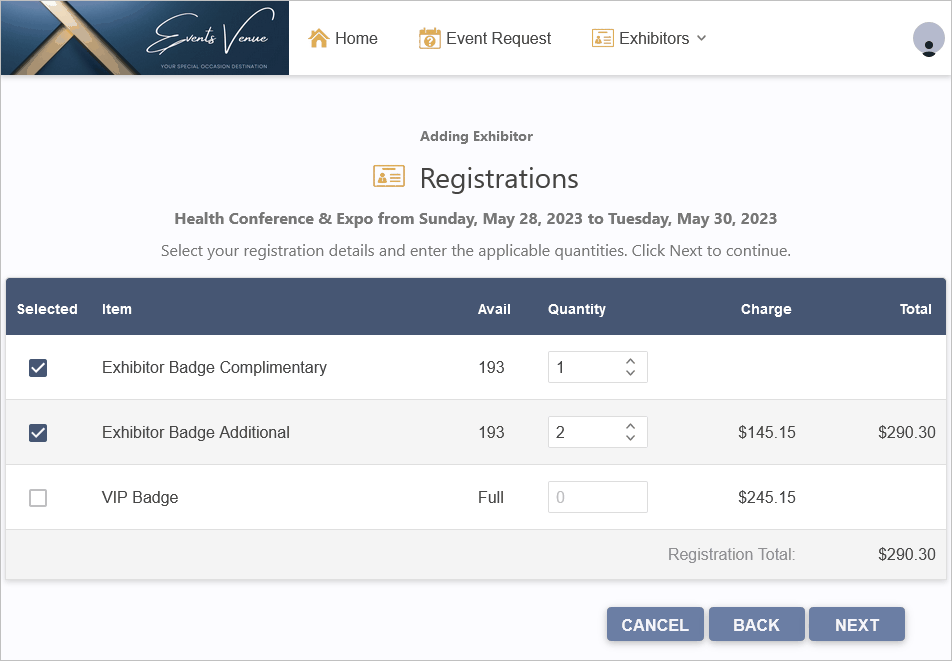
Figure 808: Select Registration Groups
If exhibitor registration is mandatory for an event, and the Exhibitor attempts to continue the wizard without choosing any registrations, they will receive a warning dialog.
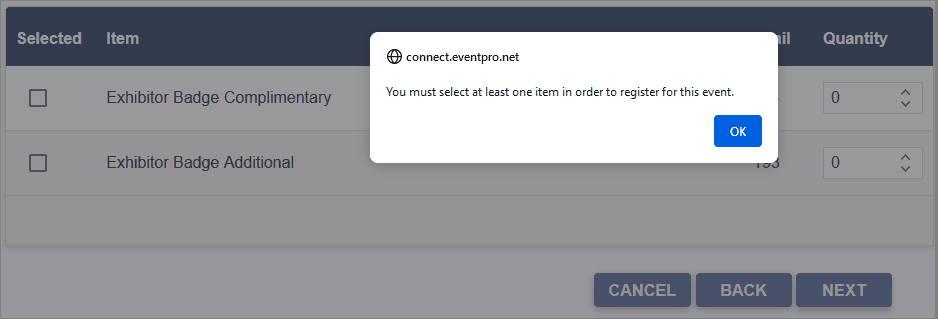
Figure 809: Mandatory Registration Message
Booths
Adding Booths is a multi-step process involving the Booths and Booth Details pages, as well as the Edit Resource window (if adding more Booth Resources).
•Booths Page Definition: New Exhibitor Booths
•Booth Details Page Definition: New Exhibitor Booth Details
This is a brief summary of the process:
1.Booths Page: Click "Add Booth", which takes you to the Booth Details page.
2.Booth Details Page: Select a Booth and enter details.
a.Optional - Edit Resource Window: Click "Add Requirements". Select item in Edit Resource window, and click "Submit" to return to Booth Details page.
b.Click "Submit" on the Booth Details page. You will return to the Booths page
3.Booths Page (returned): The selected booth appears in the Booths grid.
4.Repeat the process to add more booths.
Now let's look at the process in more detail:
Booths Page
The grid on the Booths page displays booths assigned to the Exhibitor.
•The grid will be empty if the Exhibitor has not yet selected or been assigned a booth
•If the Exhibitor is reviewing or editing a registration, there may already be a booth in the grid.
The Exhibitor clicks the Add Booth button, which takes the Exhibitor to the Booth Details page.
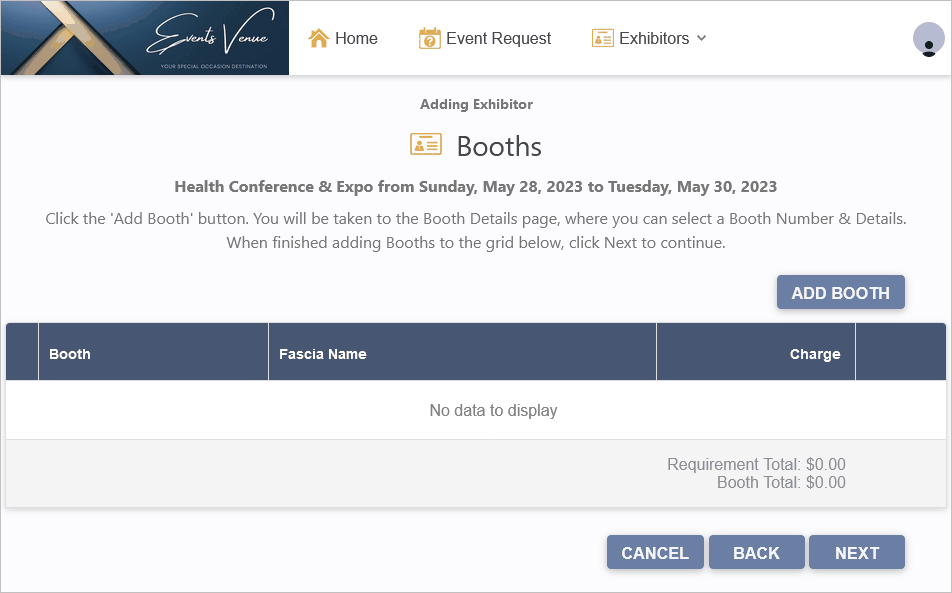
Figure 810: Add Booths
Booth Details Page
On the Booth Details page, the Exhibitor selects a Booth from the drop-down list.
The grid at the bottom of the page pulls in the Booth's assigned resource items, if any.
The Exhibitor can add more resource items to the booth by clicking the Add Requirements button, which opens the Resource Edit window.
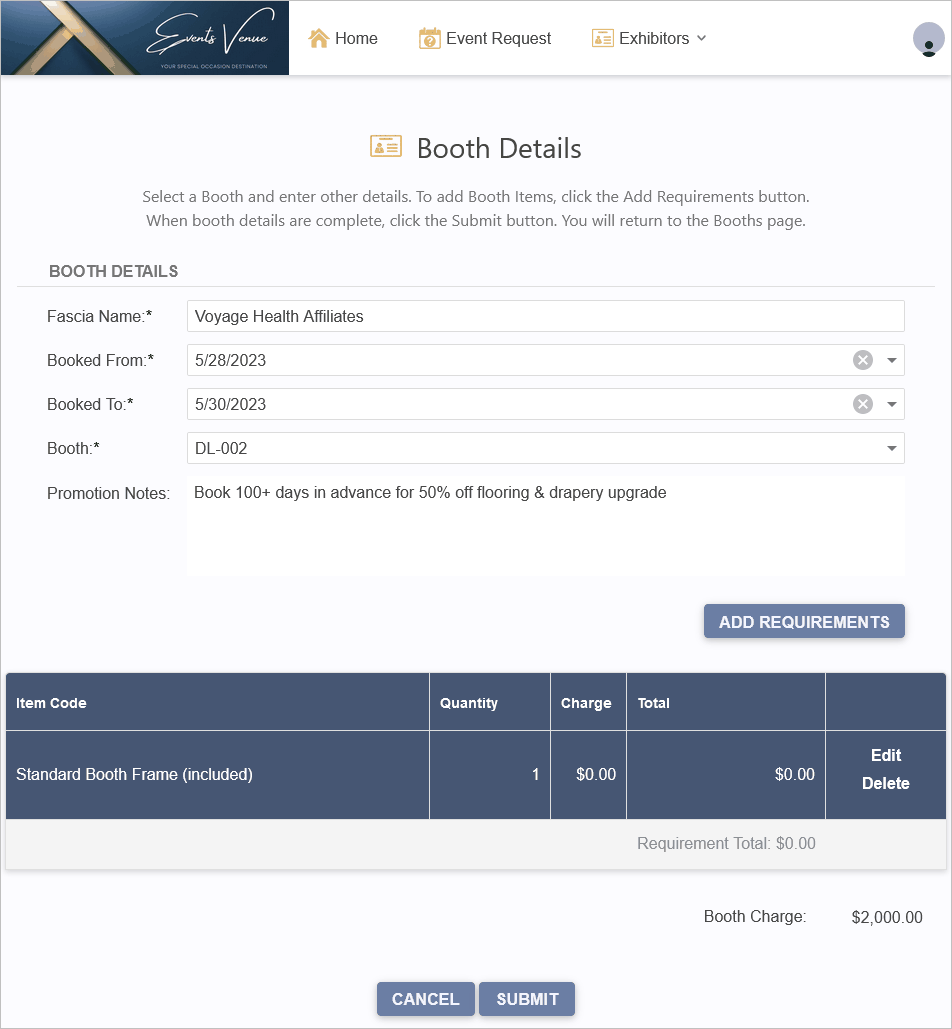
Figure 811: Select Booth
Resource Edit Window
In the Resource Edit window, the Exhibitor makes their resource selections, and clicks Submit, which returns them to the Booth Details page.
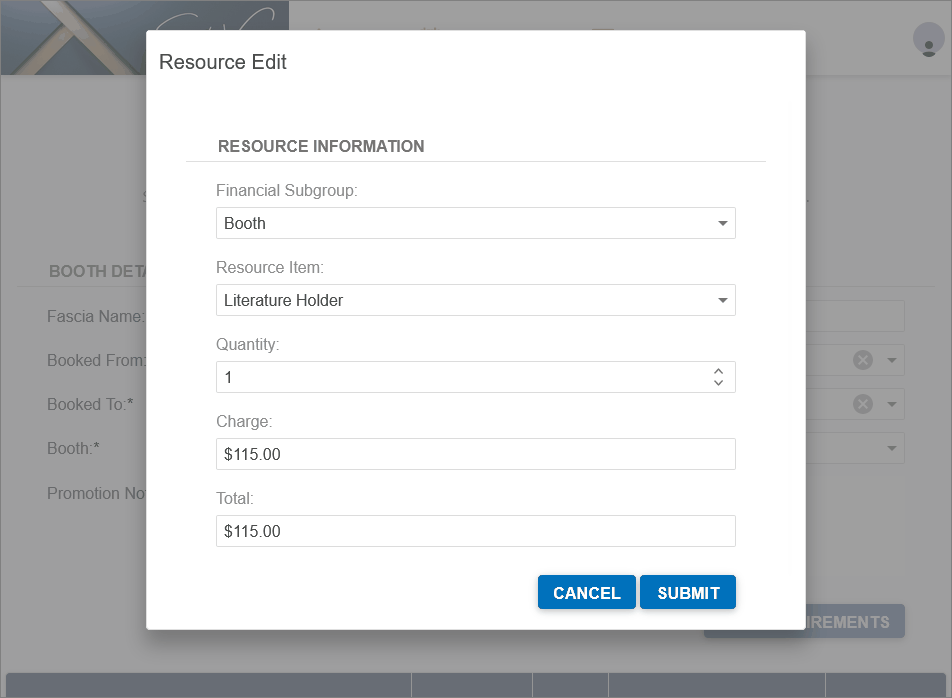
Figure 812: Add Setup Items to Booth
The selected Resource Item will be added to the grid of the Booth Details page.
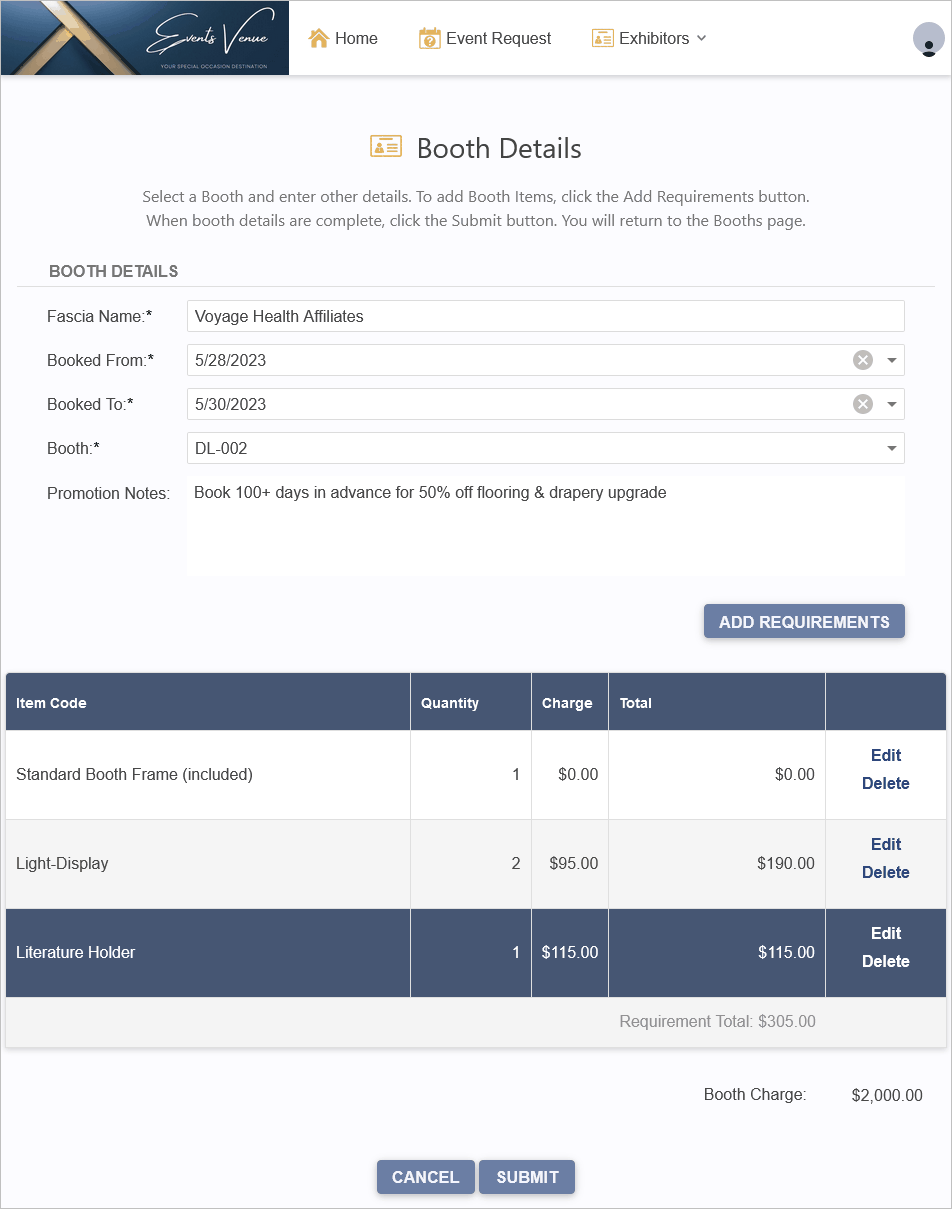
Figure 813: Submit Booth Details & Requirements
The Exhibitor can repeat the Add Requirements process to add more resource items to the Booth Details page.
When the Exhibitor has added all the resource items they want to the Booth Details page, they click Submit. This will return the Exhibitor to the Booths page.
Booths Page (returned)
Back in the Booths page, the submitted Booth and its resources appear in the grid.
The Exhibitor can add more booths by repeating the Add Booth process.
When the Exhibitor is done with the Booths page, they click Next to continue to the Requirements page.
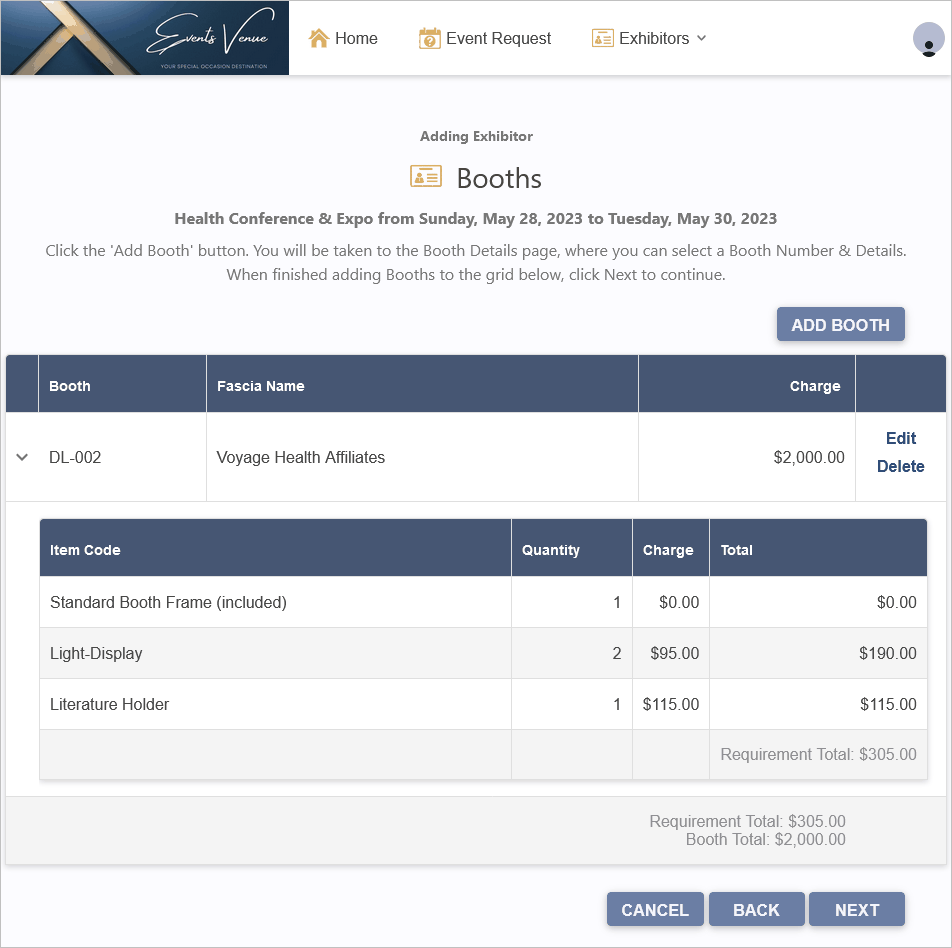
Figure 814: View Booth(s) Added to Registration
If booth selection is mandatory for an event, and the Exhibitor attempts to continue the wizard with the Booths grids empty, they will receive a warning dialog.
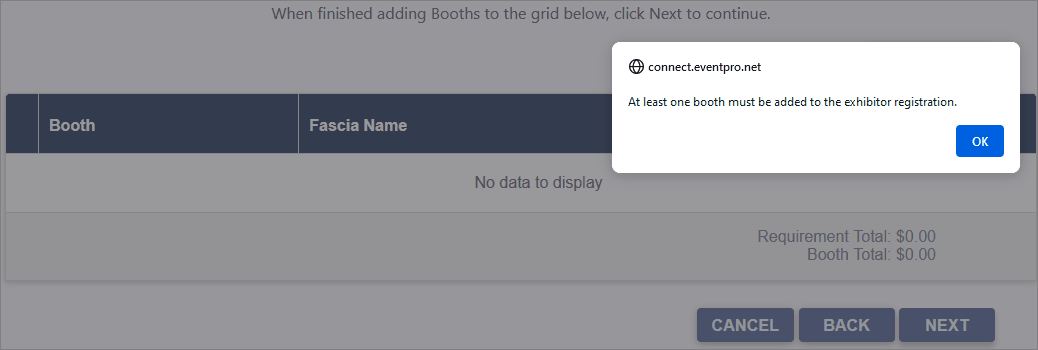
Figure 815: Mandatory Booth Message
Requirements
Page Definition: New Exhibitor Requirements
This Requirements page allows the Exhibitor to add resource items not connected to their booth.
The Exhibitor clicks the Add Requirements button to open the Resource Edit window.
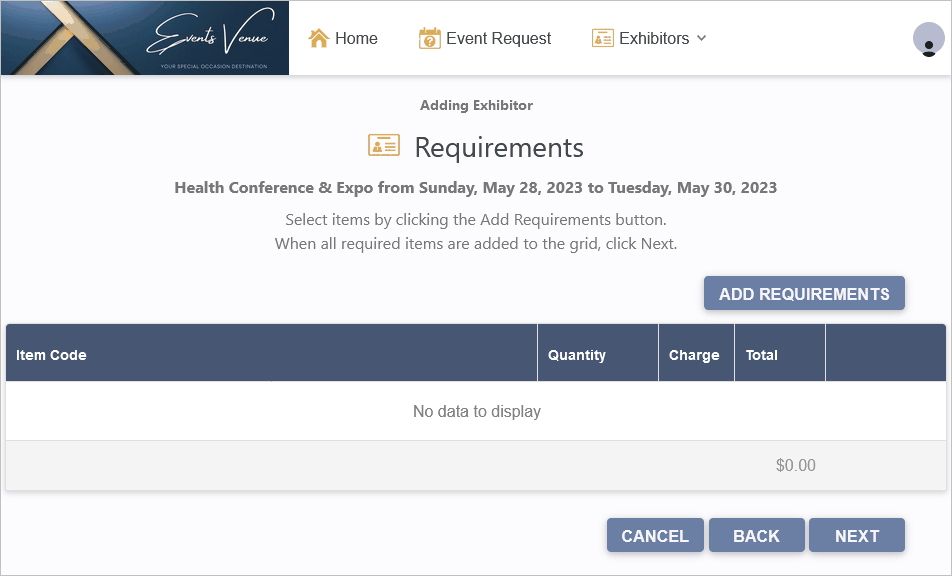
Figure 816: Add Requirements
In the Resource Edit window, the Exhibitor makes their selections, and clicks Submit, which returns them to the Requirements page.
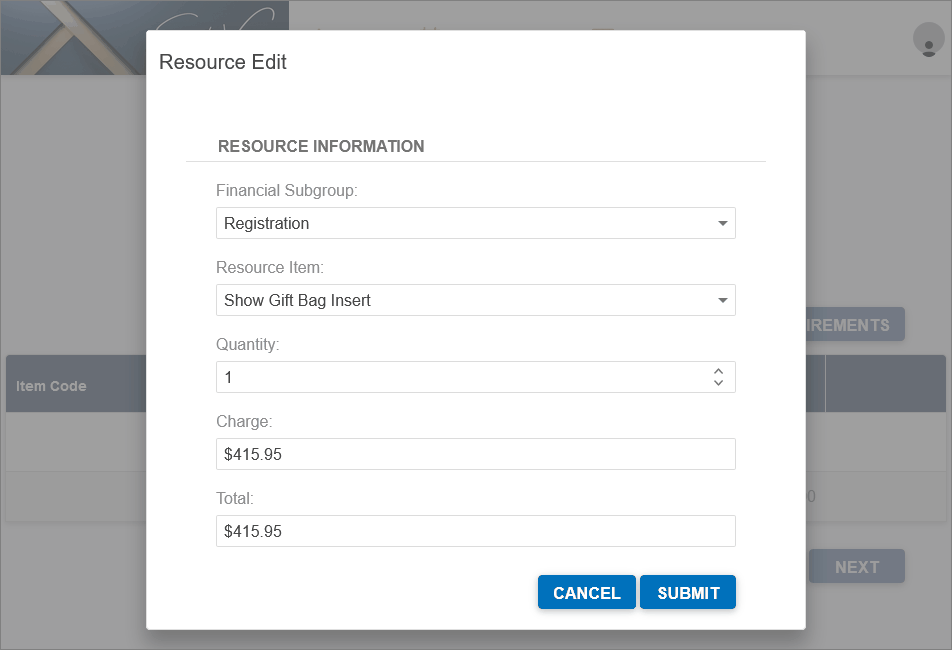
Figure 817: Select Setup Resource Item
Back in the Requirements page, the selected Resource Item will be added to the grid.
The Exhibitor can repeat the Add Requirements process to add more resource items to the Requirements page.
When the Exhibitor has added all the resource items they want to the Requirements page, they click Next to continue to the Required Documents page.
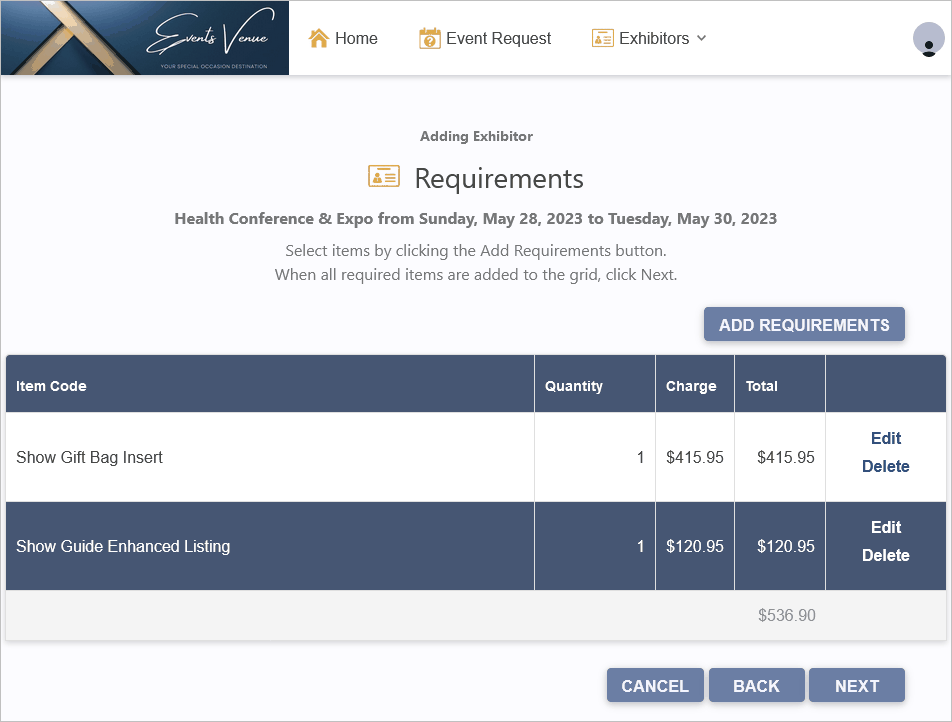
Figure 818: View Requirement(s) Added to Registration
Required Documents
Page Definition: New Exhibitor Required Documents
The grid displays the documents that the Exhibitor is required to upload.
In the row of a Document Name, the Exhibitor clicks the Browse button under the Upload column.
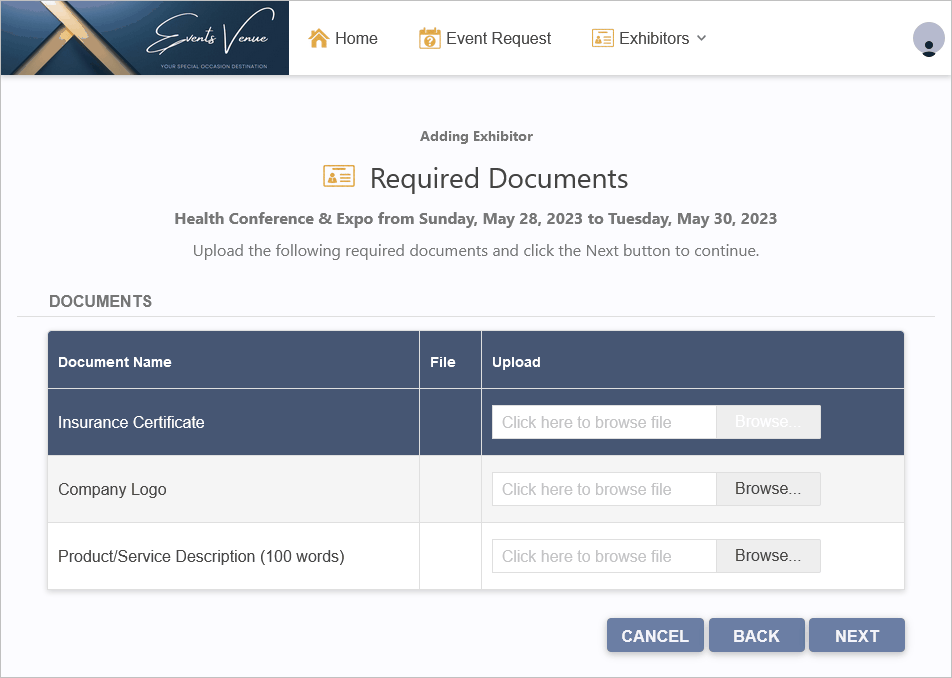
Figure 819: Upload Required Documents
The file selection window appears.
The Exhibitor selects the applicable file, and clicks Open, which returns them to the Required Documents page.
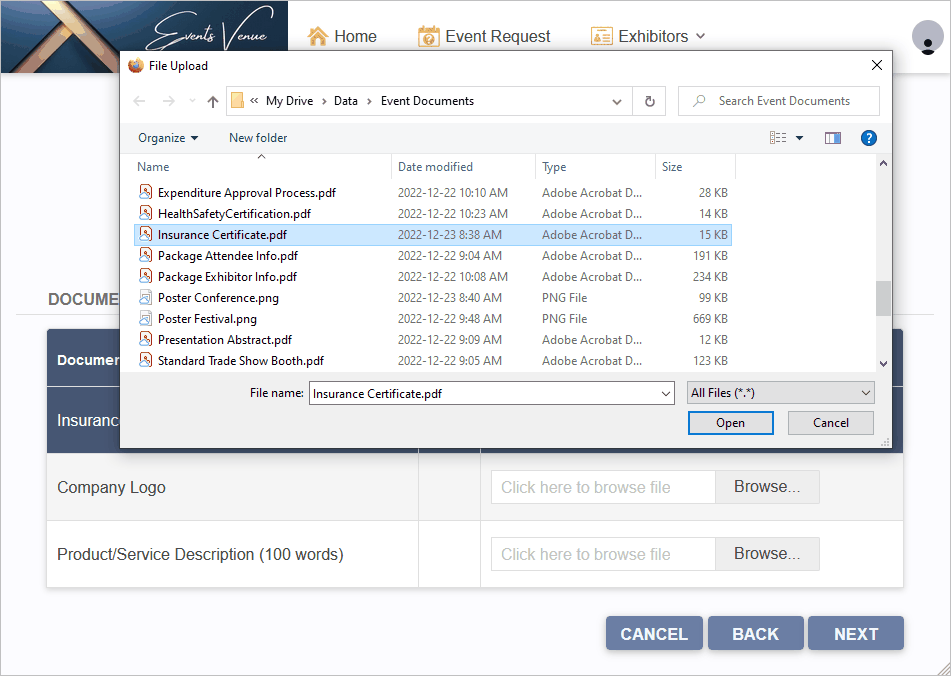
Figure 820: Select Document to Upload
Back in the Required Documents page, the selected file appears in the grid under the File column for the corresponding Document Name.
The Exhibitor can repeat the file upload process for each Document Name row in the grid.
When the Exhibitor has uploaded all of the required files, they click Next to continue to the Attendees page.
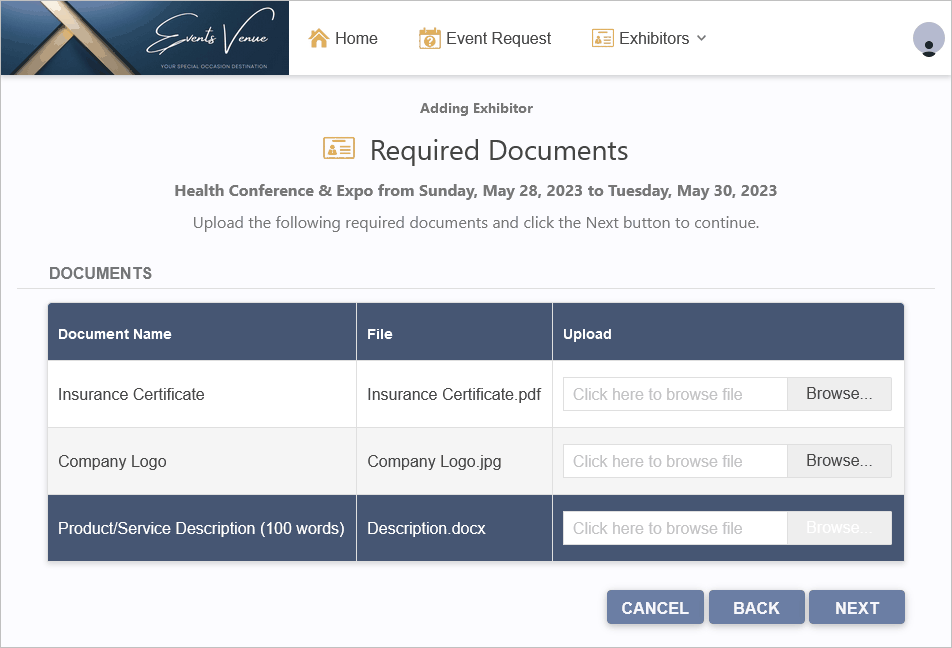
Figure 821: View Uploaded Documents
Attendees
Adding Attendees is a multi-step process involving two pages: the Attendees page and the Attendee Details page.
•Attendees Page Definition: New Exhibitor Attendees
•Attendee Details Page Definition: New Exhibitor Attendee Details
This is a brief summary of the process:
1.Attendees Page: Click the "Add Attendee" button, which goes to the Attendee Details page.
2.Attendee Details Page: Enter the Attendee's name, and click Submit. You return to the Attendees page.
3.Attendees Page (returned): The newly added Attendee appears in the Attendees grid.
4.Repeat the process to add more Attendees.
Now let's look at the process in more detail:
Attendees Page
The Exhibitor clicks the Add Attendee button, which takes them to the Attendee Details page.
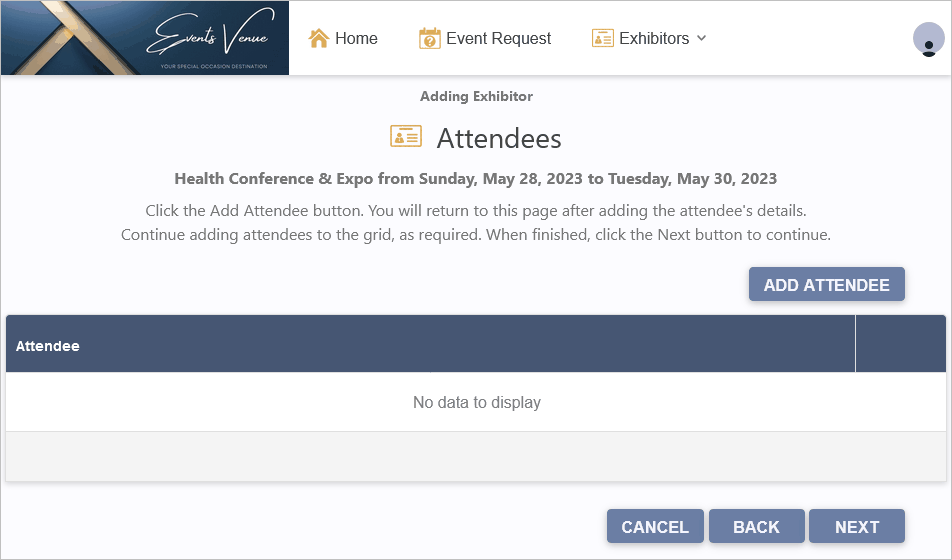
Figure 822: Add Exhibitor Attendees
Attendee Details Page
In the Attendee Details page, the Exhibitor enters the required information, and clicks Submit, which takes them back to the Attendees page.
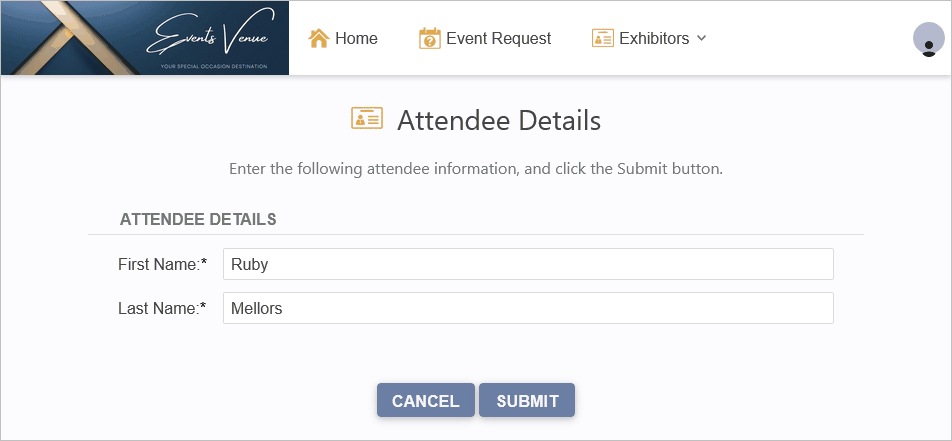
Figure 823: Enter Attendee Details
Attendees Page (returned)
Back in the Attendees page, the submitted attendee details will now appear in the grid.
The Exhibitor can repeat the Add Attendee process as required.
When the Exhibitor has added all of their Attendees, they click Next to continue the wizard, which takes them to the Summary page.
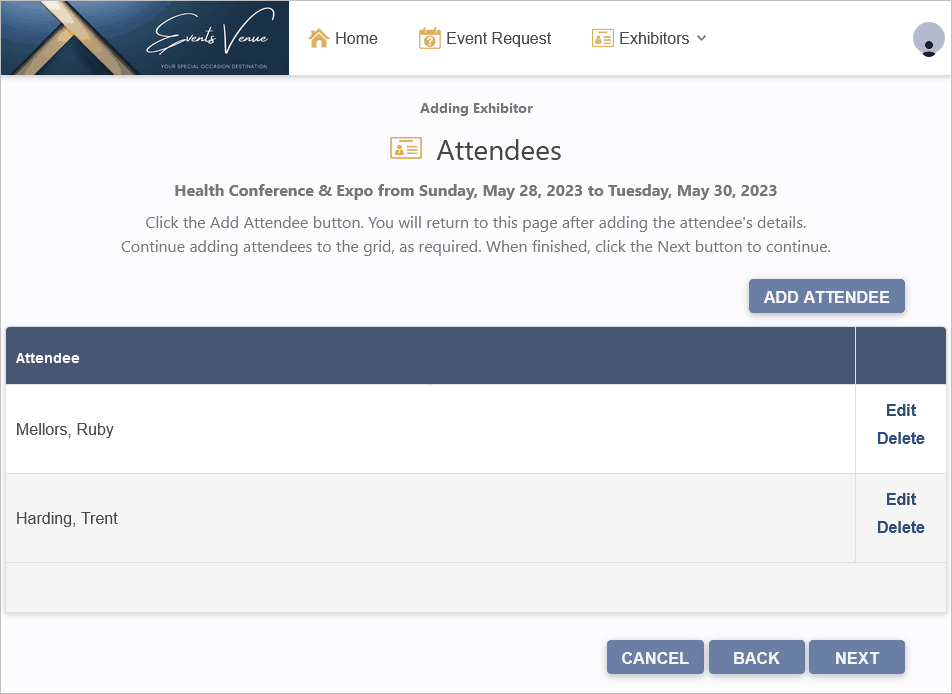
Figure 824: Attendees Added to Registration
Summary
Page Definition: New Exhibitor Summary
The Exhibitor reviews their registration information, and clicks Submit or Submit and Pay Now.

Figure 825: View Registration Summary
Success (Registration Complete)
Page Definition: New Exhibitor Success
When the Exhibitor arrives at this page, their registration has been submitted to your EventPro program.
The Exhibitor should record their Confirmation Number, which can be used to review their registration later.

Figure 826: Registration Complete - View Confirmation Number