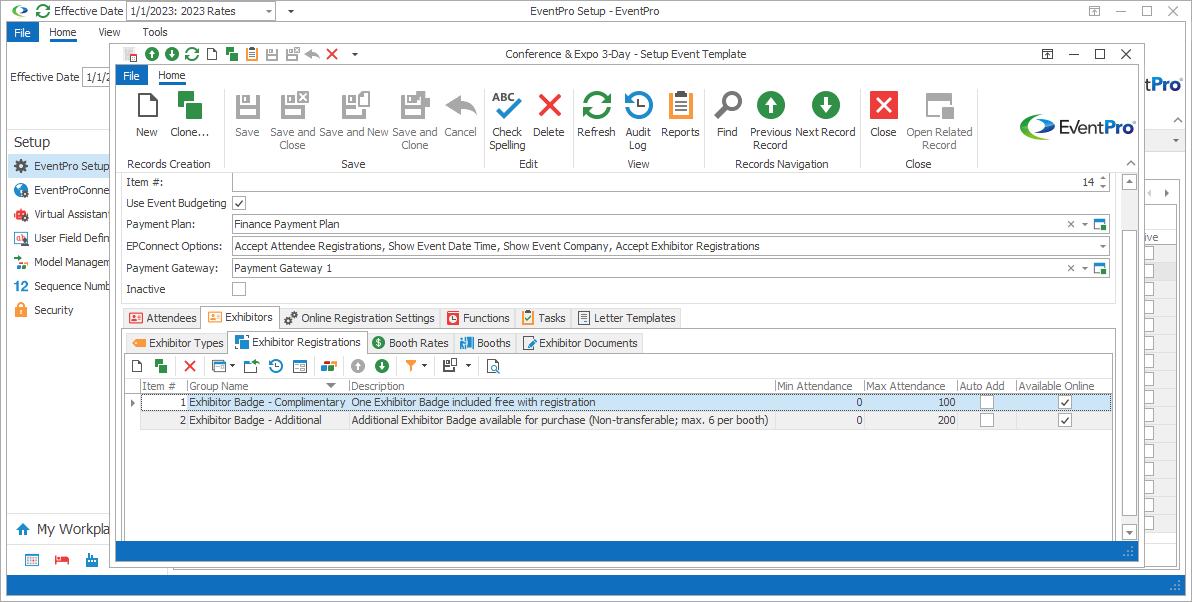
Figure 466: Event Template Exhibitor Registrations
In the Setup Event Template edit form, go to the Exhibitors / Exhibitor Registrations sub-tab, and start a New record.
The Setup Event Template Exhibitor Reg Group edit form opens.
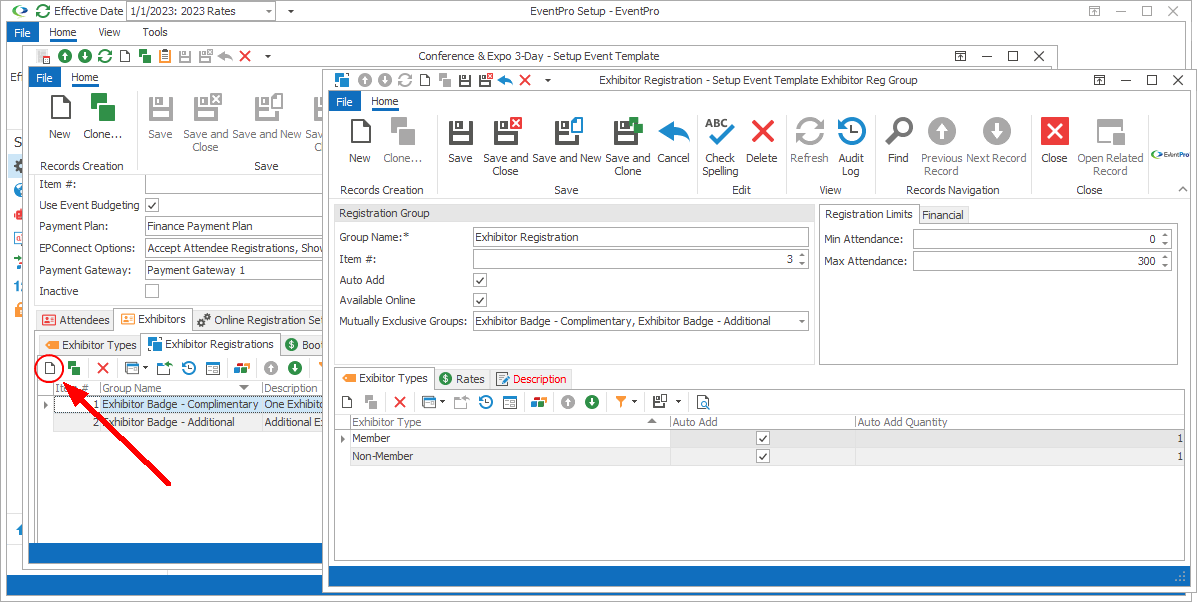
Figure 467: Adding Exhibitor Registration Group
There are several tabs and areas under which you can add information to the Setup Event Template Exhibitor Reg Group edit form:
Registration Group
1.Group Name: Enter a name for the Exhibitor Registration Group.
2.Item #: The Item Number determines a record's position relative to other records in a list sorted by Item #. Change the Item # to change the record's position in the sort order.
3.Auto Add: Select this checkbox if this registration group can be automatically assigned to exhibitors by default. Later in this edit form, you will be able to set the specific Exhibitor Types to which this registration group will be automatically added, and how many to add per exhibitor.
4.Available Online: Select this checkbox if you would like this Exhibitor Registration Group to be available online.
5.Mutually Exclusive Groups: If you do not want to allow exhibitors to register in two registration groups at the same time, you can define the groups as "mutually exclusive". In the Mutually Exclusive Groups drop-down list, select the checkboxes next to the other registration groups in which exhibitors cannot register if they register in the group you are currently creating.
Registration Limits
1.Min Attendance: Choose the minimum number of registrations that can be received for this exhibitor registration group. If you leave the number at 0 (zero), there will be no limitations.
2.Max Attendance: Choose the maximum number of registrations that can be received for this exhibitor registration group. If you leave the number at 0 (zero), there will be no limitations.
Financial
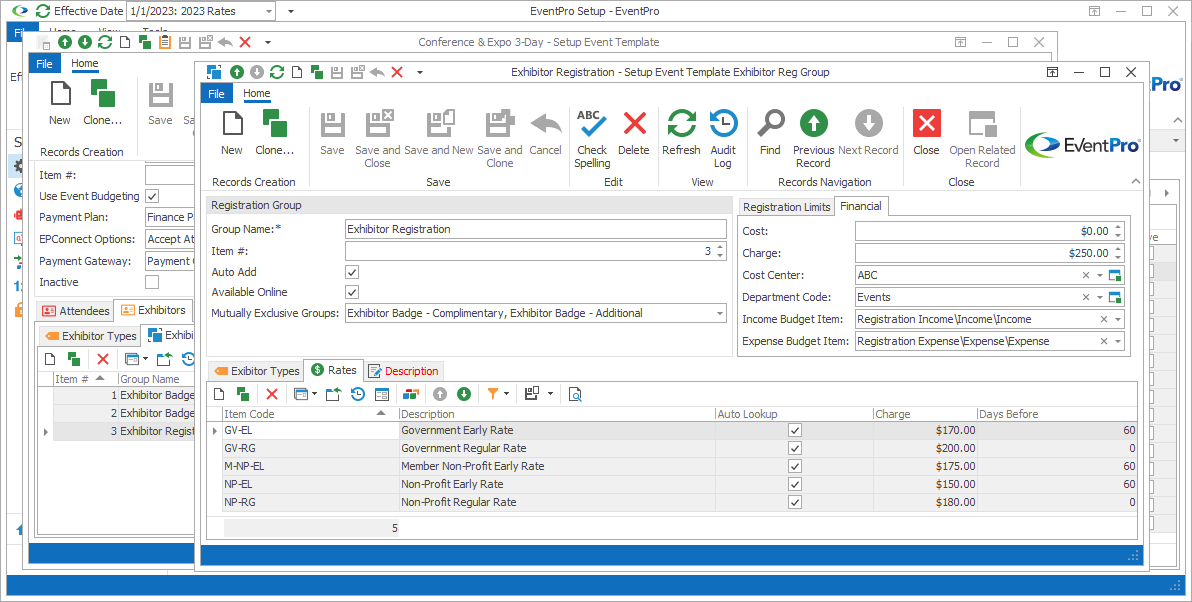
Figure 468: Adding Financial Info to Registration Group
1.Cost: If applicable, you can enter a default Cost for this Registration Group. If you later add variable Rates, this default Cost would only be used when none of the Rate criteria are met.
2.Charge: If applicable, you can enter a default Charge for this Registration Group. If you later add variable Rates, this default Charge would only be used when none of the Rate criteria are met.
3.Cost Center: If applicable, choose the Registration Group's Cost Center from the drop-down. You created cost centers under EventPro Setup; see the topic Cost Centers.
4.Department Code: If applicable, choose the Registration Group's Department Code from the drop-down. You created department codes under EventPro Setup; see the topic Department Codes.
5.Income Budget Item & Expense Budget Item: If applicable, select the Income Budget Item and/or Expense Budget Item for this Registration Group. You set up your budget items under EventPro Setup; see the topic Budget Configuration.
Exhibitor Types
Under this tab, you will select the Exhibitor Types to which this Registration Group can be applied.
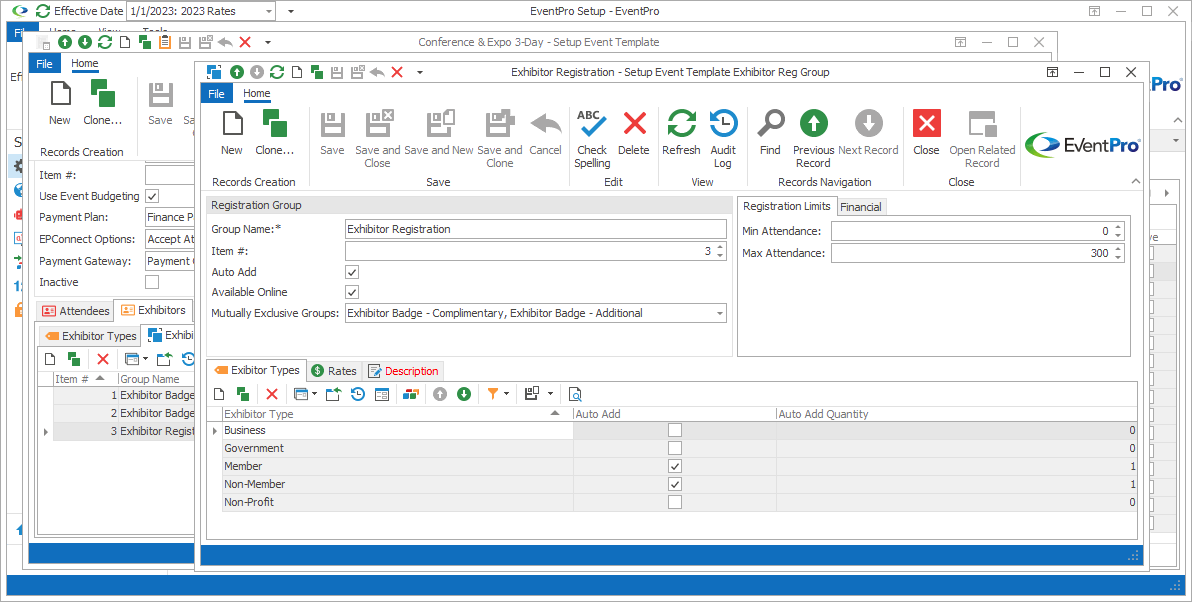
Figure 469: Registration Group's Exhibitor Types
Under the Exhibitor Types tab of the Setup Event Template Exhibitor Reg Group edit form, start a New record.
The Setup Event Template Exhibitor Reg Group Exhibitor Type edit form appears.
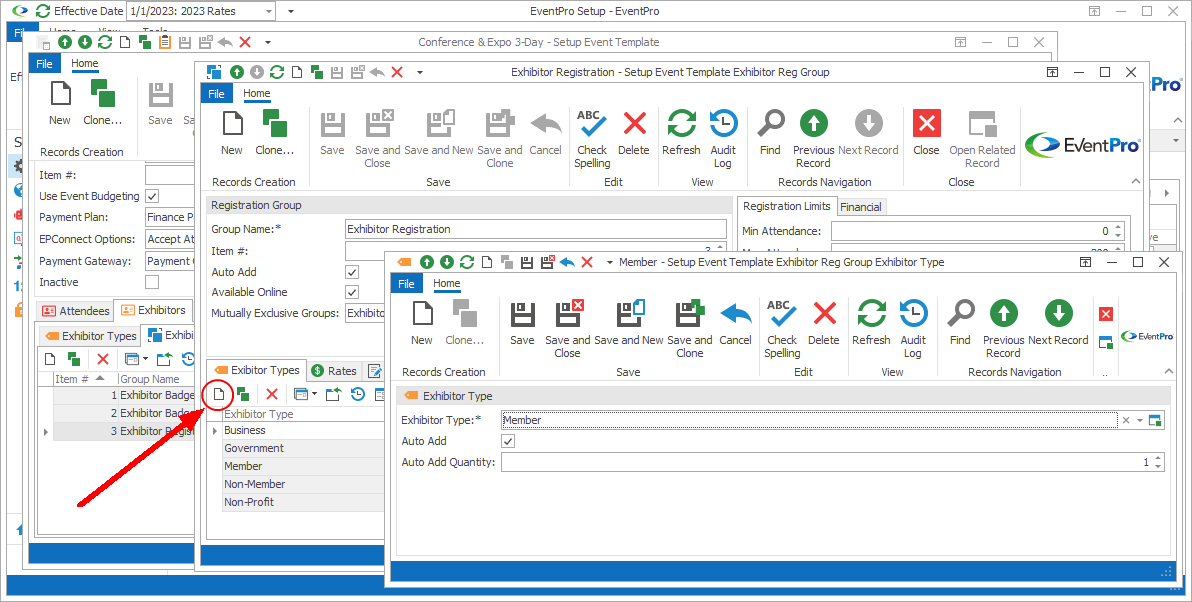
Figure 470: Adding Exhibitor Type to Registration Group
1.Exhibitor Type: Choose an Exhibitor Type to which this Registration Group can be assigned. This Exhibitor Type drop-down is populated by the Exhibitor Types you selected earlier for this Event Template. Review the topic Exhibitor Types.
2.Auto Add: Select this checkbox if you want the Registration Group to be automatically assigned to Exhibitors of the selected Exhibitor Type (when those Exhibitors are added to the event).
3.Auto Add Quantity: If you selected the Auto Add checkbox above, enter a number to indicate the Quantity of Registration Groups that should be automatically assigned to each Exhibitor of the selected Exhibitor Type.
Click Save and Close to return to the Setup Event Template Exhibitor Reg Group edit form.
Continue adding any other Exhibitor Types to which the Registration Group can be assigned.
Rates
Under the Rates tab of the Setup Event Template Exhibitor Reg Group edit form, you can define the registration group rates and the criteria under which they apply.
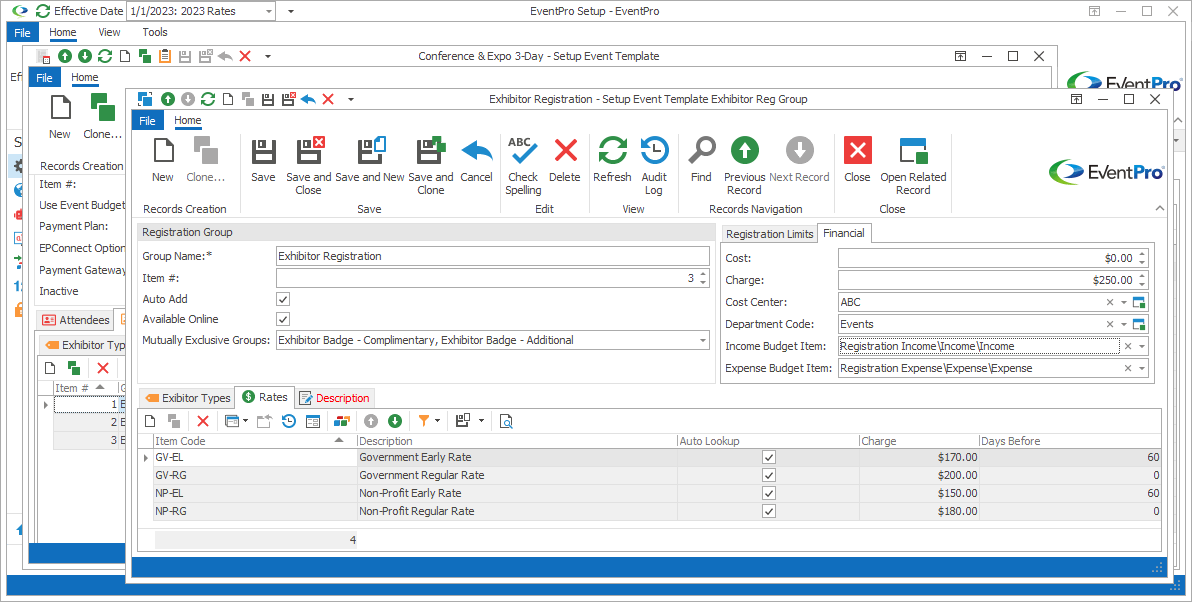
Figure 471: Exhibitor Registration Group Rates
Under the Rates tab, start a New record.
The Setup Event Template Exhibitor Reg Group Rate Code edit form appears.
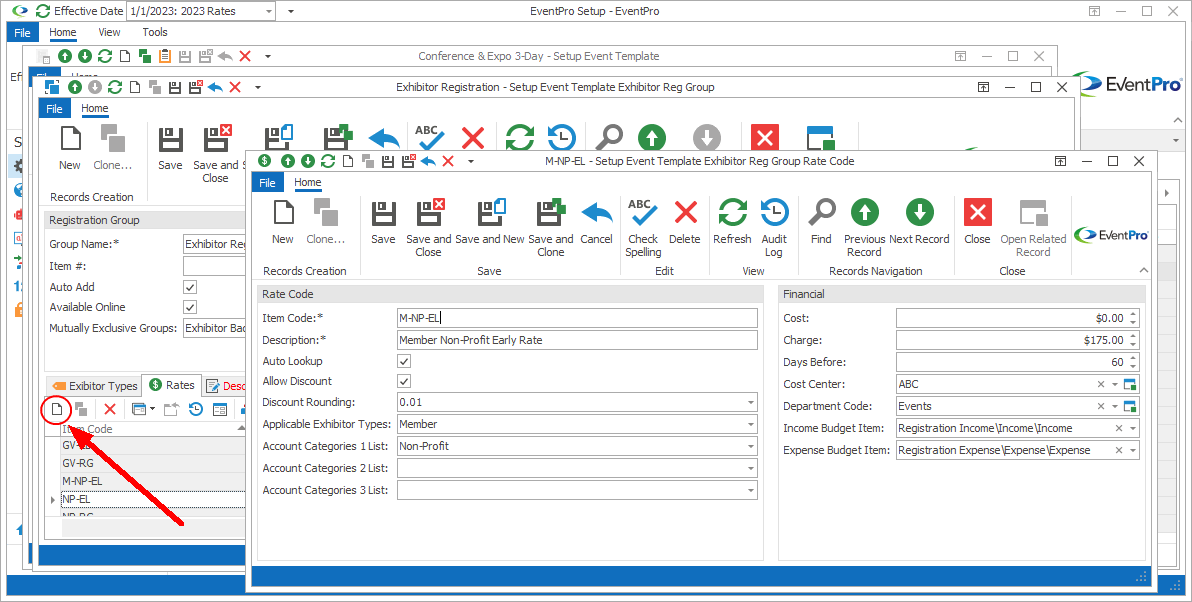
Figure 472: Adding Registration Rate
1.Item Code: Enter the name of this Rate Code.
2.Description: The Description will copy the Item Code by default, but you can edit it if you want.
3.Auto Lookup: Select the Auto Lookup checkbox if you want EventPro to automatically assign this Rate if the set criteria are fulfilled.
4.Allow Discount: Select this checkbox if you want to allow Users to discount this registration group rate.
5.Discount Rounding: If discounting is allowed for this rate, select an option from this drop-down list to determine the place value to which the discount will be rounded.
6.Exhibitor Types: If you want this registration group rate to only apply to Exhibitors of certain Types, select the checkboxes next to the applicable Exhibitor Types in the drop-down list. The drop-down list is populated by the Exhibitor Types you added to this Setup Event Template Exhibitor Reg Group's Exhibitor Types tab.
7.Account Category 1, 2 and 3: If you want to restrict the availability of this rate to Accounts (Companies/Contacts) belonging to certain Account Categories, select the checkboxes next to the applicable categories in the relevant drop-down lists. The drop-down lists are populated by the Setup Account Categories you created earlier.
8.Cost: Enter the Cost amount, if applicable.
9.Charge: Enter the Charge amount.
10.Days Before: If you want to define a registration group rate that takes effect if the exhibitor registers a certain number of days in advance (i.e. "Early Bird" pricing), enter the number of Days Before during which this particular rate applies.
11.Cost Center: If applicable, select an option from this Cost Center drop-down, which is populated by the records created under EventPro Setup / Financial / Cost Centers.
12.Department Code: If applicable, select an option from this Department Code drop-down, which is populated by the records created under EventPro Setup / Financial / Department Codes.
13.Income Budget Item and Expense Budget Item: If you intend to track budgets for events using this Setup Event Template, you can select the Budget Items for this rate code. The Budget Item drop-downs are populated by Setup Budget Items created earlier in Financial Setup.
When you are done entering information for this Exhibitor Registration Group Rate Code, click Save and Close.
You will return to the Setup Event Template Exhibitor Reg Group edit form.
Continue adding as many Rate Codes as you require for the Exhibitor Registration Group.
Description
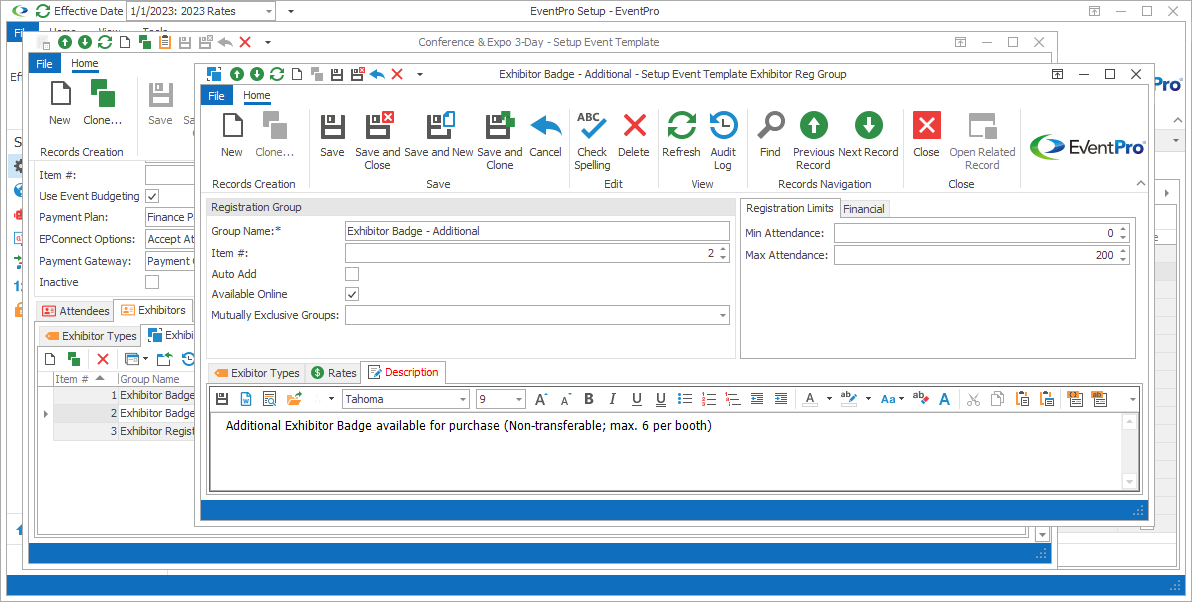
Figure 473: Entering Description for Registration Group
If you want, you can enter a description of the Registration Group under the Description tab.
You can type the notes directly into the Description memo field, or click Word Processor to work in the more sophisticated functionality of the built-in Word Processor.
Save & Close
When you are done creating the Exhibitor Registration Group for the Setup Event Template, click Save and Close.
You will return to the Setup Event Template edit form, where you can continue adding more Exhibitor Registration Groups to the template, or move on to adding other template elements.
Next topic: Booth Rates