•NOTE: The Calendar Settings in this edit form will vary, particularly depending on the View Type and Group Type you select below.
•These instructions will describe the various different settings, but remember that you may not see all of the described options, depending on the View Type and/or Group Type. Different settings are applicable to different View Types and Group Types.
•This is a quick reference list of the settings discussed in this topic. Click a link to skip down to that setting.
|
Current Time Indicator Visibility
|
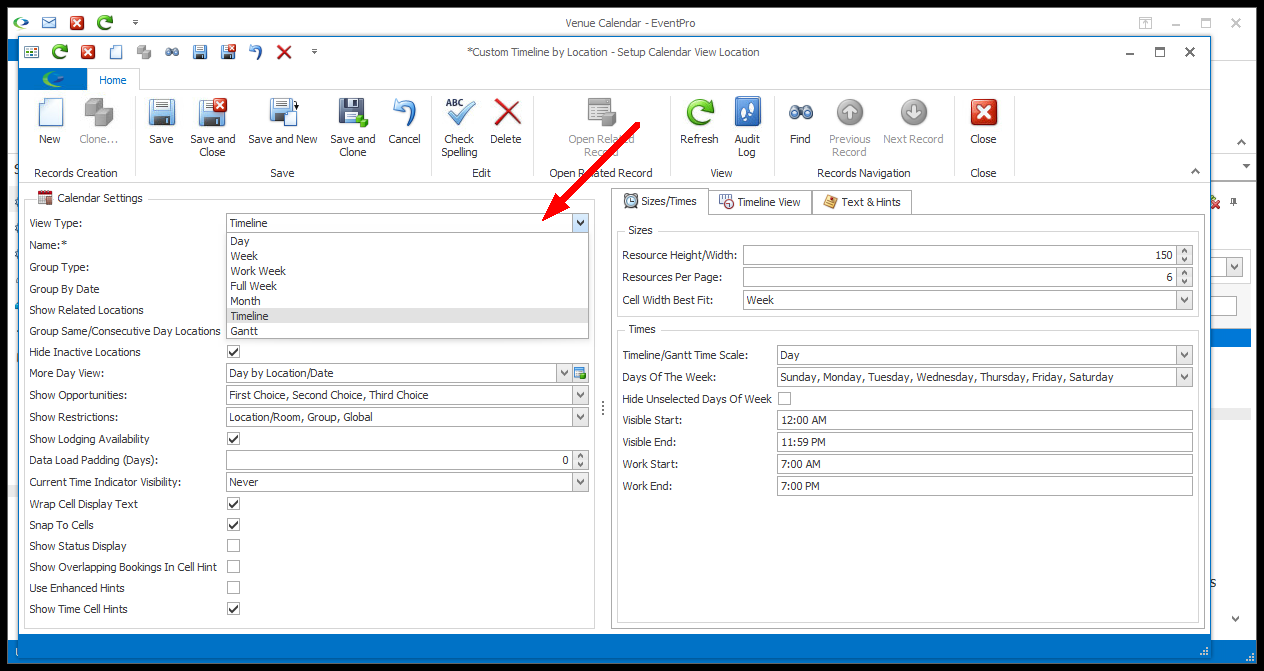
1.View Type: Select the View Type you want to use: e.g. Day, Week, Month, Timeline, etc.
You may notice that the options in the edit form change, depending on which View Type you have selected. Different settings are applicable to different View Types.
2.Name: Give the Setup Calendar View a unique name to distinguish it from other views, particularly if you have multiple views of the same View Type and/or Group Type.

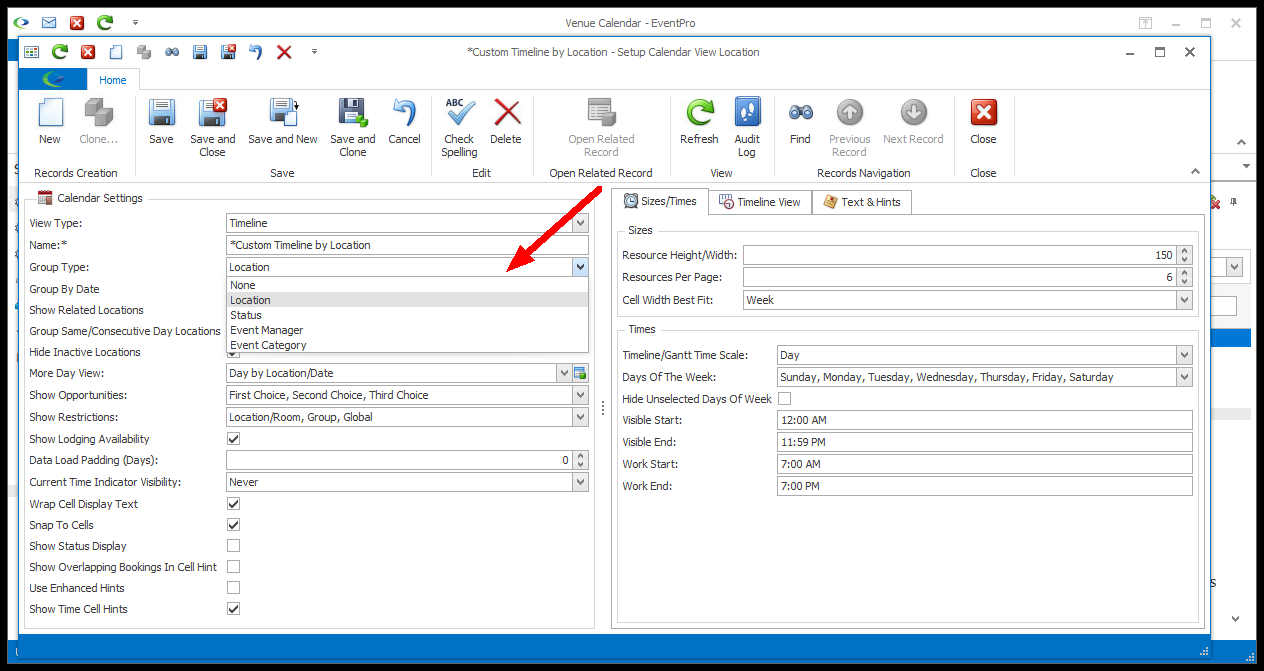
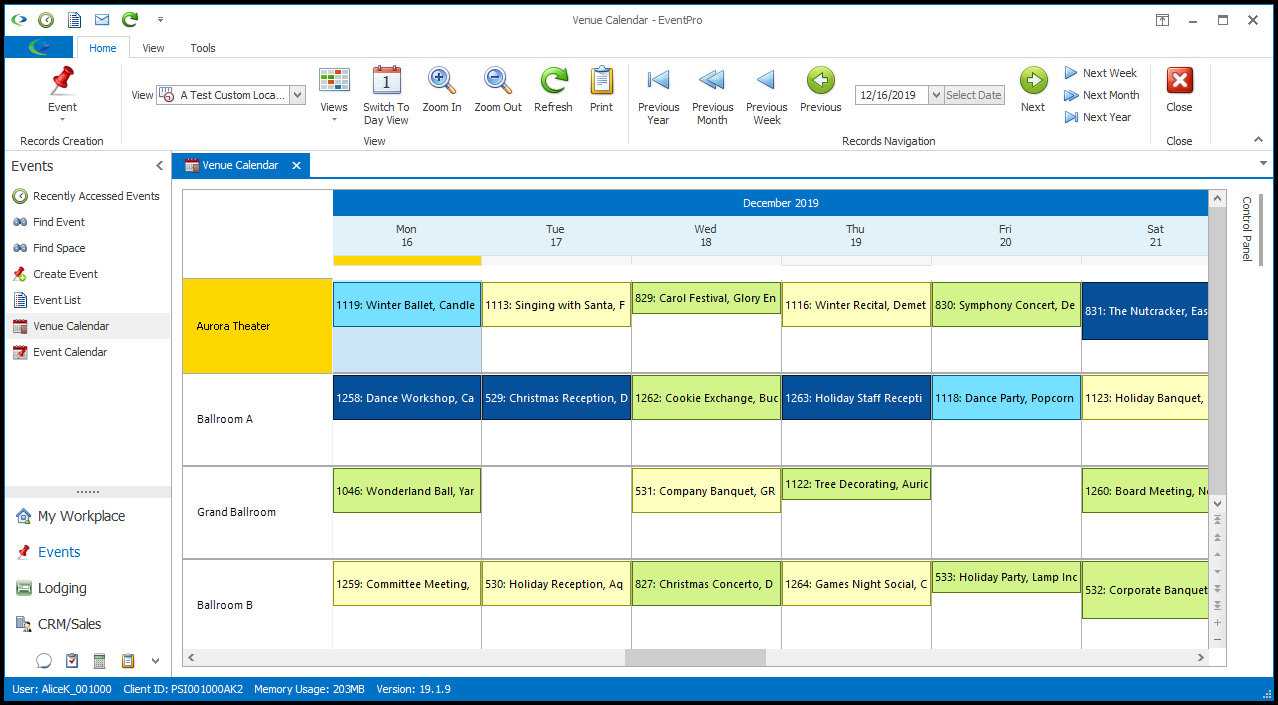
3.Group Type: Choose how you want the Events grouped: None (no grouping), by Location (Venue Calendar only), by Status, by Event Manager, or by Event Category.
You may notice that the options in the edit form change, depending on which Group Type you have selected. Different settings are applicable to different Group Types.
4.Group By Date: Select this option to have the view grouped by date columns, in addition to the Group Type option in rows.

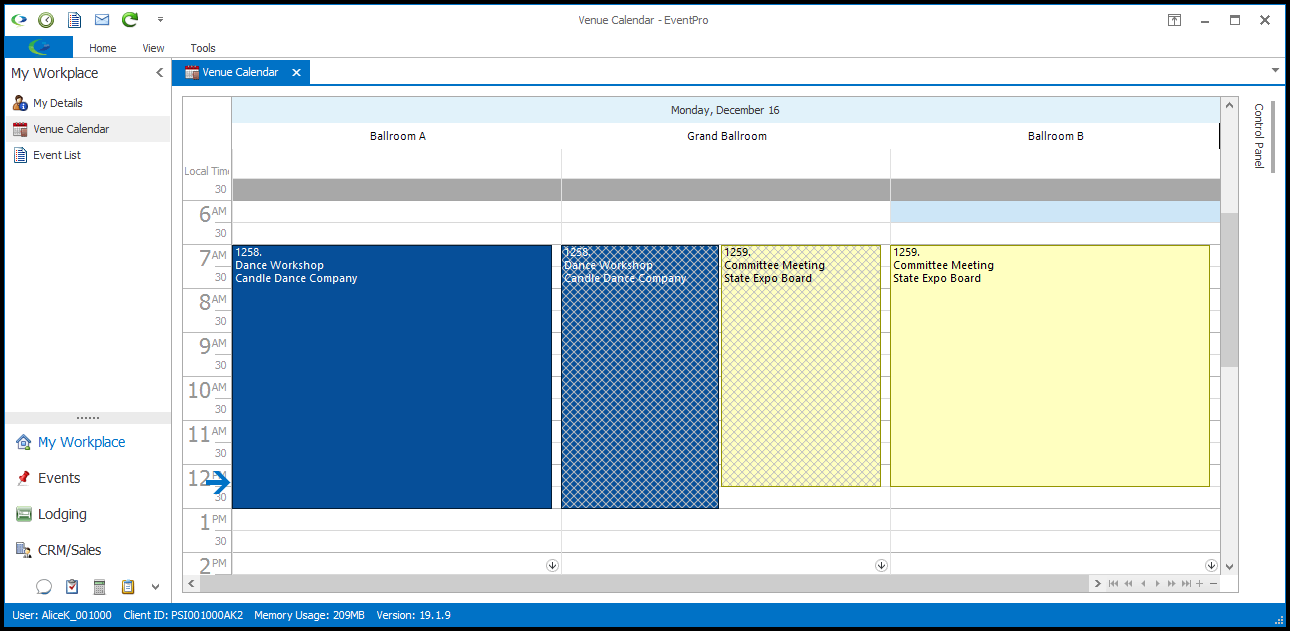
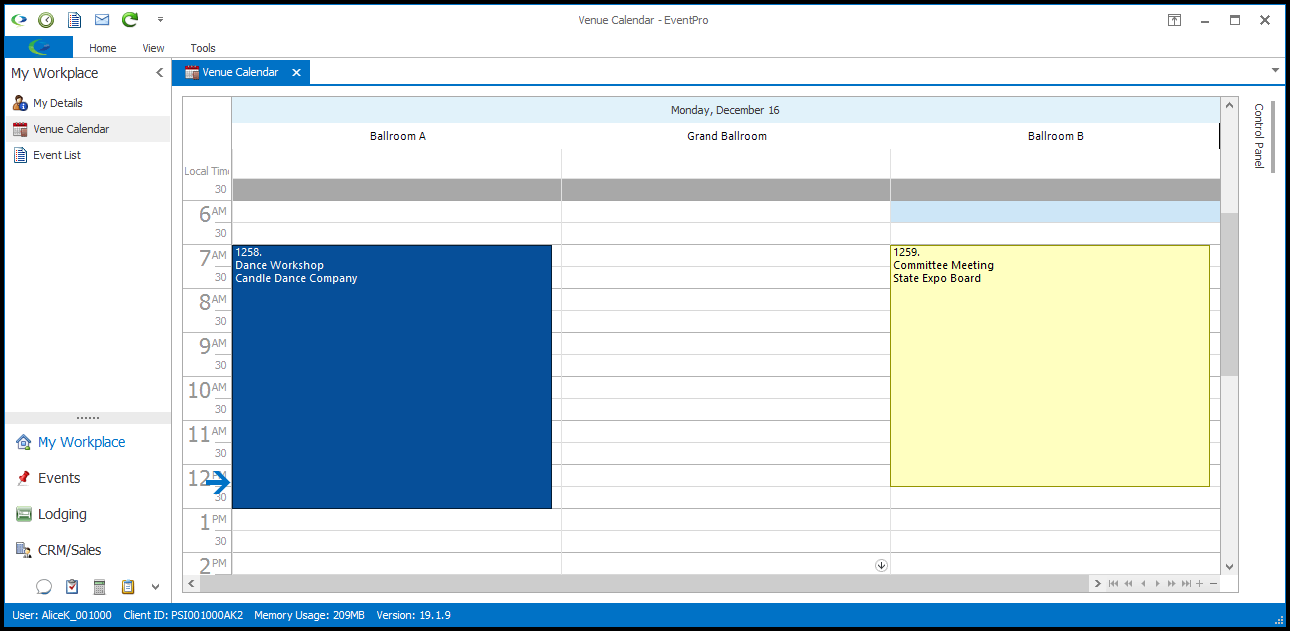
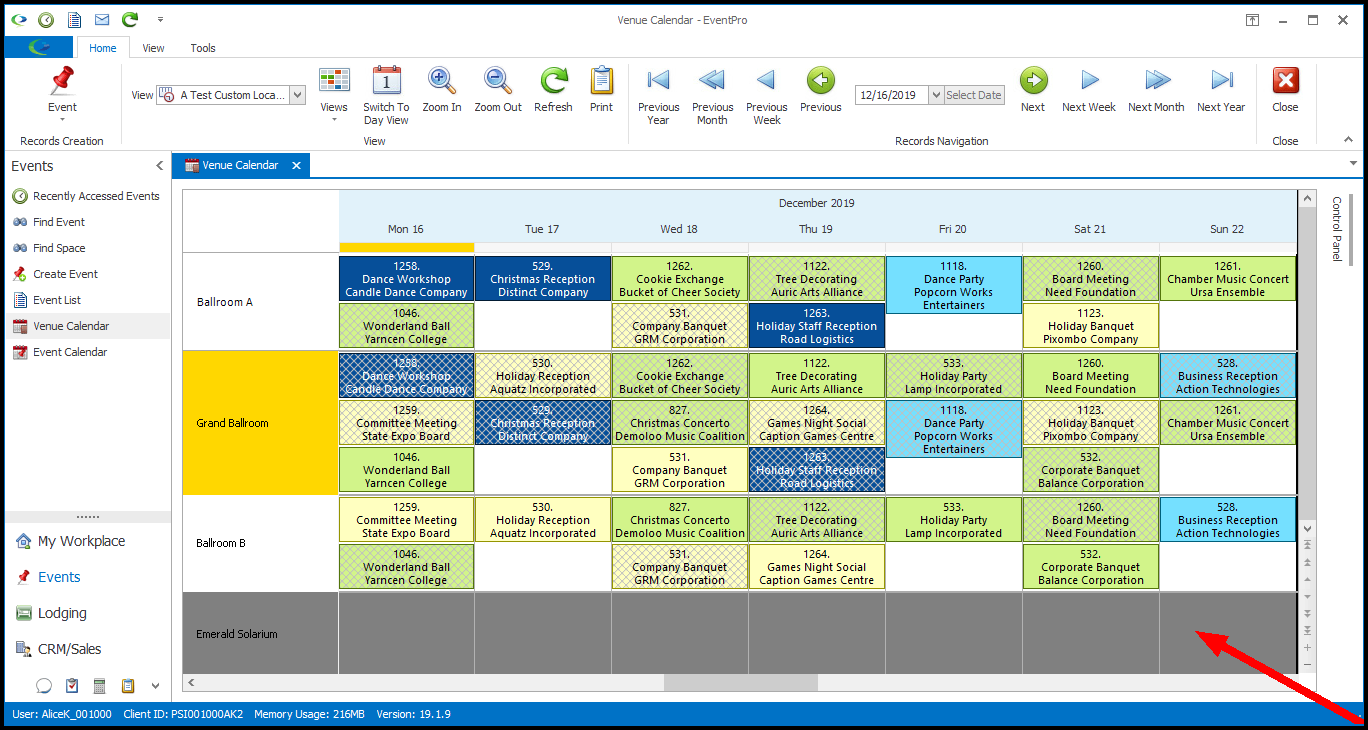
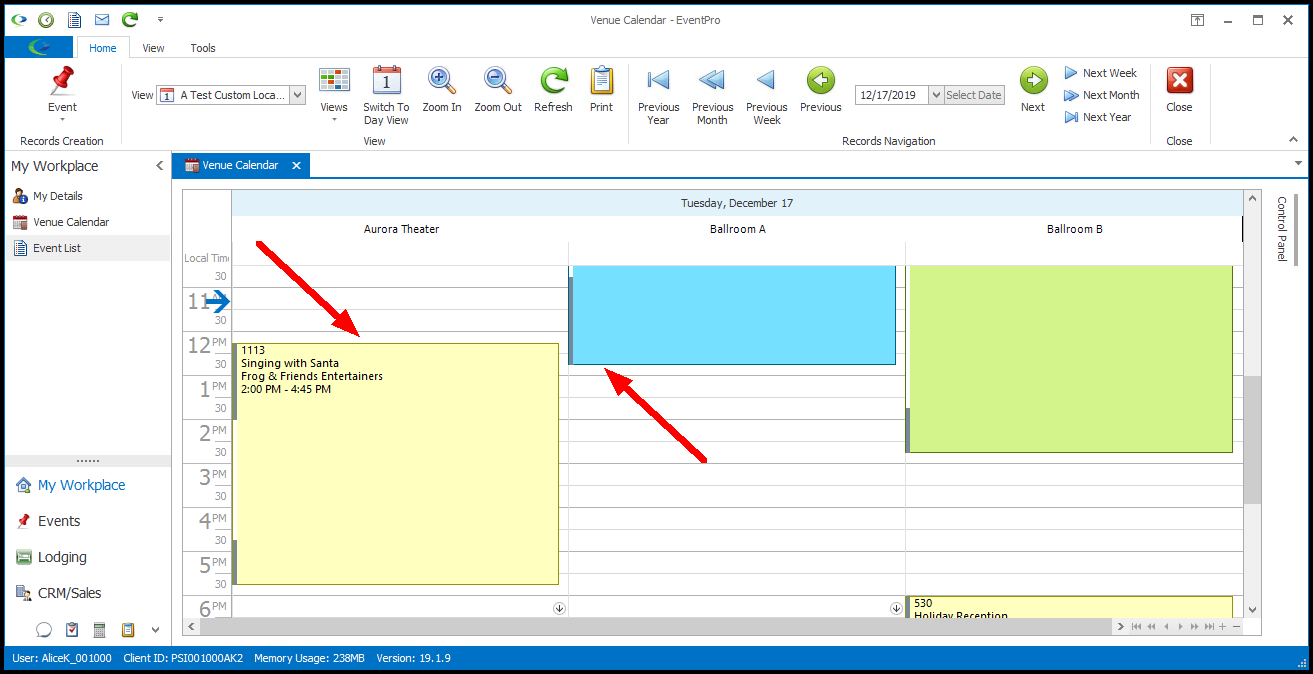
5.Show Related Locations: Select this checkbox if you want the calendar to cross-hatch locations that are unavailable because of bookings in related locations.
For example, let's say you have a Grand Ballroom that can be divided into Ballroom A and Ballroom B. If an Event is booked in Ballroom A, the Grand Ballroom is unavailable, even though the Event isn't actually in the Grand Ballroom. If you have the Show Related Locations setting turned on, the Grand Ballroom would be cross-hatched and filled with the same color as the Ballroom A booking.
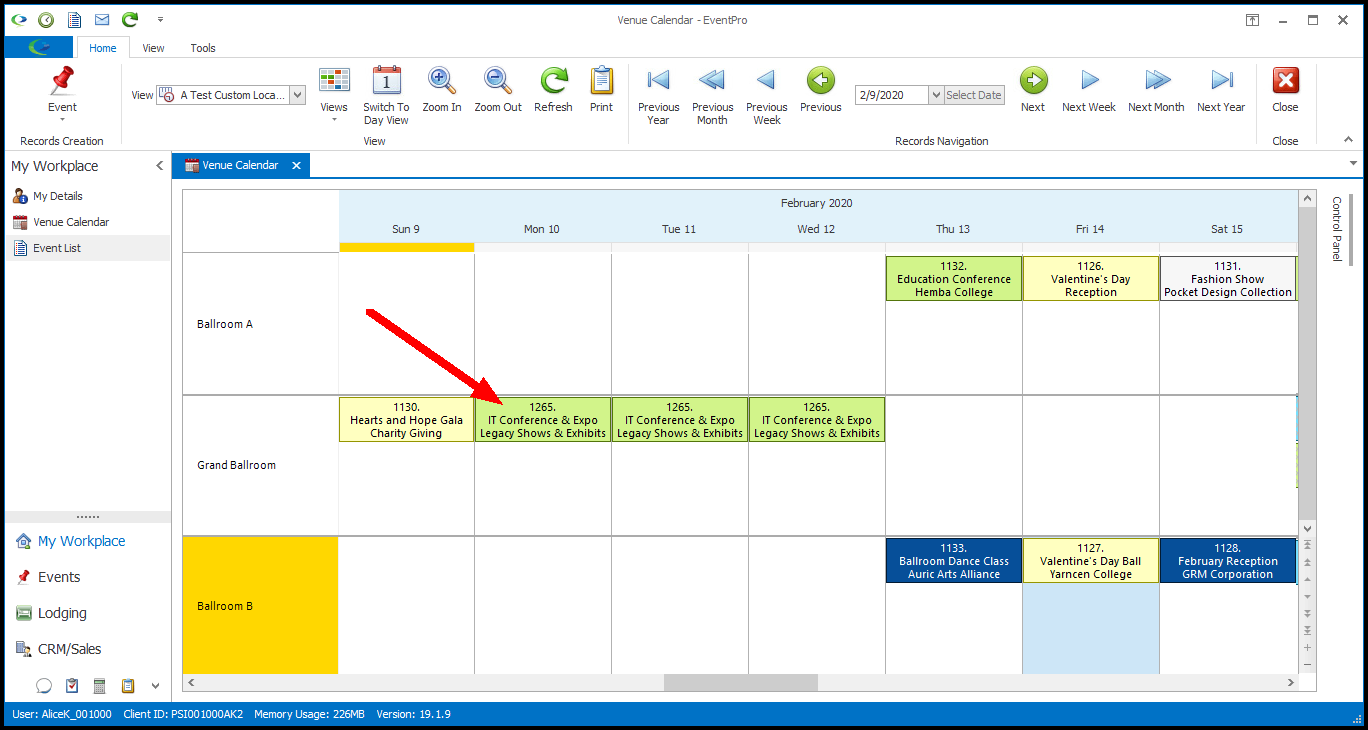
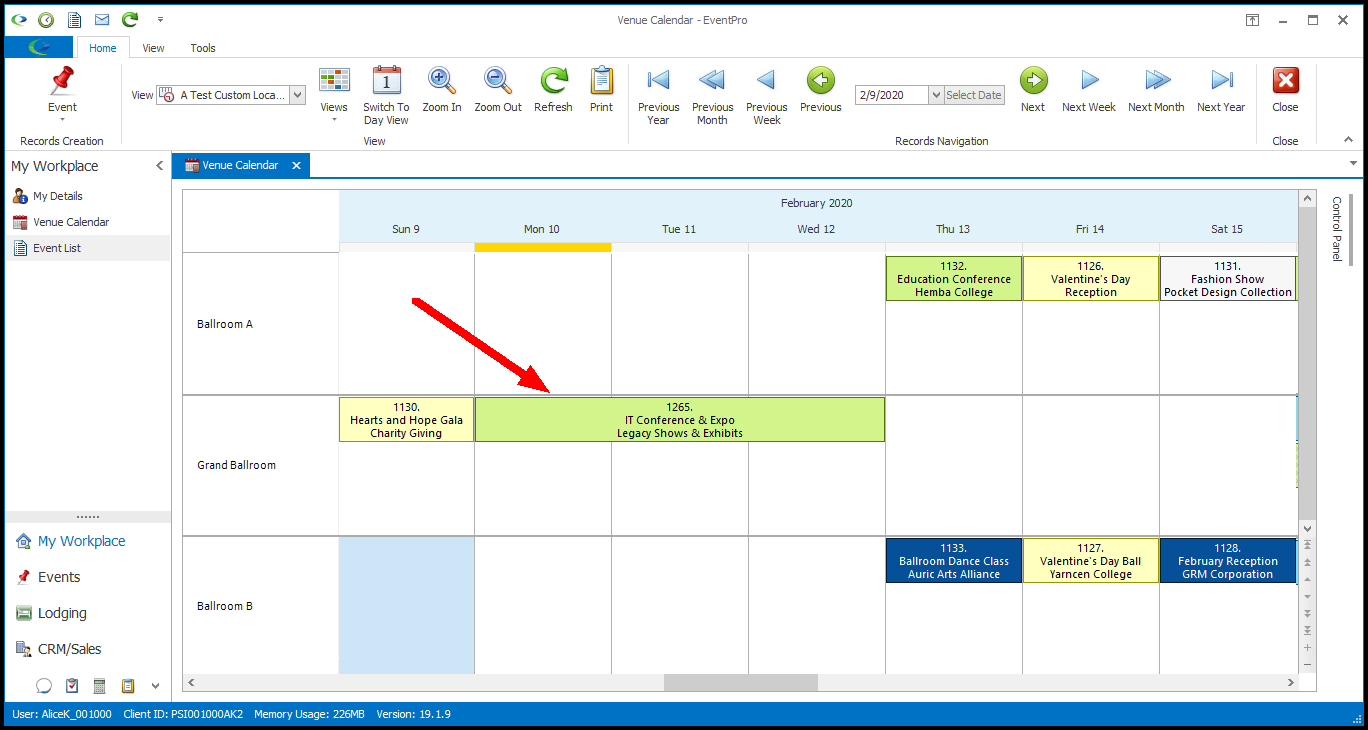
6.Group Same/Consecutive Day Locations: This option will group together Event Booked Locations belonging to the same Event as one item on the calendar if those Event Locations are on the same day or on consecutive days. The calendar item start time/end time is calculated from the earliest/latest location record in the group.
7.Hide Inactive Locations: Select this checkbox if you want to hide Venue Locations that are currently set to Inactive. The Inactive/Hidden Locations will be hidden on the Calendar, as well as in the Control Panel selections. If you do not select this checkbox, the Inactive locations will be displayed (unless you have filtered them out using the Control Panel).

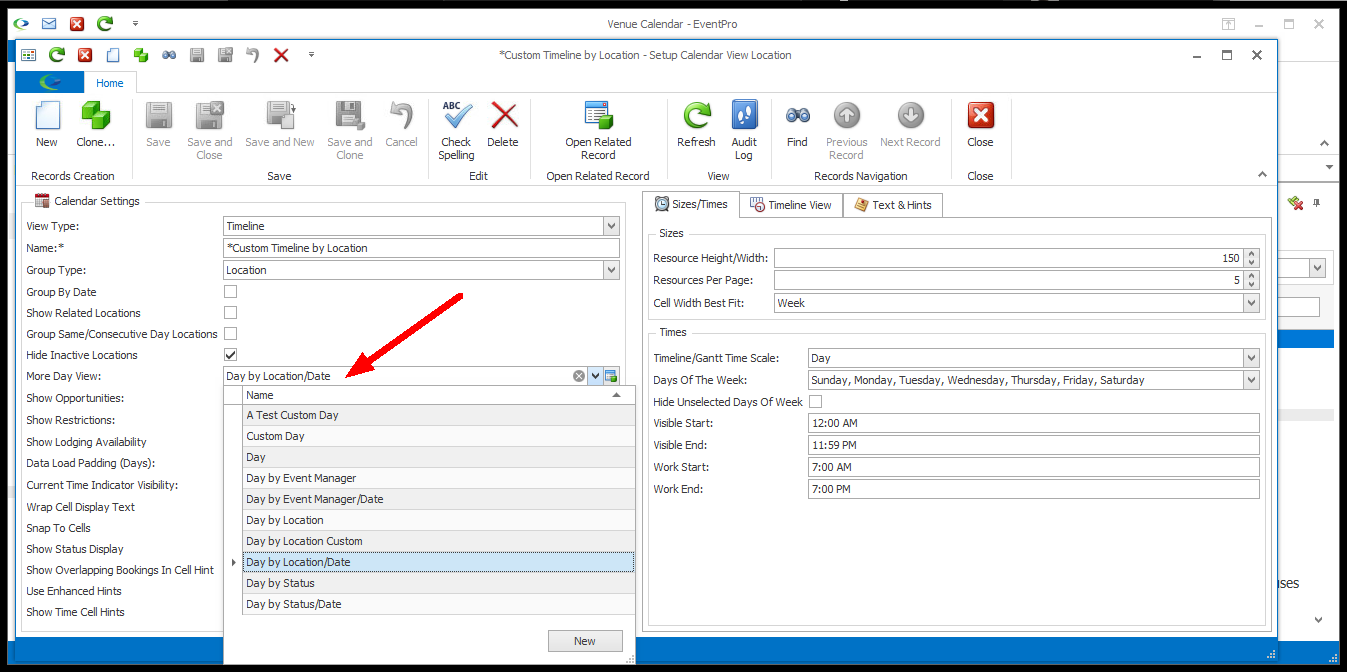
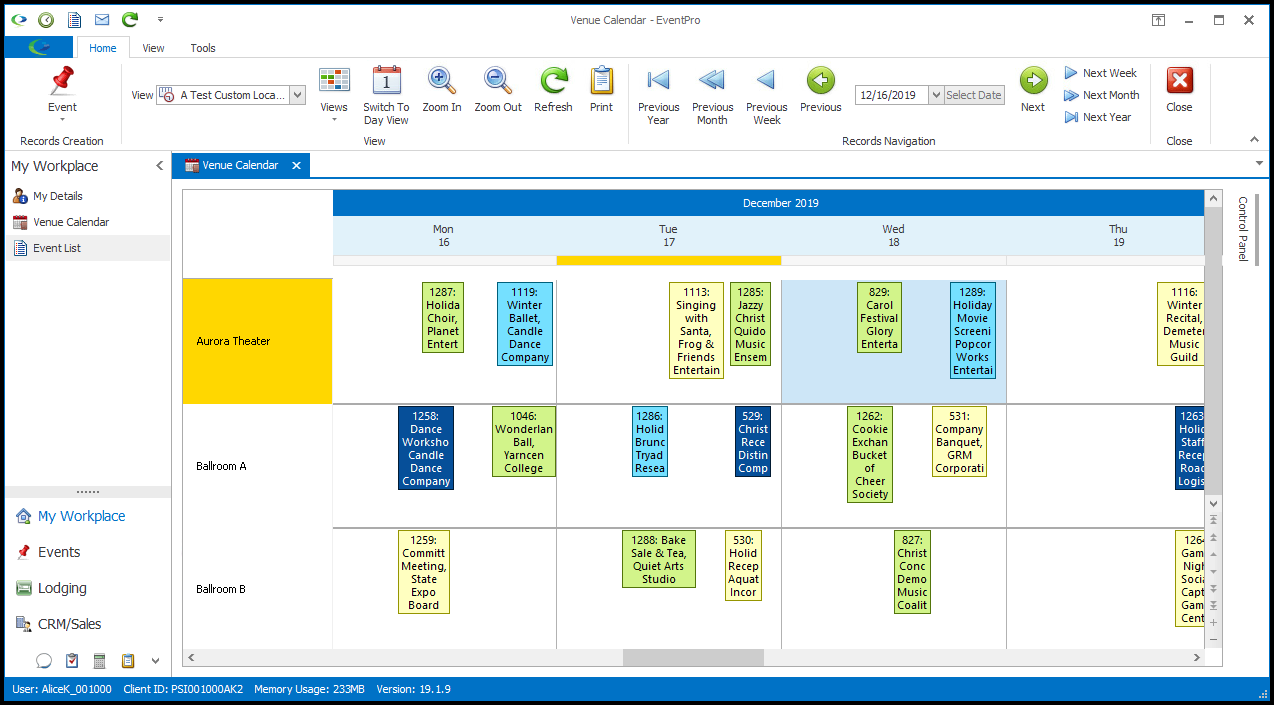
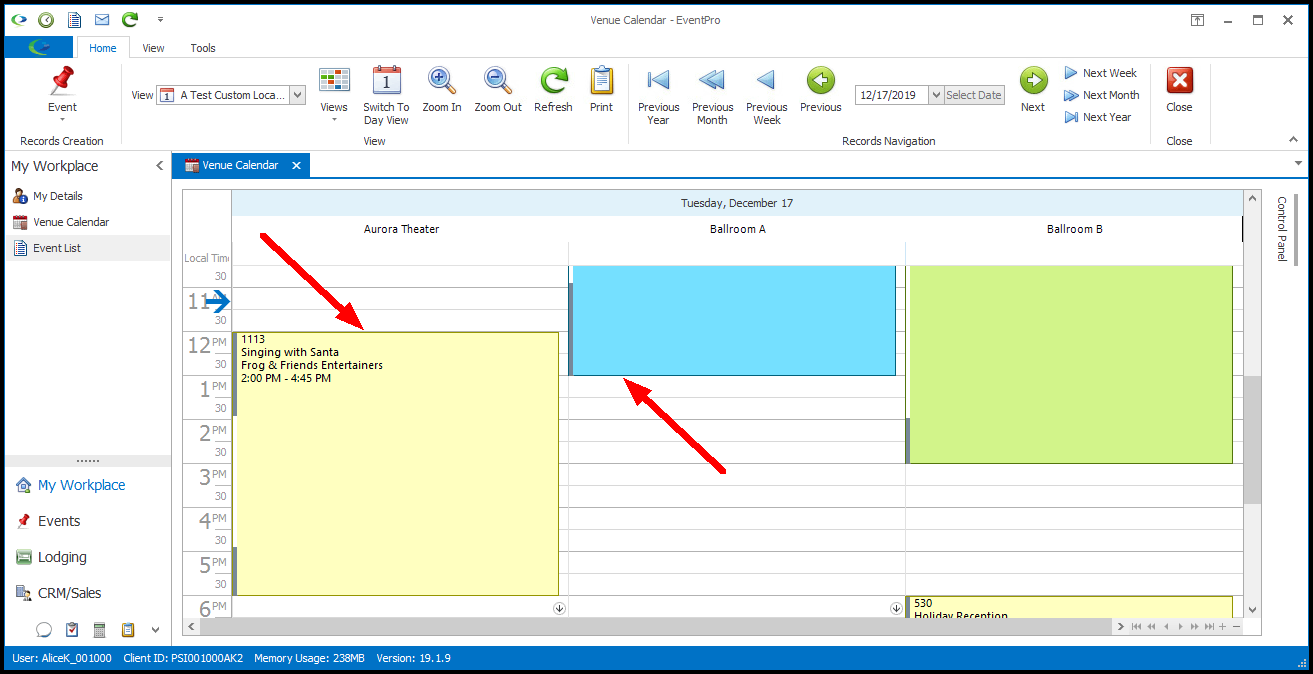
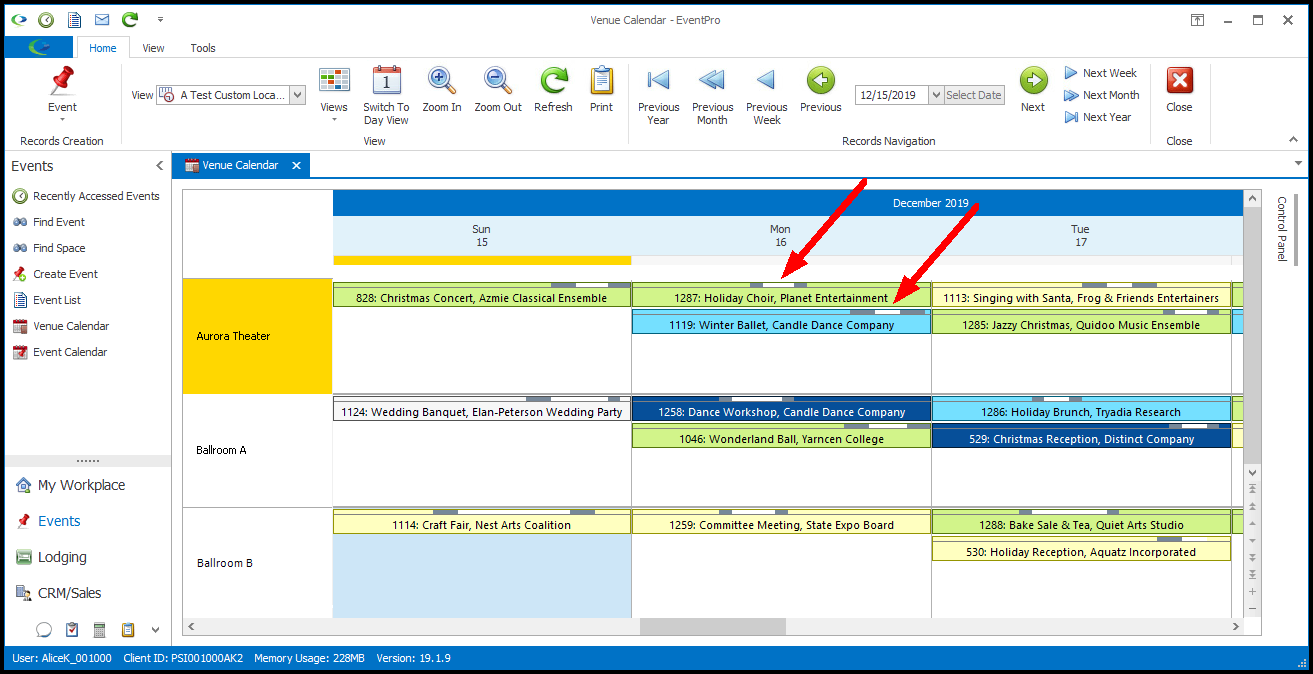
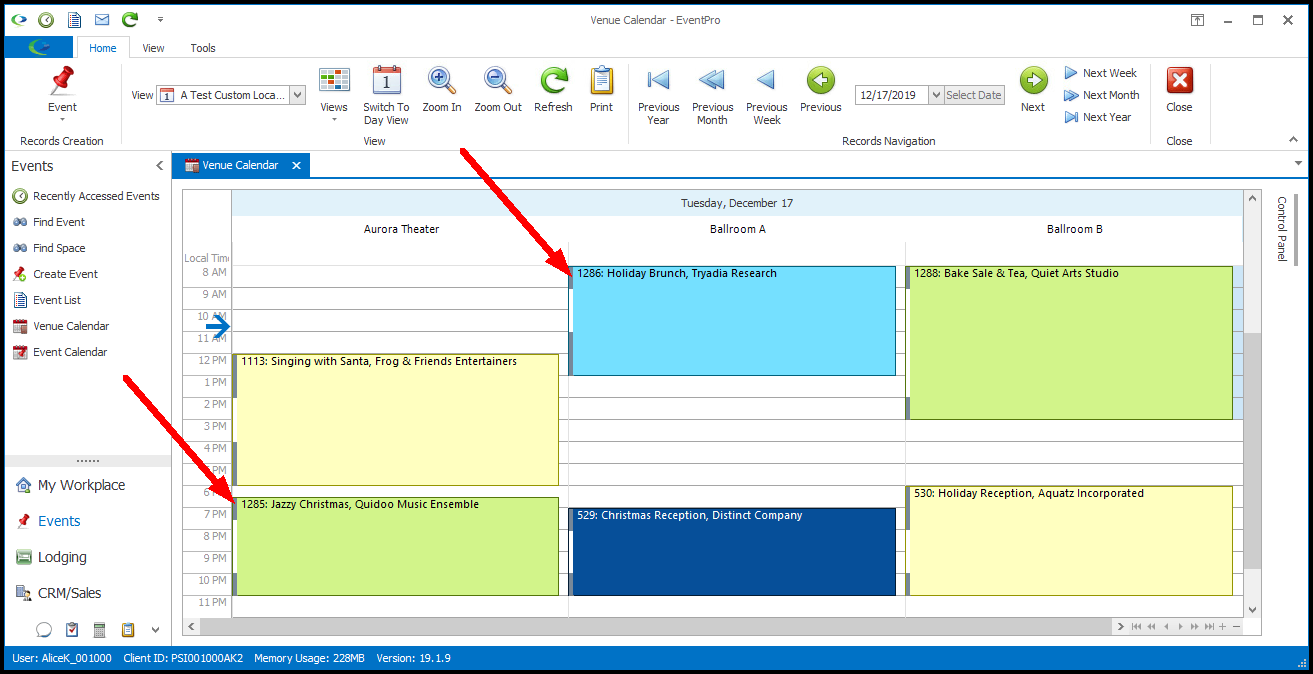
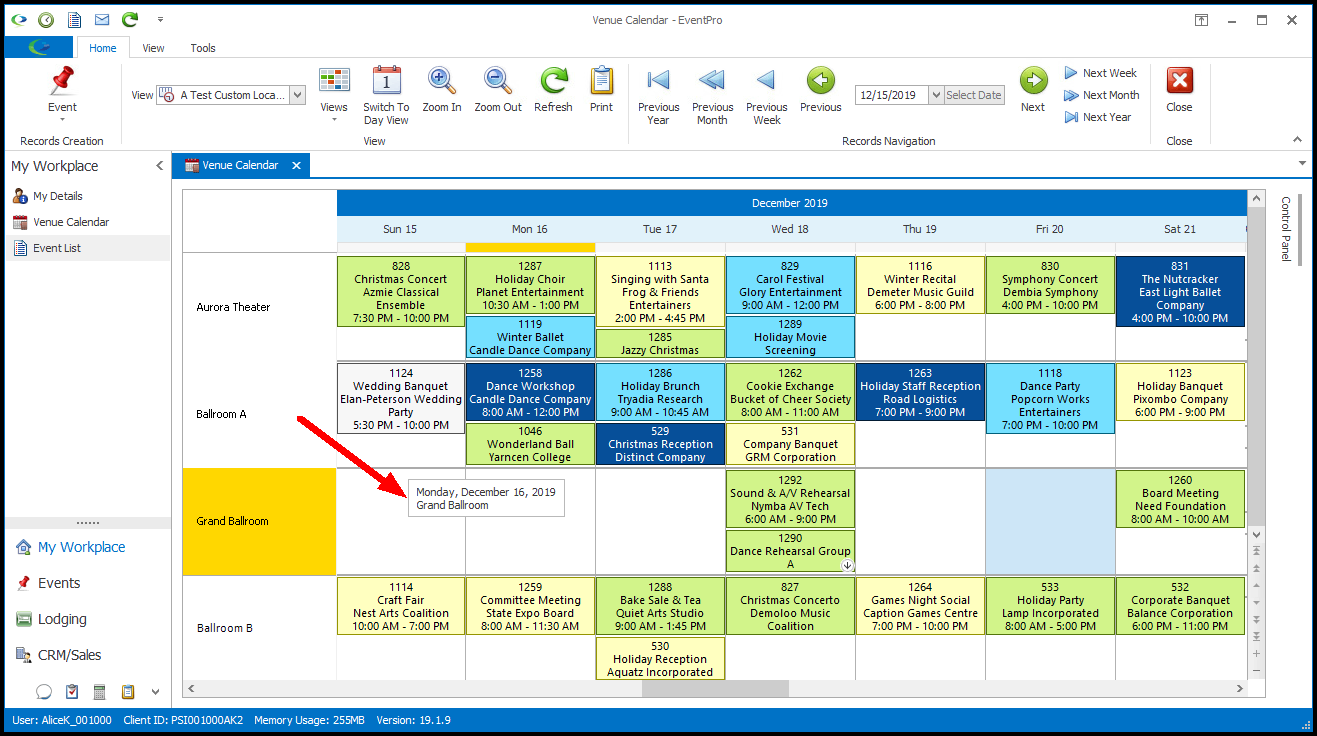
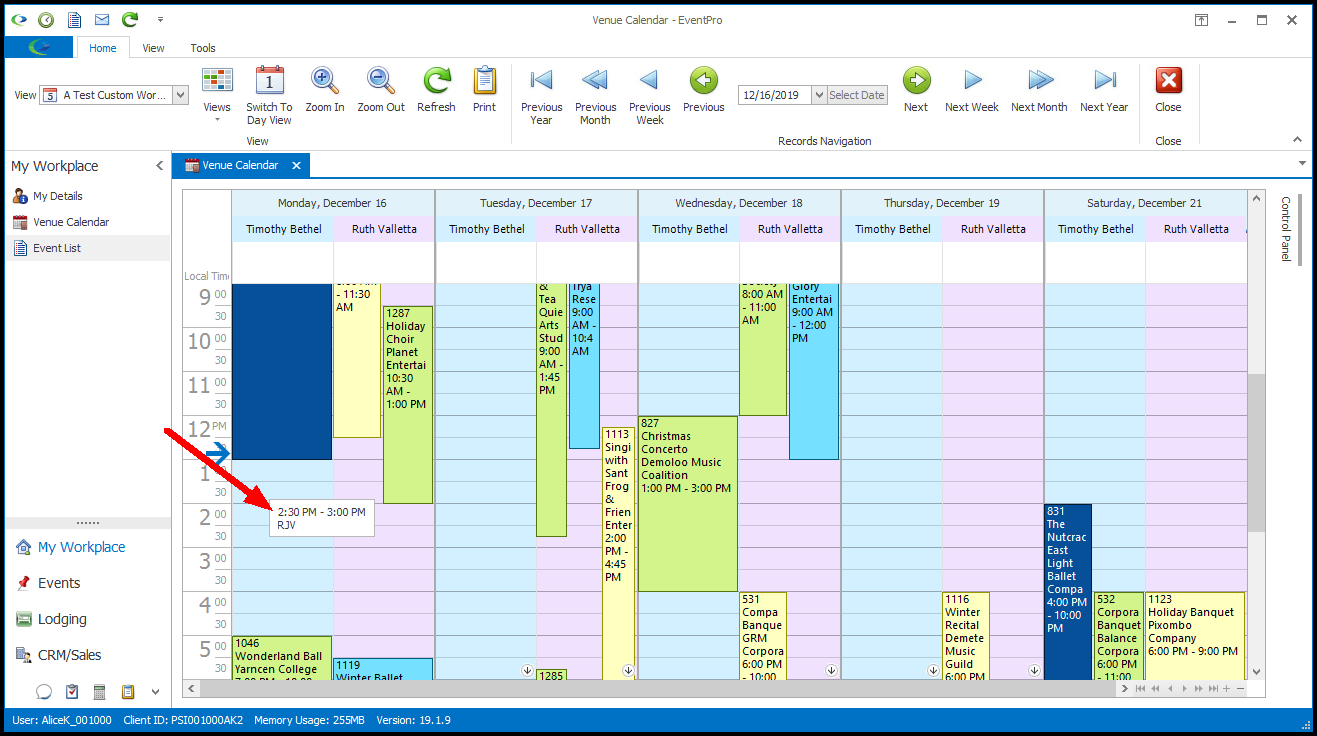
8.More Day View: From the drop-down, select the Day View that the current view will switch to when clicking the Switch to Day View button in the ribbon above the calendar.
This is also the Day View that the calendar will switch to if you click the small arrow icon indicating that there are more appointments in a given cell.
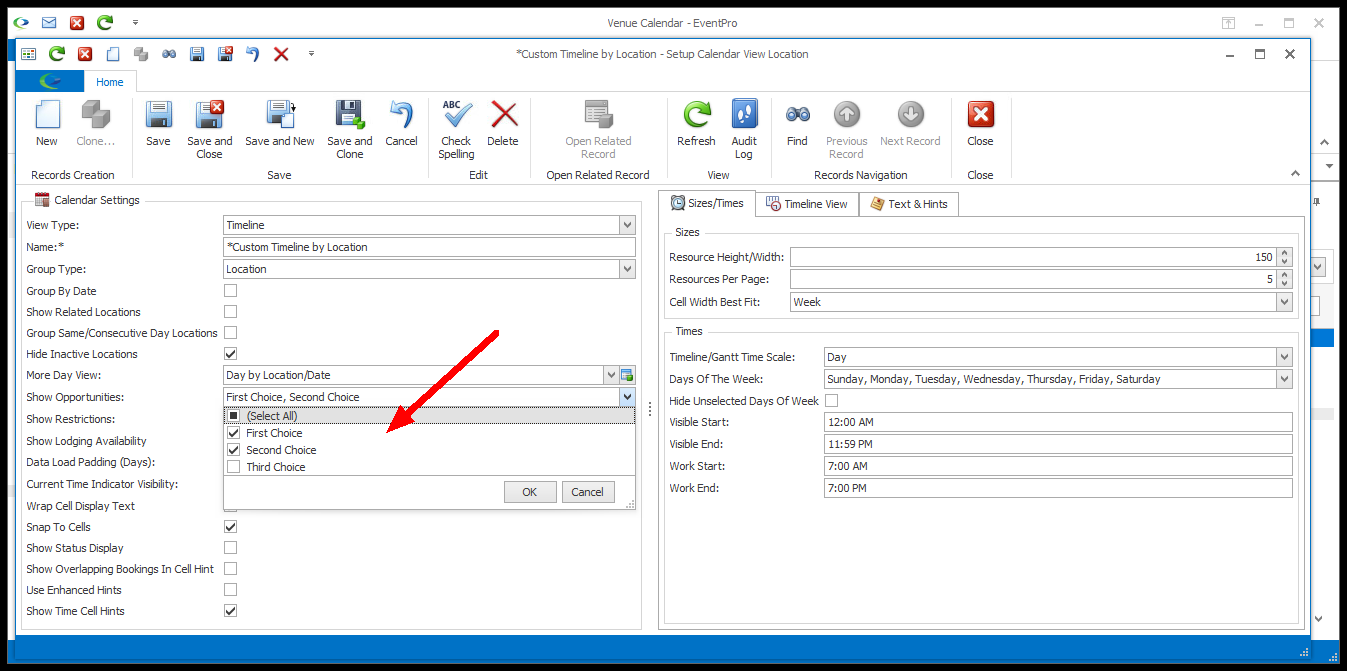
9.Show Opportunities: From the Show Opportunities drop-down, select the type of Opportunity Preferred Dates/Times you want to view (if any) on this calendar view - First Choice, Second Choice, and/or Third Choice - and click OK.
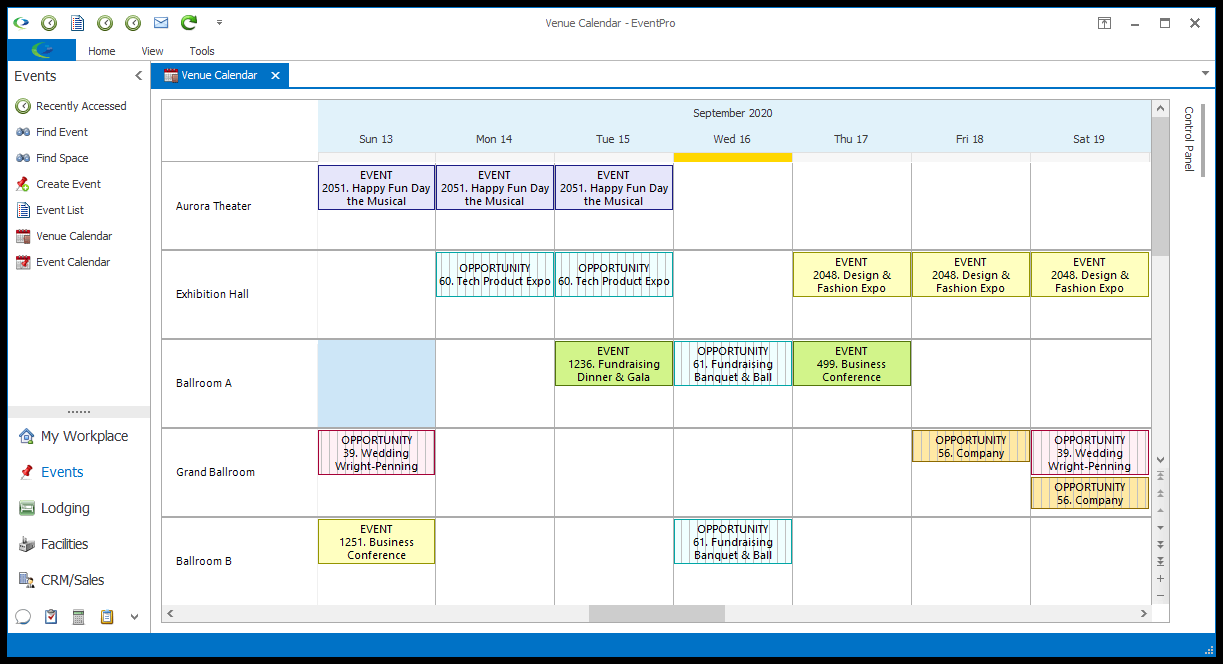
If displayed, the Opportunity appointment spaces will contain a vertically striped pattern fill to distinguish them from Events.
If you do not want to show any Opportunities in this calendar view, unselect all of the checkboxes and click OK.

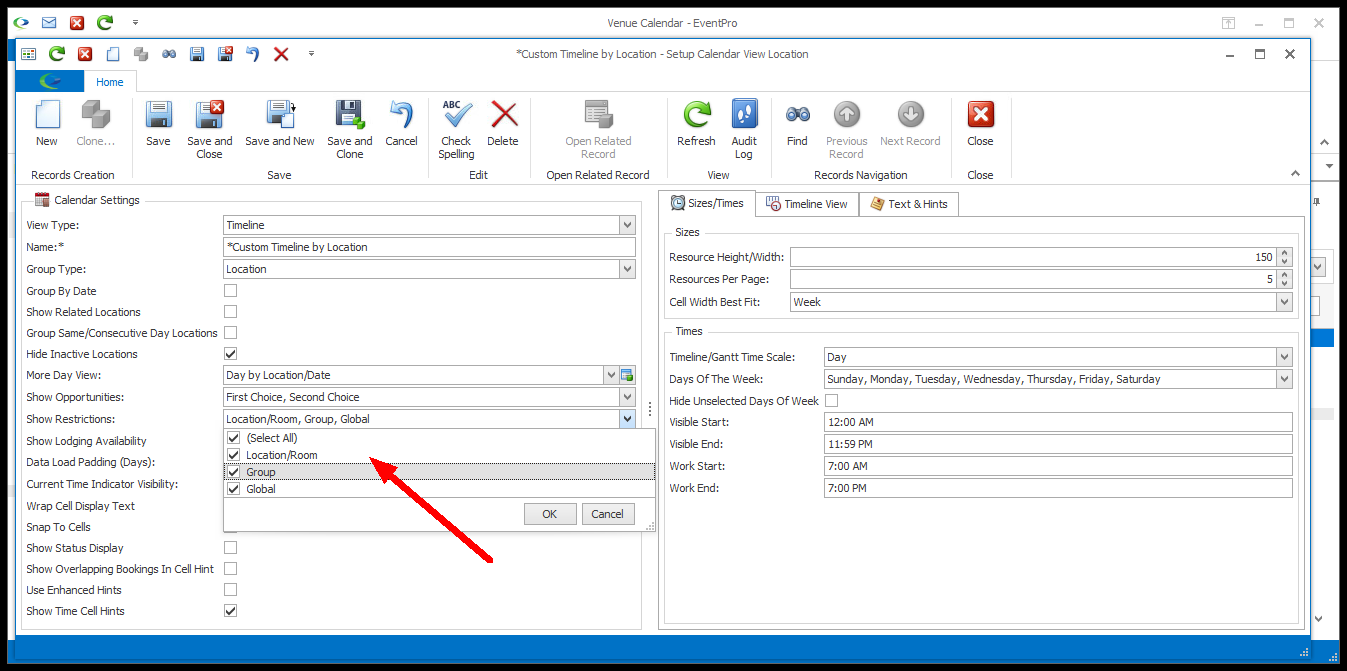
10.Show Restrictions: From the Show Restrictions drop-down, select the type of Restrictions you want to view (if any) on this calendar view - Location/Room, Group and/or Global - and click OK. If you do not want to show any Restrictions in this calendar view, unselect all of the checkboxes and click OK.
a.However, note that even if you choose to show certain types of Restrictions in the calendar view, the Restrictions themselves may be marked to not appear in certain calendar views.
b.When setting up Venue Restrictions, you can choose in which types of Calendar Views a Restriction will be visible (Calendar Options).
c.For example, let's say you set up a Restriction, and you unselect its "Show On Timeline Views" checkbox, i.e. hiding the Restriction from Timeline views. Even if you set your Timeline Views to show All Restrictions, the Timeline Views will not display that Restriction.
d.On the other hand, let's say you select the "Show On Timeline Views" checkbox for the Restriction, but set one of your Timeline Views to hide all Restrictions (Show Restrictions = None). Once again, you will not be able to see that Restriction on that particular Timeline View.
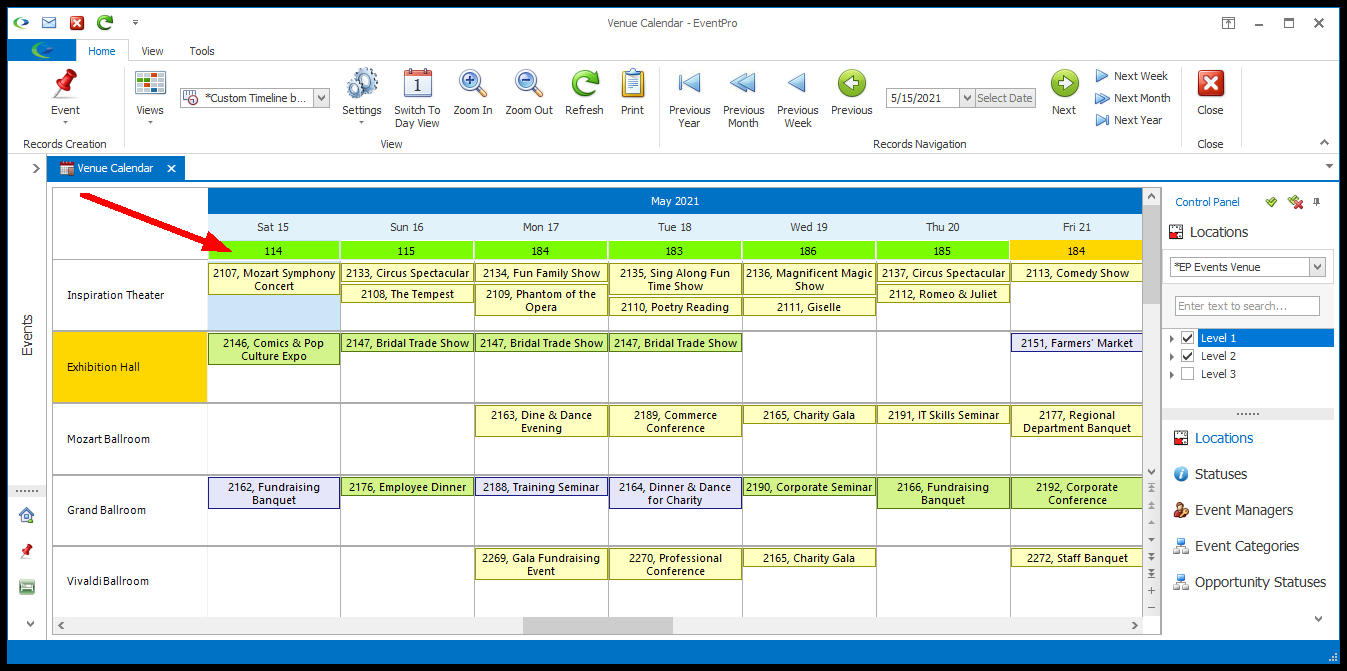
11.Show Lodging Availability: This setting is applicable to Timeline and Gantt Views. Select this Show Lodging Availability checkbox if you want the total availability of all Lodging Rooms for each day displayed in a row at the top of the calendar grid.
To review how your Lodging Facility was set up, see EventPro Setup > Facilities > Hotel Information > Rooms.
12.Data Load Padding (Days): This settings controls how many days on either side of the displayed calendar dates are loaded when new data is needed. Enter the number of days you want loaded on either side of the displayed dates in this calendar view. Setting this value higher will result in slower load times, as more data is loaded at a time, but it will also provide smoother date-to-date scrolling.
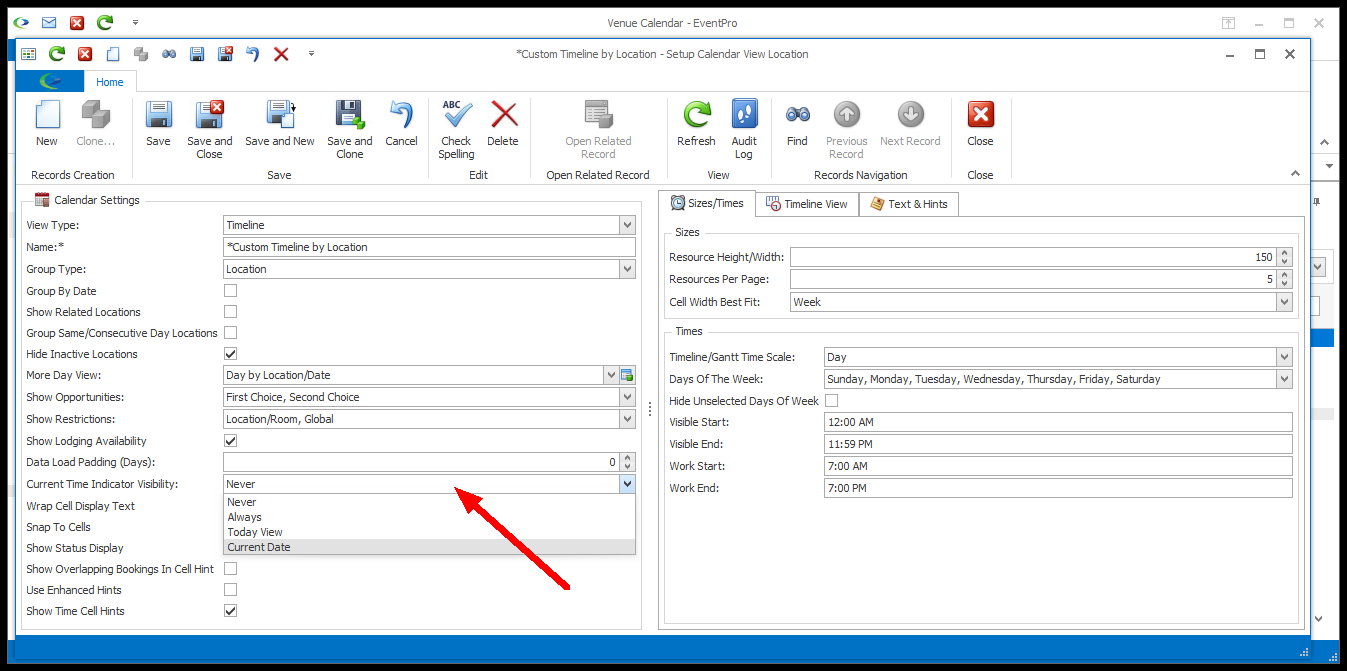
13.Current Time Indicator Visibility: This setting controls if and when the Current Time Indicator is visible. The Current Time Indicator is a line that runs horizontally or vertically through the calendar, indicating the current time.
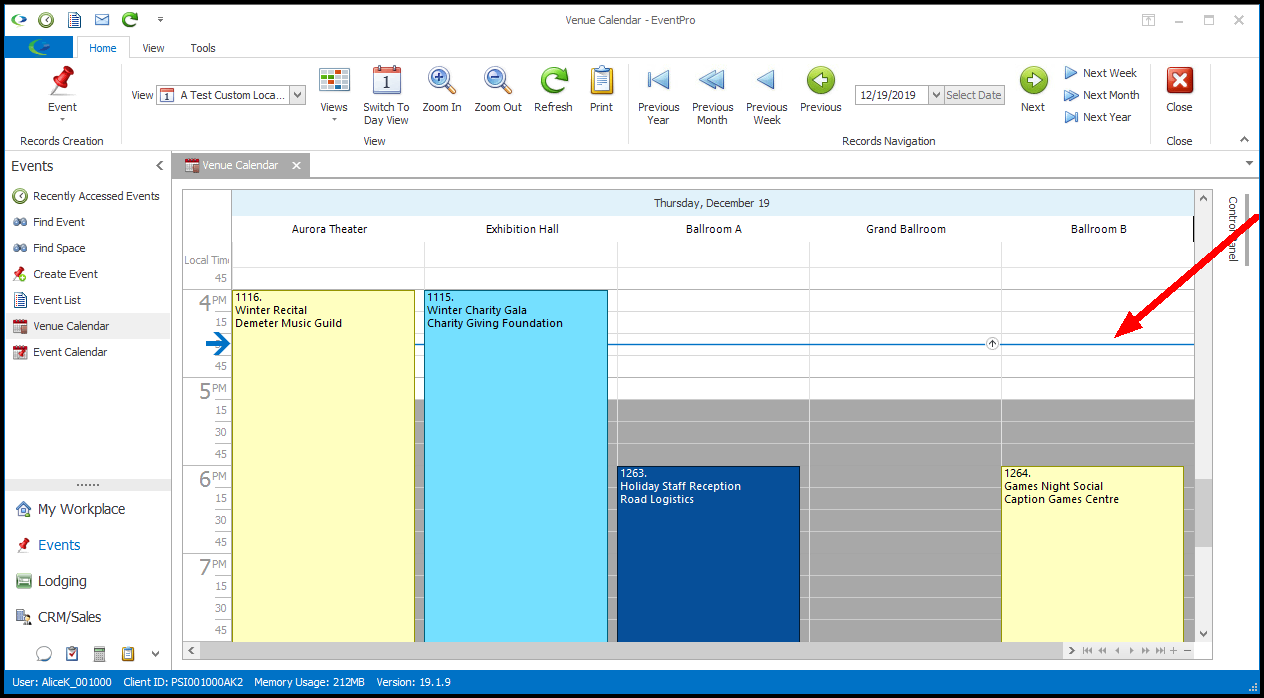

From the drop-down, choose which Current Time Indicator option you want to use for this calendar view.
a.Never: The Current Time Indicator line is never visible.
b.Always: The Current Time Indicator line will appear on every date.
c.Today View: The Current Time Indicator line appears only on the dates of the view including today's date, e.g. for the week containing today's date.
d.Current Day: The Current Time Indicator line appears only on the current date.
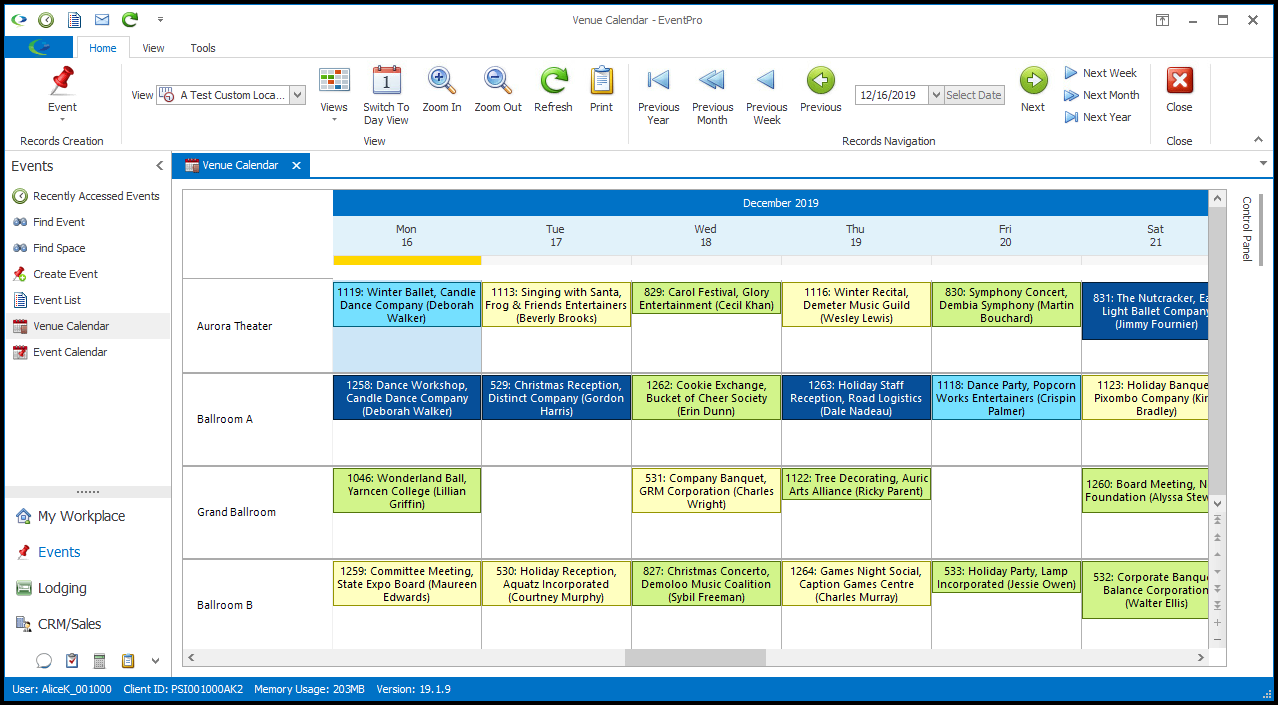
14.Wrap Cell Display Text: Select this checkbox if you want to allow cell display text to wrap if required.
15.Snap to Cells: Select the Snap to Cells checkbox if you want the appointments stretched to fill the cell width or height boundaries (depending on the type of view). If you unselect this checkbox, each appointment's visible width or length is proportional to its duration.

16.Show Status Display: Select this Show Status Display checkbox if you want the calendar to display visible status lines indicating appointment duration, with white representing the function duration and grey representing the setup/teardown durations. If you do not want the status display bars to appear in the calendar, unselect this checkbox.
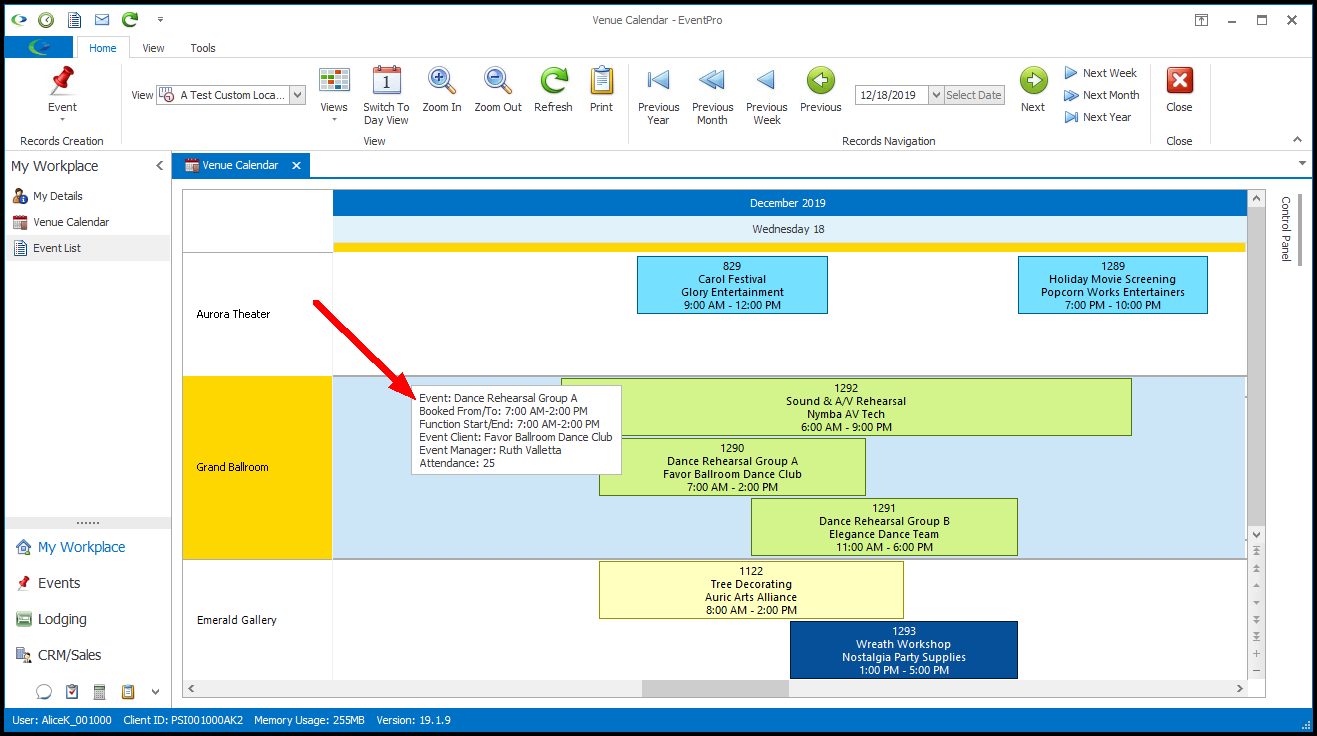
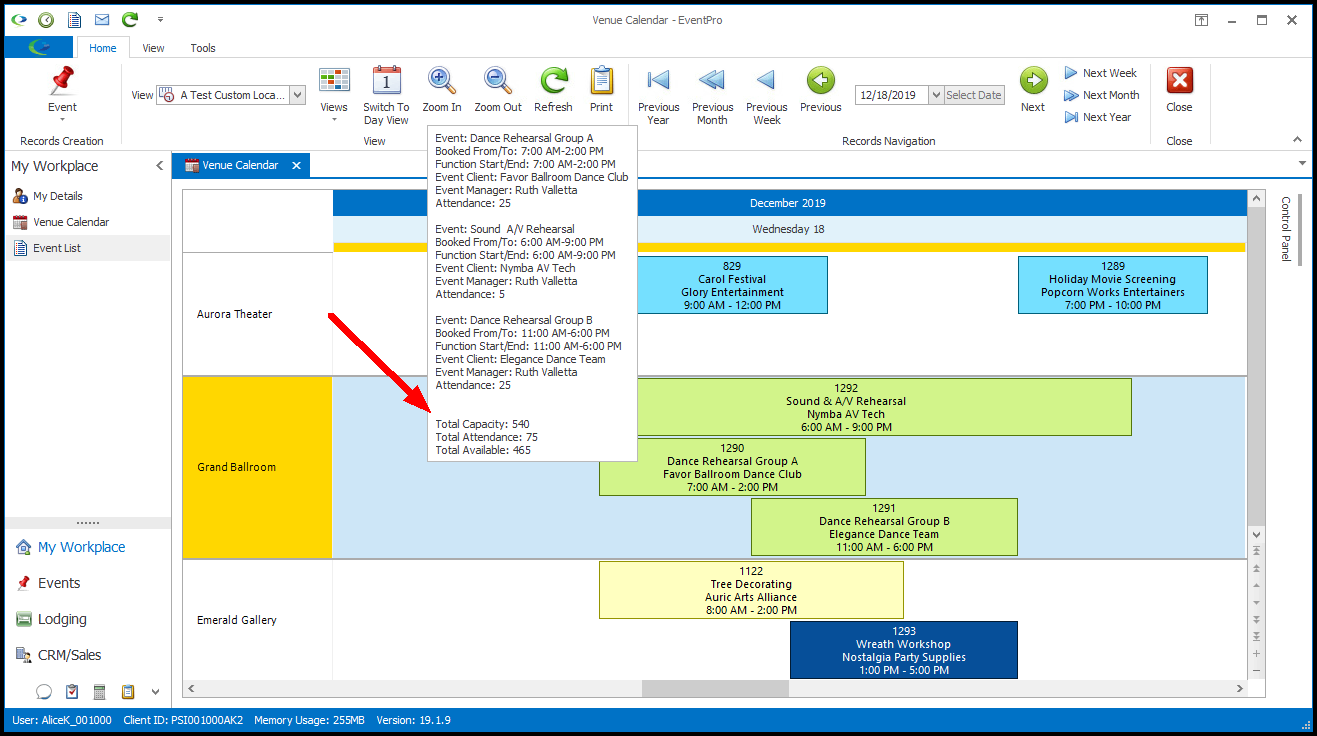
17.Show Overlapping Bookings in Cell Hint: If you select this checkbox, the hover hint will display the information for the relevant booked location, plus information for any other bookings that overlap in the particular space. It will also add a capacity summary at the end of the hint that totals up the attendance of all overlapping bookings.
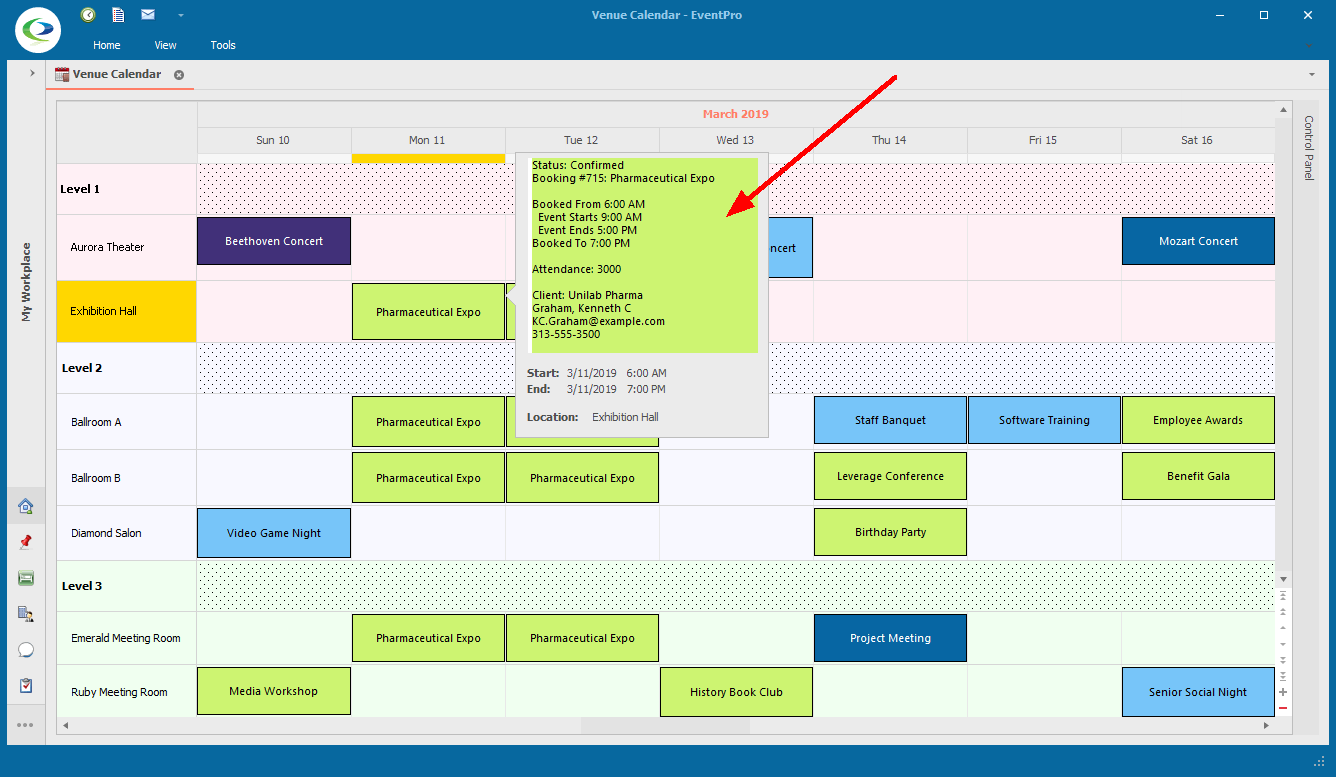
18.Use Enhanced Hints: If you want to use "Enhanced Hints" for a calendar view, select the new Use Enhanced Hints checkbox.
a.An Enhanced Hint will still use the selected Hint text for the view, but it will add the Start/End Dates & Times and Location to the bottom of the hint, regardless of what the Hint text displays.
b.The Enhanced Hint will also contain a block of color coding to indicate the Status, except in a "by Status" view, where the color-coded block will use the background color of the Booked Location's Group.
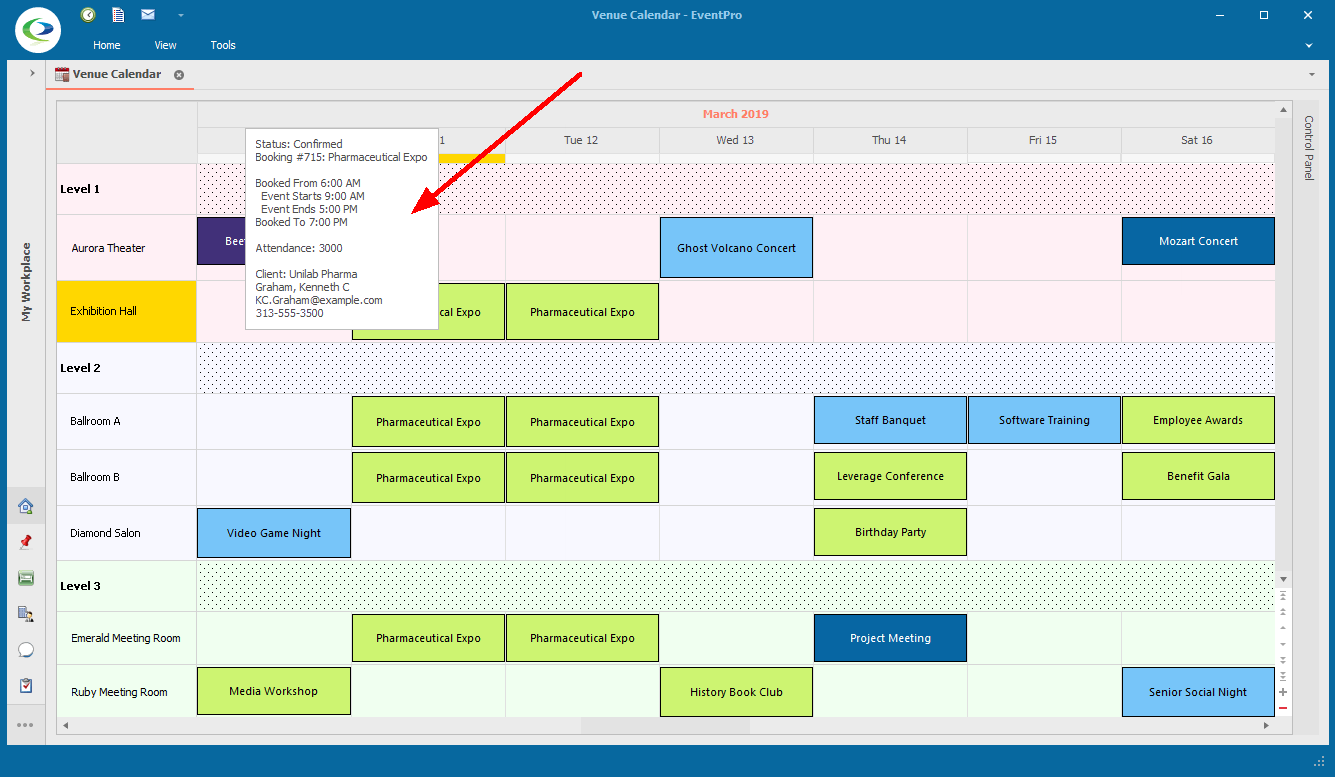

19.Show Time Cell Hints: If selected, this "Show Time Cell Hints" setting will produce a pop-up indicating the Time Slot and Location (or Event Manager, Status, or Category) of the cell over which you are hovering your mouse.
Next, you can adjust the Sizes/Times settings for the calendar view.