•In the Basic Event Information page of the Event Creation Wizard, you can enter the preliminary details of the event. You do not need enter information in every field in this form. You only need to enter an Event Name in order to continue booking the event. You can always fill in the other details about the event later.
•If you chose to connect this event booking to an existing Opportunity earlier in the wizard (the Opportunity Options and Opportunity Information pages), some of the basic event information will be filled in, using the existing Opportunity's information. You can, however, make changes to the event information here, as you require.
•If you are creating a Copy of an existing event, the basic event information will be copied from the previous event. You can, however, change any of the basic event information you require for the purposes of your new event booking.
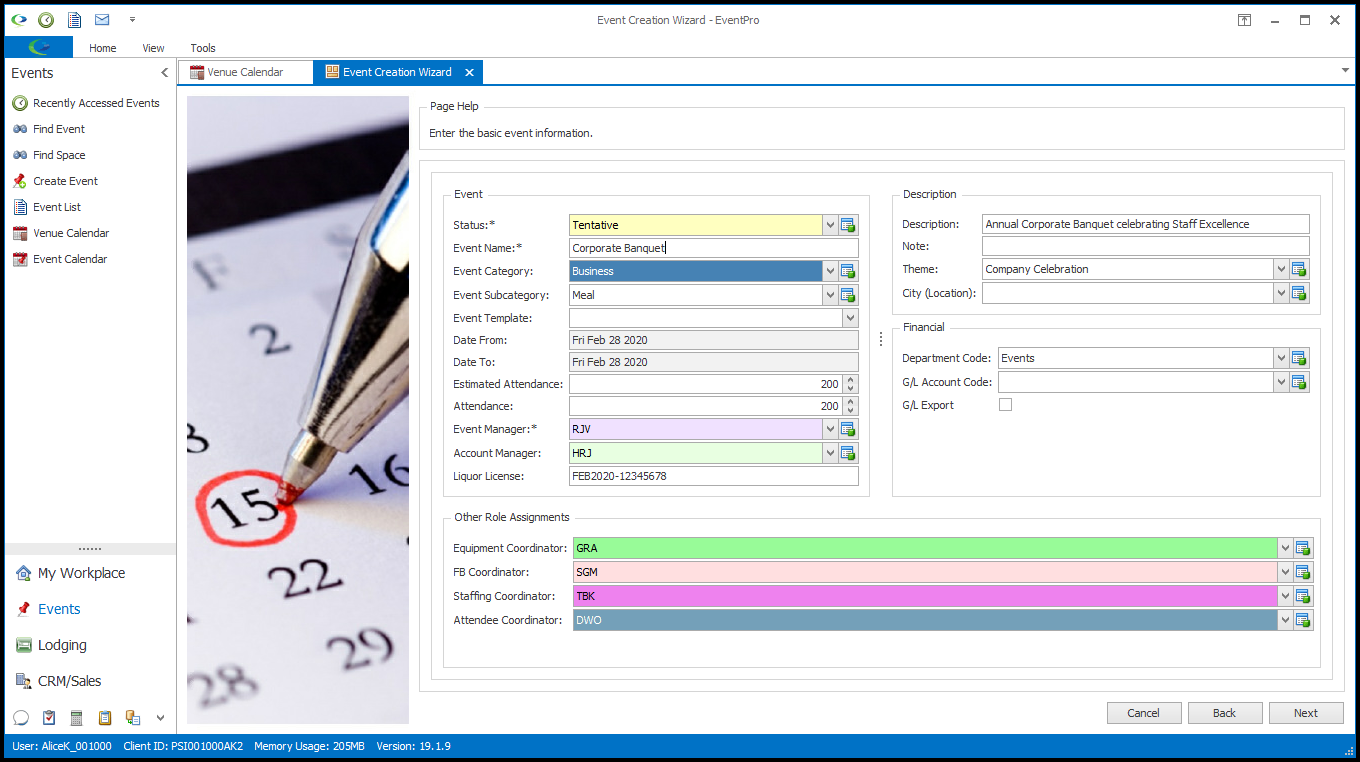
1.Event:
a.Status: The Status will initially be set to the Default Status determined under EventPro Setup > Events > Event Statuses.
If applicable, you can select a different Status from the drop-down list, which is populated by the records you created under EventPro Setup > Events > Event Statuses.
b.Event Name: Enter a name for the event.
How you name your events is entirely up to your organization. You may find it helpful to establish a naming convention that everyone at your organization uses, as it will make it easier to later sort, organize, and find events.
c.Event Category and Event Subcategory: If applicable, you can select an Event Category and Event Subcategory from the drop-down lists, which are populated by the records you created under Setup Event Categories.
d.Event Template: In EventPro Setup, you may have created Event Templates that automatically pull selected details into an event. Review EventPro Setup > Events > Event Templates.
An Event Template may already be selected by default, if it was assigned to the Event Category or Subcategory you selected above.
You can also manually select an Event Template from this drop-down list, if there are any in Setup.
e.Date From and Date To: These view-only fields will display the booked date range of the event.
f.Estimated Attendance: Enter the number representing the Estimated Attendance for the event.
This is the estimated attendance for the overall event, even if the event contains multiple booked locations. You will be able to set a different attendance for booked locations later in the Event Creation Wizard (see Booked Location Defaults).
g.Attendance: You can enter an Attendance number here, or it may have already defaulted to match the Estimated Attendance, depending on the Default Actual Attendance to Estimated Attendance system setting under EventPro Setup > Events > System Settings. You will be able to enter the actual Attendance number later.
Again, this number represents the overall attendance figure for the entire event. You will be able to set a different attendance for booked locations later in the Event Creation Wizard (see Booked Location Defaults).
h.Event Manager: The Event Manager is the EventPro User who will be the main point of contact for this event at your organization.
i.The Event Manager may be set by default. In your Events System Settings, you could choose to "Automatically Assign Events to User Creating the Booking", or select a Default Event Manager.
ii.If you have no default set, or want to change from the default, you can select the Event Manager from the User drop-down list. Users are set up under Security Setup > Users.
i.Account Manager: The Account Manager may already be set by default.
i.If the Event Client has an assigned Account Manager, it will first default to that User.
ii.If the Event Client does not have an assigned Account Manager, but you have a Default Account Manager set up in your Events System Settings, it will default to that user.
iii.If there is no default, or you want to select one manually, you can choose a different Account Manager from among your EventPro Users in this drop-down, if you wish. As you will recall, Users are set up under Security Setup > Users.
j.Liquor License: If applicable, you can enter the Liquor License number in this field.
2.Description:
a.Description: You can add a more detailed Description of the event in this field.
b.Note: There will be other places where you can keep event notes, but if there is a note of particular importance about this event, you can enter it in this Note field.
c.Theme: Select the theme of this event, if applicable. This drop-down is populated by the themes you created under EventPro Setup > Events > Event Themes.
d.City (Location): This field isn't typically important for events booked from the Venue Calendar (since the Venue's city is already defined), but if necessary, you can select the applicable City from this drop-down. Cities are set up under EventPro Setup > General > Cities.
3.Financial:
a.Department Code: If applicable, choose a Department Code from the drop-down list populated by records created under EventPro Setup > Financial > Department Codes.
b.G/L Account Code and G/L Export: If the Event Client's CRM Account is flagged for G/L Export, and its G/L Account Code is set, those values will default into these fields. If applicable, you can select the G/L Export checkbox and choose a G/L Account Code here.
4.Other Role Assignments: For each Event Role you created under EventPro Setup > Events > Event Roles, you can select the responsible User. Default Users may have already been defined for the Event Roles in Event Roles Setup, or you can manually select from the Users set up under Security Setup > Users.
5.When you have filled out whatever you need for Basic Event Information, click Next.