|
Breadcrumb Trail: Event Management > Manage Event Finances > Manage Deposits Method 3: Tracked Refundable Deposit |
Scroll Prev Top Next More |
•In this scenario, you will collect a deposit payment from the event client, and later return that amount to the event client (assuming that the conditions of return have been met).
•The most effective way of handling this kind of deposit is using Event Miscellaneous Items. This method allows you to track the deposit money coming in and going out, and include it in event reporting.

•If they haven't already been created, you need to create specialized Deposit Items in Resource Setup, and assign them a Financial Subgroup that makes it easy to split Deposit charges out from other Event Charges. •In our example, we set up a special Financial Subgroup called "Deposit" under the Financial Subgroup Type "Miscellaneous". (Review EventPro Setup > Financial > Financial Subgroups.) 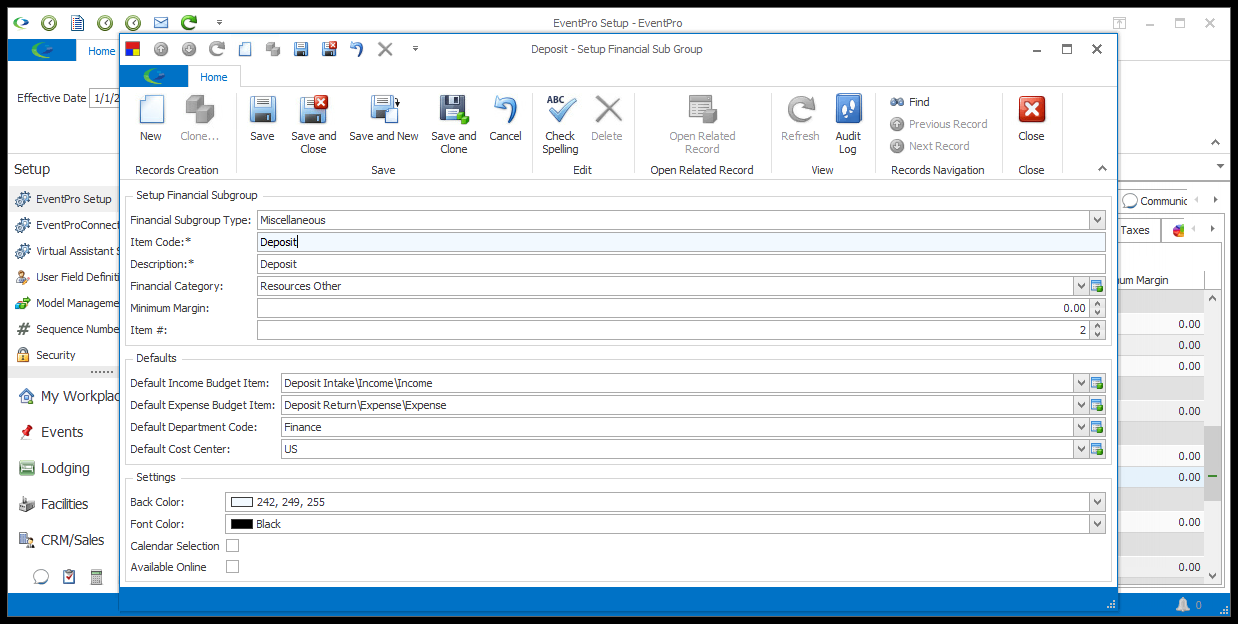 •Then we created two Deposit-related Setup Miscellaneous Items: oA Deposit In item for a given amount. In our example, we used $1,000.00.  oA Deposit Out item for the equivalent but negative amount. In our example, we used -$1,000.00.  •You could also call these Deposit Items something like Deposit In/Deposit Out, or Deposit Received/Deposit Returned, or whatever terminology your organization uses. •Make sure that you assign the correct Setup Financial Subgroup to the Deposit Items, so that you can later separate the Deposit Items out from other charges. We have assigned our "Deposit" Setup Financial Subgroup to these items. (Note that because the Deposit subgroup is part of the Miscellaneous Financial Sub Group Type, it will later appear as "Miscellaneous-Deposit" in the Invoice filtering options.) |
•Now we will move over to the Event. Add the Deposit In Item to the Event's Miscellaneous resources. (You can review how to add items to events under Organize Event Resources > Add Miscellaneous Items to Event.) 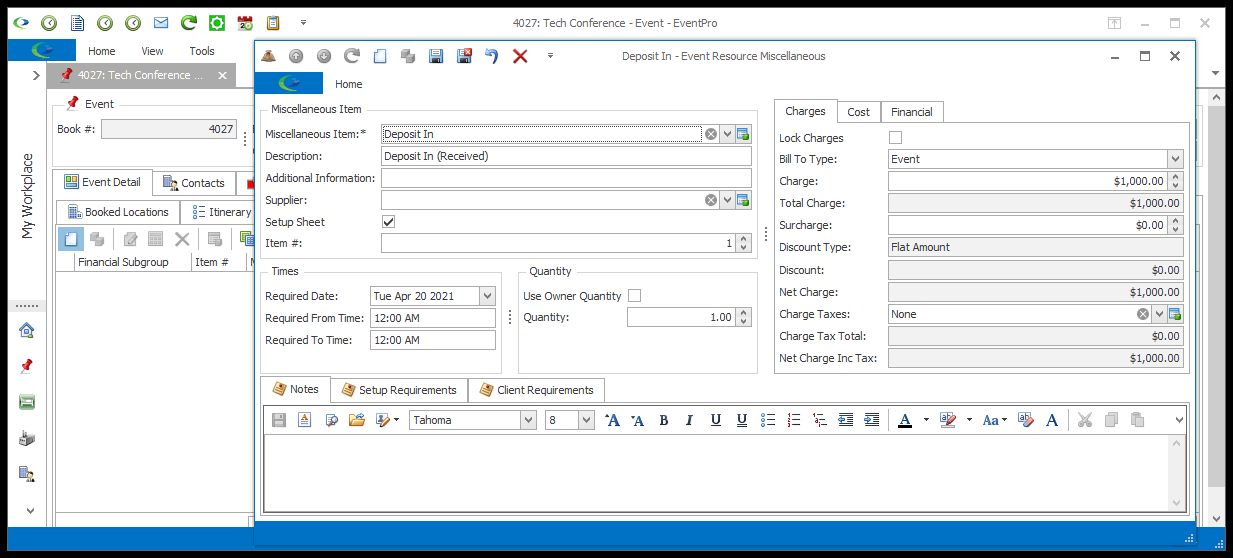 |
•You can now invoice the Event's "Deposit In" Item amount, using a Deposit Invoice. You can use a Deposit-Single or Deposit-Detailed Invoice. In our example, we're using a Deposit-Detailed Invoice.  •IMPORTANT: The critical detail for creating this Invoice is to correctly set the filter in the Creation & Filtering Options so that only the Deposit In Item is gathered into the Invoice. Ensure that the Date From and Date To of the invoice will include the "Deposit In" Item's Date. In our example, remember that our Deposit Items are part of the Financial Sub Group Type "Miscellaneous-Deposit". So, under Select Items to Invoice, from the Invoice By drop-down, we select Financial Sub Group. Then, from the Financial Subgroup drop-down, we select Miscellaneous-Deposit. This will limit the invoice to items from the Financial Subgroup "Miscellaneous-Deposit", i.e. the "Deposit In" Item. (If you set up a different Financial Sub Group or other way of separating out the Deposit Items, ensure you apply that filtering here.) 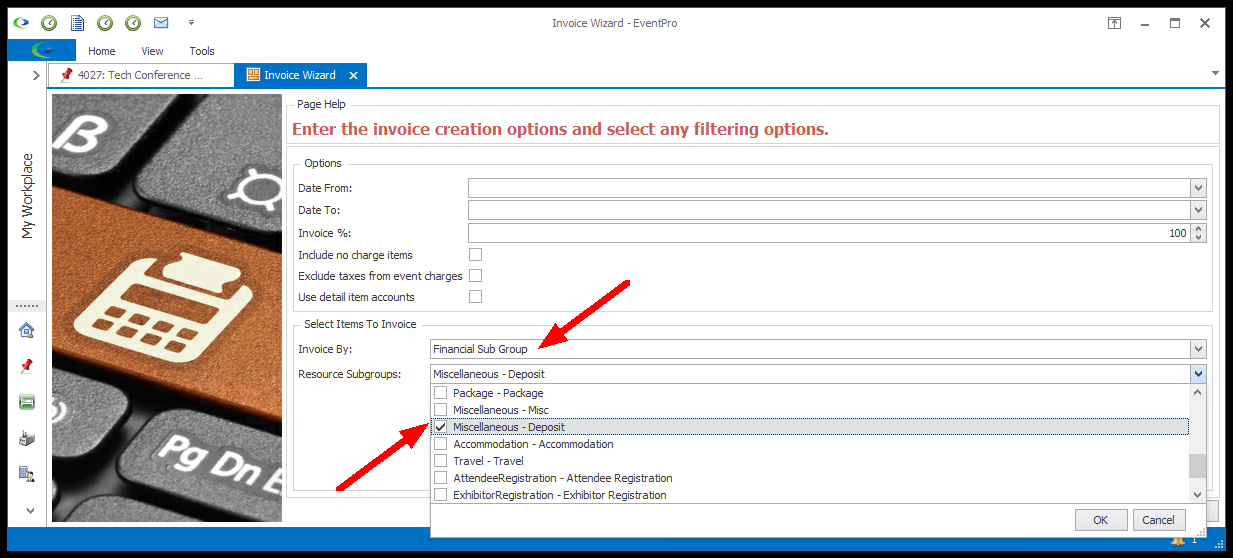 •Continue with the Deposit Invoice. (You can review the instructions under Create Event Invoices > Invoice Wizard.) •When the Invoice is completed, you will see that only the Deposit In item has been invoiced, as intended. 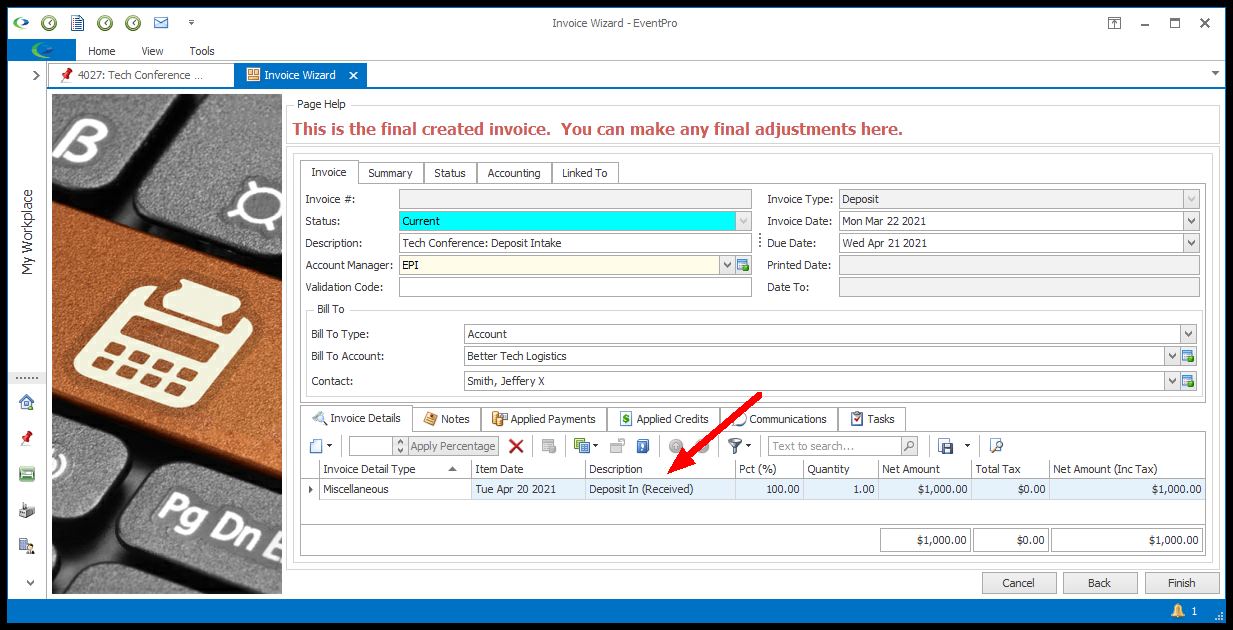 |
•When you receive the client's payment for the Deposit Invoice (for the Deposit Item), you will enter a Deposit Payment. •IMPORTANT: Select the Deposit Receipt Type. Even though we are in the process of creating a deposit that can be refunded, do not select Refundable. 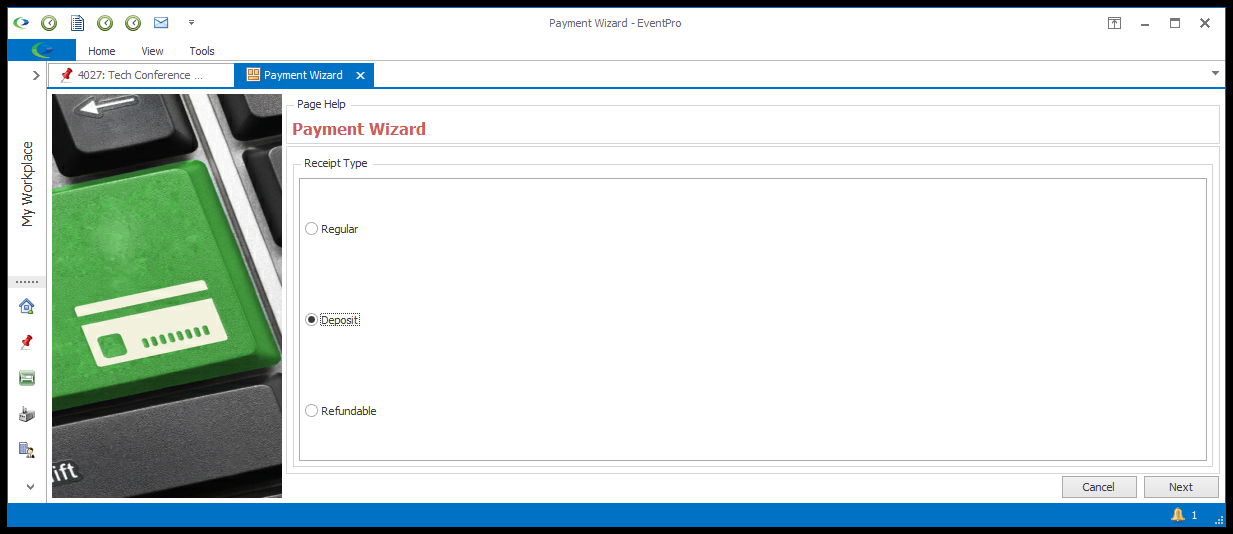 •The important detail to note when entering this payment is the allocation to the correct Invoice. In the last page of the Payment Wizard, under the Payment Details tab, you should see the "Deposit In" Invoice you created earlier. The Deposit Payment amount you are entering should be automatically allocated to that Deposit In Item Invoice. If for some reason it is not, you can edit the allocation of the payment to ensure it goes to the correct Invoice. 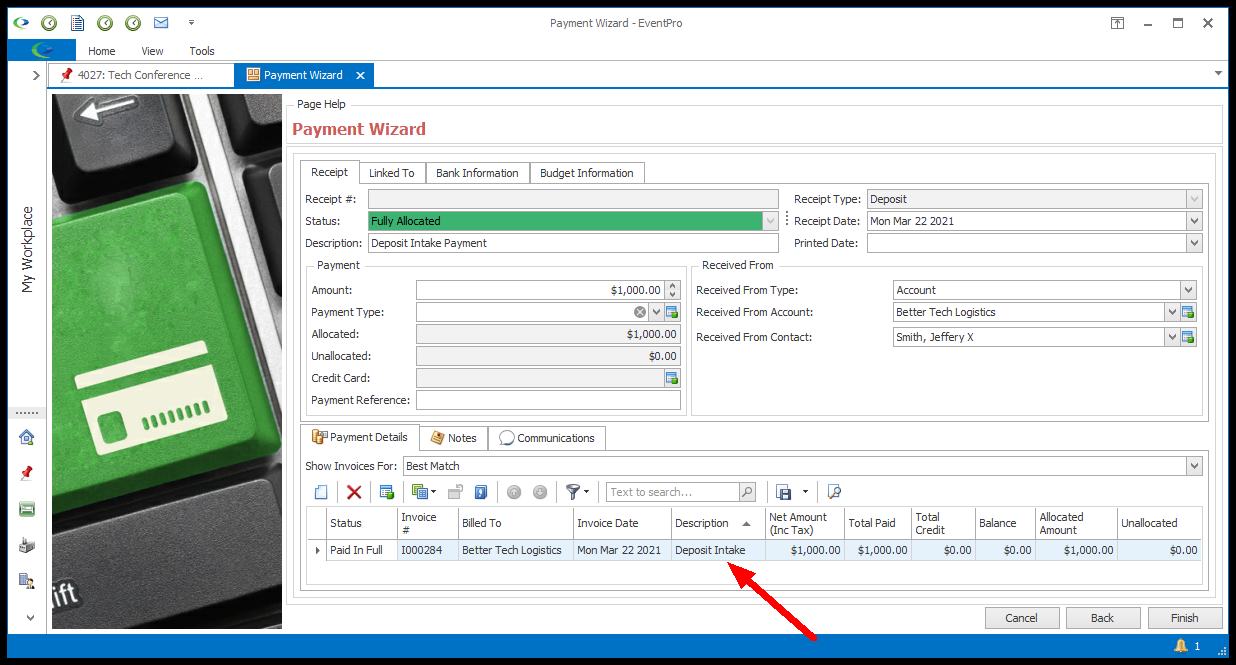 •You may also want to edit the Description of the Payment to add something like "Deposit Payment Received" or "Deposit Payment In", just to make it easier to keep track of the deposit invoice/payment process. •Adjust and Finish the Payment, as required. You can review additional instructions under Receive Event Payments > Payment Wizard. |
•Typically, a deposit isn't returned until after the Event is completed, so that you can assess the situation and ensure the deposit refund is justified. •Do not add the Deposit-Out Miscellaneous item to the event yet. •In our example, we are going to finish billing the Event with a Final Invoice that gathers up all remaining charges, but we will not add the "Deposit Out" Item to the Event yet. We do not want the "Deposit Out" Item to be gathered into the Event's Final Invoice. Instead, we will return the Deposit money in a separate invoice/payment transaction. •Create a Final Invoice for the Event. (You can review the instructions under Create Event Invoices > Invoice Wizard.) 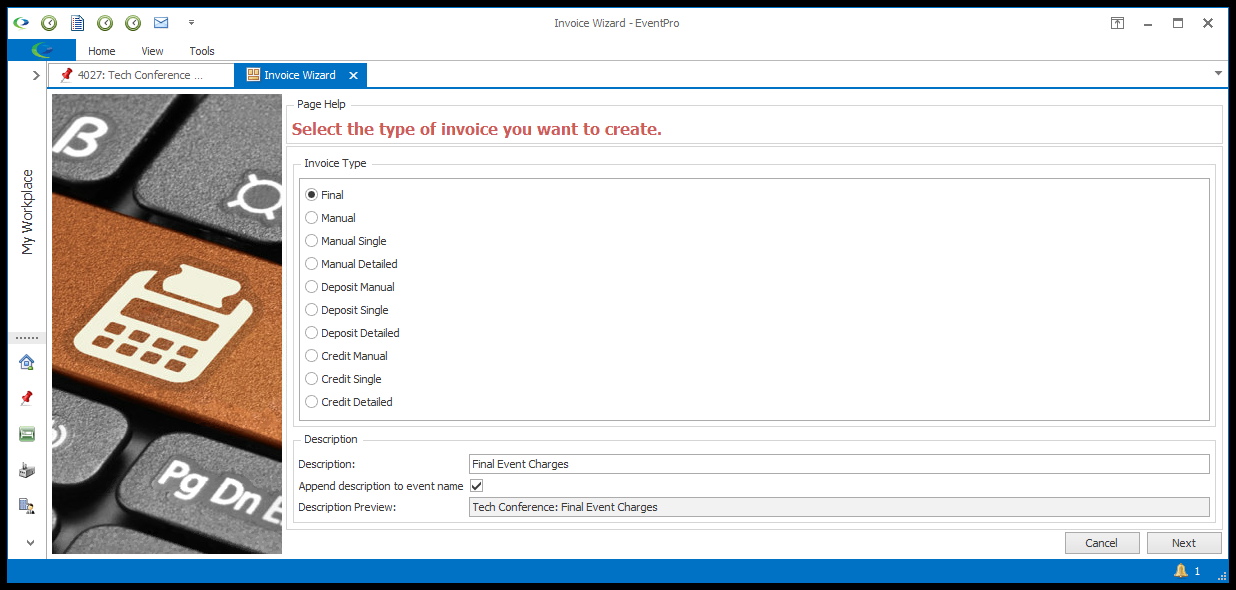 •When you get to the Unapplied Deposit Invoices page of the Invoice Wizard, ensure that the Deposit Intake Invoice is selected. 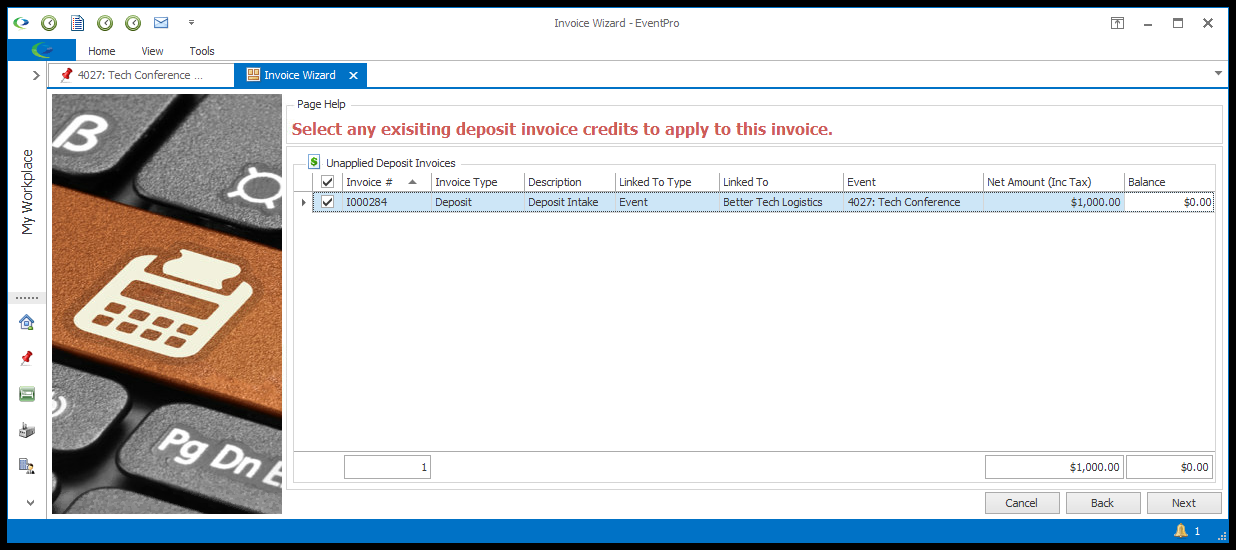 •At the end of the Final Invoice Wizard, you will see that the Deposit-In Invoice and Deposit-In Payment cancel each other out, as intended. 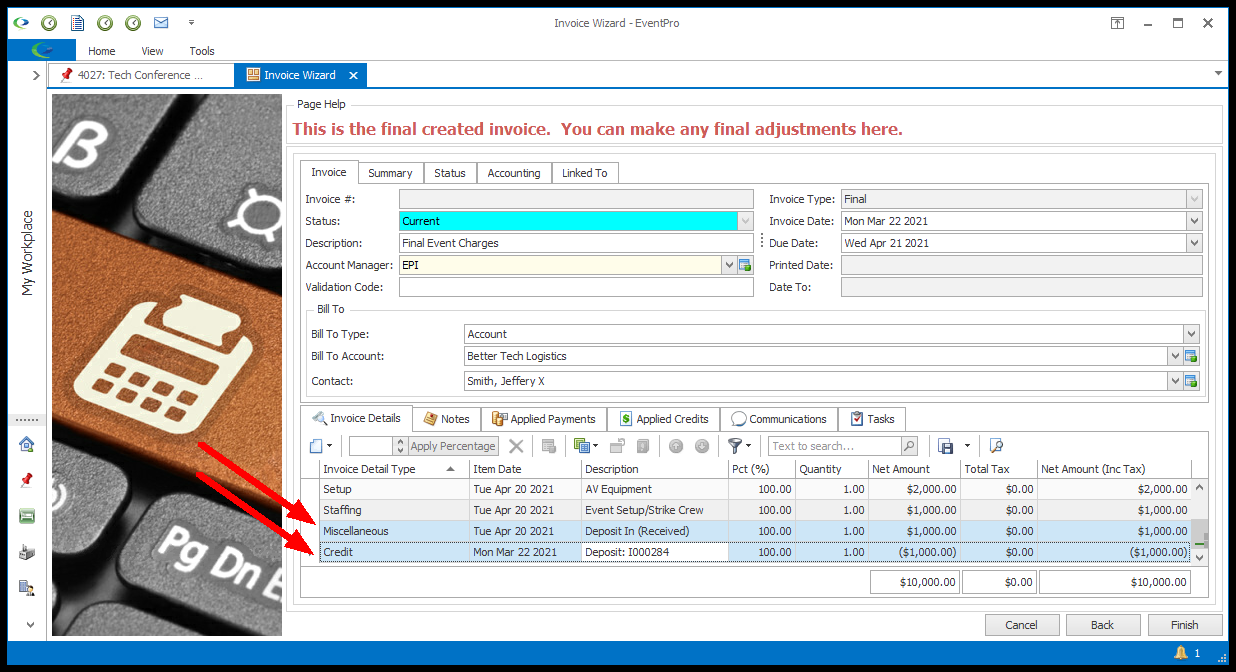 •When the client sends payment, you can process a Regular payment, which will be allocated to the Event's Final Invoice. 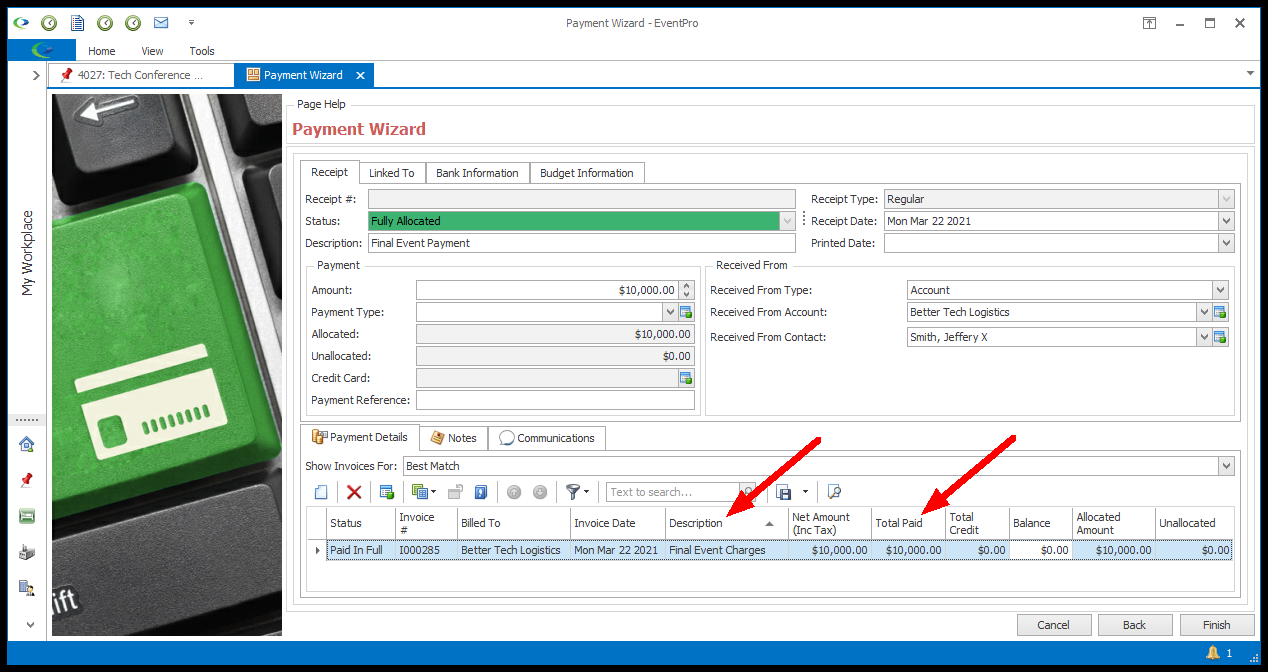 •Now, the Event's Financials are all balanced out, even if you do not return deposit money to the client. If you keep the Deposit money, the income has been recorded under the Miscellaneous-Deposit Financial Subgroup. However, if you will be returning deposit money, continue on to Step 5. 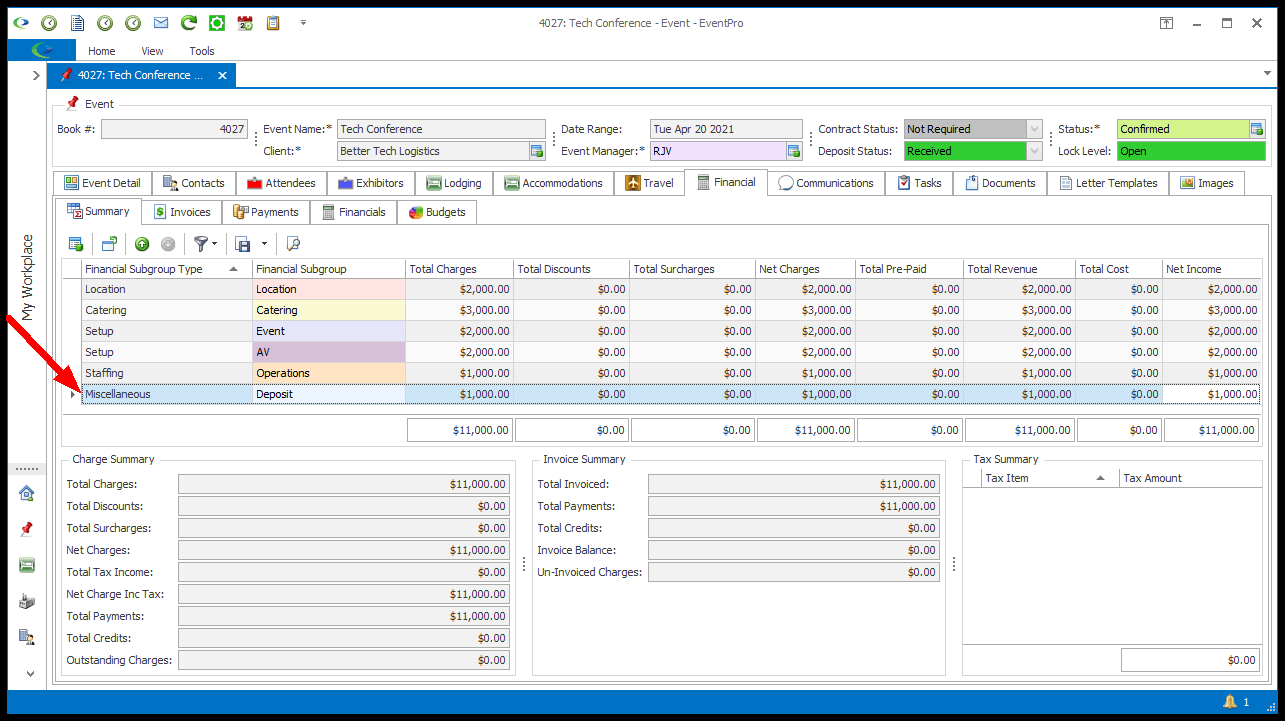 |
•Add the Deposit Out Item to the Event's Miscellaneous resources. (You can review how to add items to events under Organize Event Resources > Add Miscellaneous Items to Event.) •Ensure that the Charge amount is correct, i.e. that it is the negative number of what was charged for the Deposit In Item, or if you are not refunding the entire deposit amount, that you enter the reduced amount here. For example, if the Deposit In item was $1,000, but you are refunding only half of it, you would set the Deposit Out item to -$500. 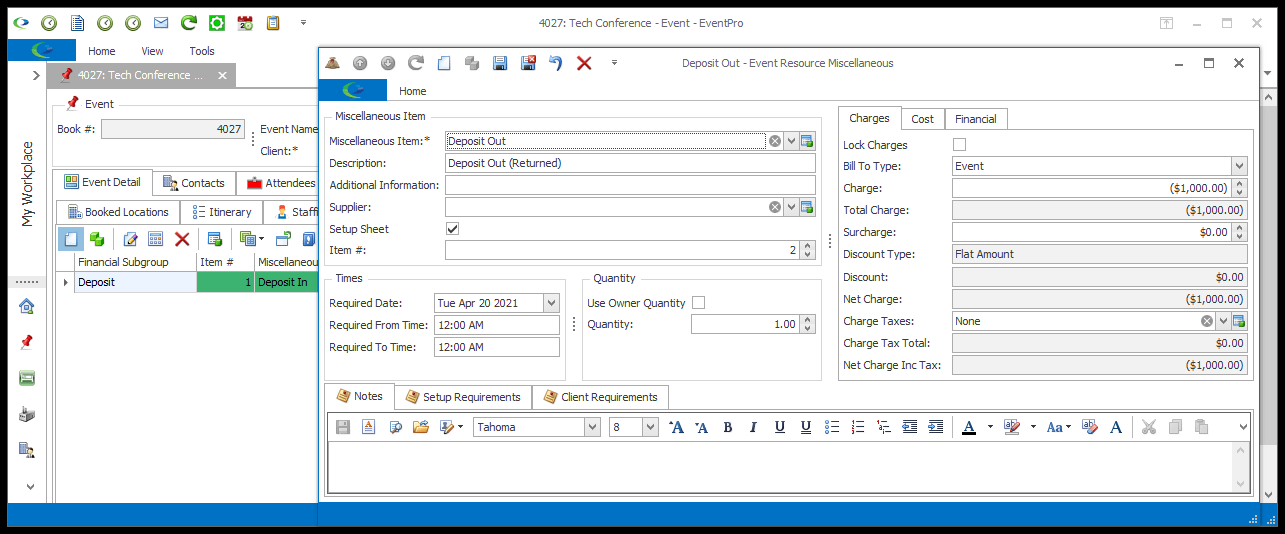 |
•You can now invoice the "Deposit Out" Item, using a Final Invoice. (We used a Deposit-type Invoice for the "Deposit In" item earlier because the Event had not yet occurred. Now that the Event is over and everything else has been invoiced, we will use a Final Invoice to complete the Deposit return process.) •Ensure that you set the Invoice Type to Final. •You shouldn't need to filter the Invoice by Financial Sub Group this time, because the "Deposit Out" Item should be the only charge remaining on the Event. If for some reason you do need to filter for the Deposit Out Item, remember that you can Select Items to Invoice during the Invoice wizard; as before, we would set Invoice By to Financial Sub Group, and select Miscellaneous-Deposit for the Financial Sub Group. •Continue with the Final Invoice, as required. (You can review the instructions under Create Event Invoices > Invoice Wizard.) •You most likely wouldn't send this Invoice to the client, as it is mostly for internal record keeping purposes. Even so, you may want to edit the Description to describe what step of the process this is, for easily distinguishing it from the Deposit In Invoice.  |
•In this final step, in order to refund the deposit, you are actually recording the return of the deposit money to the client by entering a payment as a negative amount. It might seem a bit counter-intuitive at first, but it all balances out quite nicely in the end. •Start a Regular Payment, following the instructions under Receive Event Payments > Payment Wizard. The Receipt Type of the payment must be "Regular". Even though we are in the process of refunding a deposit, do not select Refundable. •IMPORTANT: Enter the Amount you are returning to the event client as a negative number. For example, if the Deposit was $1,000, and you are returning the entire amount, the amount of this payment would be -$1,000. When you enter the negative amount in the Payment Wizard, it will appear in parentheses ($1,000.00) indicating that it is a negative value. 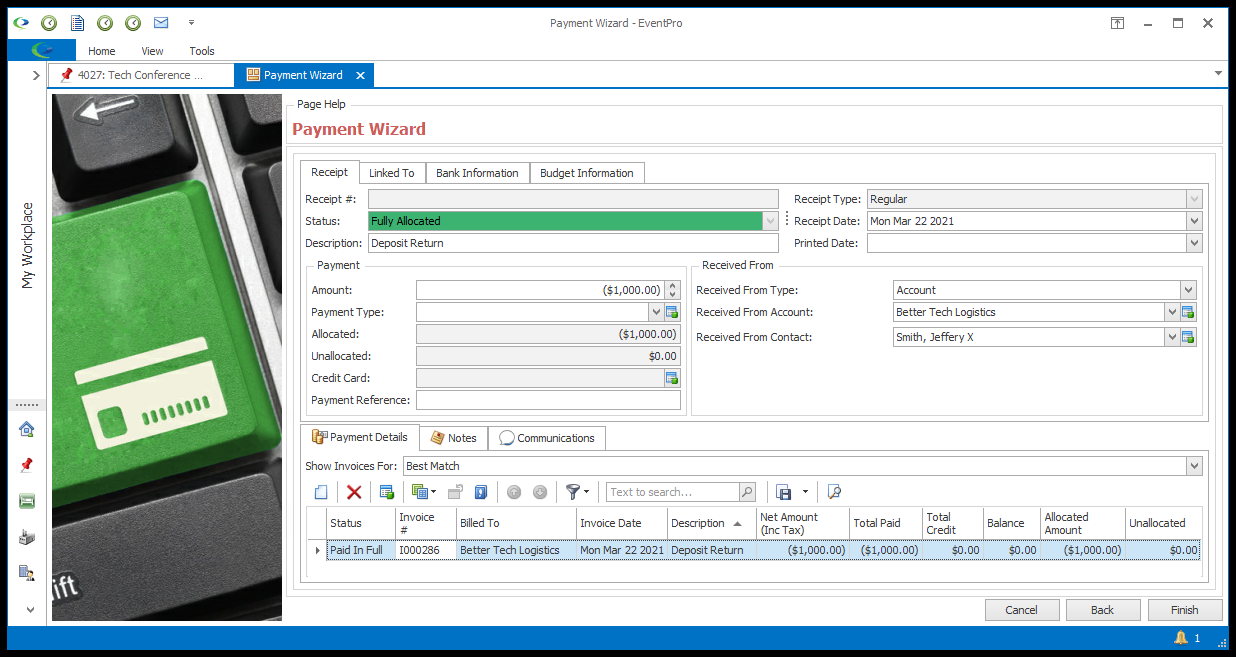 •Under the Payment Details tab, you should see that this payment was automatically allocated to the "Deposit Out" Invoice, and the balance should be zero. •In our example, we have added "Deposit Refund" to the Description, just as a way to make it clear which payment this is. •Finish the Payment Wizard. |
•This last step - Check Event Financials - isn't necessary, but it is useful for illustrating how the deposit item invoice/payment process works out in the end. •In the Event Screen, go to the Financial > Financials tab. As you see, you can track when the Deposit was submitted and returned. 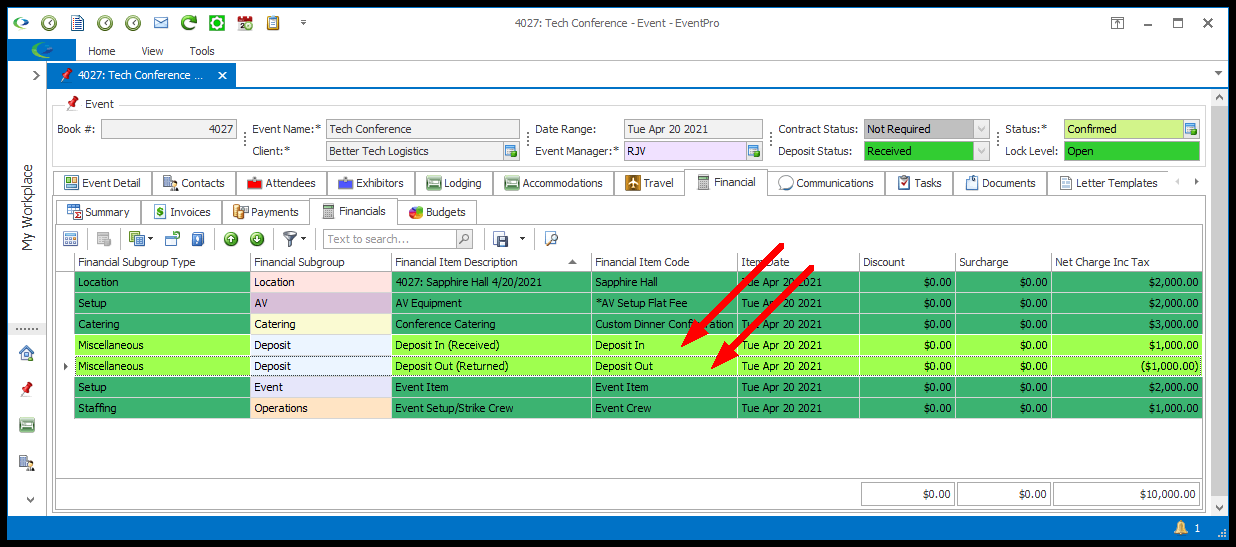 •You can also check the Financial > Summary tab, or run the Event Statement report. 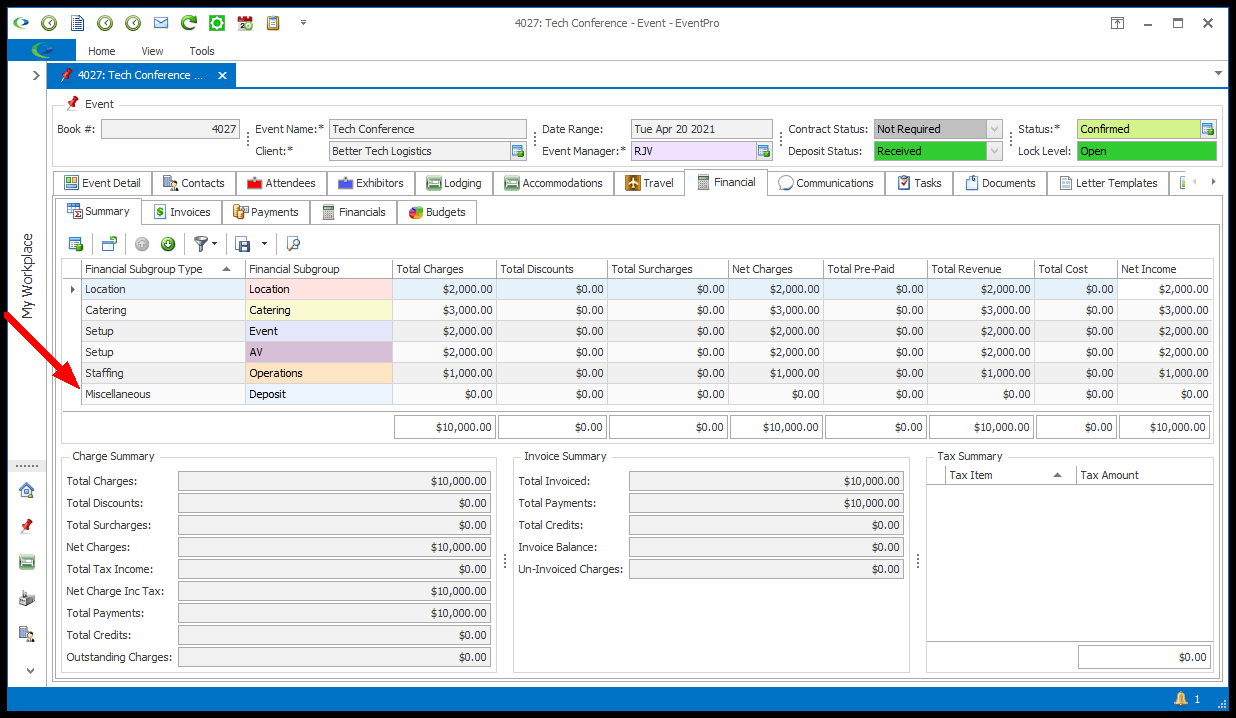 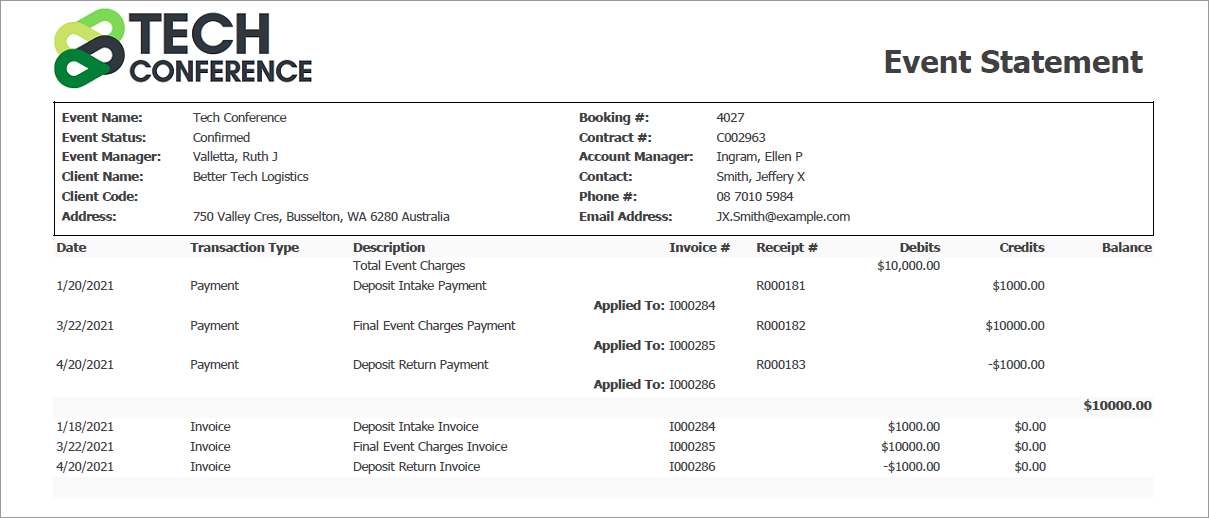 •If you decided to keep some or all of the Deposit money, the income from that non-returned Deposit would appear under the Deposit Financial Subgroup. In this example, we have kept half of the deposit money, i.e. $500 of the $1,000 deposit. In the Event's Financials screen, you can see that the Deposit Out Item has returned only half the Deposit amount. 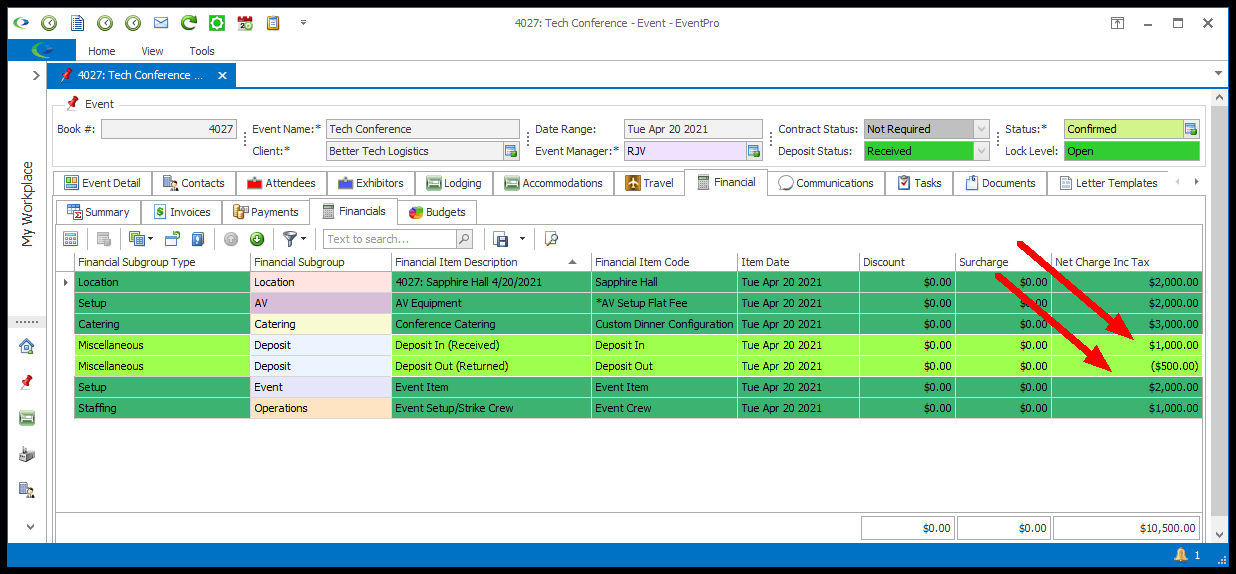 •In the Event's Financial Summary, you can see that the held-back Deposit amount of $500 has been added as income under the Miscellaneous-Deposit Financial Subgroup. 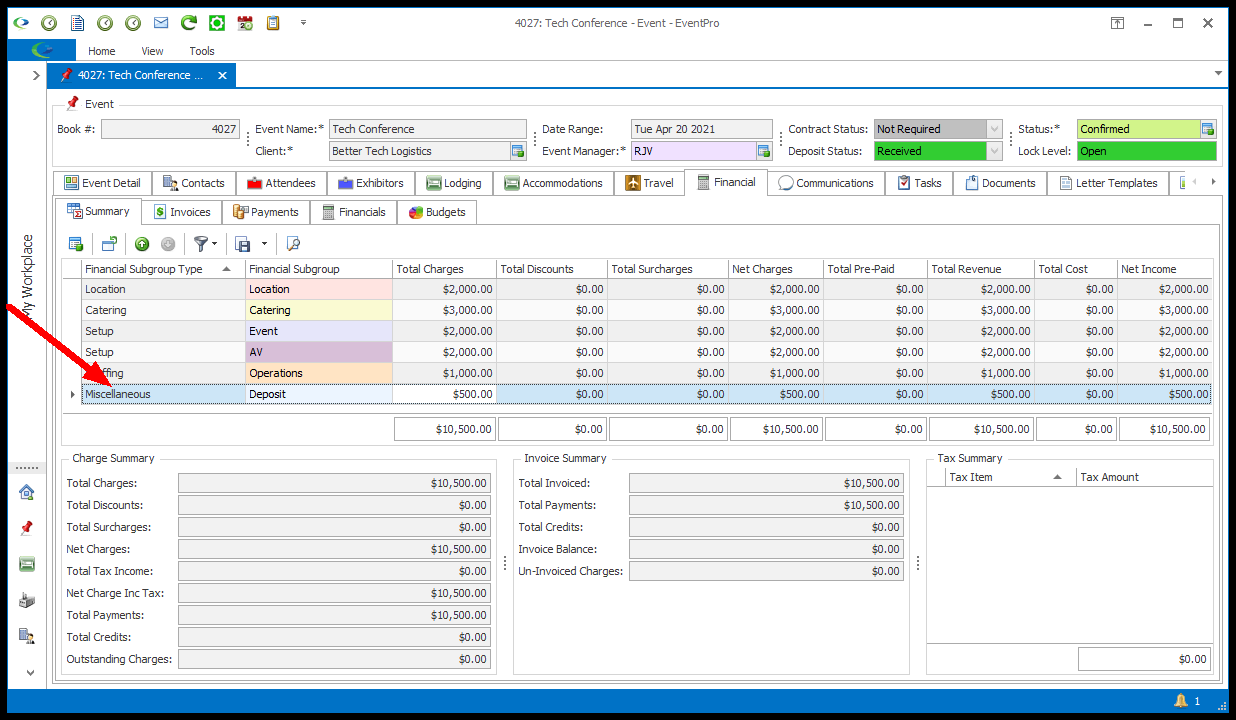  |
© 2023 EventPro Software, a wholly owned subsidiary of Profit Systems Inc. All Rights Reserved.