•The Health Check Assistant allows you to set a schedule for automatically run Health Checks, with the results emailed to selected recipients.
oHealth Checks are described earlier under Common Procedures > Tools > Health Check.
•This current section is mainly intended to explain the settings that are unique to the Health Check Assistant, but will refer back to the general instructions from Assistant Creation Overview when relevant.
1.Begin: Create a Virtual Assistant, ensuring that you select the Health Check Assistant Item.
2.Schedule: Set the Assistant's schedule under the Schedule Tab.
In addition to the common schedule settings described in Assistant Schedule Tab, the Health Check Assistant also has Repetitive Type and Repeat Frequency settings. These instructions describe the Repetitive Type and Repeat Frequency fields, as well as the related fields.
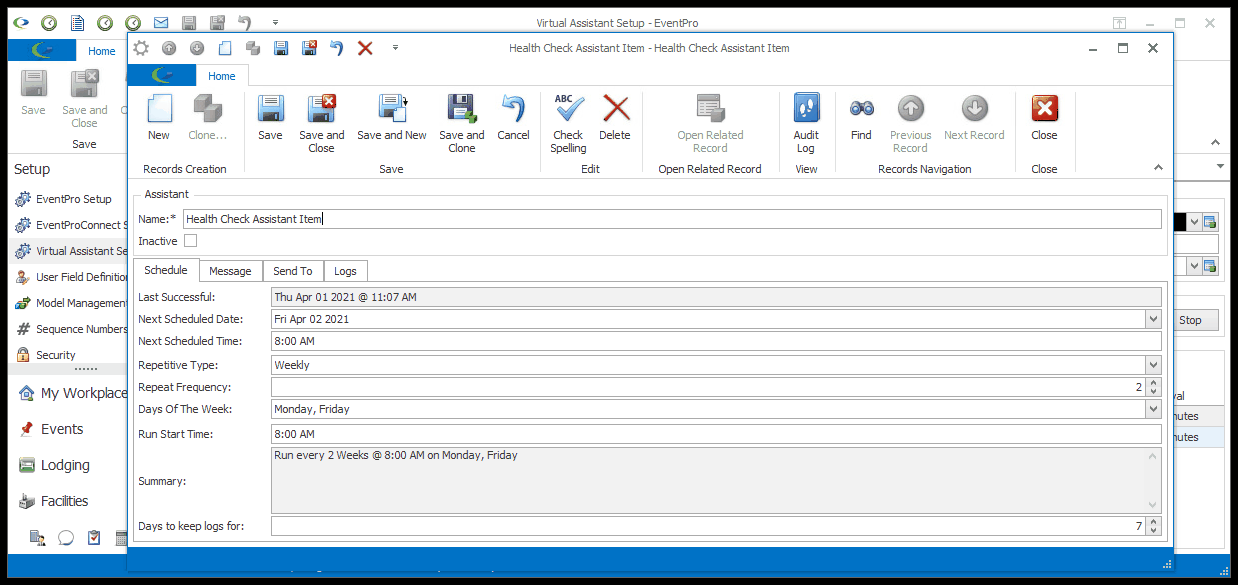
a.Repetitive Type: Select the type of repetition you want to use for the Assistant: Hourly, Daily, Weekly, Monthly by Day of Month, or Monthly by Day of Week. Note that some of the other fields in the edit form will change, depending on the Repetitive Type you select.
i.Hourly:
ii.Daily:
iii.Weekly:
iv.Monthly by Day of Month:
v.Monthly by Day of Week:
b.Repeat Frequency: Enter a number to indicate the Repeat Frequency for the Repetitive Type above.
i.In other words, enter the number that would fill in this blank: "I want the Assistant to run every ______ Hours/Days/Weeks/Months."
ii.For example, if you want the Assistant to run every 3 Days, you would set the Repetitive Type to Daily, and the Repeat Frequency to 3.
c.Days of the Week: If you selected Hourly, Daily, Weekly, or Monthly By Day of Month as the Repetitive Type, use the drop-down to select this Assistant's Days of the Week.
i.As noted earlier, these are the days on which the Assistant will run (i.e. the Assistant's "working days").
ii.When you first create an Assistant, its Days of the Week will default to the selected Work Days of the Week in your General System Settings in EventPro Setup.
iii.You can, however, select whichever days of the week you want, and those will be respected as the "working days" of this particular Assistant, overriding the default from System Settings.
d.Run Start Time and Run End Time: If you selected Hourly as the Repetitive Type, you can enter the time of day at which this Assistant will start and stop running.
e.Days of the Month:
i.If you selected Monthly by Day of Month as the Repetitive Type, use this drop-down to select the day(s) of the month on which this Assistant should run.
ii.If you scroll down through the list, you'll note that you can select "Days" of the month (First Day, Last Day, Second Day, etc.) as well as "Working Days" of the month (First Working Day, Last Working Day, Second Working Day, etc.).
f.Week Days of the Month:
i.If you selected Monthly by Day of Week as the Repetitive Type, use this drop-down to choose the day(s) on which you want the Assistant to run.
ii.If you scroll down through the list, you will notice you have multiple options for each day of the week: First Monday, First Tuesday...Second Monday, Second Tuesday...Last Monday, Last Tuesday... and so on.
g.Move Non-Working Days: This field, which appears if you selected the Monthly by Day of Month Repetitive Type, determines what will happen if the scheduled Assistant run lands on a non-working day:
i.Do Not Move
ii.Previous Working Day
iii.Next Working Day
iv.Nearest Working Day
v.Do Not Run
vi.As noted above, the Assistant's "working days" are determined by the selected Days of the Week. Days not selected as Days of the Week are the Assistant's "non-working days".
h.Summary: This read-only field summarizes the repetition cycle you set for this Assistant
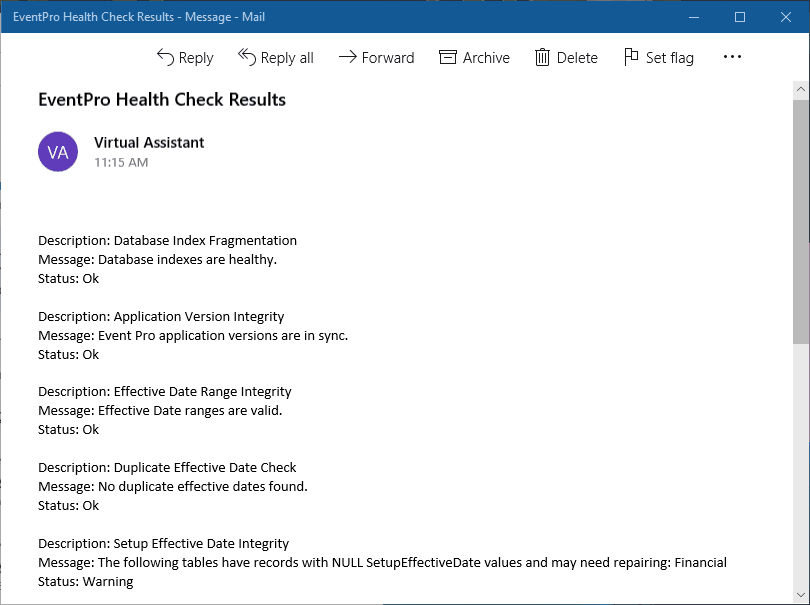
3.Message: The Health Check Assistant's Message tab is different than most of the other Message tabs.
a.Here, the only options are to optionally select an Override Email Account (review Assistant Message Tab) and define an email Subject, if you want something different from the default.
b.You do not need to add content to the message, because the Health Check Results are automatically pulled into the email, displaying the Description, Message, and Status for each Health Check item.
4.Send To: Make your recipient selections under the Send To tab. The common Send To recipient options are described under Assistant Send To Tab.
5.Logs: You can later review the Assistant Logs Tab to see if the Assistant has been running successfully.
6.Finish: When you are done with the Assistant edit form, Save and Close the Assistant.