1.If it hasn't been added already, add the Account Request Area Definition to your EPConnect Area Definitions tab. Ensure that you select Account Request as the Area Type.
If necessary, you can review the general overview instructions in Area Definitions: Add, Edit, Delete.
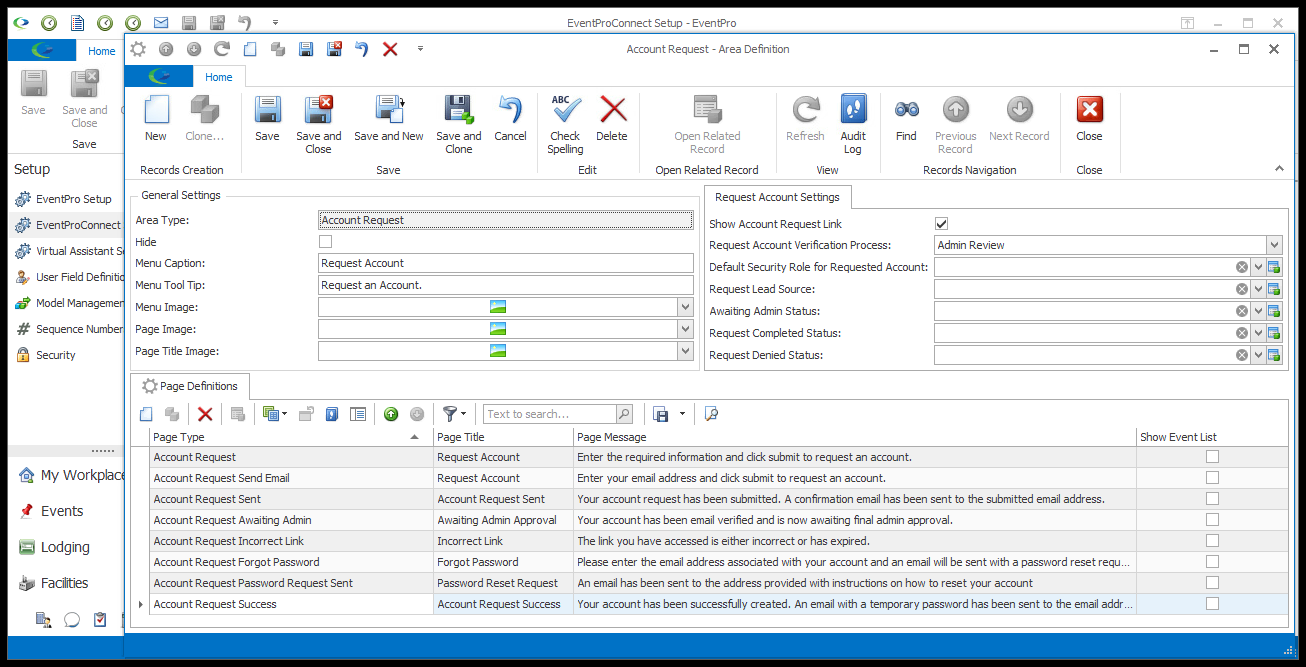
2.The Account Request Area Definition edit form has the common General Settings described earlier. Review the topic General Settings, if necessary.
3.Under the Request Account Settings tab, there are settings unique to the Account Request Area Definition.
a.Show Account Request Link: Select this checkbox if you want the Account Request button to appear in the main menu of the home page, as well as the login page.
In the Process Flow example, you can see the Account Request buttons displayed.
b.Request Account Verification Process: This setting determines the approval process used for Account Requests. To see when and how the verification processes diverge, as viewed by the the online requester, see Process Flow.
i.Admin Review: With this option, after the requester submits information to the Account Request page, the request must be processed by an EventPro User in the EventPro Account Requests area. After the request is approved in EventPro, the request will receive the Request Account Success Notification email (defined here), including the Account Username and Temporary Password.
ii.Email Confirmation: With this option, Request Account Success Notification email (defined here), including the Account Username and Temporary Password, is sent immediately after the requester submits information to the Account Request page, without requiring manual approval granted through EventPro.
c.Default Security Role for Requested Account: You need to select a default Security Role that is applied to new accounts, and it must be an Online Security Role.
i.This drop-down is populated by Online-type Security Roles created in Security Setup > Roles > Create Security Roles.
ii.If the request is approved/converted, you will see that the new Security Account has been assigned this default Security Role.
d.Request Lead Source: Select a Setup Lead Source to be assigned to Account Request leads.
i.This drop-down is populated by Lead Sources created under EventPro Setup > CRM > Lead Sources.
ii.If the request is approved, you will see that the Lead Source in the Lead to Account Conversion Wizard defaults to the source selected here.
e.Awaiting Admin Status: You will need this default status for the Admin Review verification process, and it must be set to a Lead Status of the type "Account Request Awaiting Admin".
i.If you haven't already, you need to create this Lead Status under EventPro Setup > CRM > Lead Statuses.
ii.Ensure that the Status Type is set to "Account Request Awaiting Admin", and that the Available Online checkbox is selected.
iii.When the requests are pulled into the EventPro Account Requests area, they will be assigned this selected status.
f.Request Completed Status: Select a Setup Lead Status to be assigned as the Request Completed Status. This drop-down is populated by Lead Statuses created under EventPro Setup > CRM > Lead Statuses. Ensure that the status you select has the Available Online checkbox checked.
g.Request Denied Status: Select a Setup Lead Status to be assigned as the Request Denied Status. This drop-down is populated by Lead Statuses created under EventPro Setup > CRM > Lead Statuses. Ensure that the status you select has the Available Online checkbox checked.
4.Next, you can proceed to the Account Request Page Definitions.