•Payment Plans can be applied to Events and Event Quotes.
•You can create a Payment Plan on the spot for each Event or Quote, but if you frequently use the same or similar payment plans, you may find it easier and more efficient to set up your standard Payment Plans here in Setup.
•Setup Payment Plans can be added to an Event or Quote in a few different ways:
oAuto Add: The Auto Add setting (see below) will automatically apply a Payment Plan to Events and Event Quotes of the specified Event Category/Subcategory.
oEvent Template: You can add a Payment Plan to a Setup Event Template, which will pull the Payment Plan into the Event when used.
oManually Select: You can manually select a Payment Plan for an Event in the Edit Event window, or for a Quote in the Edit Event Quote window.
•After you apply a Setup Payment Plan to an Event or Quote, you can still make adjustments for that particular Event or Quote, if necessary, which will likely be less time-consuming than creating a new payment plan each time.
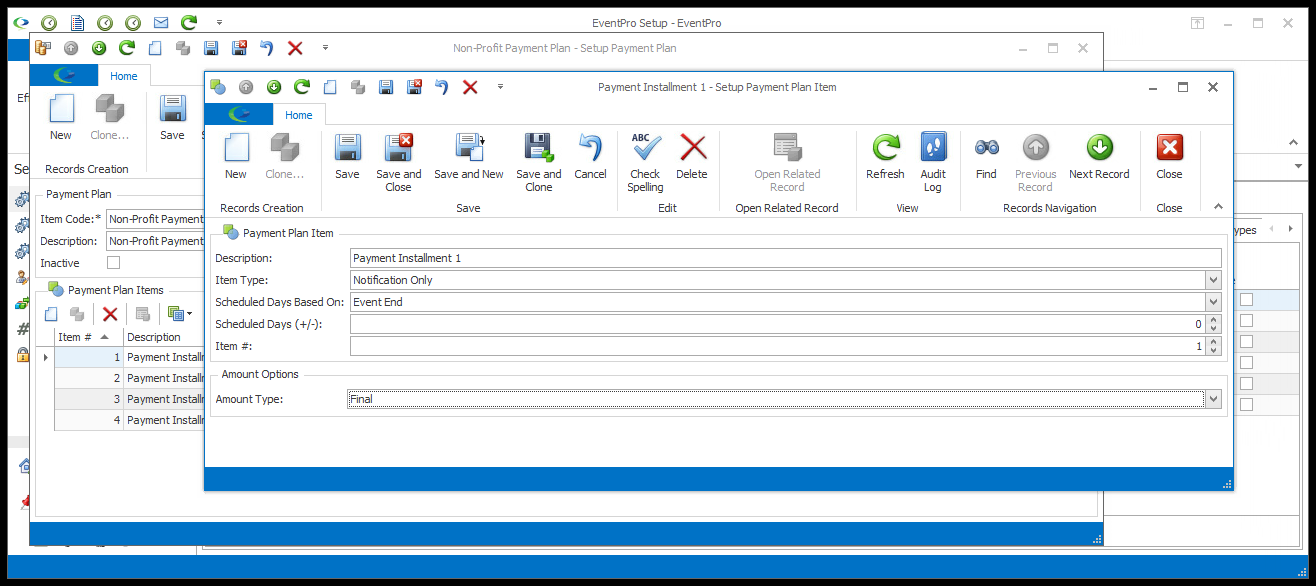
1.To create Setup Payment Plans, start under EventPro Setup > Financial > Payment Plans.
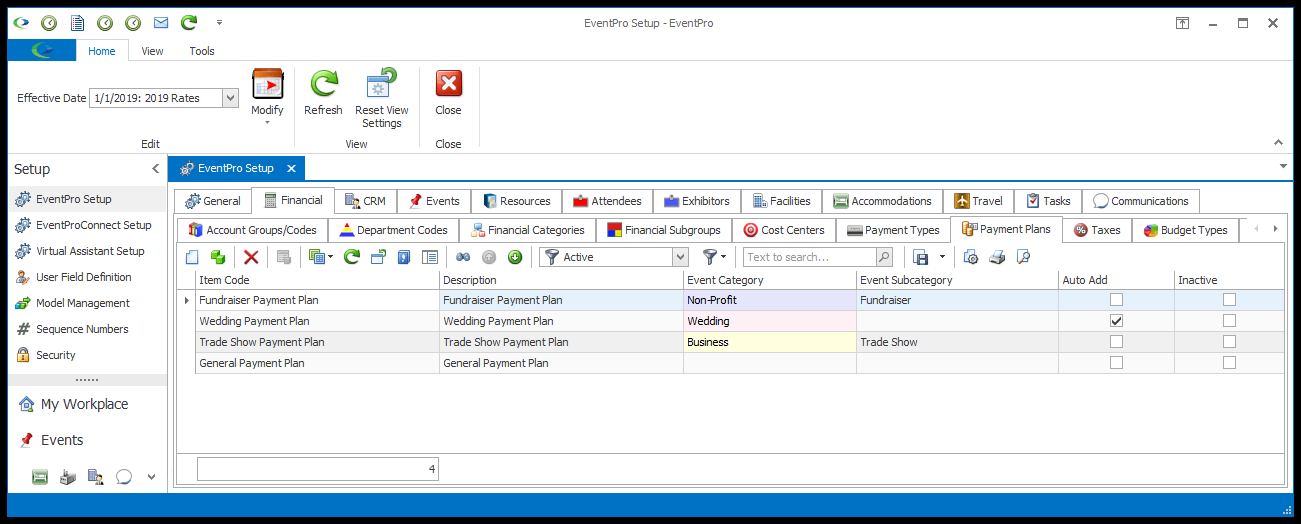
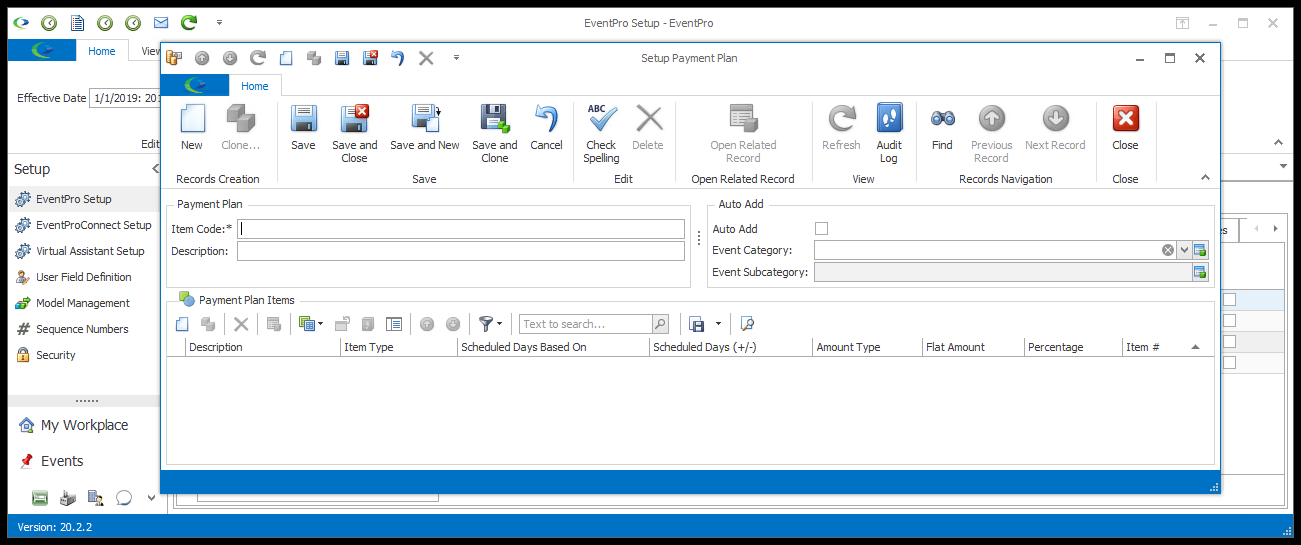
2.Start a new record. The Setup Payment Plan edit form opens.
3.Item Code: Type in the name of this payment plan.
4.Description: The Description will initially default to match the Item Code, but you can edit the Description as you require.
a.If you want this payment plan to be automatically added to certain Events and Event Quotes upon event/quote creation, select the Auto Add checkbox.
b.From the drop-down below, select the relevant Event Category, and (if applicable) Event Subcategory. The drop-downs are populated by the Event Categories and Subcategories created under EventPro Setup > Events > Event Categories.
c.This payment plan will be automatically added to Events and Event Quotes of the selected Event Category/Event Subcategory. You will still be able to make adjustments to the payment plan after it is assigned to an Event or Quote.
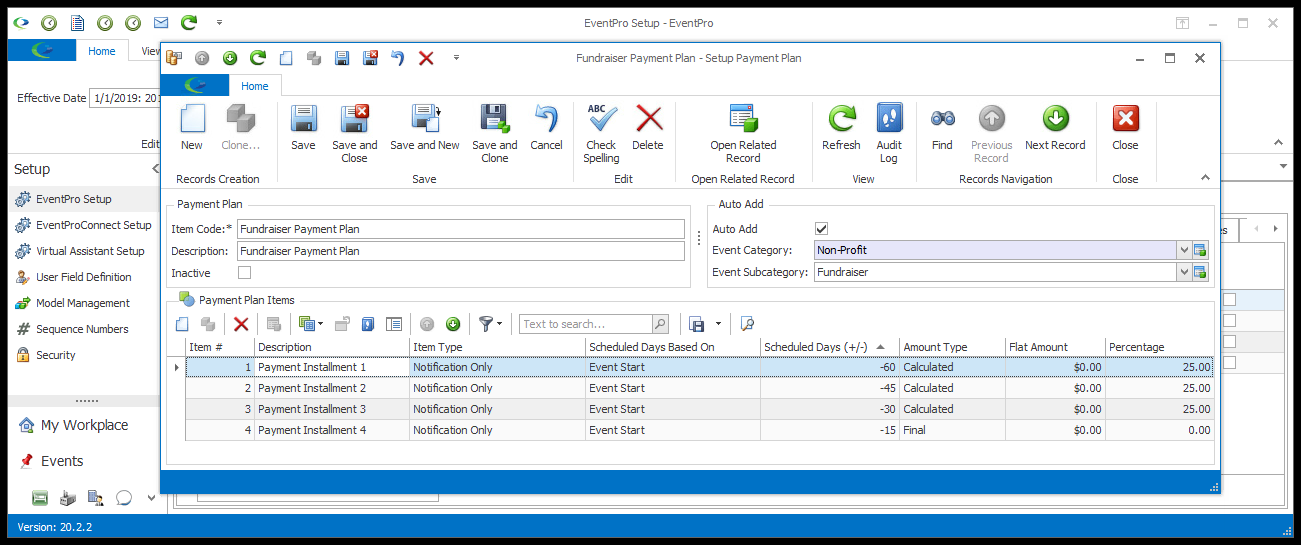
6.Payment Plan Items: The selection grid in the bottom half of the Setup Payment Plan edit form contains Payment Plan Items, which determine the timing and amounts of the payment installments.
7.To add a Payment Plan Item, click the New button just above the Payment Plan Items selection grid.
8.The Setup Payment Plan Item edit form opens.
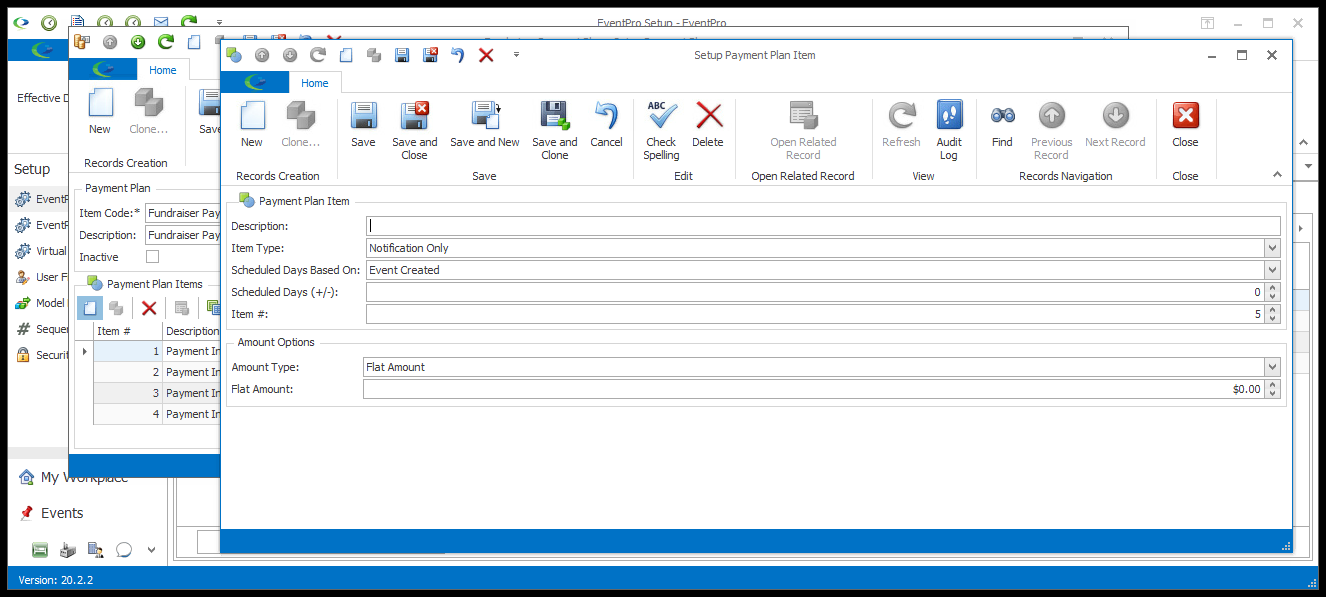
9.Description: Type in a Description for this Payment Plan Item. If an Invoice is automatically generated for this Payment Plan Item (see Item Type below), the Description you enter here will also be used for the Description of the Invoice.
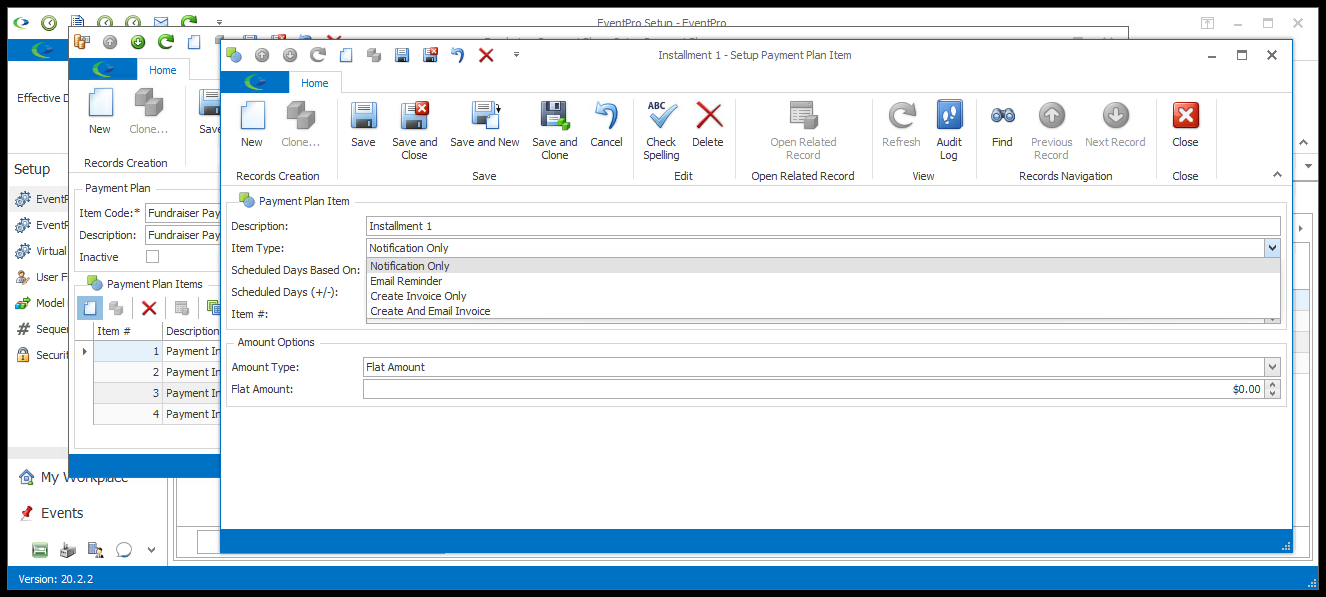
10.Item Type: From the Item Type drop-down, select the type of action you want to occur when this Payment Plan Item's scheduled date arrives.
a.Notification Only: Generates a notification using EventPro's internal alerts system. Ensure that your User Messages are activated and set to show alerts about Scheduled Payments. NOTE ABOUT EVENT STATUS: EventPro's internal messaging system will only show Scheduled Payment alerts for Events set to a Confirmed or Completed status.
NOTE ABOUT VIRTUAL ASSISTANT: The next three Item Types require the A/R Event Payment Plan Virtual Assistant to function.
b.Email Reminder: Generates an email reminder that can be sent internally and/or to the Event's Billing Contact, or other recipient options, depending on the Send To selections in the A/R Event Payment Plan Virtual Assistant setup. Ensure that intended recipients have email addresses set up on their records.
c.Create Invoice Only: Generates the required invoice, as specified in Amount Options and Invoice Options.
d.Create and Email Invoice: Generates the invoice and email reminder with that invoice attached, sent internally and/or to the Event's Billing Contact, or other recipient options, depending on the Send To selections in the A/R Event Payment Plan Virtual Assistant setup. Ensure that intended recipients have email addresses set up on their records.
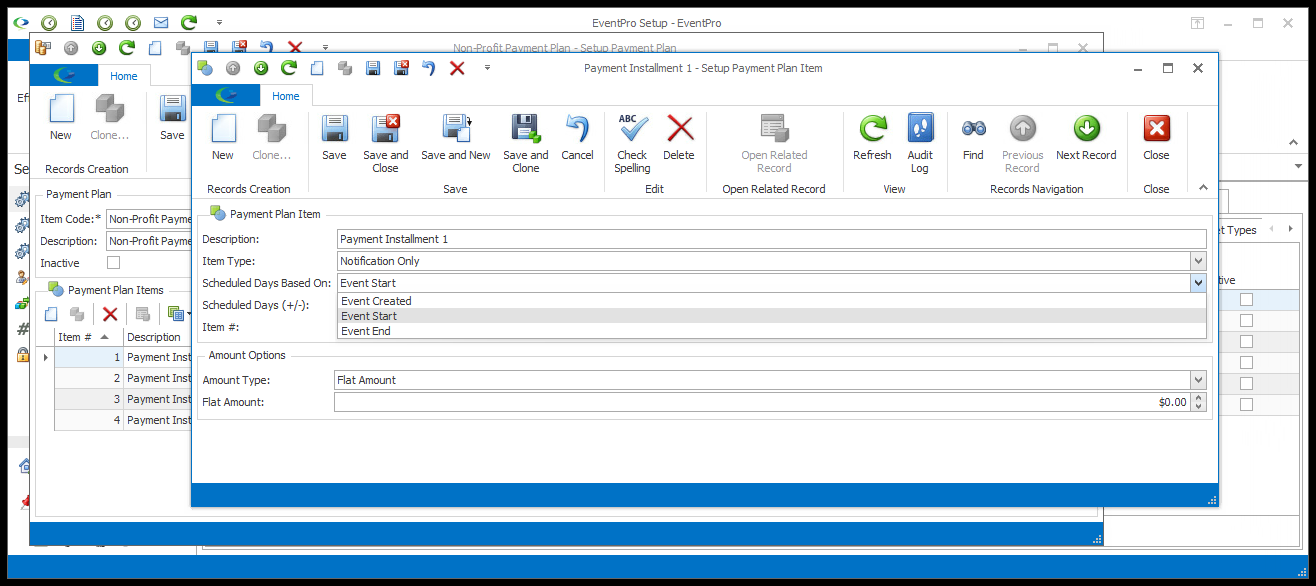
11.Scheduling: A Payment Plan Item is scheduled according to certain key event-related dates: Event Created, Event Start, Event End.
a.Scheduled Days Based On: From this drop-down, choose whether you want to schedule the Payment Plan Item according to the Event Created, Event Start, or Event End date.
b.Scheduled Days (+/–): Select the number of days before/after the Scheduled Day that the Item should occur. A positive number indicates number of days after, and a negative number indicates the number of days before.
i.For example, if Scheduled Days Based On = Event Created, and Scheduled Days (+/–) = 3, the Payment Plan Item would be scheduled for 3 days after the Event is created.
ii.If Scheduled Days Based On = Event Start, and Scheduled Days (+/–) = -3, the Payment Plan Item would be scheduled for 3 days before the Event starts.
12.Item #: The Item Number determines a record's position relative to other records in a list sorted by Item #. Change the Item # to change the record's position in the sort order.
13.Amount Options: These Amount Options determine how the Invoice Amount resulting from this Payment Plan Item will be determined. If you are planning to have the Payment Plan automatically create the invoice (i.e. selected Create Invoice Only or Create and Email Invoice as the Item Type), be sure to also read the Note About Invoice Types below.
a.Flat Amount: Select this option if you want to set a flat payment amount that is not calculated from anything in the event. In the Flat Amount field below, enter the amount.
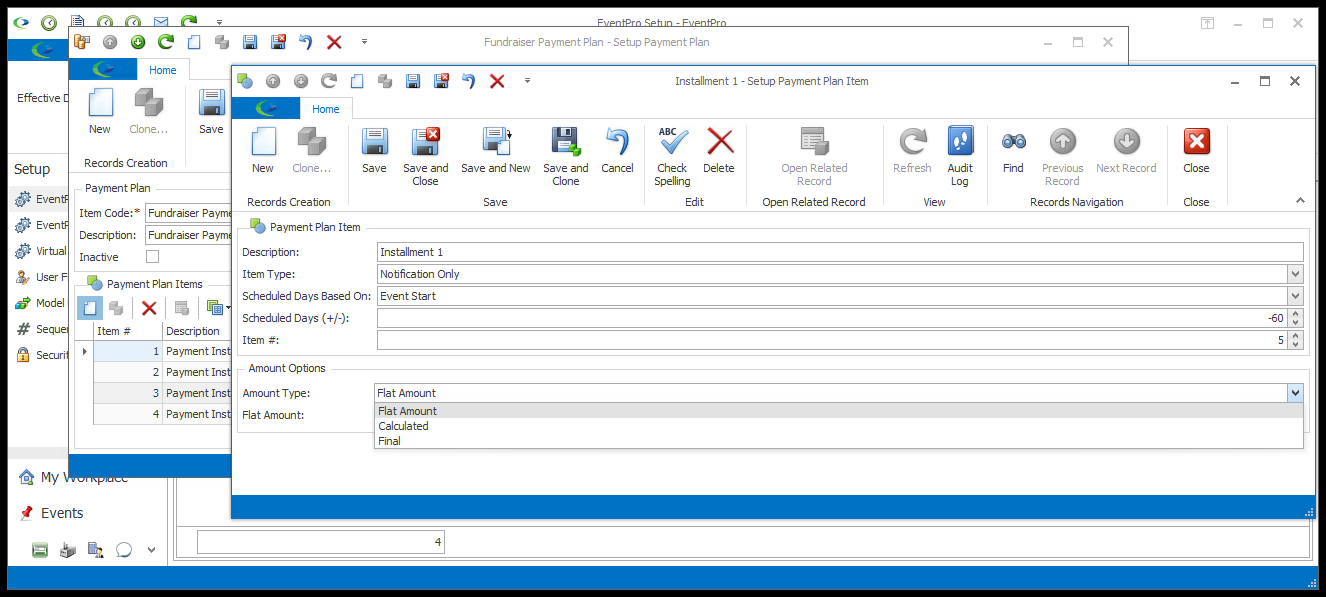
b.Calculated: Select this option if you want the payment amount to be calculated as a percentage of the event's charges.
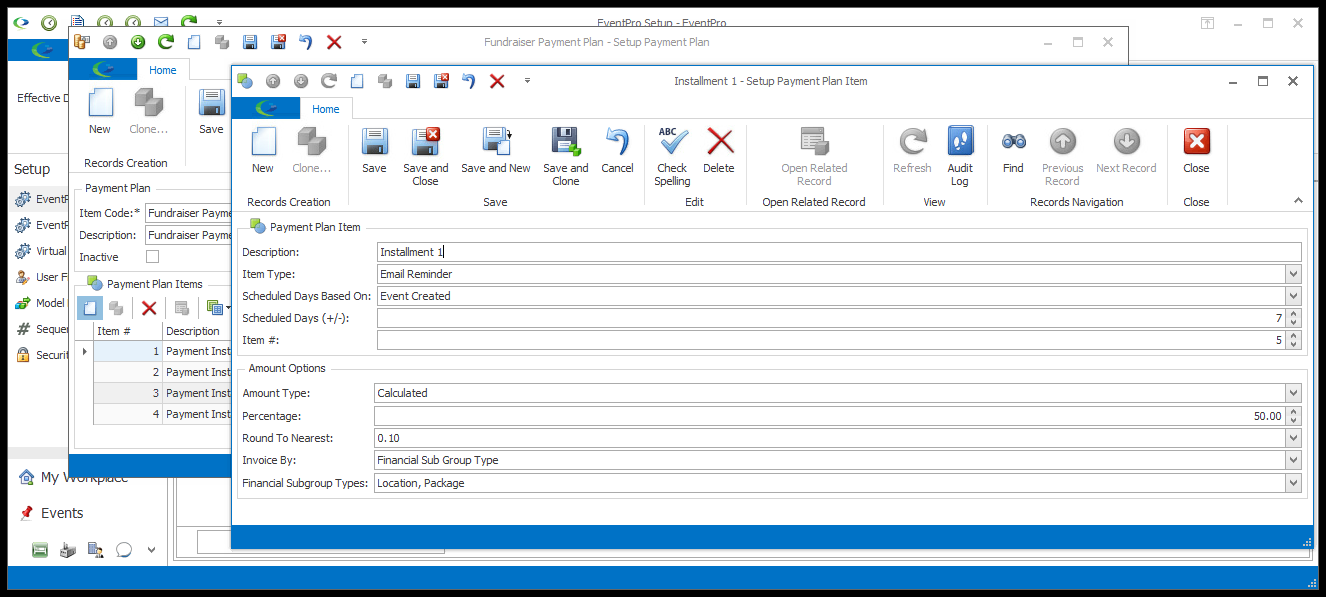
i.Percentage: Enter the percent of the event charges that will be invoiced for this Payment Plan Item.
If you have multiple Calculated Items on an Event, the percentage for each Item is calculated from the Total Event Charges (not from the diminishing remaining charges after each subsequent Item). For example, if you want to split an Event's Charges into four equal calculated installments, you would create 4 Payment Plan Items as follows: (1) Calculated 25%, (2) Calculated 25%, (3) Calculated 25%, (4) Final. The Final-type Payment Plan Item gathers together all remaining un-invoiced charges, as described below).
ii.Round to Nearest: Choose a rounding-off option for the calculated amount.
iii.Invoice By: If you want to further narrow down the charges included in the calculation, you can change the Invoice By field from All to a different option: Financial Groups or Financial Sub Group Types.
iv.Financial Groups: If you selected Financial Groups, use this drop-down to select the checkboxes next to the Financial Groups you want included in the calculation, and click OK.
v.Financial Sub Group Types: If you selected Financial Sub Group Types, use this drop-down to select the checkboxes next to the Financial Sub Group Types you want included in the calculation, and click OK. (As you may recall, Financial Sub Group Types are hard-coded in EventPro.)
c.Final: Select this option to create a Final Invoice that automatically pulls in all of the Event's remaining un-invoiced charges.
14.Invoice Options: You will only see these Invoice Options if you selected one of the invoice-creating Item Types above (Create Invoice Only or Create and Email Invoice).
a.NOTE ABOUT INVOICE TYPES: If you choose an invoice-creating Item Type, the resulting invoices will be of a specific Invoice Type, which depends on the Amount Type you chose for the Payment Plan Item.
i.If the Payment Plan Item is for a "Flat Amount", the resulting Invoice Type is set to Deposit.
ii.If the Payment Plan Item is "Calculated", the resulting Invoice Type is set to Deposit.
iii.If the Payment Plan Item is "Final", the resulting Invoice Type is set to Final. Any Deposit-Type Invoices made for "Flat Amount" or "Calculated" Payment Plan Items are applied to this Final Invoice, so that the client isn't billed multiple times for the charges already included in the Flat Amount or Calculated Payment Plan Items.
b.Append Description to Event Name: Select this checkbox if you want the resulting Invoice's Description to include the Event Name. For example, let's say an Event's Name is "Fundraising Banquet" and the Payment Item Description is "Installment 1",
i.If you select this checkbox, the Invoice Description will be Fundraising Banquet: Installment 1.
ii.If you do not select this checkbox, the Invoice Description will be Installment 1.
c.Invoice Due in Days: Enter the number of days from the Invoice Date that the Invoice will be due.
d.Include No Charge Items (for the "Final" Amount Type only): If you want no-charge items to be included in the Final Invoice, select this checkbox.
e.Invoice Report: Your organization may have different styles of invoice reports, such as Invoice-Standard, Invoice-Detailed, Invoice-Category, and so on, perhaps including invoices customized for your organization. From the Invoice Report drop-down, choose the Invoice style you want to use for this particular Payment Plan Item.
f.Report Attachment Type: From the drop-down, select the format in which you want the Invoice attached - PDF, MHT, XLS, XLSX, RTF, CSV, TXT, DOCX, HTML, or JPG.

15.When you are done defining the Payment Plan Item, click Save and Close to return to the Setup Payment Plan edit form.
16.The new Payment Plan Item will appear in the bottom Payment Plan Items selection grid in the Setup Payment Plan edit form.
17.Continue adding as many Items as this Payment Plan requires.
18. When you are done adding Items, and you have defined everything you need for the Setup Payment Plan, Save your changes if required, and Close the edit form to return to EventPro Setup > Financial > Payment Plans.