|
Breadcrumb Trail: Security Setup > Roles (Security Permissions) > Create Security Roles > Permissions Advanced Permissions |
Scroll Prev Top Next More |
•Advanced Permissions provide almost limitless options for determining User access, from broad areas to specific fields. It would take an entire manual (or more) to describe every possible variation available in Advanced Permissions.
•This topic will look at a general overview of how to set up a Security Permission Object. We will then look at a few examples that explain the basic process of setting up an Advanced Security Permission Object. Once you see a few variations of the process, you should be able to apply that understanding to setting up the Advanced Permissions you require.
•This topic will also explain the object modification permissions that allow you to deny permission to modify an object overall, while still allowing changes to specified fields of that object.
•Click the link headings below for more information:

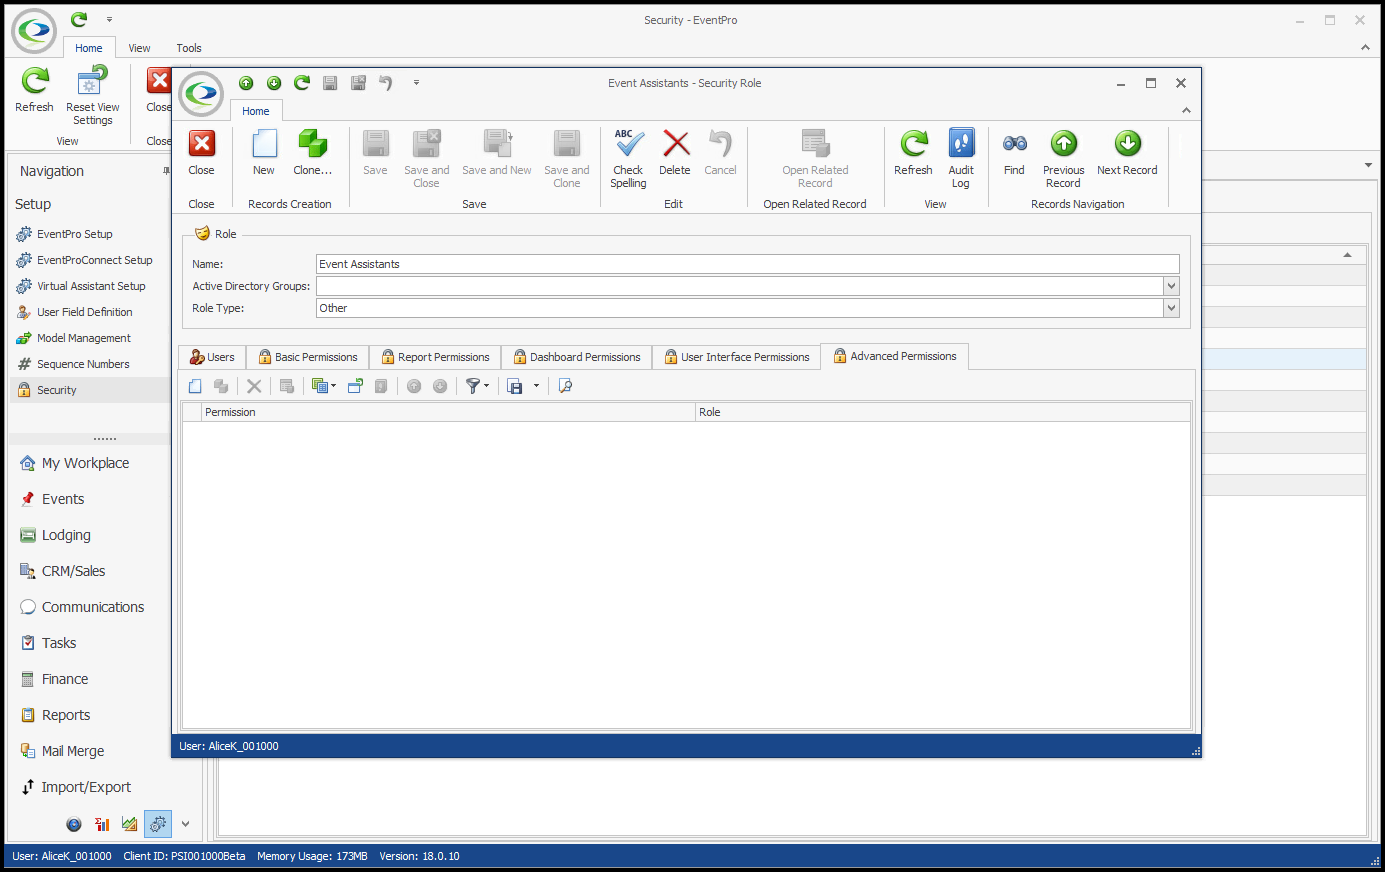
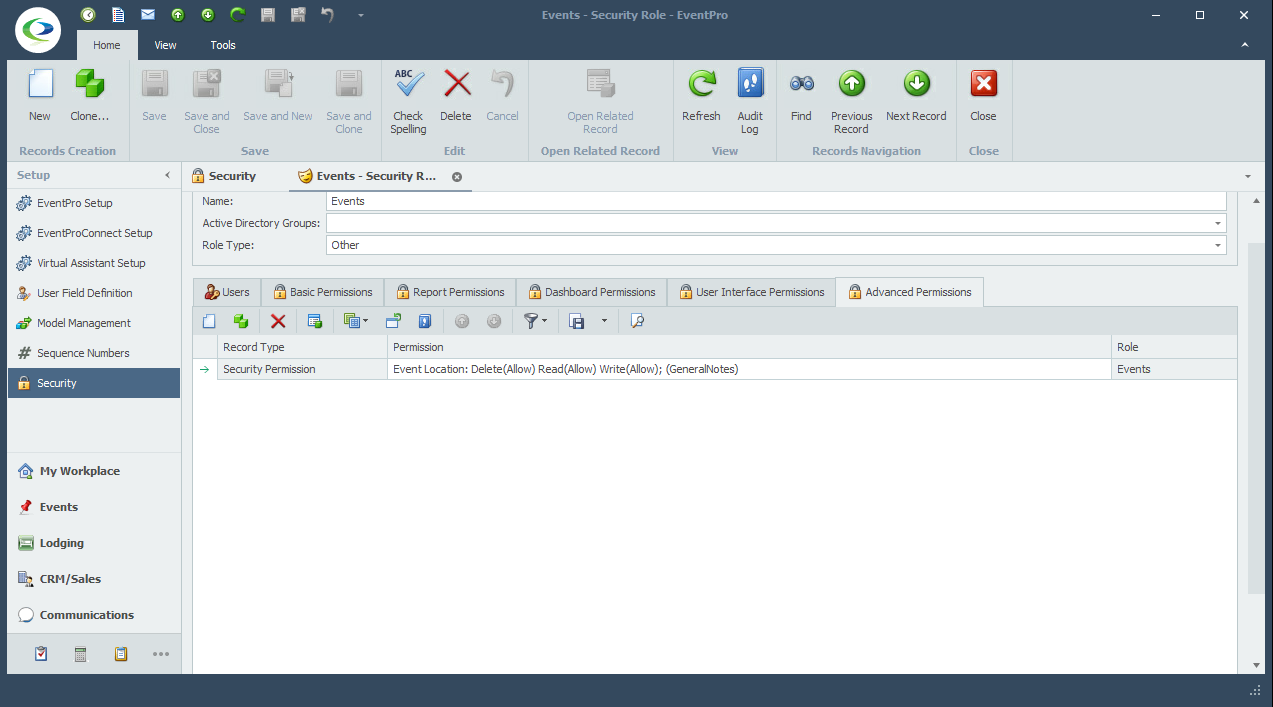
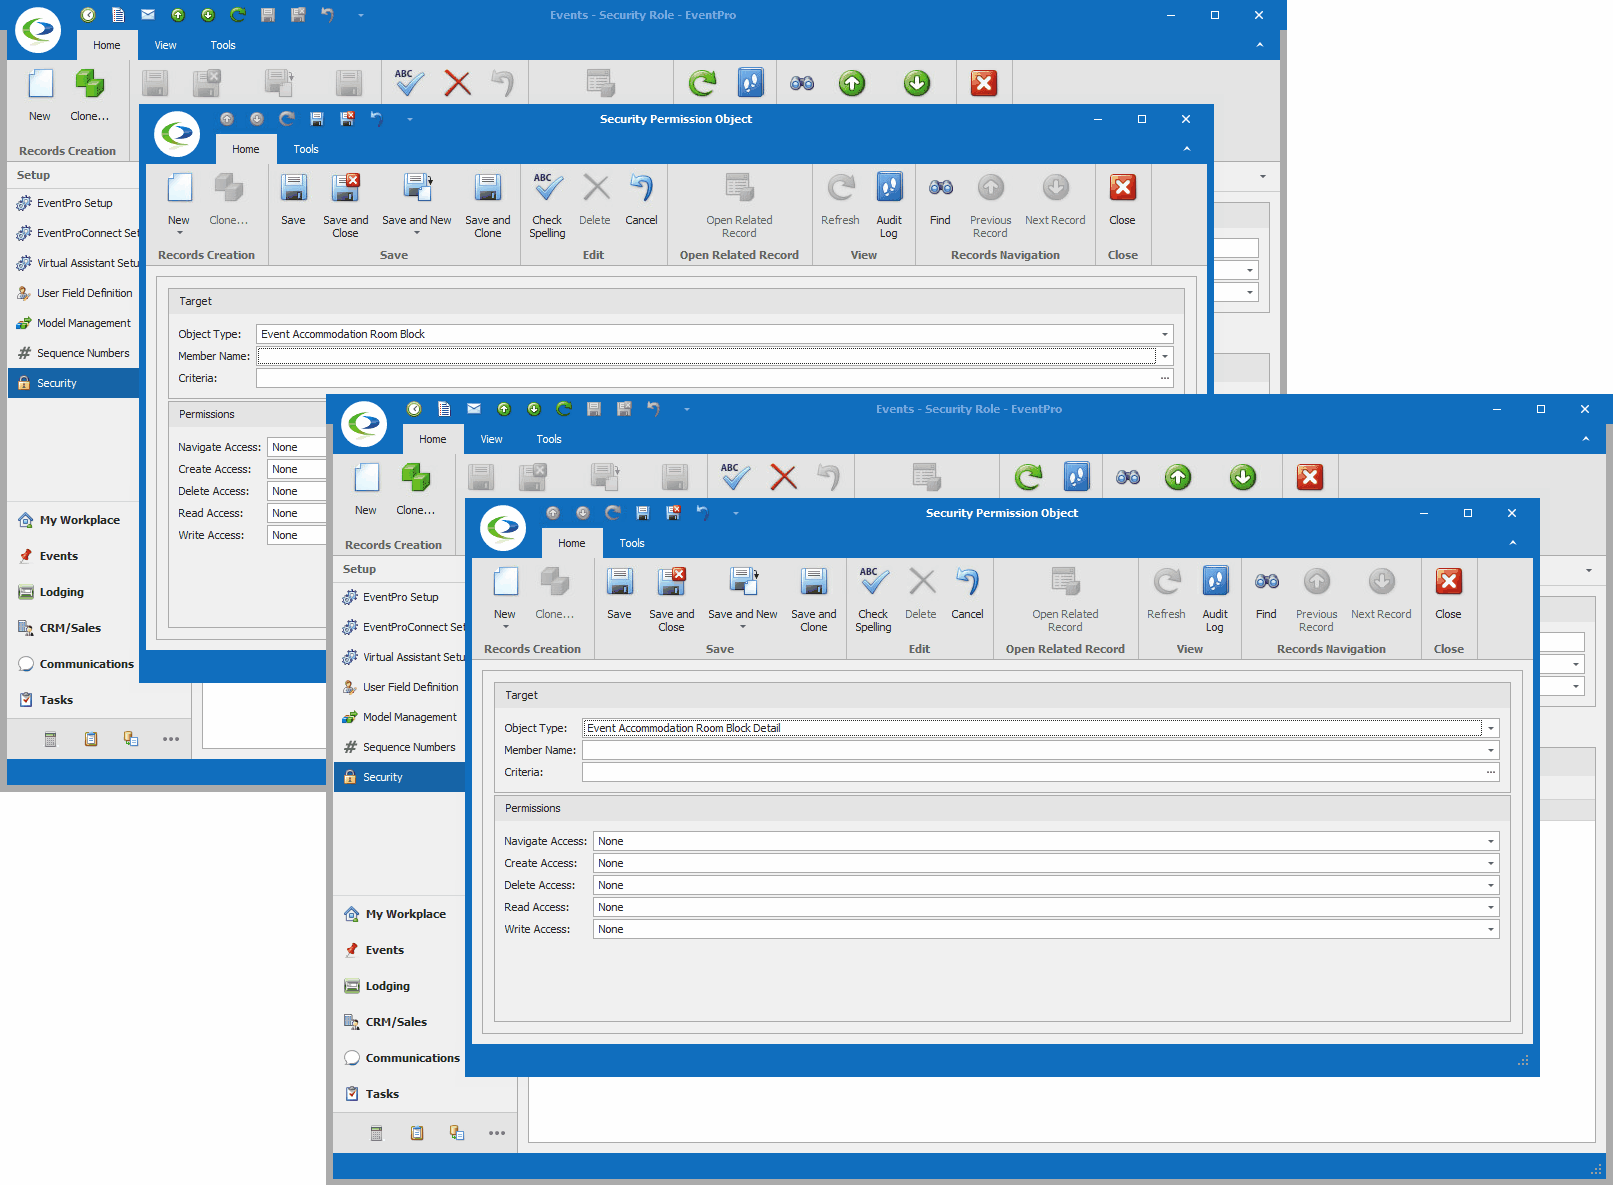
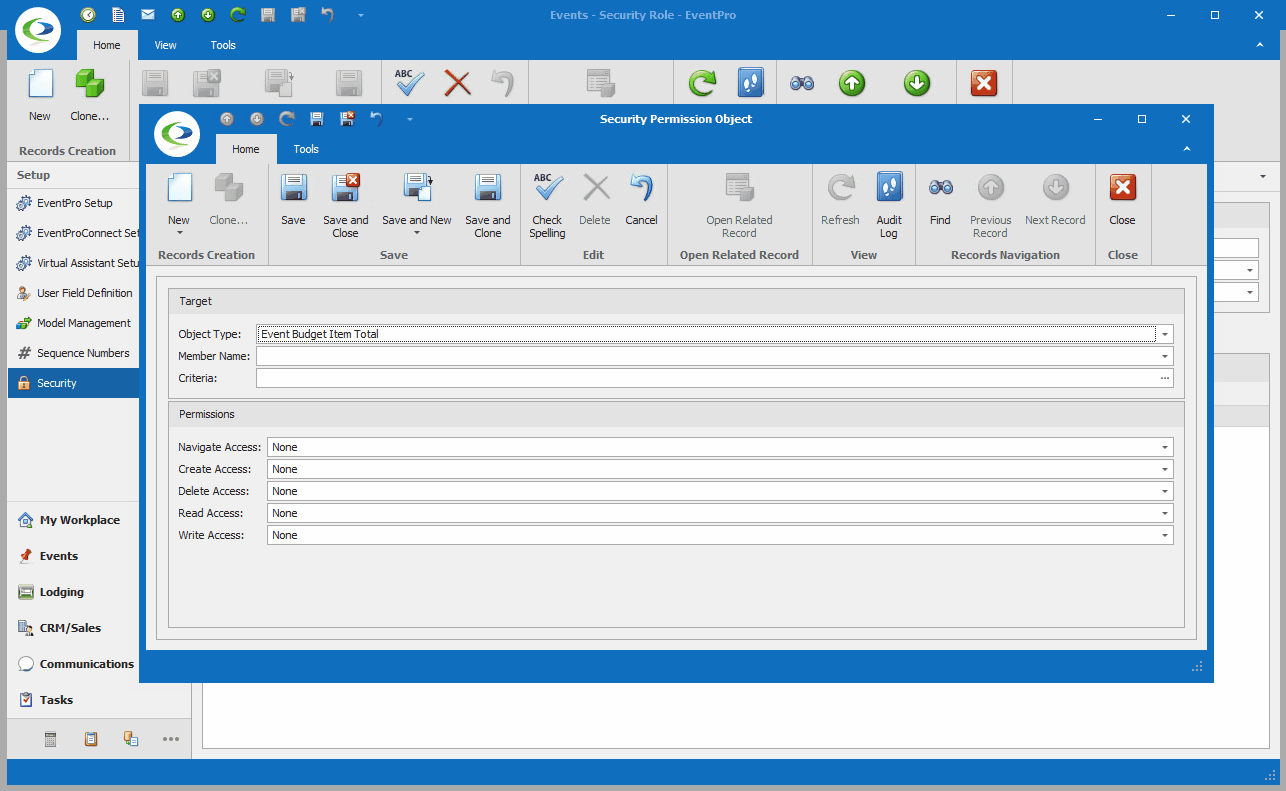
In a very general overview, the process of creating Advanced Permissions looks like this: 1.Under the Advanced Permissions tab of the Security Role edit form, start a New record. 2.The Security Permission Object edit form appears. 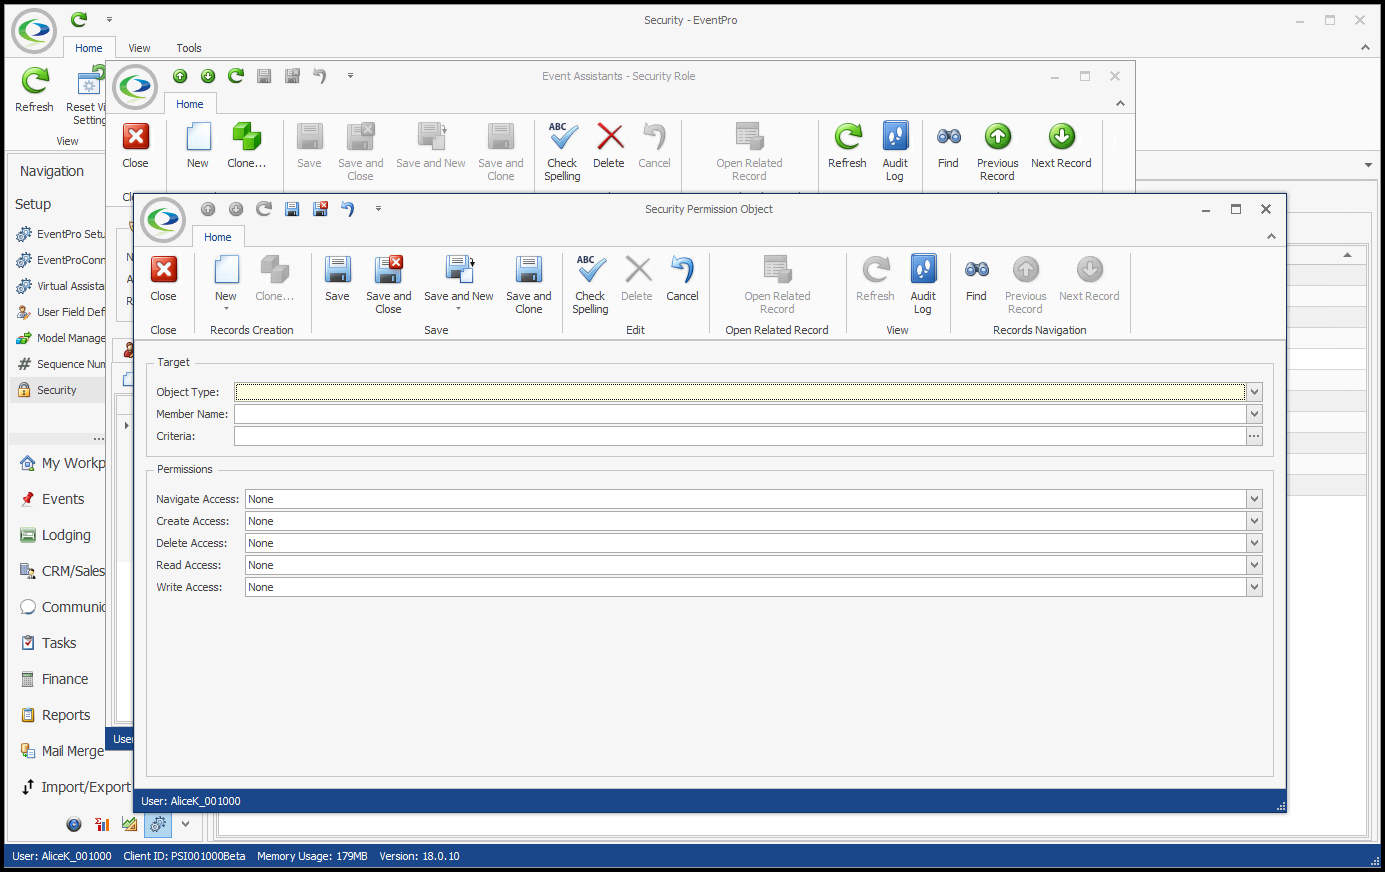 3.Target: Define the Target of these Security Permissions. a.Object Type: Select the relevant Object Type from the drop-down. b.Member Name: If applicable, you can select relevant Member Name(s). This allows you to further narrow down precisely the fields for which you want to define permissions. If you are defining permissions for the entire object, you do not need to select any Member Names. i.In a simplified example, if you want to prevent a User from viewing any "Object A" records in EventPro, you would set the Object Type to "Object A" and set the Read Permission to Deny. Because you want to deny Read Access to the entire Object A record, you do not need to select any Member Names. ii.If however, you wanted to allow a User to view "Object A" records but NOT see their Cost or Price, you would set the Object Type to "Object A", select "Cost" and "Price" under Member Names, and then set the Read Permission to Deny. This prevents the User from viewing the selected Member Names, but the User can still view the other fields of the Object Type. c.Criteria: Under Criteria, you can create a filter that defines the circumstances under which this Security Permission will apply. This is yet another way to narrow down the Target and make the applicable Permissions more precise. The Edit Criteria window that appears here uses the same essential principles described earlier under Common Procedures | Construct Filters. 4.Permissions: Now you can determine what access the User has for various actions (Create, Delete, Edit, etc.) in relation to the Target you just defined. For these Permissions, as with most, you would usually either leave the selection as "None" if you want to allow the action, or set the option to "Deny" if you want to prevent the action. "Allow" is only used to override a “Deny” assigned in a different conflicting Security Role applied to the same User(s). You can review the interaction of None, Deny, Allow above. a.Navigate Access: Denying Navigate Access to an Object Type typically completely removes the related tab, menu item, or other method of getting to the related records. b.Create Access: Denying Create Access prevents the User from creating new records of the Object Type selected. c.Delete Access: Denying Delete Access prevents the User from deleting records of the Object Type selected. d.Read Access: Denying Read Access prevents the User from viewing the Object Type records, or the selected Member Names within Object Type records. e.Write Access: Denying Write Access prevents the User from editing records or specified Member Names within the records of the selected Object Type. 5.Save and Close the Security Permission Object edit form to return to the Security Role edit form. |
•Now we can look at some specific examples that will help further explain the process of setting Advanced Security Permissions.
In our first example, we are going to create an Advanced Security Permissions Object that prevents a User from accessing any Tasks EXCEPT for "Staff" Category Tasks. 1.In the Security Permission Object edit form, we select Task from the Object Type drop-down. 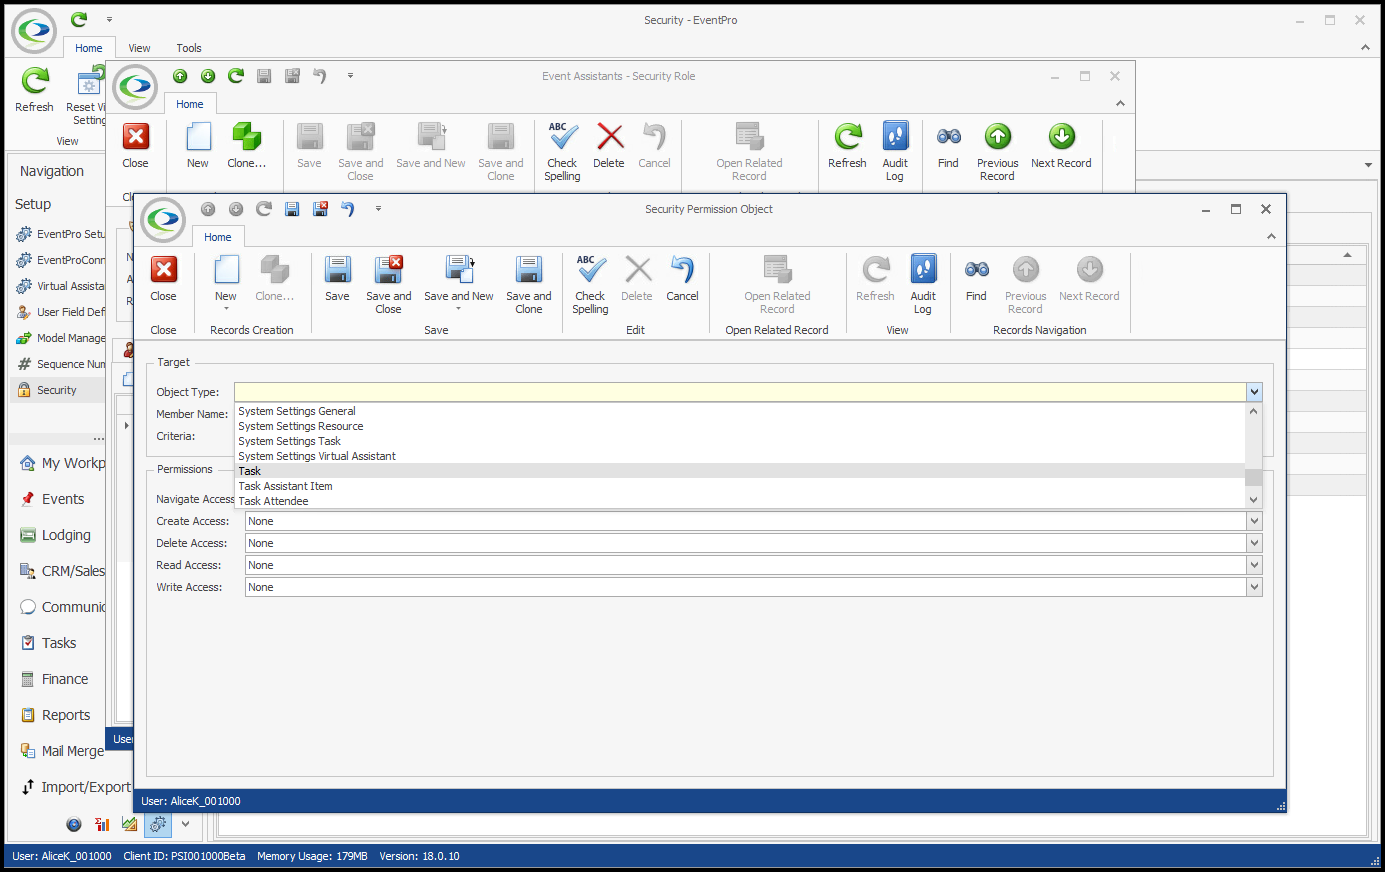 2.We are not going to select any Member Names for this example. The Permissions we are defining will apply to the entire Task record, i.e. whether or not a User can access an entire Task record, not just certain fields. 3.Under Criteria, we want to create a Filter based on Task Category. Our intention is to restrict access to Tasks of all Categories except "Staff". a.Click the ellipsis next to the Criteria field to open the Edit Criteria window. b.For our filter, we select Category in the first drop-down. 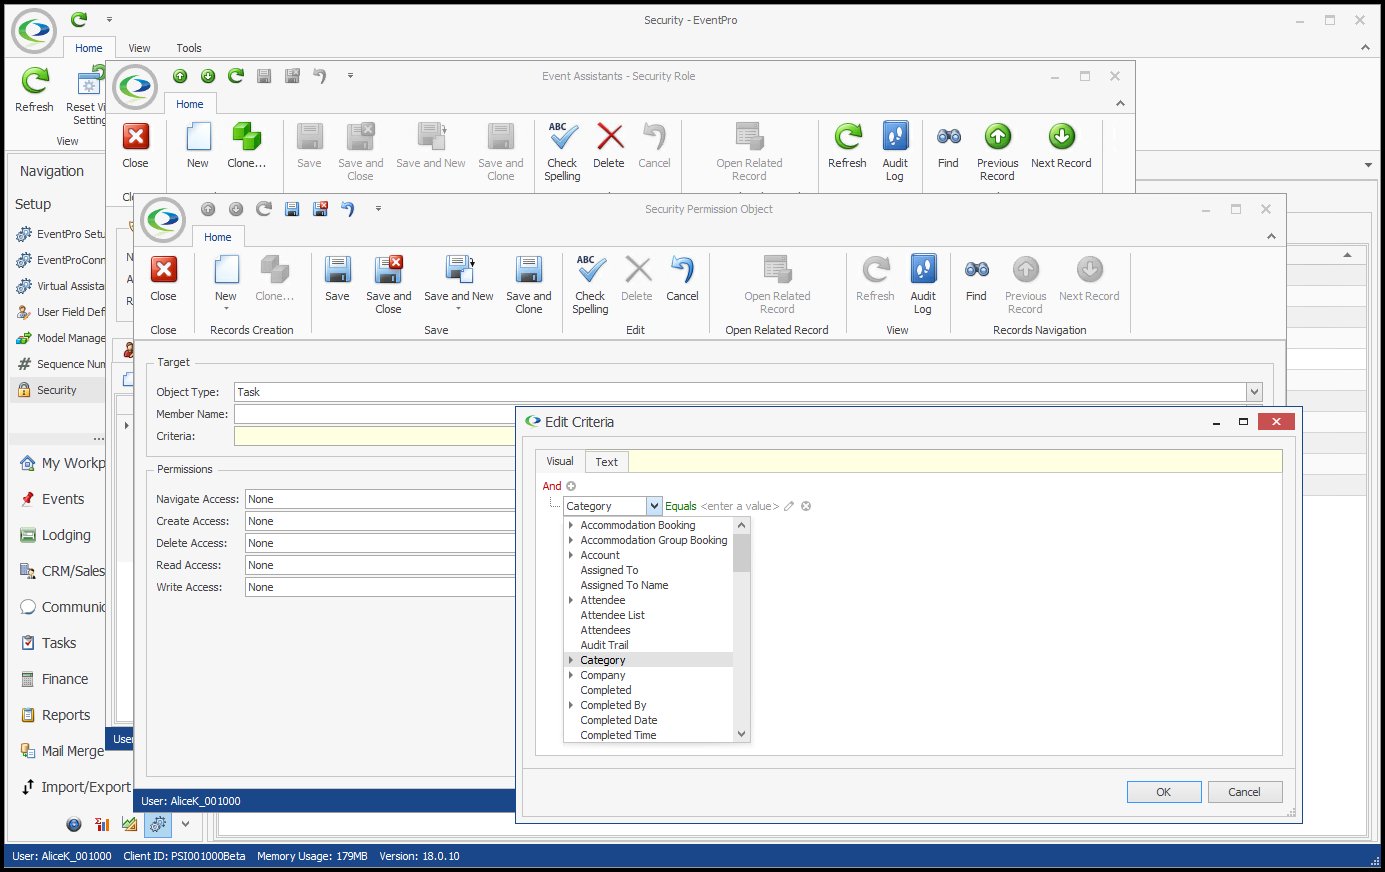 c.Next, we select an operator and value. We could set the operator to "Is Any Of" and then individually add all of the Task Categories that the User will not be able to view, so it would look something like "[Category] Is any of (Event, F&B, Finance, Resources, etc.)". However, it's easier to set the filter the other way around. We will set the operator to "Does Not Equal", and select the value of "Staff". This means the Permissions will be applied to All Task Categories that are not "Staff". (Note that the value drop-down is populated by the Categories defined in EventPro Setup > Tasks > Task Categories). Click OK at the bottom of the Edit Criteria window. 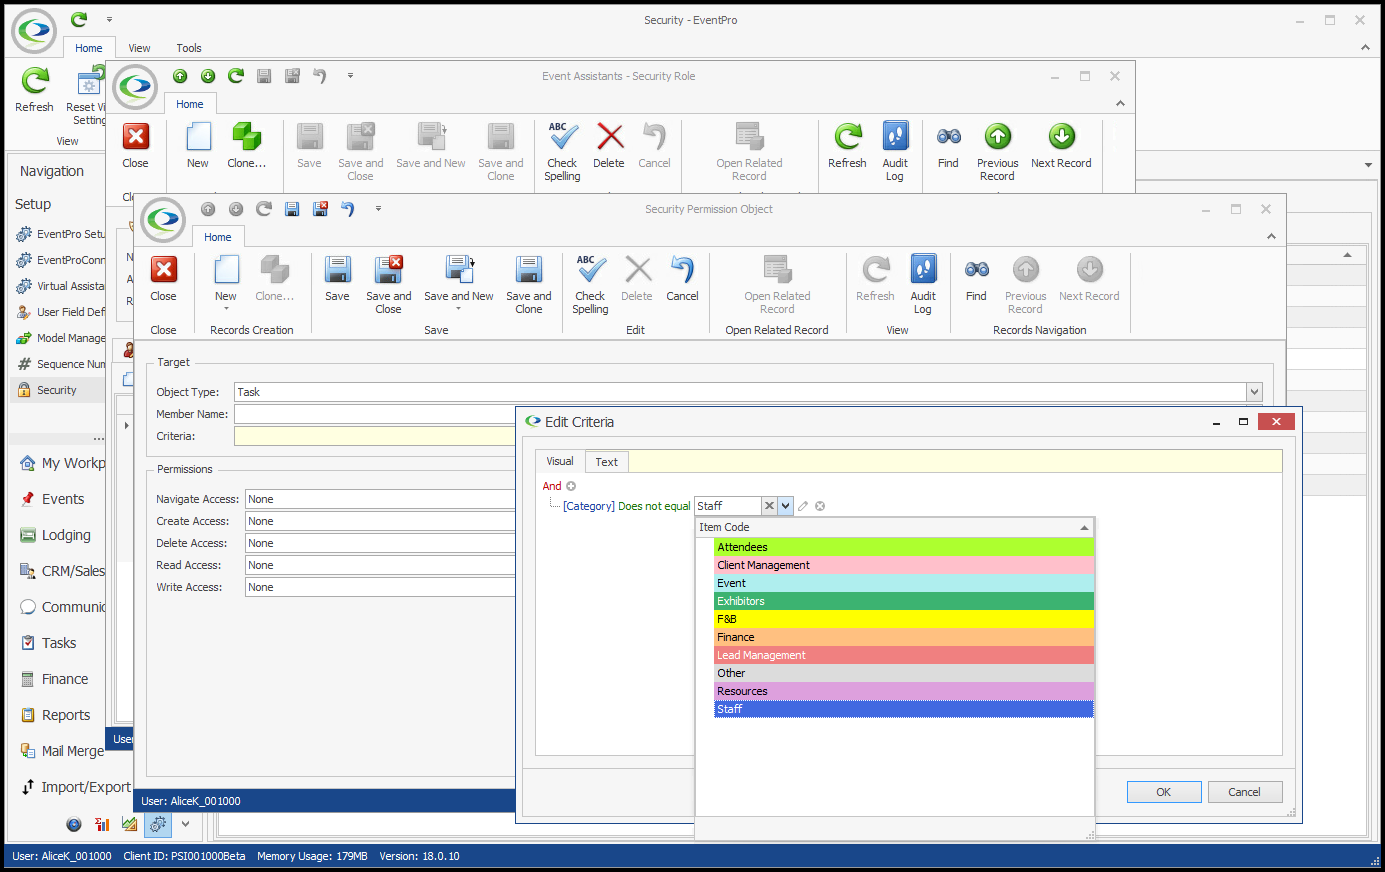 4.Permissions: Now we will determine what access the User has for Tasks of any Category except "Staff". a.Navigate Access: We will leave this as "None", because we still want the User to be able to navigate to Task tabs and lists. b.Create Access: Deny c.Delete Access: Deny d.Read Access: Deny e.Write Access: Deny 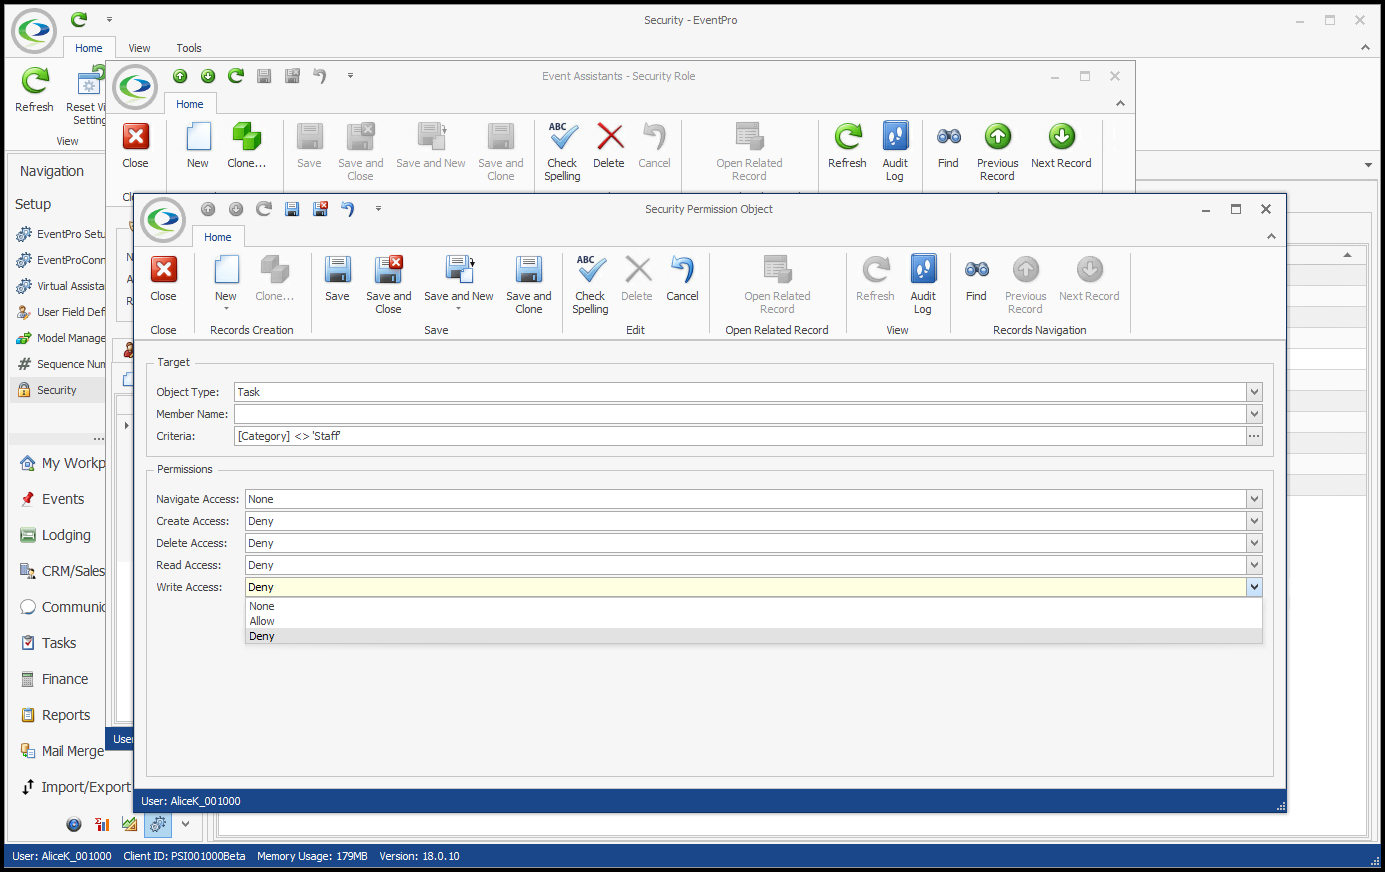 5.Save and Close the Security Permission Object edit form. If we compare the views of two different Users in EventPro, we can see how these Permissions determine access to Tasks. •This is viewing the EventPro Task List as a User with no restrictions set on Task Permissions: 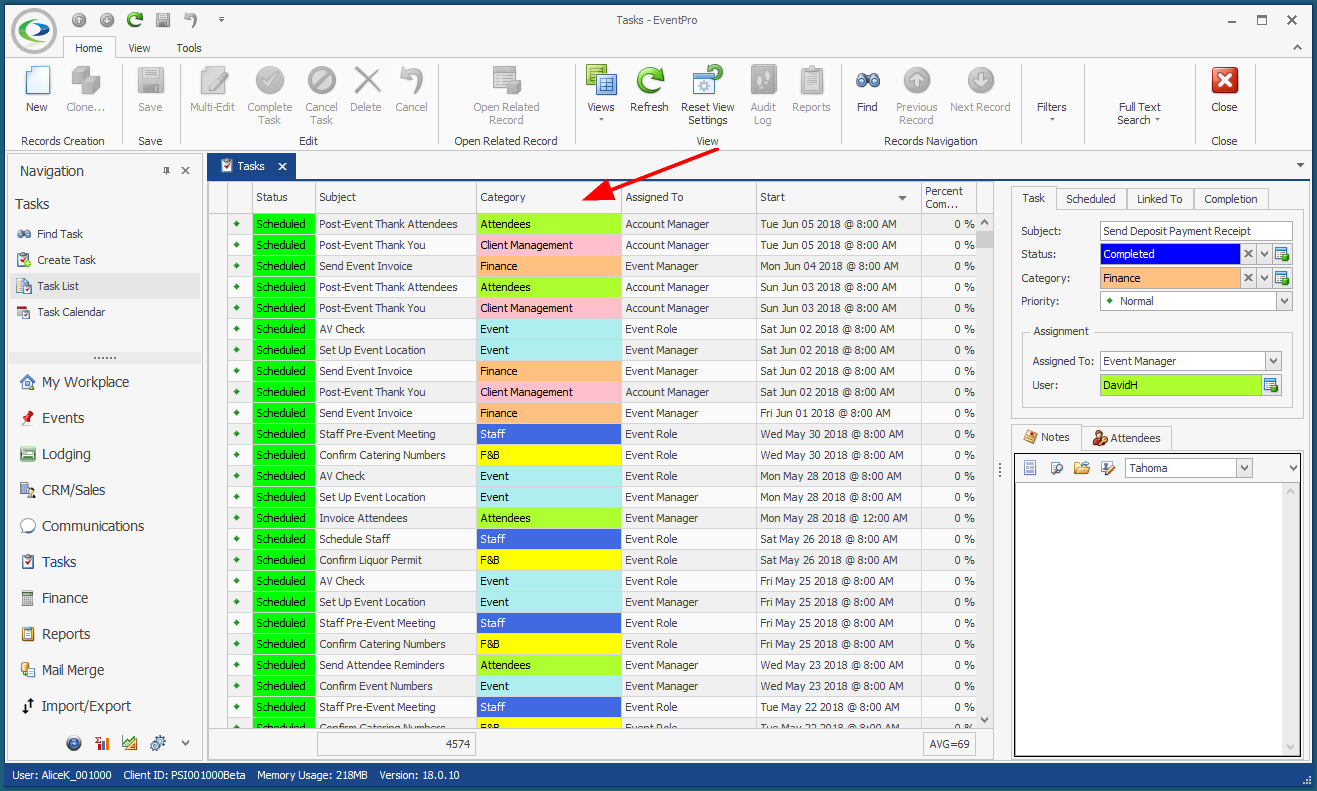 •This is viewing the EventPro Task List as a User with the restricted Task Permissions from our example: 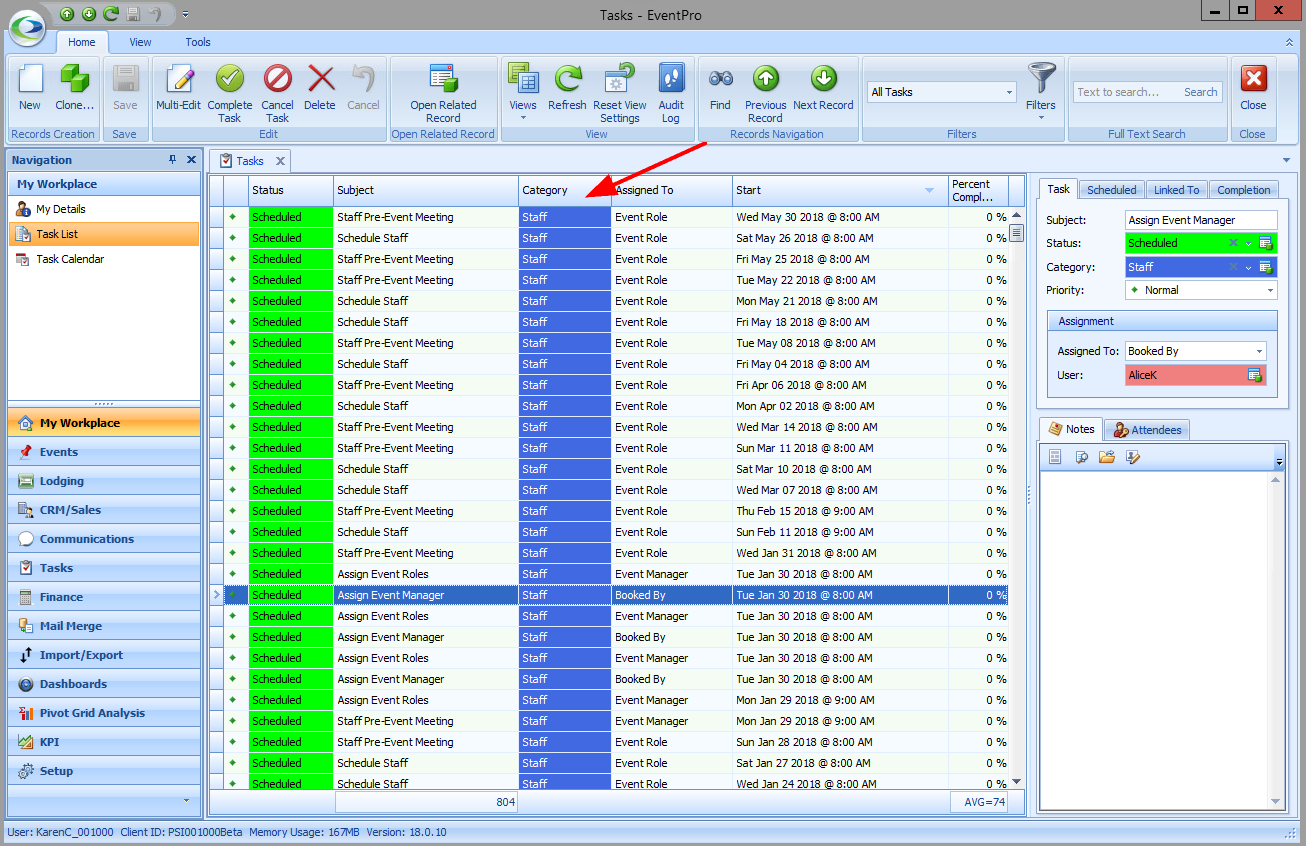 •The User assigned this Security Role will not be able to create, delete, view or edit non-Staff Tasks. •The User will, however, be able to create, delete, view or edit any "Staff" Tasks. •If you wanted to further restrict the User to only view Staff Tasks, you would have to create another Security Permission Object filtered for Staff-category Tasks, and Deny access to Create, Delete and Write. |
In Report Permissions, you were able to restrict the User's ability to design reports, edit the Global Style Sheet, and run specific reports. However, let's say you want to completely block a User's ability to access or run any reports. We would create two Security Permissions Objects to Deny Navigation Access to the Report object type and the Report Category object type. 1.Create a Security Permission Object, and select Report as the Object Type. 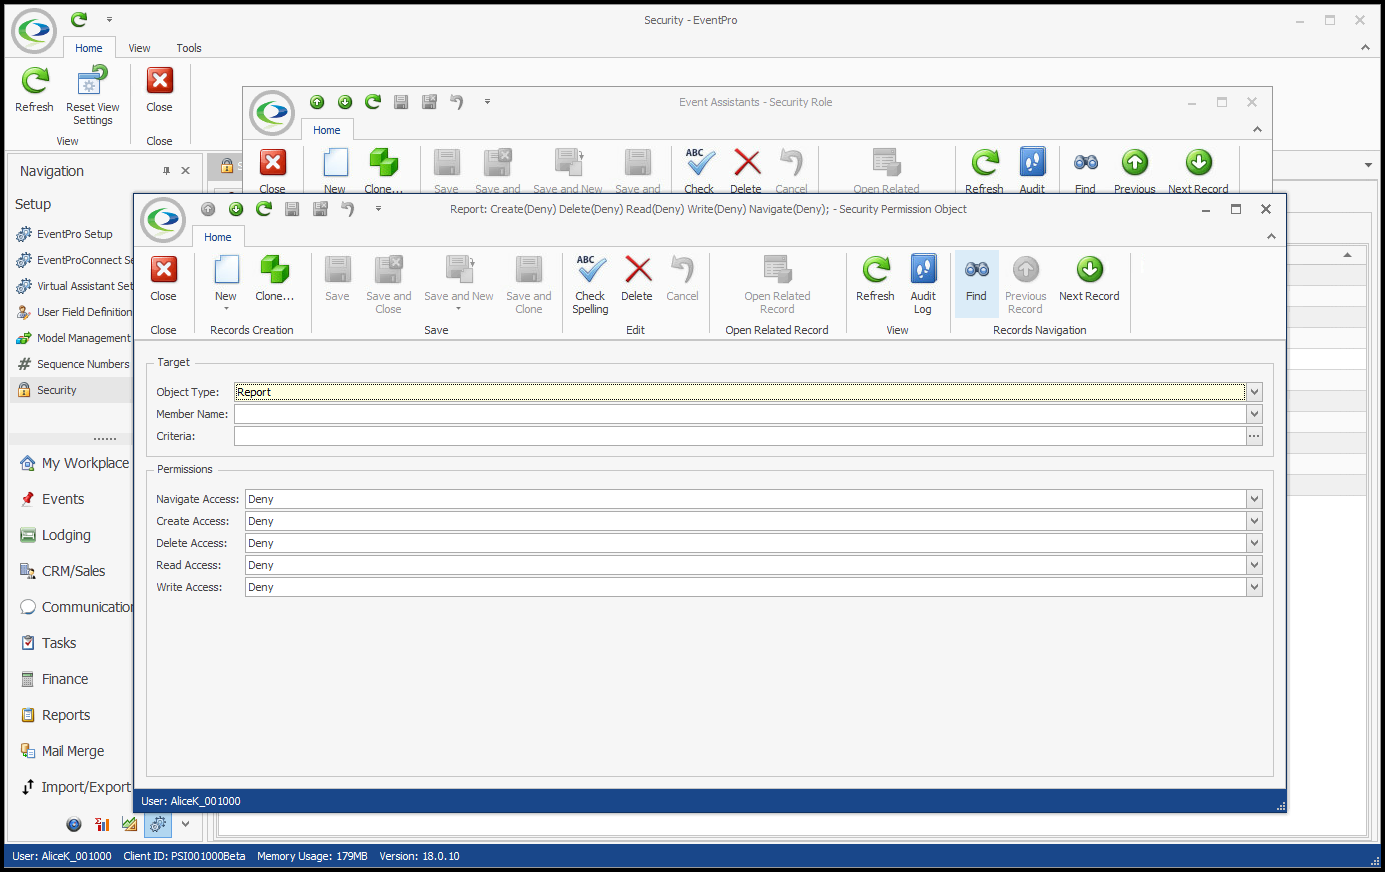 2.You don't need to select any Member Names or set any Criteria. 3.Set all Permissions - Navigate Access, Create Access, Delete Access, Read Access, and Write Access - to Deny. 4.Save and Close the Security Permission Object edit form. 5.Create another Security Permission Object, this time selecting Report Category as the Object Type. 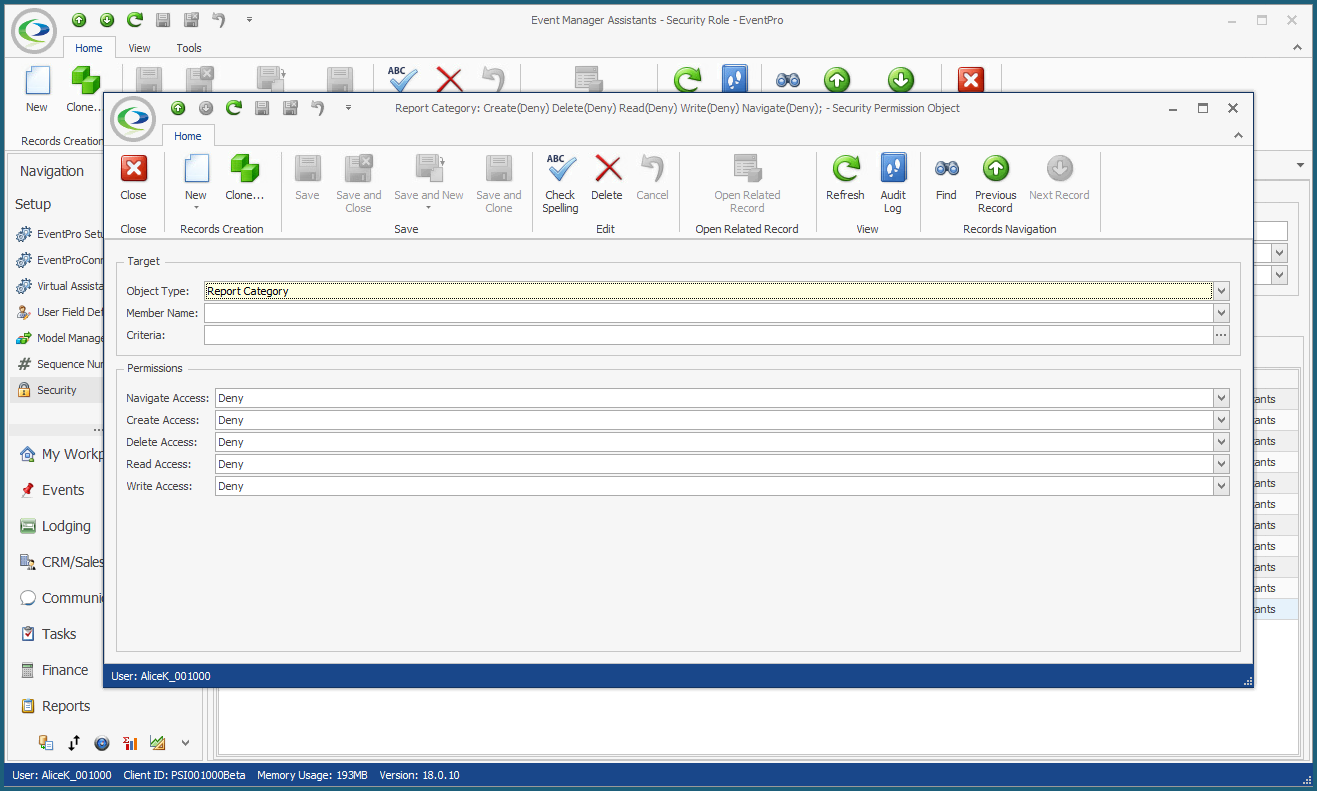 6.Once again, do not select any Member Names or set any Criteria. 7.Set all Permissions to Deny. 8.Save and Close the Security Permission Object edit form If we compare the views of two different Users in EventPro, you can see how these Permissions affect access to Reports. •This is the view of a User with unlimited access to Reports. Note the multiple Report buttons and commands: 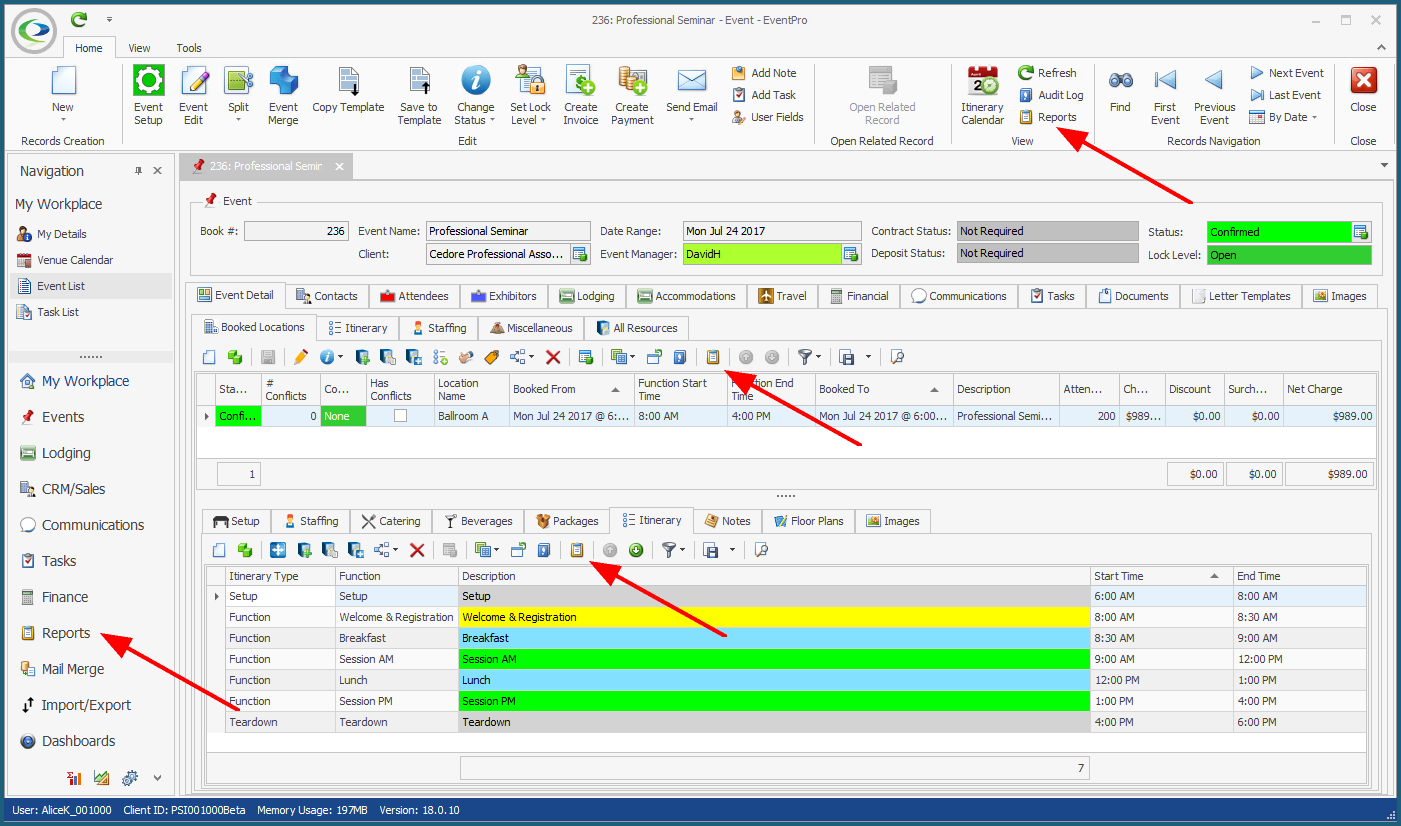 •This is the view of a User with all Report access denied, as per our example. Note the lack of any Report buttons or commands: 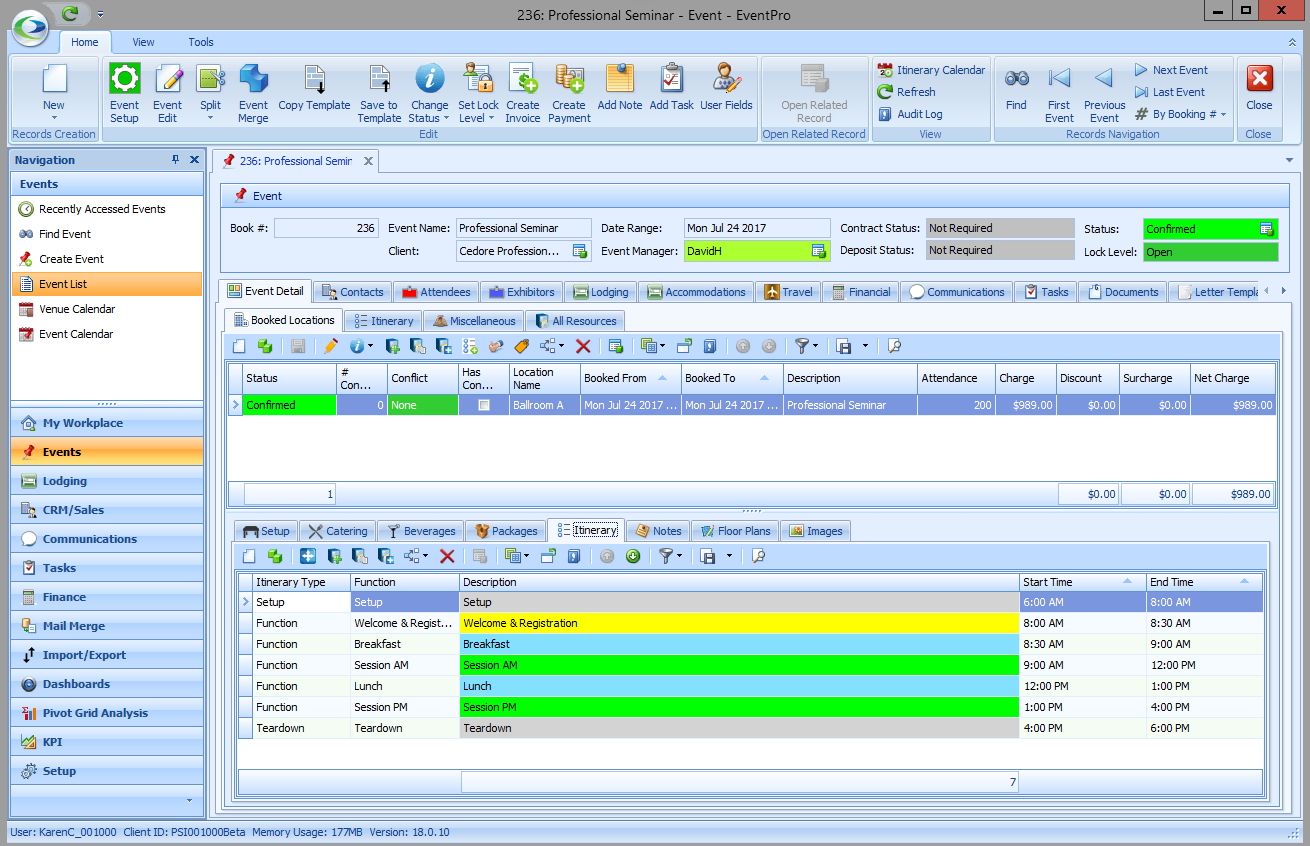 |
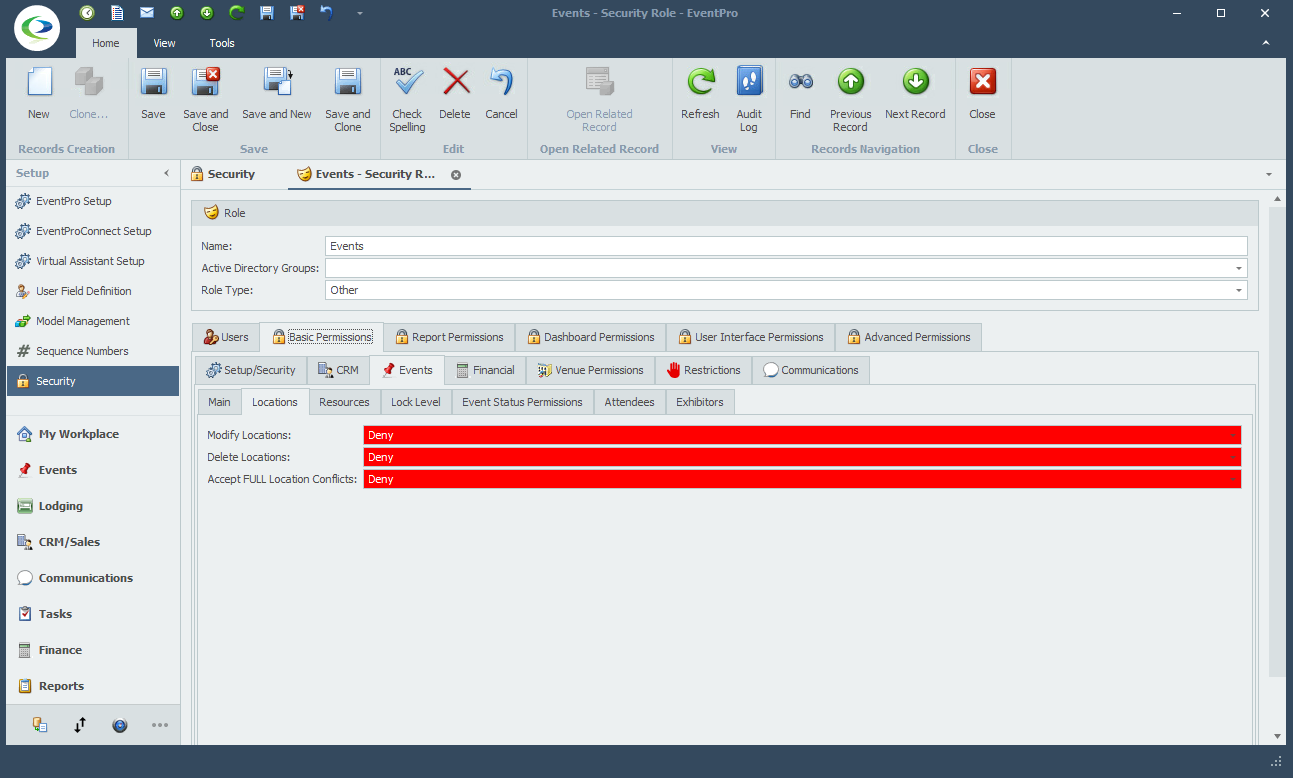
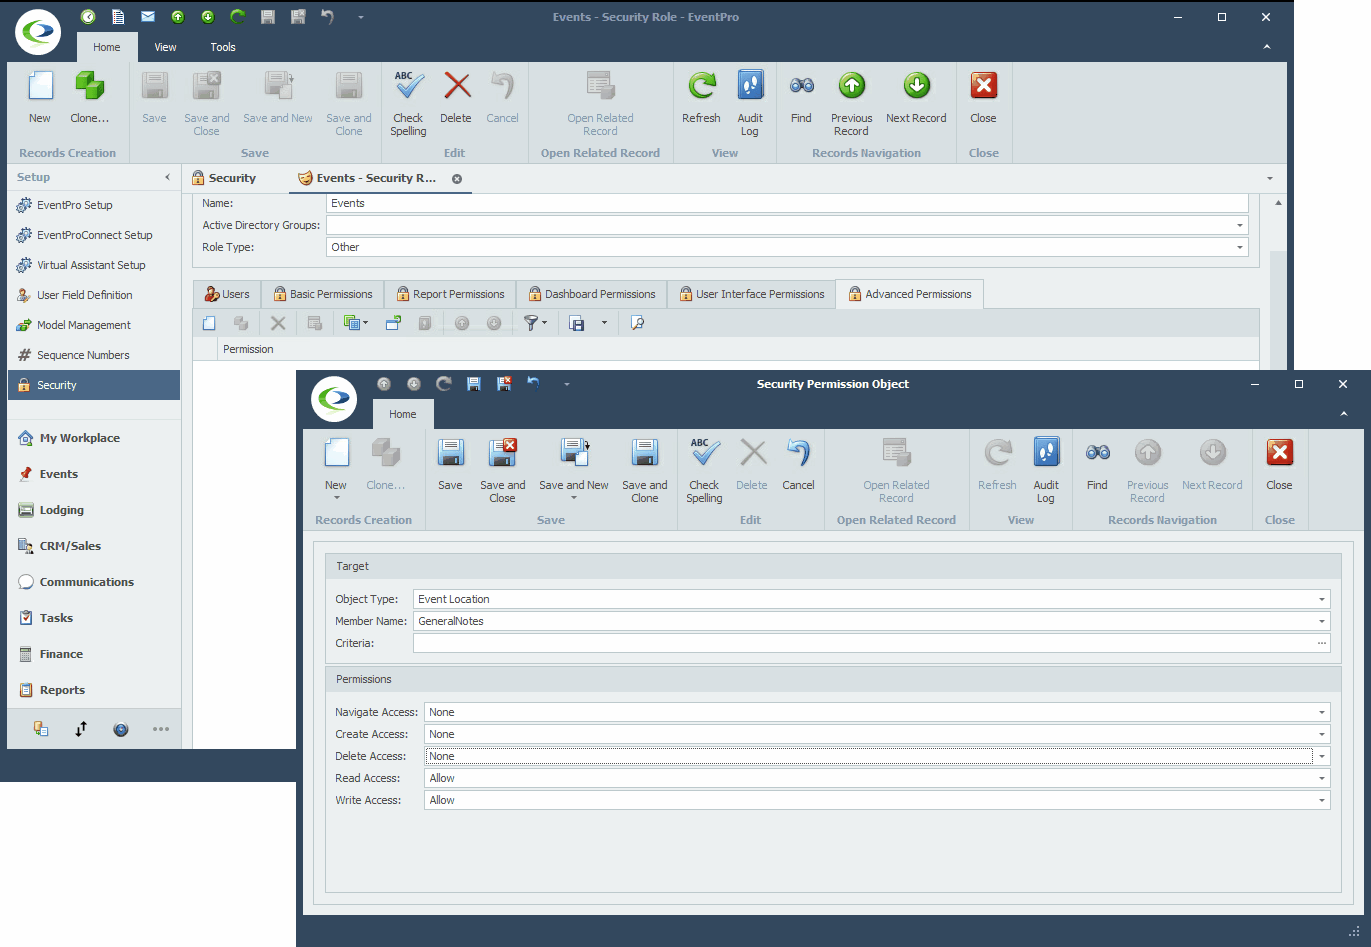
In this example, we are going to set up Advanced Permissions that will allow the User to view the Event Resource Setup tab and the Setup Resource items within, but not to edit, add, or delete Event Setup items. •Select Event Resource Setup as the Object Type. In this example, we will not select any Member Names, or set Criteria. •For Permissions, you can leave Navigate Access and Read Access at "None" (as we want the User to be able to view the tab and items). Set Create, Delete and Write Access to "Deny".  •As a result, the User with this Security Role will be able to view the Event Resource Setup Tab and Items, as you see in the example screenshot, but the User cannot access the related New, Edit or Delete commands. 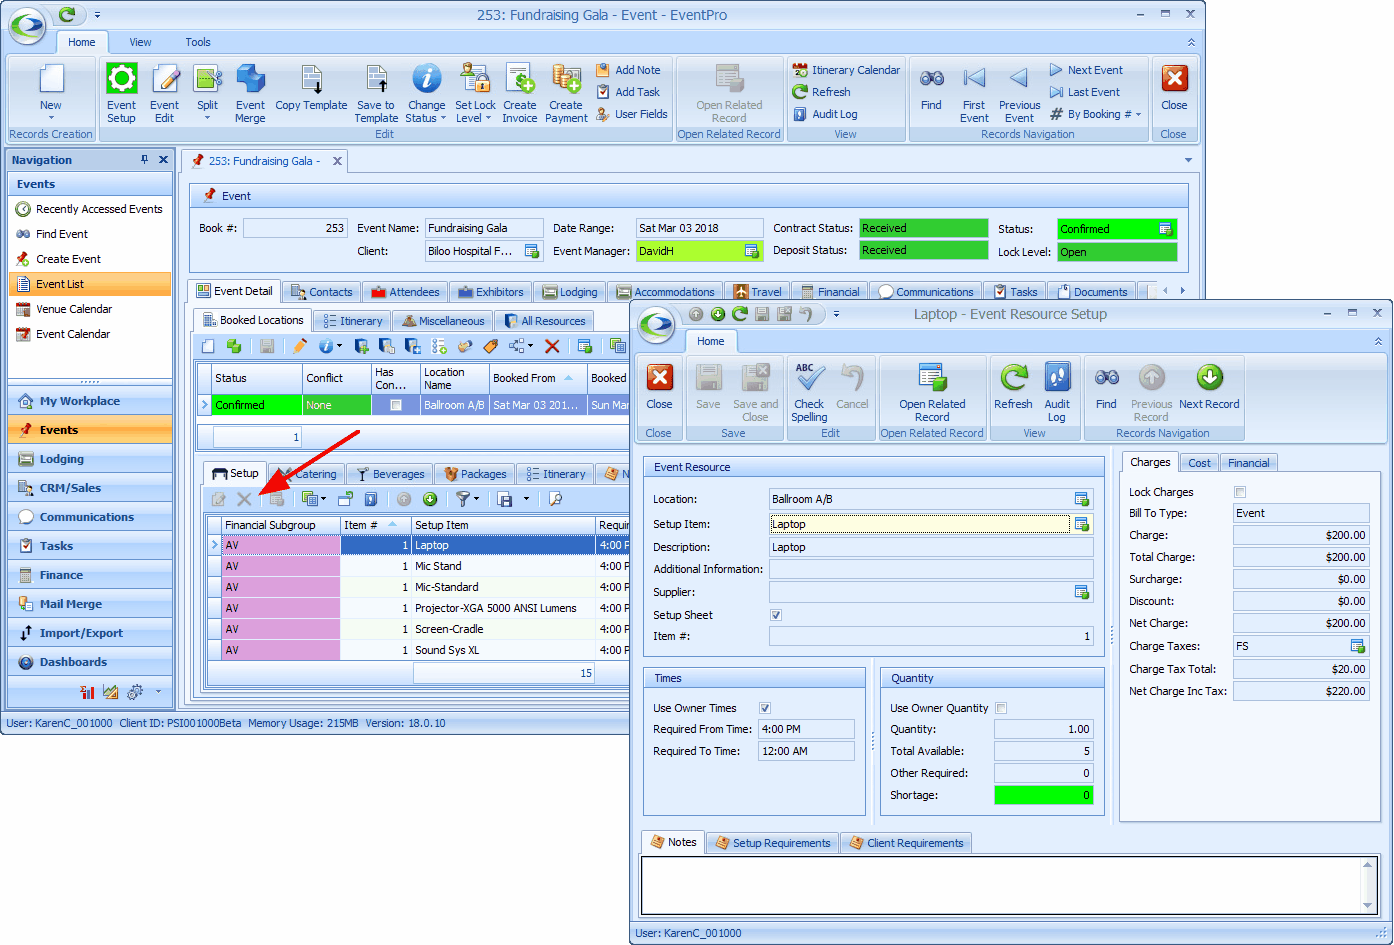 NOTE: Users may also be able to access and add Setup Resource Items in the Event Edit window, but that is a separate Security Object Type: Event Setup Resource Setup Item. |
Let's say your Event Venue books a lot of big shows by famous acts. To prevent gossip and potential disappointment, you don't want to reveal the acts tentatively booked for your venue, but you still want Users to see that there are potential events booked in those time slots. In this situation, you could set Advanced Permissions to hide the Event Client's name for any "Tentative" status events. •In this example, you will create a Security Permission Object for the Event Object Type. oFor the Event object, you need to select all the Member Names that would display the Event Client's names, and perhaps the Agent and Delivery names as well, depending on what you want hidden: Client, ClientContact, BillTo, BillToContact, Agent, AgentContact, DeliverTo, DeliverToContact, etc. oUnder Criteria, you need to set a Filter for Tentative-status events, e.g. [Status] Equals "Tentative" (or whatever Tentative-type status you use). oUnder Permissions, you can set them all to "Deny", except Navigate Access, which can be left as "None". The User with this Security Role will still be able to see the Event - just not the fields of the Member Names you selected above.  •When the User with this Security Role views a Tentative Event, the Event Client's name will appear as "Restricted", or in some calendar views, will simply be blank. 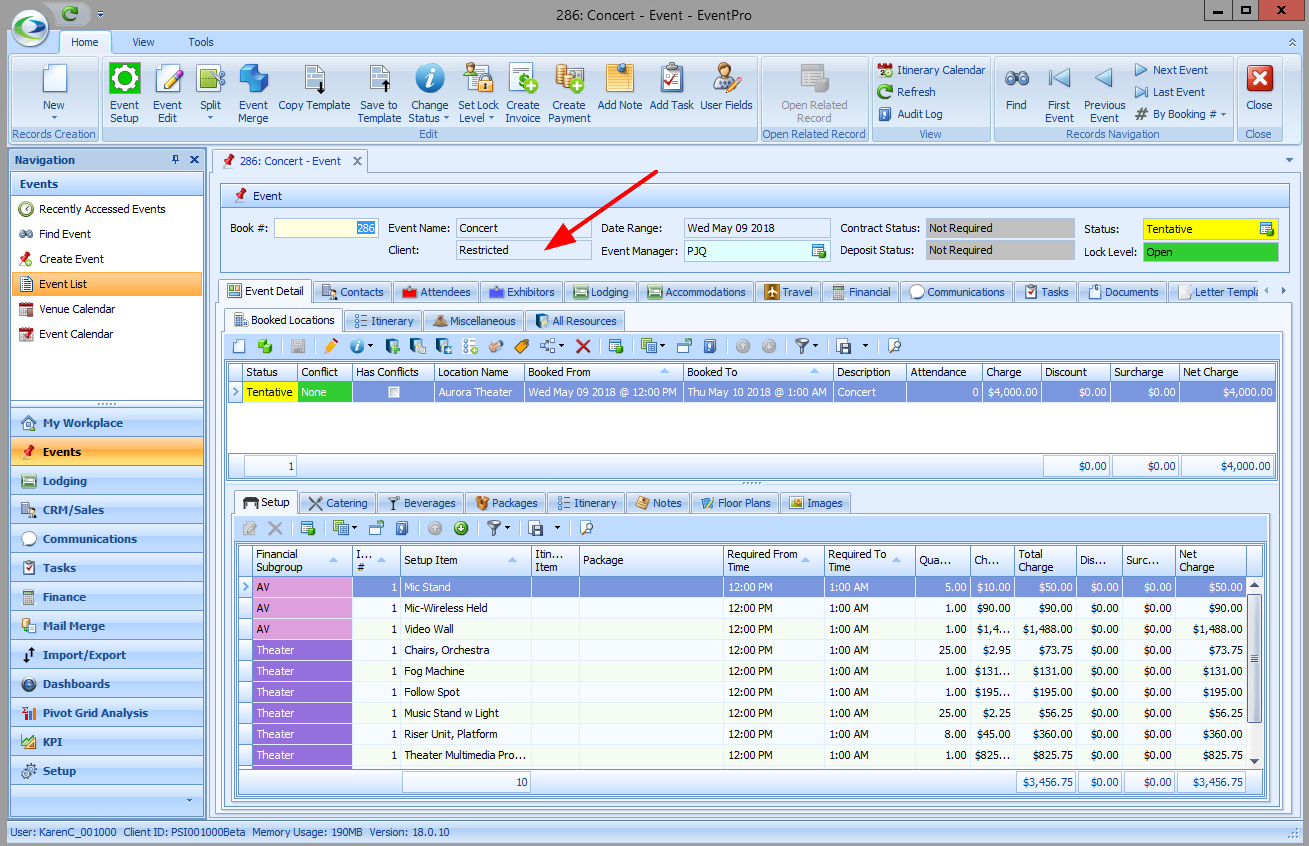 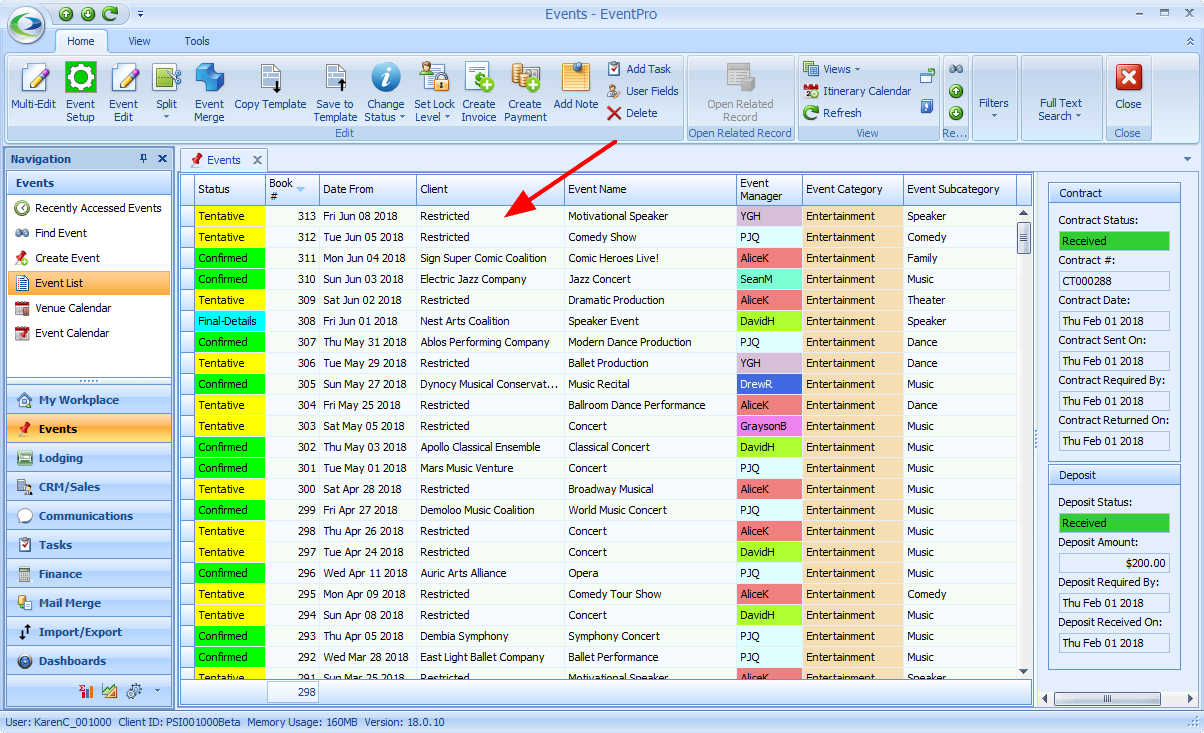 •In comparison, a User without this restriction will be able to see the Client Name on Tentative Events: 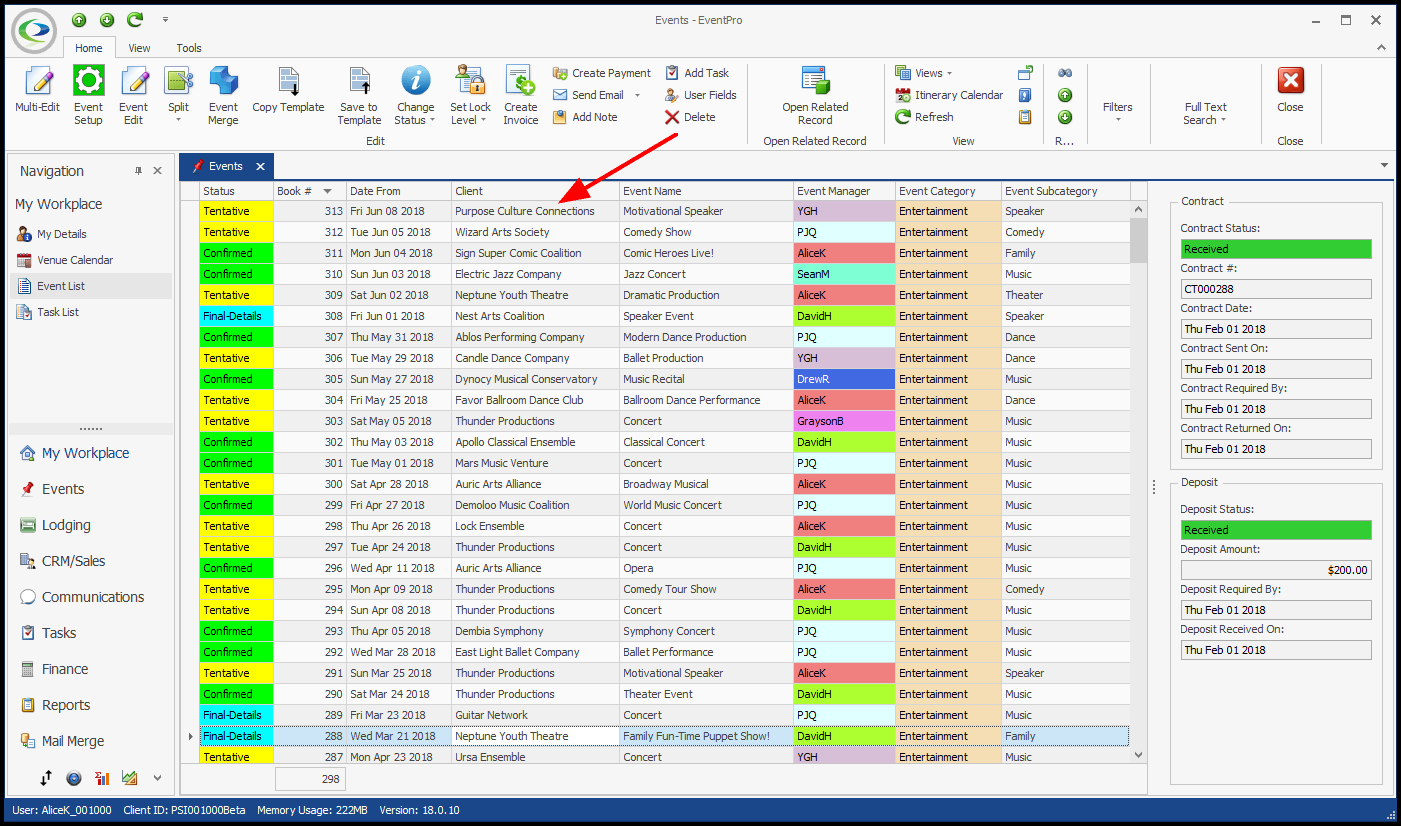 |
© 2023 EventPro Software, a wholly owned subsidiary of Profit Systems Inc. All Rights Reserved.