|
Breadcrumb Trail: Security Setup > Roles (Security Permissions) > Create Security Roles > Permissions Online Permissions |
Scroll Prev Top Next More |
•As you will recall from above, Online Permissions are only relevant for "Online" type Security Roles.
•Online Permissions are divided under several sub-tabs - Account, Events, Event Locations, Opportunities, Venue Permissions, and Attendee Admin - some of which will have further sub-tabs of specific permissions.
Note that you may not see all of the sub-tabs depicted in the sample screenshots below. If you do not own a certain Module, you will not need to access the tab of related Permissions.
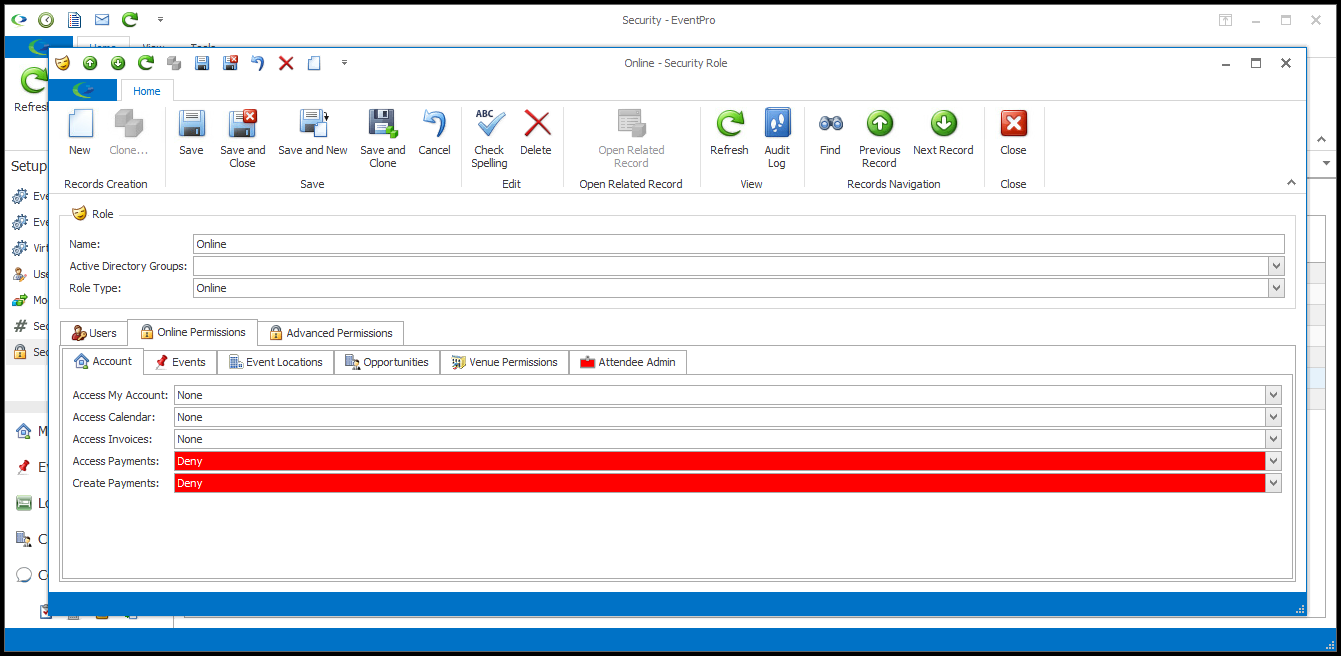

•Under the Account tab, select None, Deny, or Allow for the various actions related to the "My Account" area of EPConnect: Access My Account, Access Calendar, Access Invoices, Access Payments, and Create Payments. |
•For some of the Event-related permissions, you have multiple options to choose from: oNone oAllow All oAllow Own, Company, and Booked oAllow Own and Company oAllow Own and Booked oAllow Own oAllow Booked oDeny 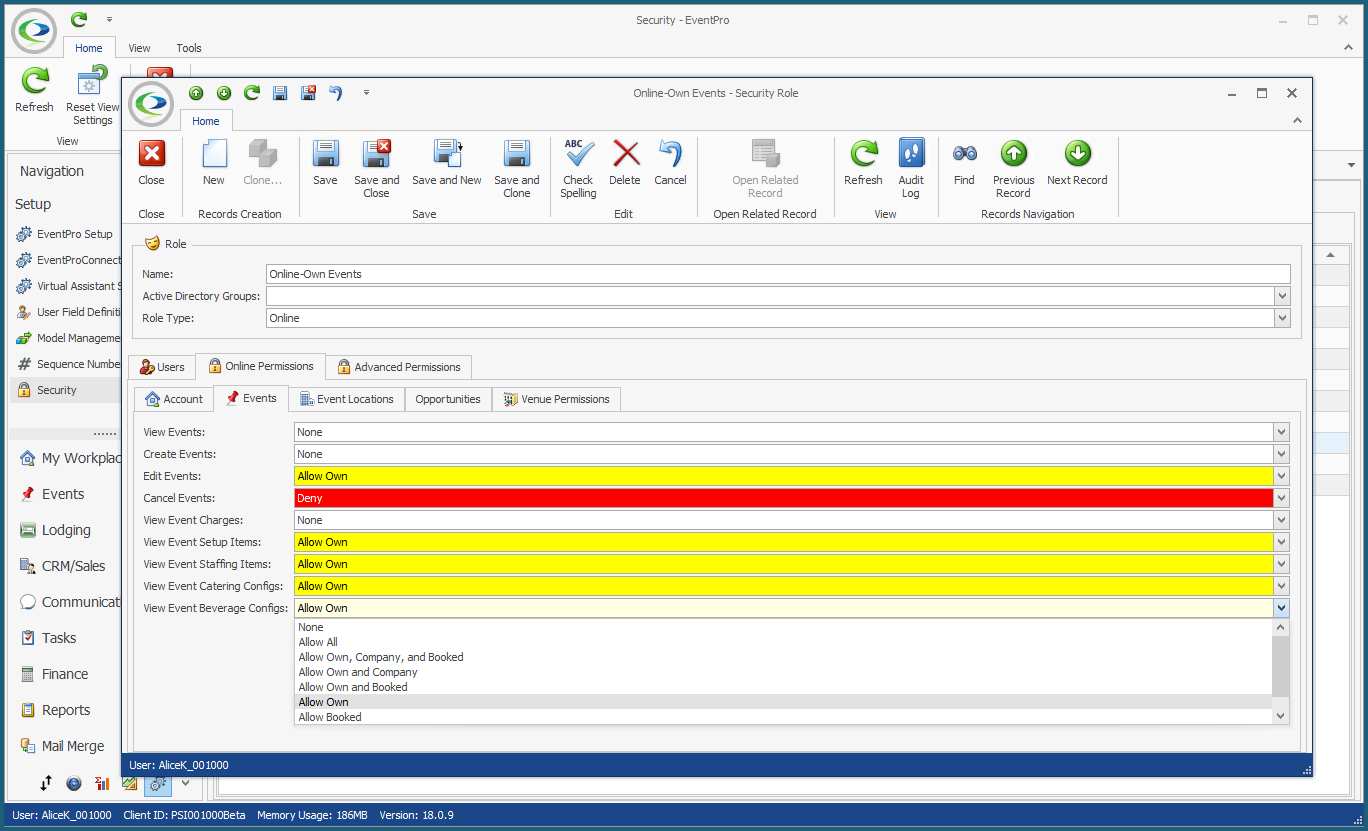 •None, Deny, and Allow All: In this context, the None, Deny, and Allow All options operate in the usual manner described in None, Deny, or Allow and Allow Assigned Only, Allow All above. You really only need to select the "Allow All" setting if you need to override a "Deny" or other lower permission from another Security Role set on the same User. •The terms "Booked", "Own", and "Company" in relation to Events have specific meanings in this context: oBooked: These are Events for which the logged-in User is the Event's Booked By User, i.e. the User who booked the Event. oOwn: These are Events for which the logged-in User's linked CRM Account is either the Event Client Company or Event Client Contact set on the Event. oCompany: These are Events of the Event Client Company that the logged-in User's linked CRM Account belongs to as a Contact (but is not necessarily the Event Client Contact). •To further illustrate the difference between Own and Company, we will look at a brief example: oThe Company, ABC Inc., has 3 Company Contacts: John Smith, Mary Brown, and Jane Draper. oJohn, Mary, and Jane log into EPConnect as Users linked to their own individual Contact accounts, not as the Company. oABC Inc. is the Event Client for 3 Events, but the Event Client Contact is not the same for all 3 Events: oFor Events 1 and 2, the Event Client Contact is John Smith. oFor Event 3, the Event Client Contact is Mary Brown. oThere is a fourth event, Event 4, for which Jane Draper is both the Event Client and the Event Client Contact. (It could be an event she booked personally outside of company business - a family event, for example.) oIf the Users are permitted to access their "Own" events, only John Smith can access Events 1 and 2, while only Mary Brown can access Event 3. Jane Draper couldn't access Events 1, 2, or 3 because she can't log in as the Event Client Company or Event Client Contact. However, Jane can access her own event, Event 4. oIf the Users are permitted to access their "Company" events, all three contacts - John, Mary, and Jane - would be able to access Events 1, 2 & 3, because their linked Contacts belong to the Event Client. However, Event 4 can still only be accessed by Jane, because it is not a "Company" event for ABC Inc.; Jane is both the Event Client and the Event Client Contact, so John and Mary would not have access to that event. •REMEMBER: An Event's online visibility is not determined by the User's Permissions alone. There are some other factors to consider: oVenue Online Availability: Venues, Location Groups, Subgroups and Locations must be marked as "Available Online" in order to appear online EPConnect. If a Location, for example, is not marked "Available Online", none of the online Users will be able to see that Location or its Events in EPConnect, even if the Users have full access permissions. Review EventPro Setup > Facilities > Facilities Setup. oEvent Statuses: When defining Event Statuses, you would have marked them as "Available Online" if you wanted Events set to those Statuses to be visible online. If an Event Status is not marked as "Available Online", none of the Users will be able to view Events of that particular Status online, even if the Users have full access permissions. Review EventPro Setup > Events > Event Statuses. oEPConnect Options: In an Event's Event Edit window, the EPConnect Options field determines what, if any, event information will appear online for the particular Event. |
•As with the Online Event permissions described above, there multiple options for assigning Online Event Location Permissions: oNone oAllow All oAllow Own, Company, and Booked oAllow Own and Company oAllow Own and Booked oAllow Own oAllow Booked oDeny •You can review the explanation of these various options under Events above. In particular, you can review the example for distinguishing "Own", "Company", and "Booked" Events. 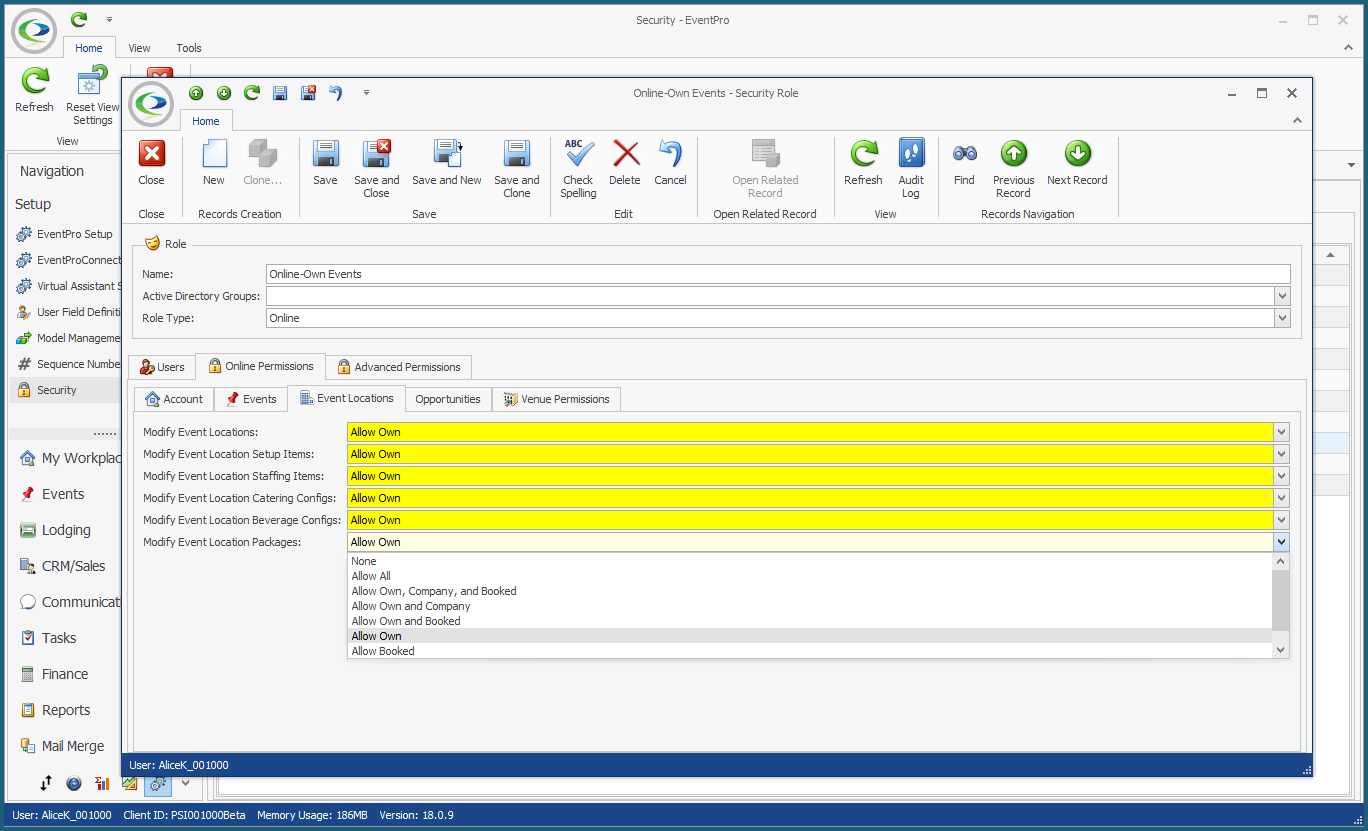 |
•Under the Opportunities tab, indicate the User's permission level (None, Deny, or Allow) to Create Opportunities online. 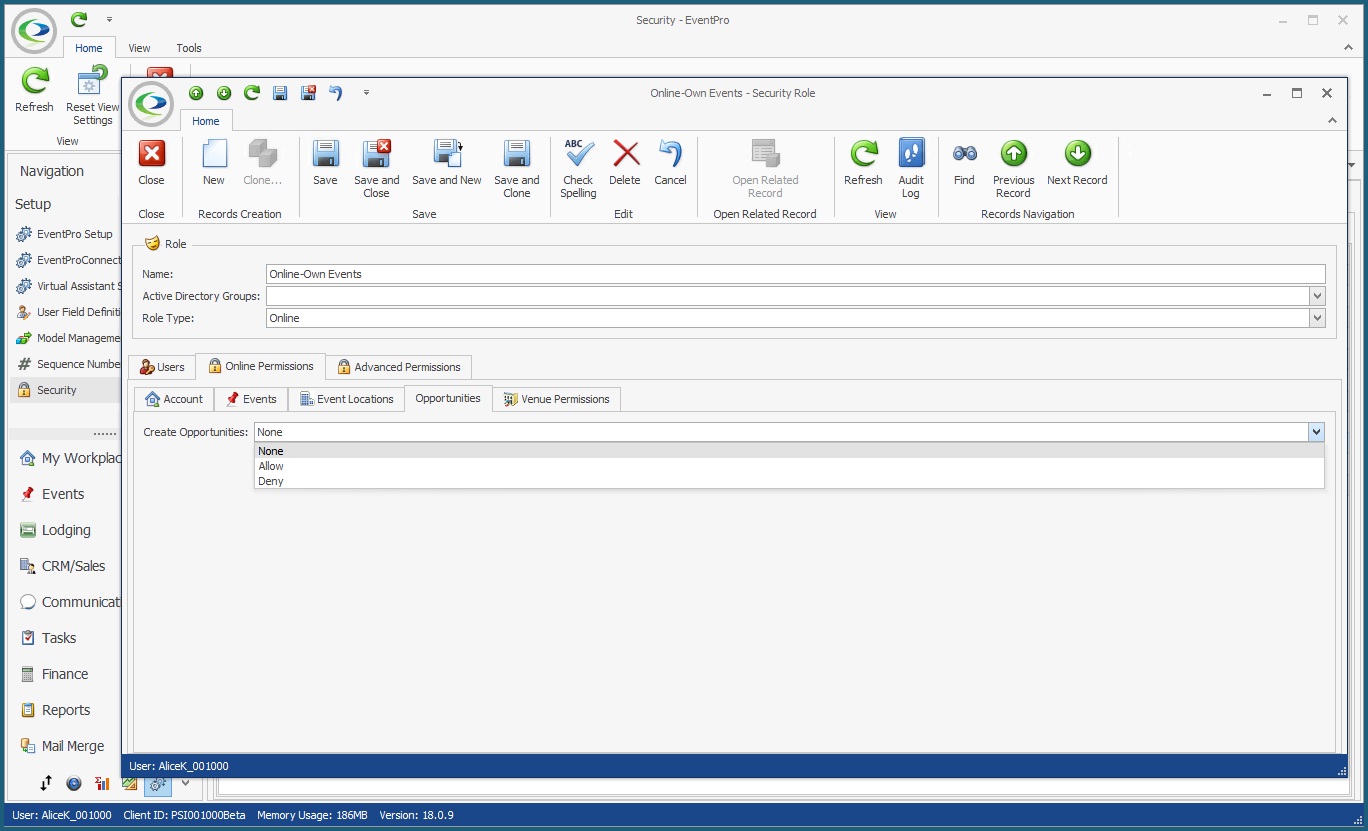 |
•These are similar to the Venue Permissions set for the EventPro program, except that they apply to accessing the Venues/Locations online with EPConnect. •These permissions control the User's online ability to view, edit, create, and delete Events in the selected Venues and Locations. You can even specify which Event Status the Events in a given Location must be in order for the online User to view, edit, or delete the Event, or set the Event to that particular Event Status. •NOTE: Before defining these permissions, take note that if you do not set any permissions for Venues and Locations, the default is to allow full access. In other words, if you want Users in this role to have full online access to a Venue, you wouldn't have to define permissions for it...UNLESS the Users will be assigned another Security Role that denies access, and which you want to override. You can review the interaction of Deny/Allow in conflicting Roles in None, Deny, or Allow above. •HOWEVER, it is important to remember that the online visibility of a Venue and its Events will not be determined by the User's Permissions alone. There are some other factors to consider: oVenue Online Availability: Venues, Location Groups, Subgroups and Locations must be marked as "Available Online" in order to appear online EPConnect. If a Location, for example, is not marked "Available Online", none of the online Users will be able to see that Location or its Events in EPConnect, even if the Users have full access permissions. Review EventPro Setup > Facilities > Facilities Setup. oEvent Statuses: When defining Event Statuses, you would have marked them as "Available Online" if you wanted Events set to those Statuses to be visible online. If an Event Status is not marked as "Available Online", none of the Users will be able to view Events of that particular Status online, even if the Users have full access permissions. Review EventPro Setup > Events > Event Statuses. oEPConnect Options: In an Event's Event Edit window, the EPConnect Options field determines what, if any, event information will appear online for the particular Event. 1.Click the New button under the Venue Permissions tab. 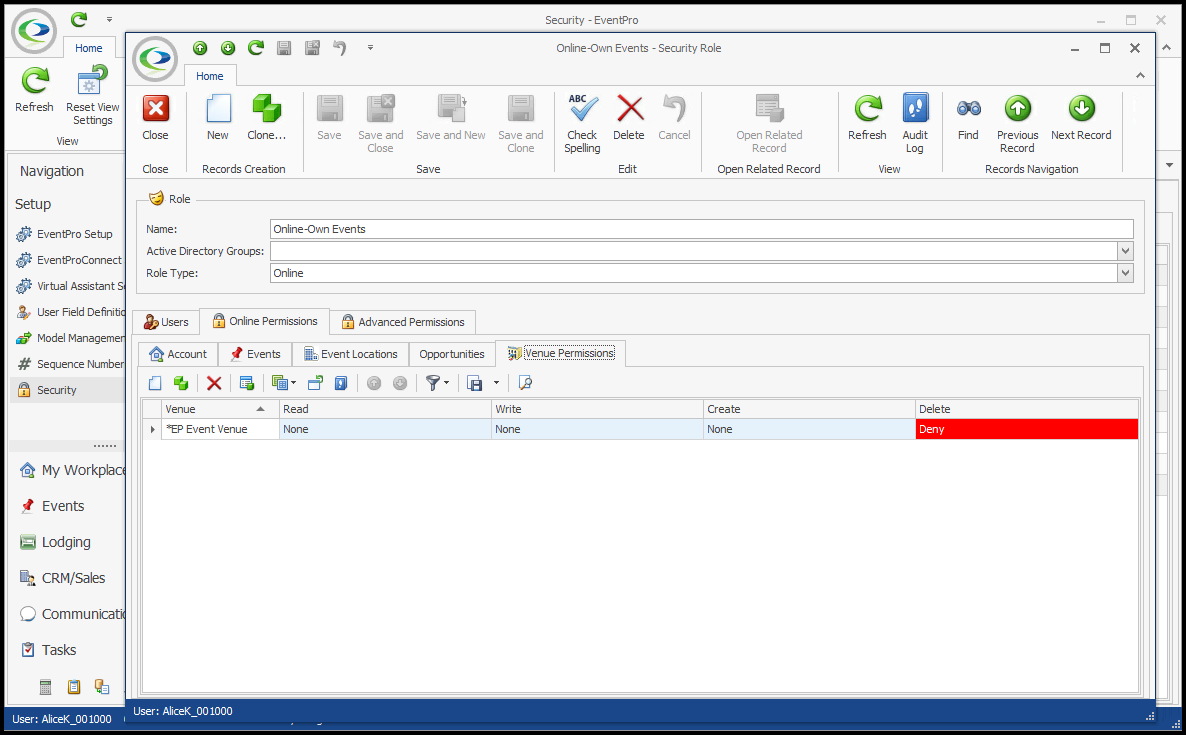 2.The Security Venue edit form opens. 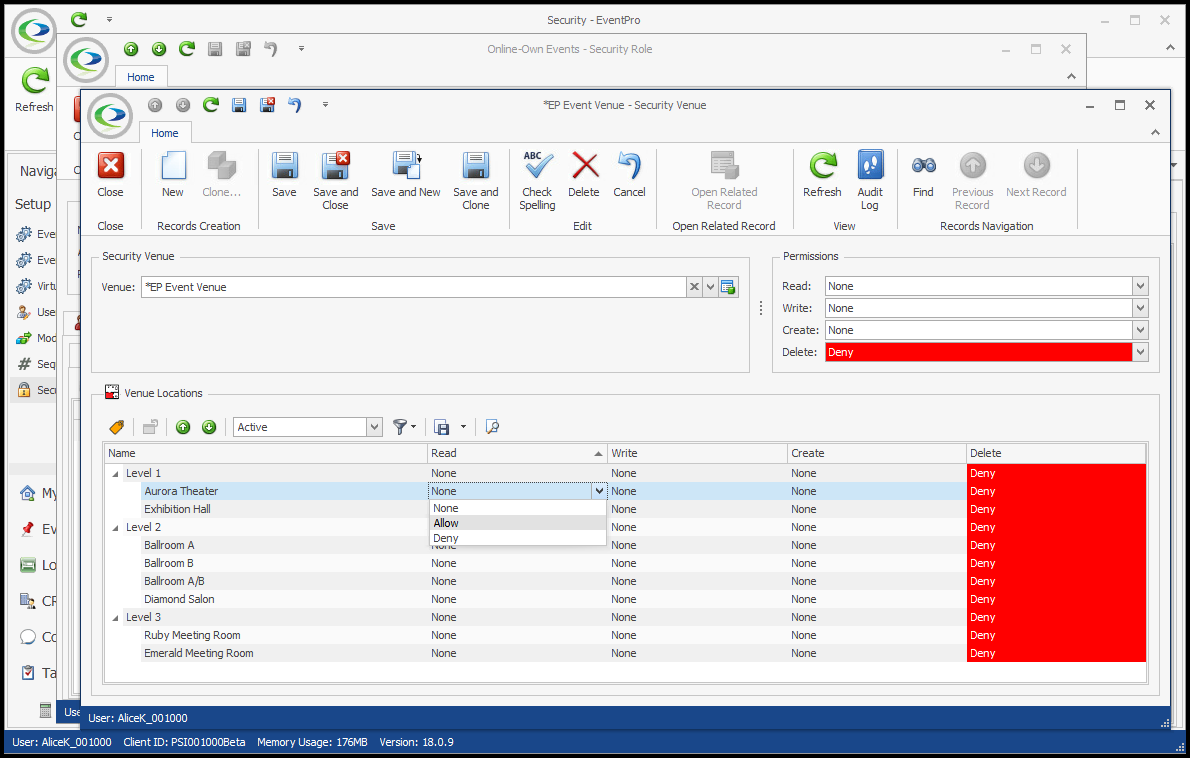 3.Under Security Venue, select the relevant Venue from the drop-down. The Venue drop-down will be populated by Companies marked as "Venues". Review EventPro Setup > Facilities > Facilities Setup. NOTE: Remember that Venues, Location Groups, Subgroups and Locations must be marked as "Available Online" in order to appear online EPConnect. 4.When you select the venue, its Location Groups, Subgroups and Locations will appear in the Venue Locations grid below. 5.You can first set online permissions for the overall Venue, in the Permissions area in the upper right corner. a.Select an option for the Read, Write, Create, and Delete Permissions. b.The permission level you set here will apply across the entire Venue - all the Location Groups, Subgroups and Locations - so it saves the time if permissions will be the same for all levels. c.However, if you want to allow the Users in this Role to be able to access some locations, but not others, you need to set the permissions on each location individually. 6.To set online permissions on the Location Groups, Subgroups and/or Locations individually, expand the menu tree in the Venue Locations grid so that you can see all Location Groups, Subgroups and Locations. a.Use the drop-down lists under each column (Read, Write, Create and Delete) to indicate the permission level for each Location Group, Location Subgroup, and Location, as applicable. Note that if you set a permission for a Location Group, that permission applies to all Subgroups and Locations beneath it. b.We will look at an example of setting permissions at the Location level, in order to explain what Read, Write, Create and Delete mean in this context. i.Read: If you deny Read access to a Location, the User cannot see that Location on the Online Calendar, in Find Space results, or in Location drop-down lists for New Bookings or Add Locations for existing events. If any of an Event's Booked Locations are in the Read-Denied Location, the User will not be able to see that Event in an Events List; however, if the Event has Booked Locations in other permitted Locations, the User will be able to see those permitted Booked Locations in the Online Calendar, but will not be able to open the Event in the View Event page. ii.Write: If you deny Write access to a Location, the User cannot edit Events that have one or more Booked Locations in that Write-Denied Location. The User will be able to see the Event Locations in the Online Calendar, but cannot access the Edit button in the hover hint. The User will, however, be able to access the View button, and see the event in the View Event page. iii.Create: If you deny Create access to a Location, the User cannot start a new booking in that Location, and cannot append that Location as a Booked Location to an existing Event. For example, if the User starts a New Booking or Adds Locations to an event, the Locations drop-down will not display Create-Denied Locations. The User will be able to see those Locations in Find Space search results, but will not be able to book an event in Create-Denied Locations. iv.Delete: If you deny Delete access to a Location, the User cannot Cancel Events that have one or more Booked Locations in that Delete-Denied Location. The hover hint over the Event's Booked Locations in the Online Calendar will not display the Cancel Event button. 7.You can also further set online permissions for Venue Location Statuses on a Location Group, Location Subgroup, or Location Level. a.In the Venue Locations grid of the Security Venue form, double-click the Location Group, Location Subgroup, or Location for which you want to set Status Permissions. b.The Security Venue Location edit form opens. We will use the example of an individual Location. 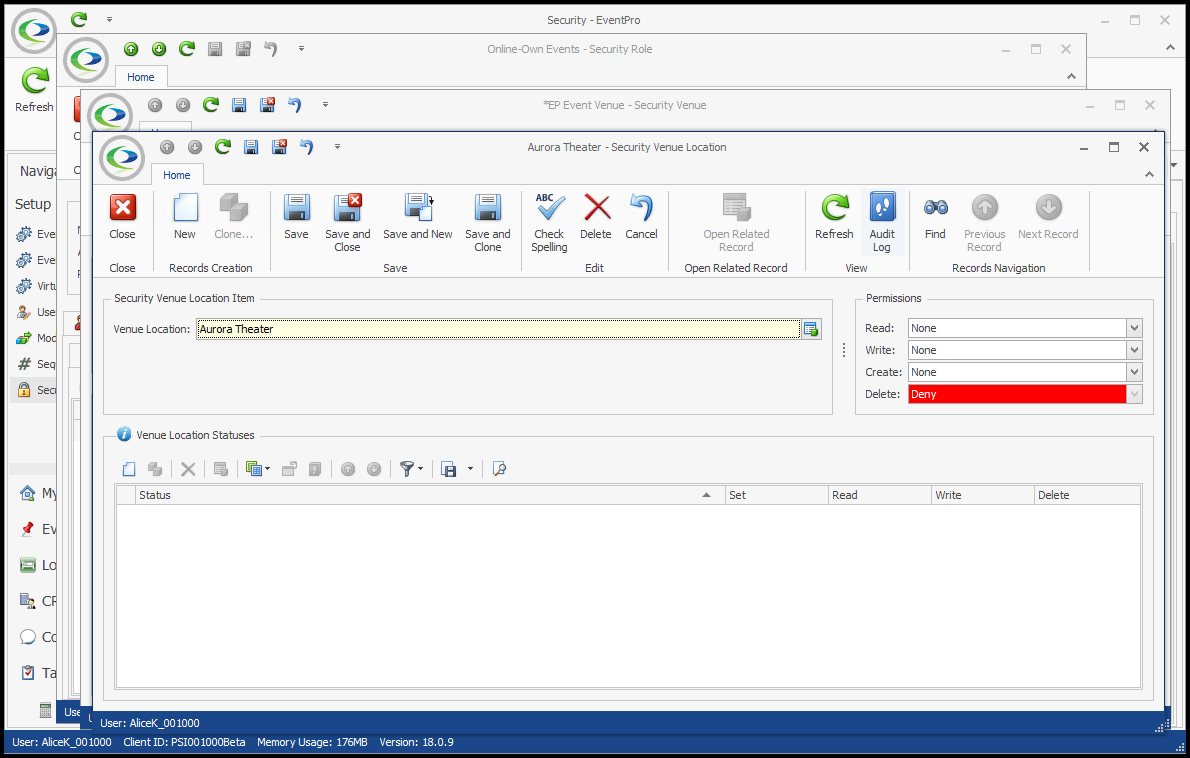 c.In the Venue Location Statuses grid at the bottom of the form, click the New button to open the Security Venue Location Status edit form. d.Select the applicable Status from the drop-down. These are the Event Statuses you defined under EventPro Setup > Events > Event Statuses. 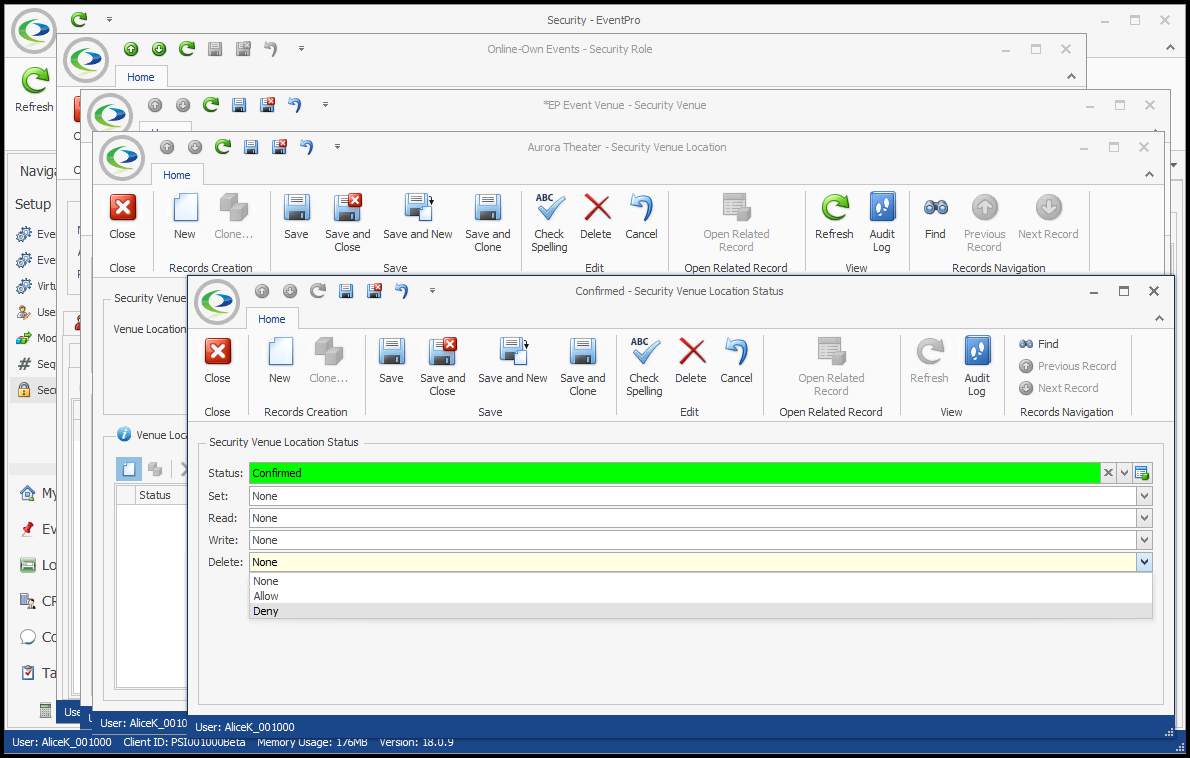 e.For the selected Event Status, indicate the permission level for Set, Read, Write, and Delete. By way of example, we will look at what these permissions would mean when applied to an Event Status for a Location. i.Set: If you deny Set access to a Security Venue Location Status, the User cannot set Events in that particular Location to that selected Event Status. ii.Read: If you deny Read access to a Security Venue Location Status, the User cannot see Events that contain one or more Booked Locations of that Read-Denied Location/Status in an Events List. However, if the Event has Booked Locations in other Read-permitted Locations/Statuses, the User will be able to see those Booked Locations in the Online Calendar, but will not be able to open the Event in the View Event page. iii.Write: If you deny Write access to a Security Venue Location Status, the User cannot edit Events that have one or more Booked Locations of that Write-Denied Location/Status. The User will be able to see the Event Locations in the Online Calendar, but cannot access the Edit button in the hover hint. The User will, however, be able to access the View button, and see the event in the View Event page. iv.Delete: If you deny Delete access to a Security Venue Location Status, the User cannot Cancel Events that have one or more Booked Locations of that Delete-Denied Location/Status. The hover hint over the Event's Booked Locations in the Online Calendar will not have the Cancel Event button. f.When you are done with the Security Venue Location Status edit form, click Save and Close to return to the Security Venue Location edit form. g.Continue setting permissions for any other applicable Security Venue Location Statuses. 8.You can click Save and Close in the various open edit forms to get back to the Venue Permissions tab of the Security Role edit form. 9.Continue defining the online permissions for as many Venues and Locations as you require for this Online Security Role. |
•For the View Attendees permission, select None, Allow All, Allow Own, or Deny. Review Events above for an overview of the All/Own permissions. 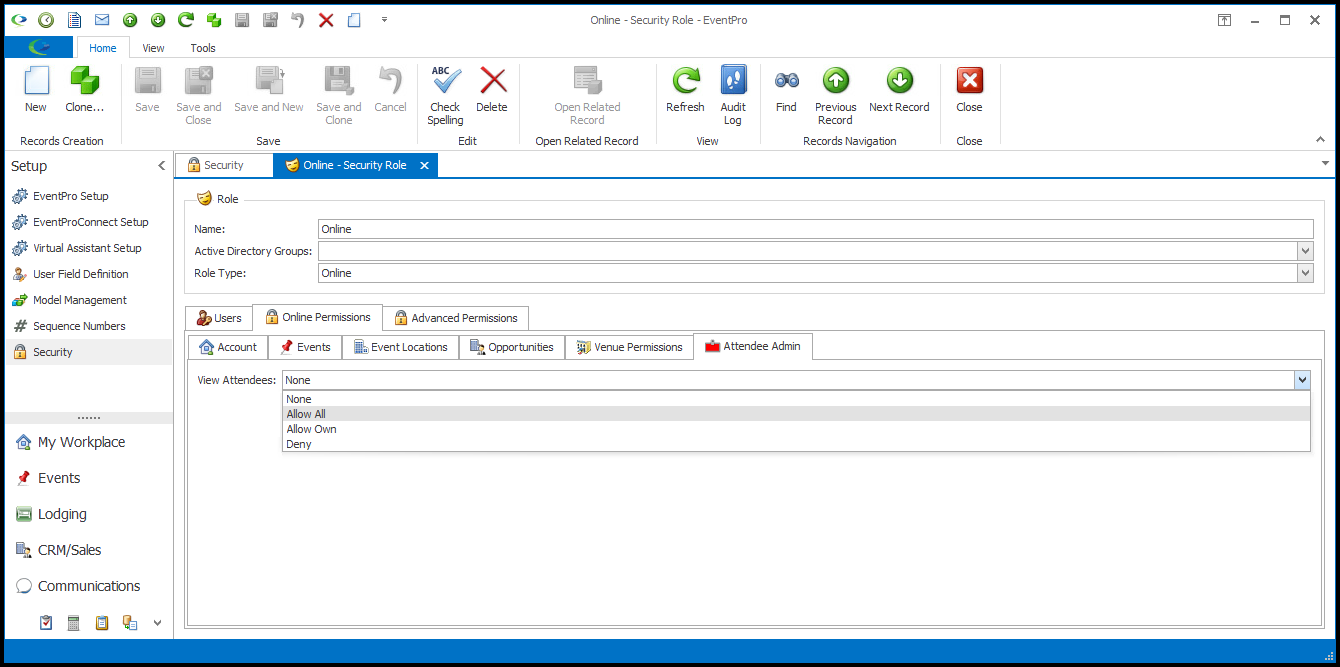 |
© 2023 EventPro Software, a wholly owned subsidiary of Profit Systems Inc. All Rights Reserved.