|
Breadcrumb Trail: Security Setup > Roles (Security Permissions) > Create Security Roles > Permissions Basic Permissions |
Scroll Prev Top Next More |
•Basic Permissions for a Security Role are divided under several sub-tabs - Setup/Security, CRM, Events, Financial, Venue Permissions, Restrictions, and Communications - some of which will have further sub-tabs of specific permissions.
•This topic will also look briefly at the Allow Open Object Permissions, which may be useful for preventing Users from making unintentional changes to data records in EventPro.
•You may need more granular control over object modification permissions than the Basic Permissions provide. For example, you may want to allow Users to edit a few fields on a certain object without giving those Users full object modification rights. For information on how to set those more granular permissions, see Object Modification Permissions under Advanced Permissions.
NOTE: You may not see all of the sub-tabs depicted in the sample screenshots below. If you do not own a certain Module, you will not need to access the tab of related Permissions.

•Under the Setup/Security tab, you simply select None, Deny, or Allow for the various actions listed below. •For the Allow Open Object setting, see the special instructions under Allow Open Object Permissions below. 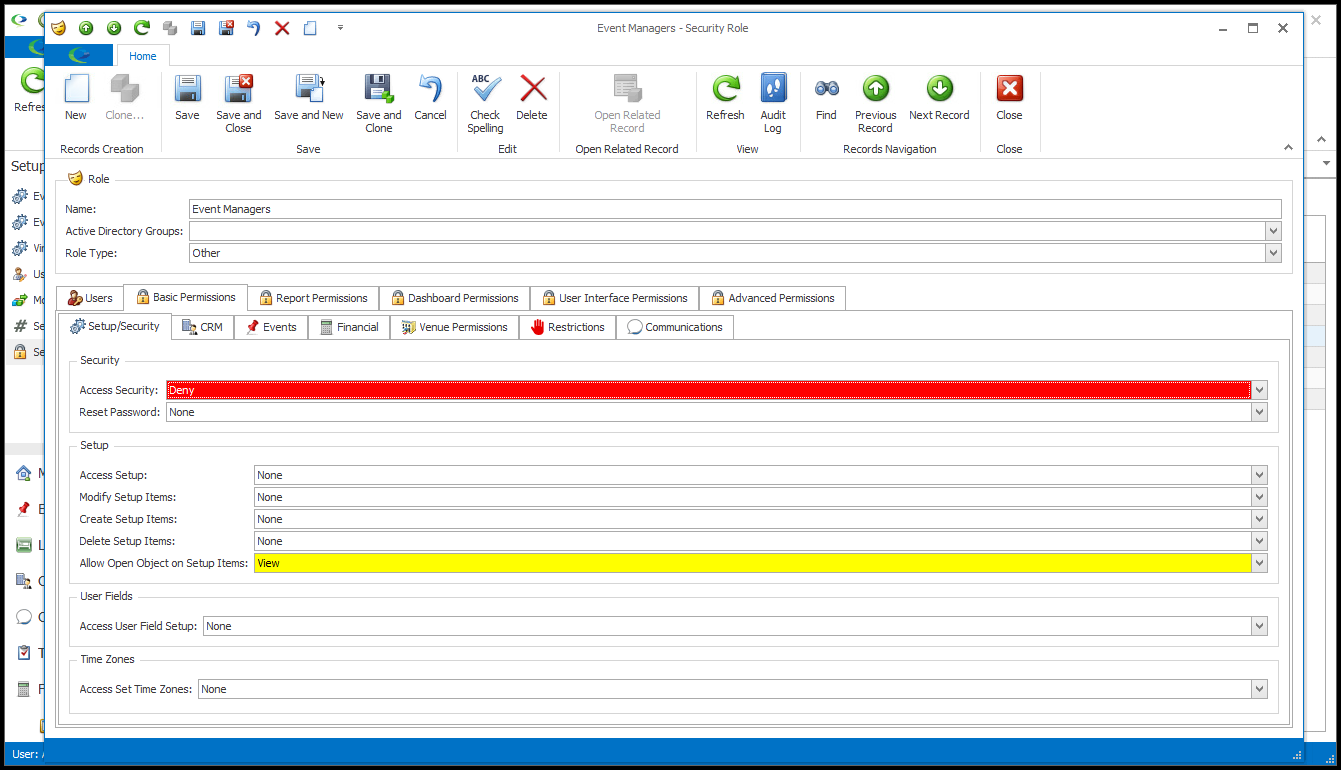 |
•Under the CRM tab, you can use the None, Deny, or Allow options to indicate whether the Users can Access CRM, as well as the actions described under the Companies and Contacts tabs. •For the Allow Open Object setting, see the special instructions under Allow Open Object Permissions below. 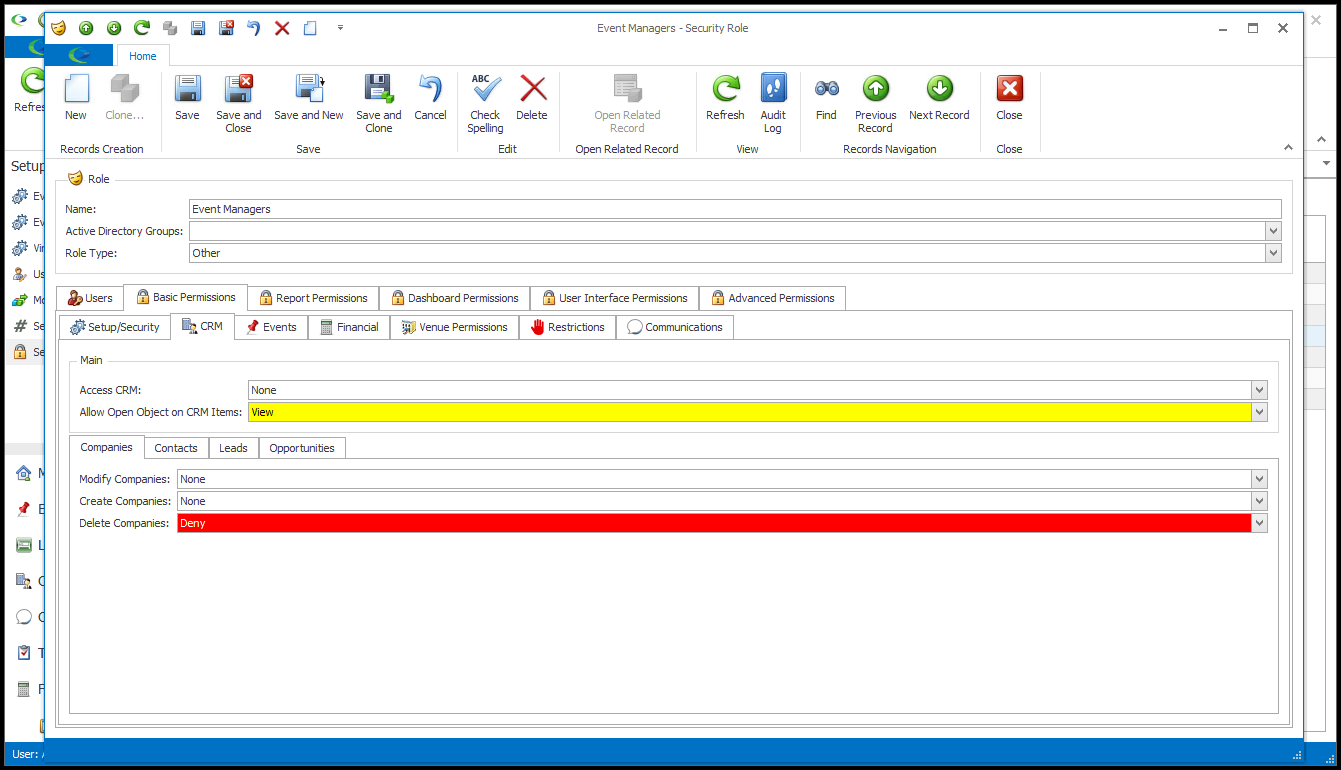 •Some of the actions under the Leads and Opportunities tabs have the additional "Allow Assigned Only" option, described in Permissions > Allow Assigned Only, Allow All above. Users are assigned to Leads and Opportunities as "Account Managers". So, for example, if Users only have permission to Modify "Assigned" Leads, those Users would only be able to modify leads for which they are the assigned Account Manager. 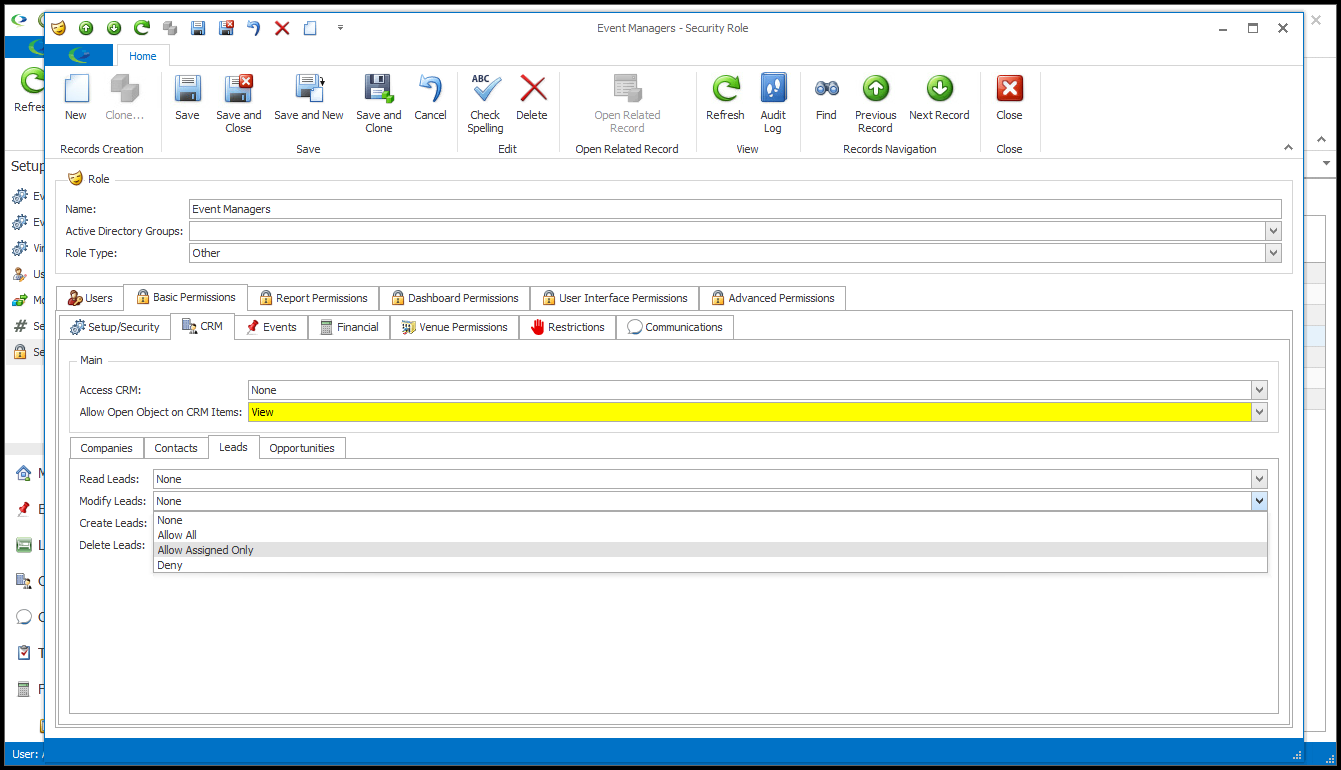 |
Event-related Permissions are further subdivided into 7 other tabs (assuming you have all of the related modules): Main, Locations, Resources, Lock Level, Event Status Permissions, Attendees, and Exhibitors. •Main: For the rights listed under the Main tab, you can select from the None, Deny, Allow options, and sometimes the Allow Assigned Only, Allow All options. oWhen dealing with Events, remember that the "Assigned" User will be the Event Manager. So, for example, if this Role only allows Users to Modify "Assigned" Events, those Users would only be able to modify Events to which they have been assigned as Event Manager. You can review the example above in Allow Assigned Only, Allow All. •For the Allow Open Object setting, see the special instructions under Allow Open Object Permissions below. 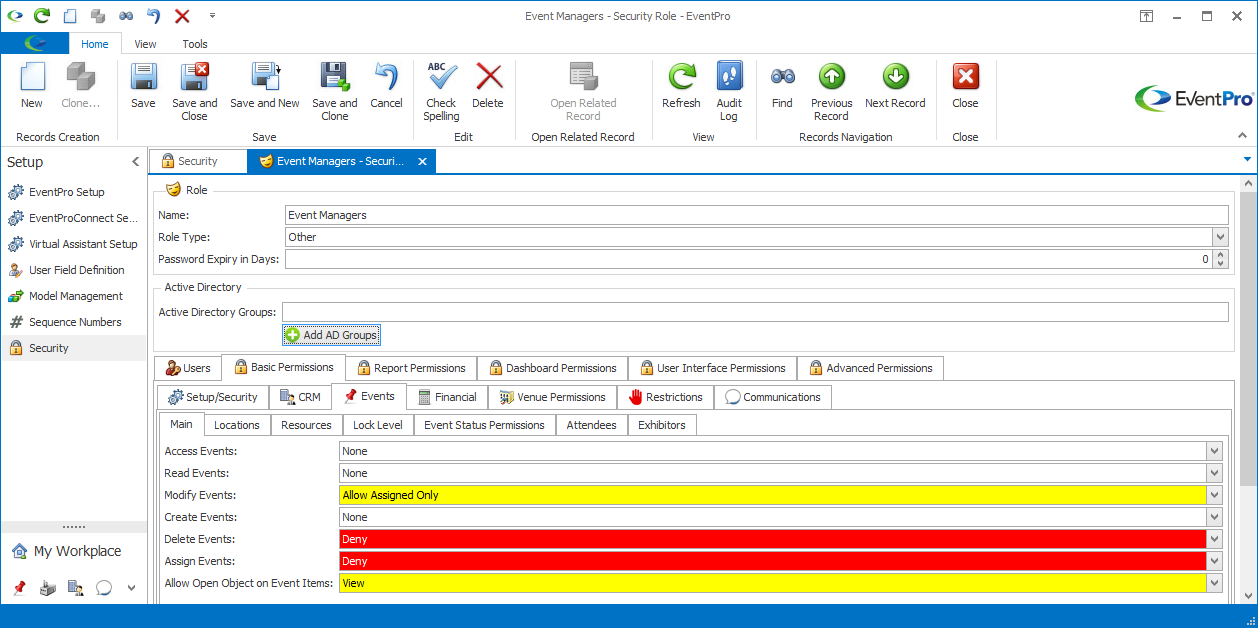 •Locations: These permissions affect Event Locations, i.e the booked locations in Events. Select from the None, Deny, Allow options for each action. 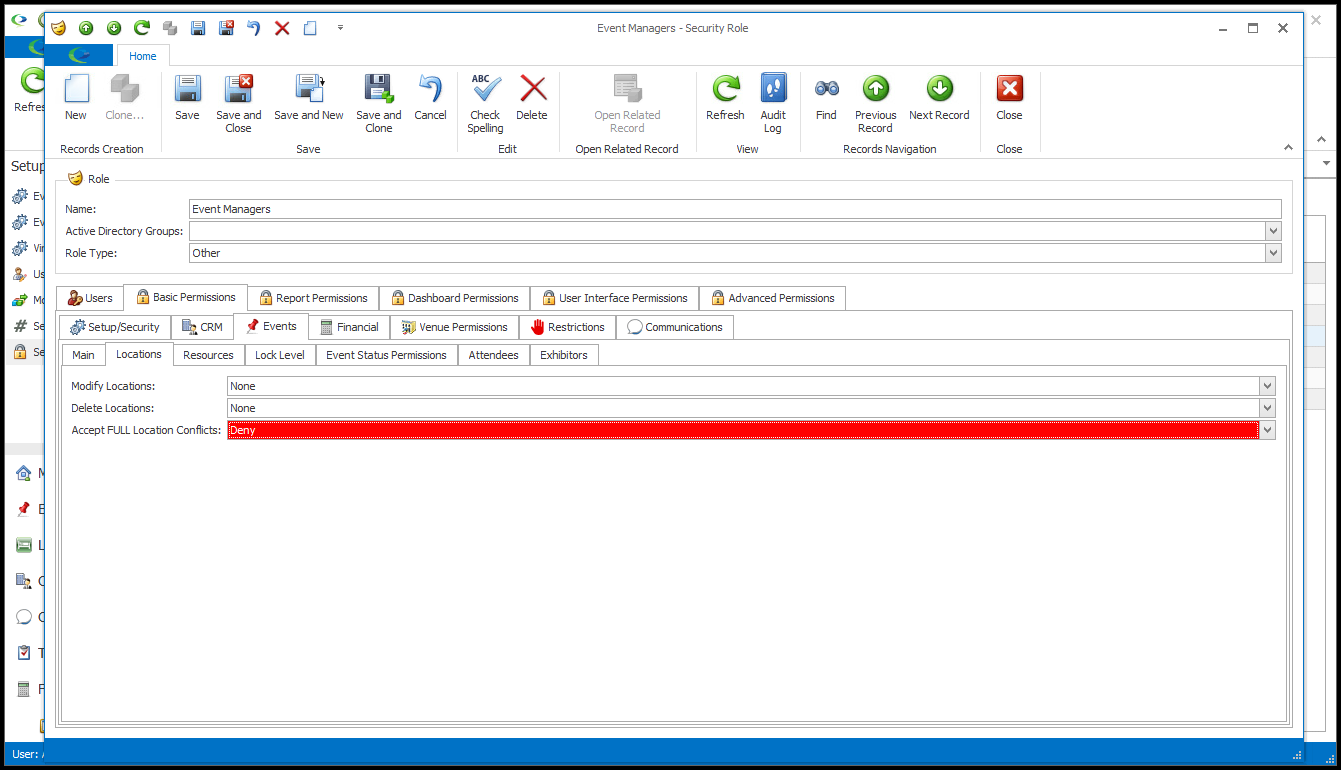 •Resources: Under this tab, indicate whether Users in this Role can Accept Resource Conflicts (None, Deny, or Allow). 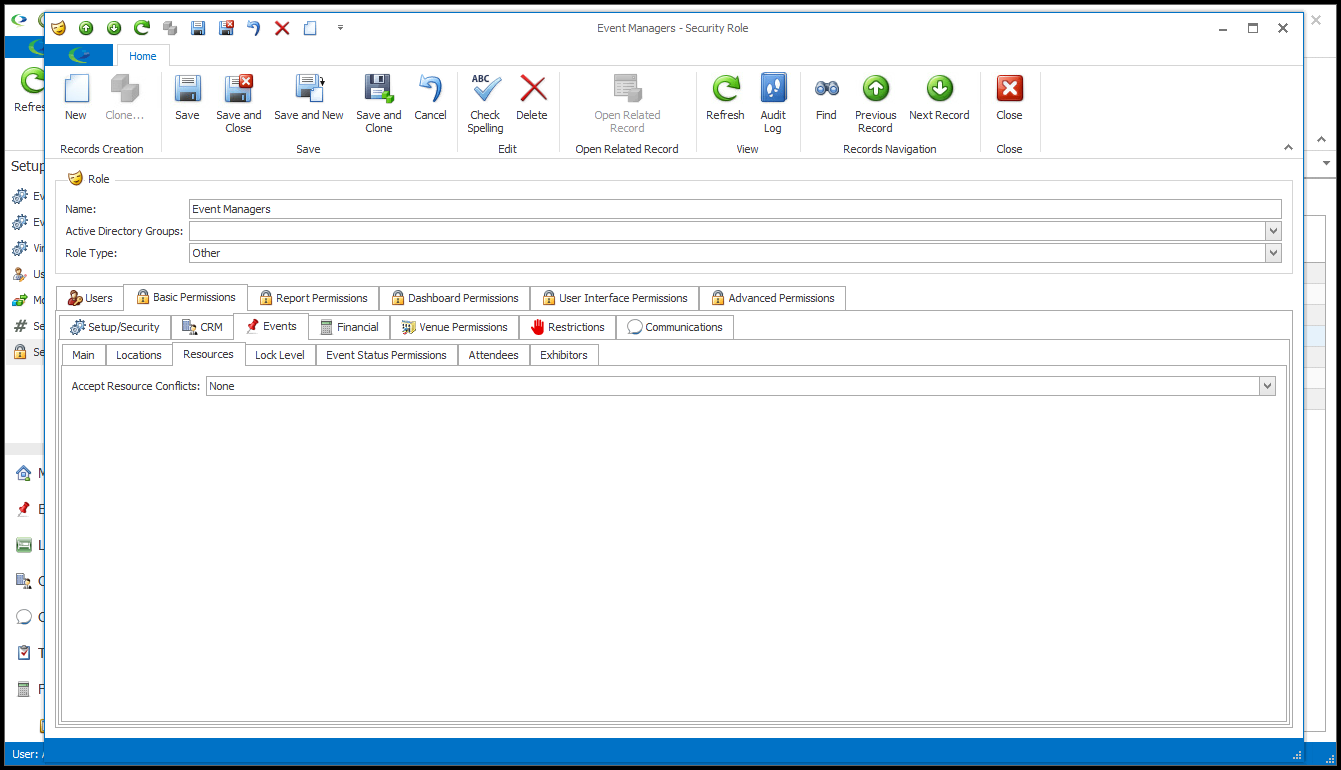 •Lock Level: Under this tab, select None, Deny, or Allow to indicate the Users' ability to modify Events in specified Lock Levels, and whether the Users can set Events to certain Lock Levels. 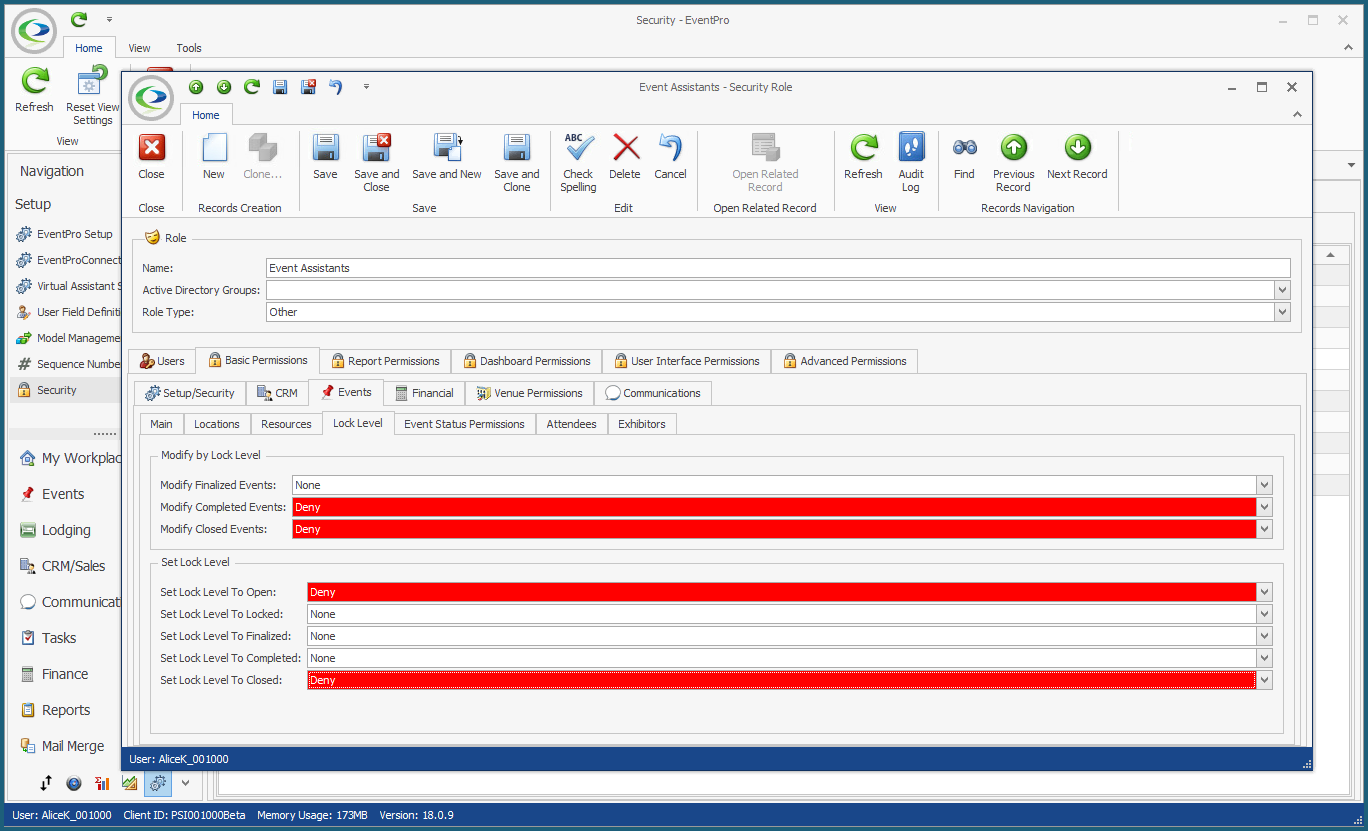 •Event Status Permissions: For user-defined objects like Event Statuses, you need to create a Security Permission Object, and set Permissions for various actions related to that object (View, Edit, Read, Write, Delete, etc.). Review how to define Event Status Permissions above in Permissions > Define Security Permission Objects. NOTE: You can also set Permissions on Event Statuses in Venue Locations, i.e. controlling a User's access to Events of a certain Status in a certain Location. See Venue Permissions, particularly the explanation regarding Security Venue Location Statuses. If you intend to set both Security Event Status Permissions and Security Venue Location Status Permissions, just remember to consider any intersecting permissions. 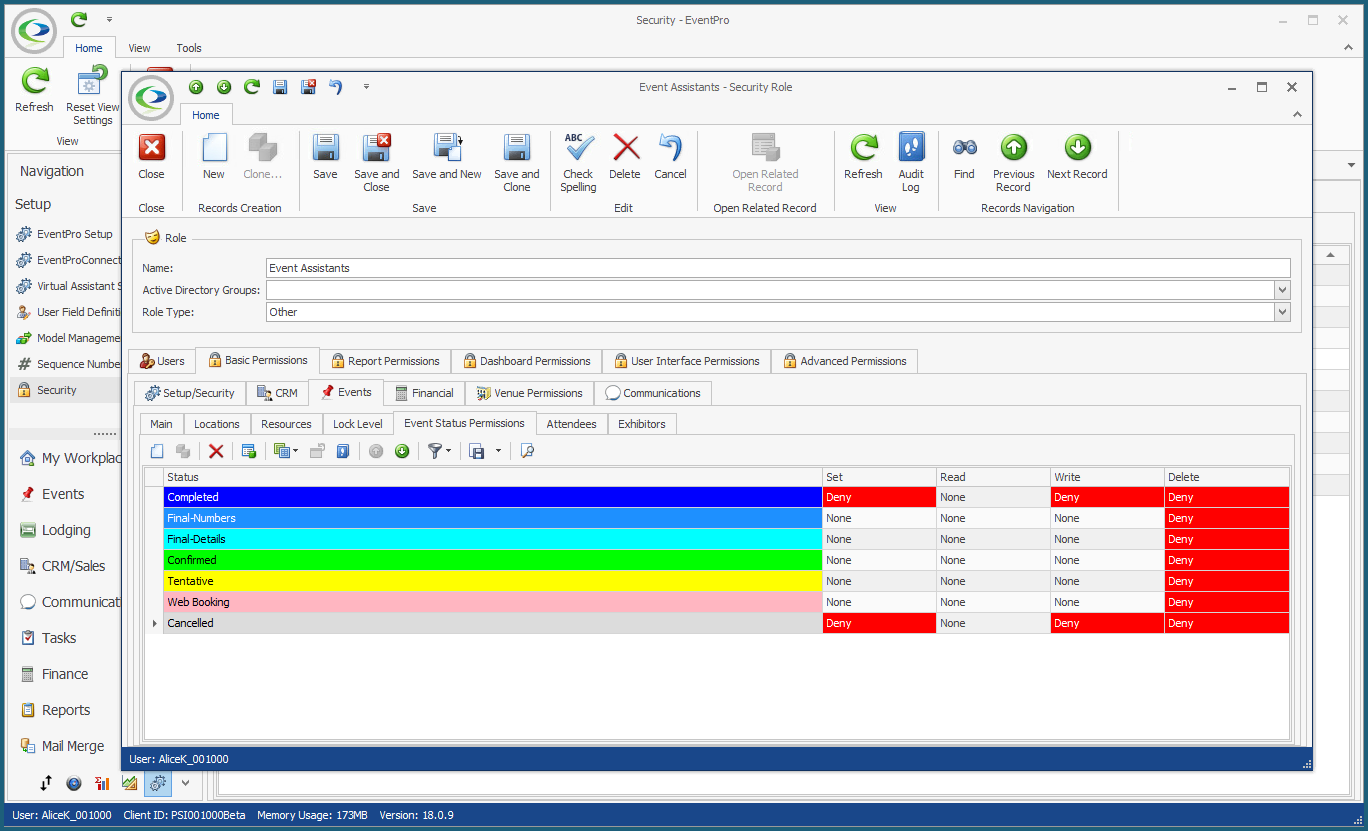 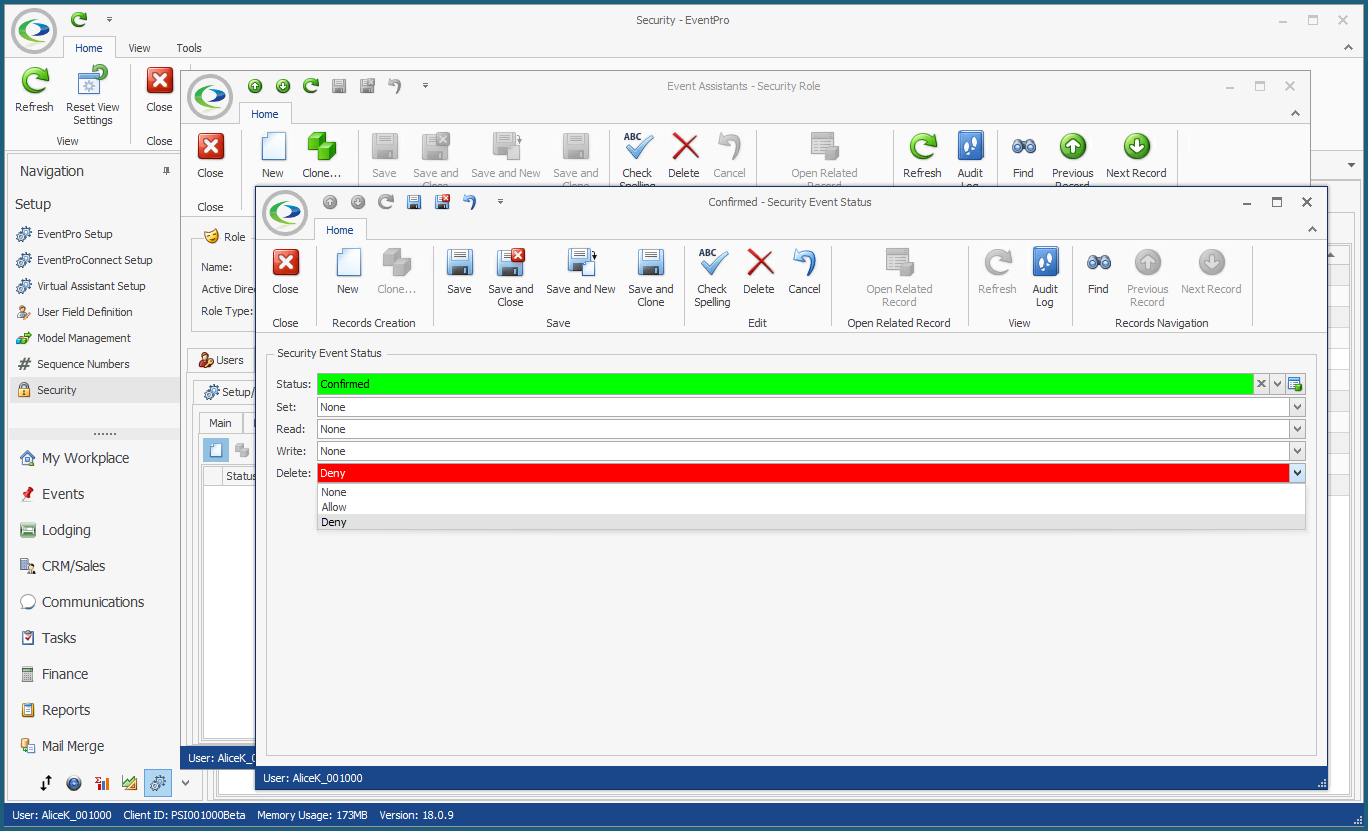 •Attendees and Exhibitors: We will look at these two tabs together, as they are very similar. As usual, you will choose from None, Deny, Allow, and sometimes Allow Assigned Only, Allow All, for each action listed. A User's "Assigned" Attendees and/or Exhibitors are those added to an Event for which the User is the "Event Manager". So, for example, if a User only had permission to Modify "Assigned" Exhibitors, that User would only be able to modify Exhibitors in Events for which the User is the Event Manager. NOTE: These permissions are not based on the "Account Manager" set on Attendees or Exhibitors. Being the Account Manager for an Attendee or Exhibitor does not "assign" that Attendee or Exhibitor to the User for the purposes of these Event Attendee/Event Exhibitor Permissions. These permissions are based on Event-level assignment, i.e. the Event Manager of the Event that the Attendee/Exhibitor is attending.  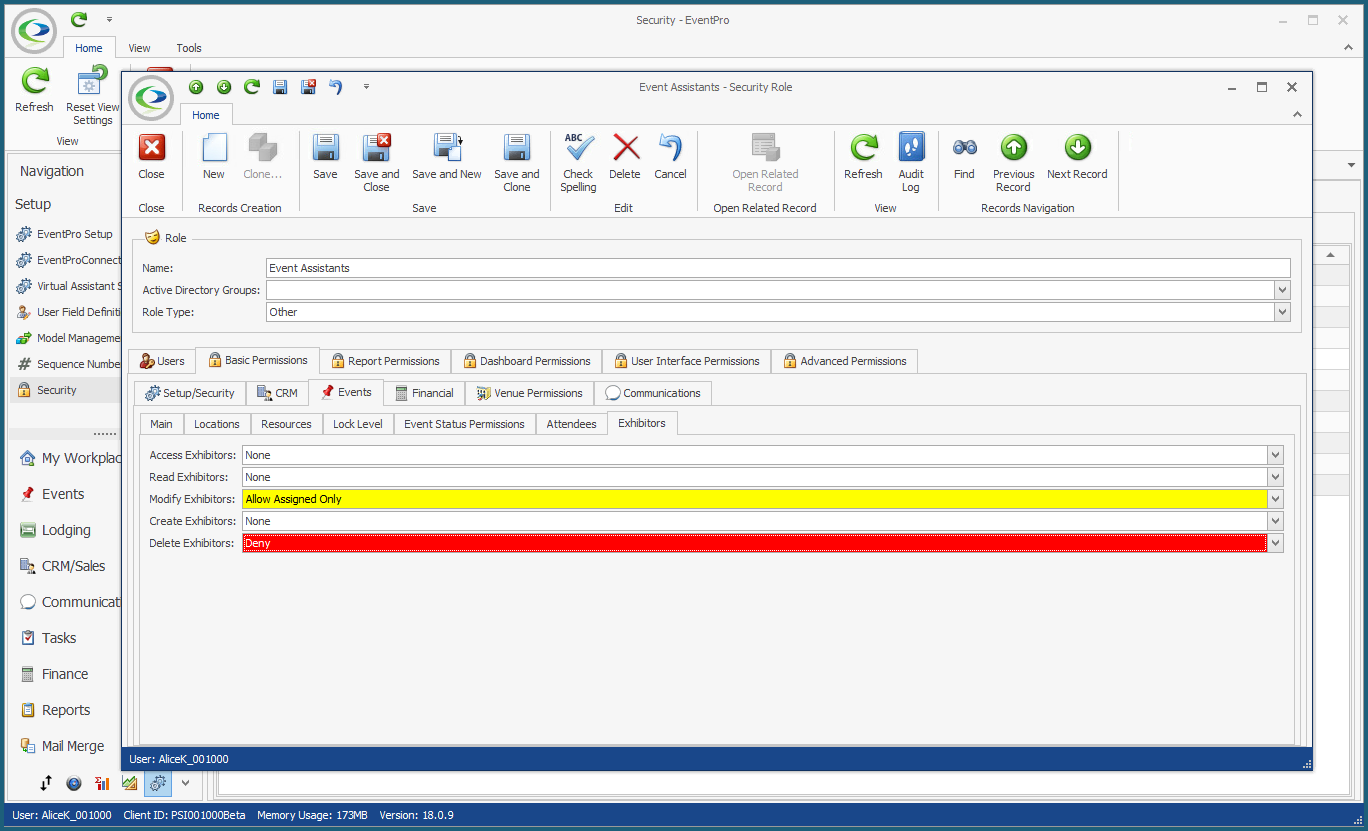 |
Financial Permissions are divided among several sub-tabs: General, Invoices, Payments, Budgets, Costs/Charges, Financial Subgroup Type, and Financial Subgroup. •General: This tab contains the Allow Open Object on Financial Items setting. Review the instructions below under Allow Open Object Permissions. 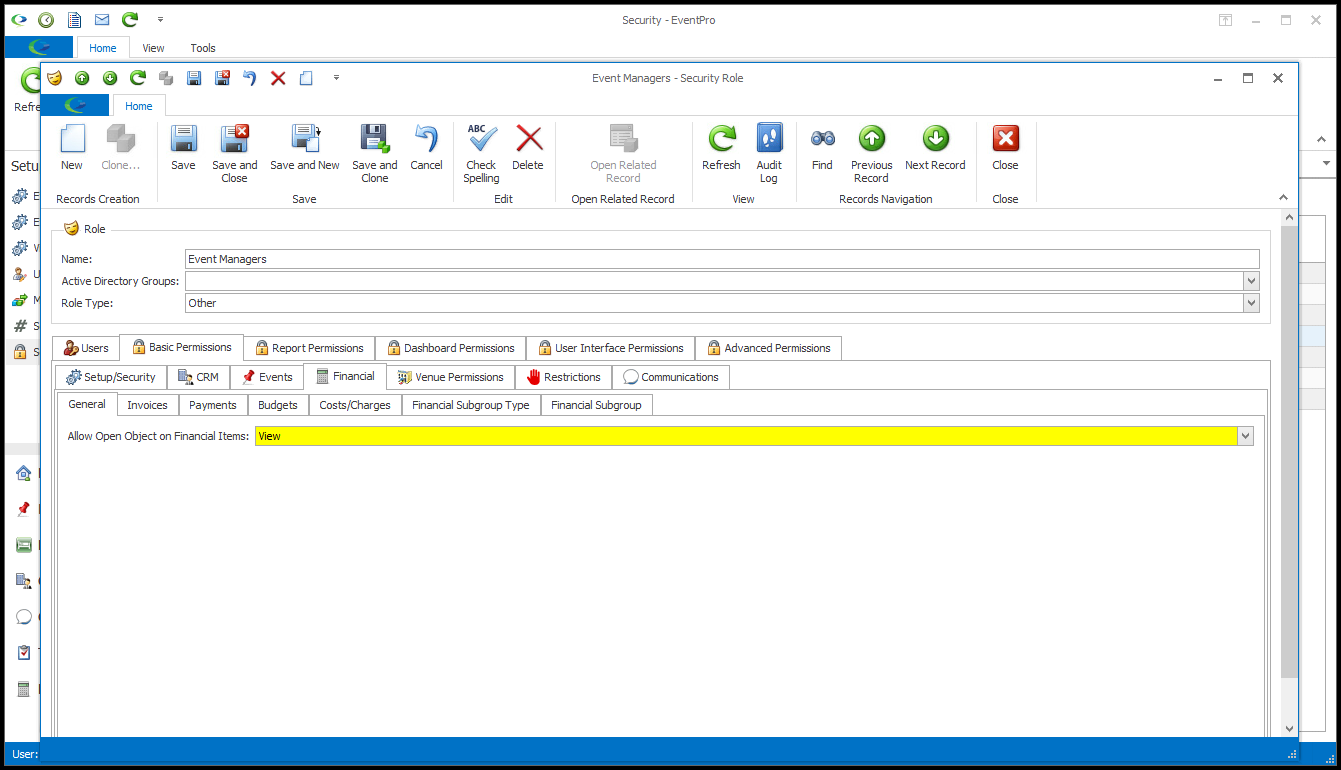 •Invoices and Payments: We will look at these two tabs together, as the process of setting the permissions is very similar for both. For each listed action (Access, Modify, Void, etc.) choose None, Deny, or Allow.  •Budgets: Under this tab, indicate whether Users in this Security Role can Access Budgeting and/or Modify Budgets (None, Deny, Allow). 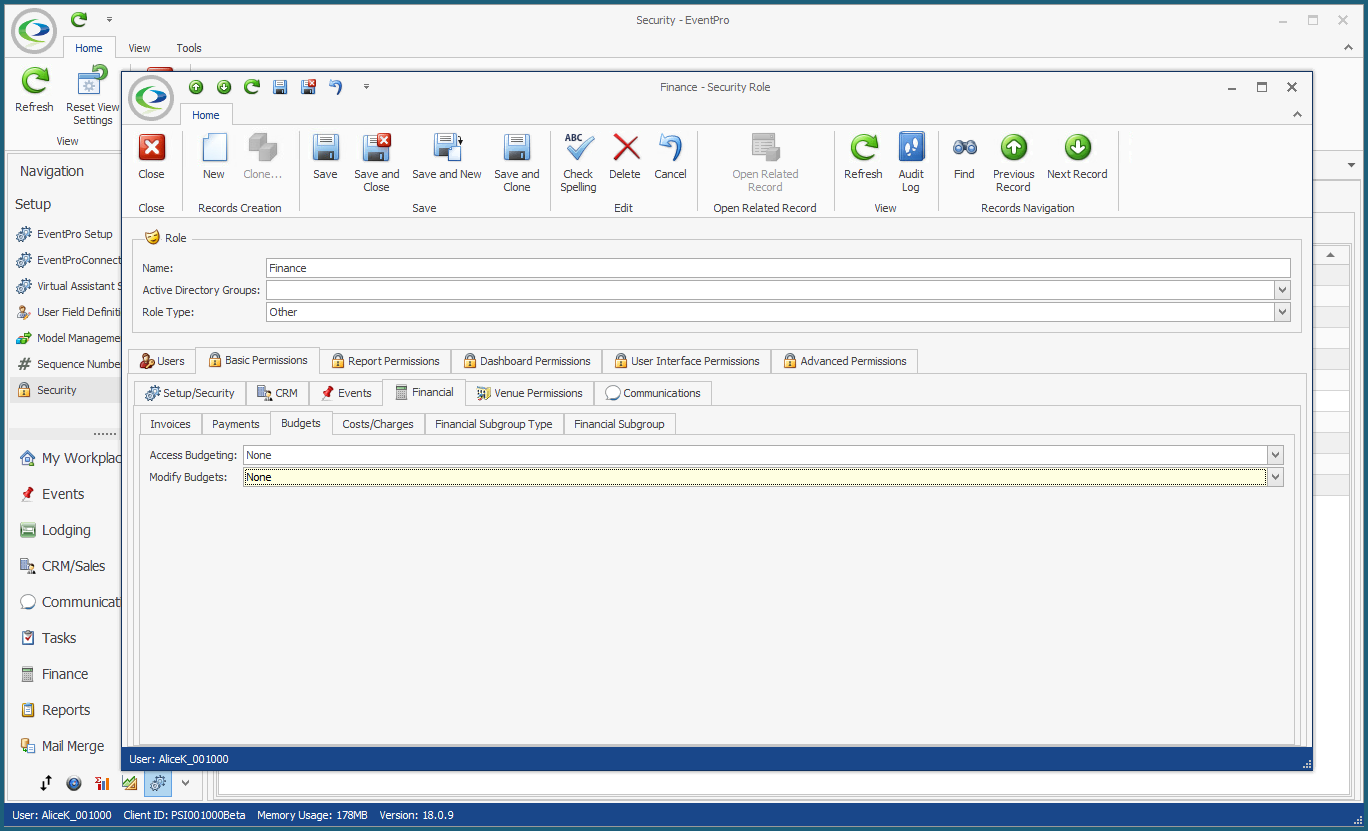 •Cost/Charges: For each of the activities listed below (View Costs, Edit Costs, View Charges, etc.), choose from None, Deny, or Allow. 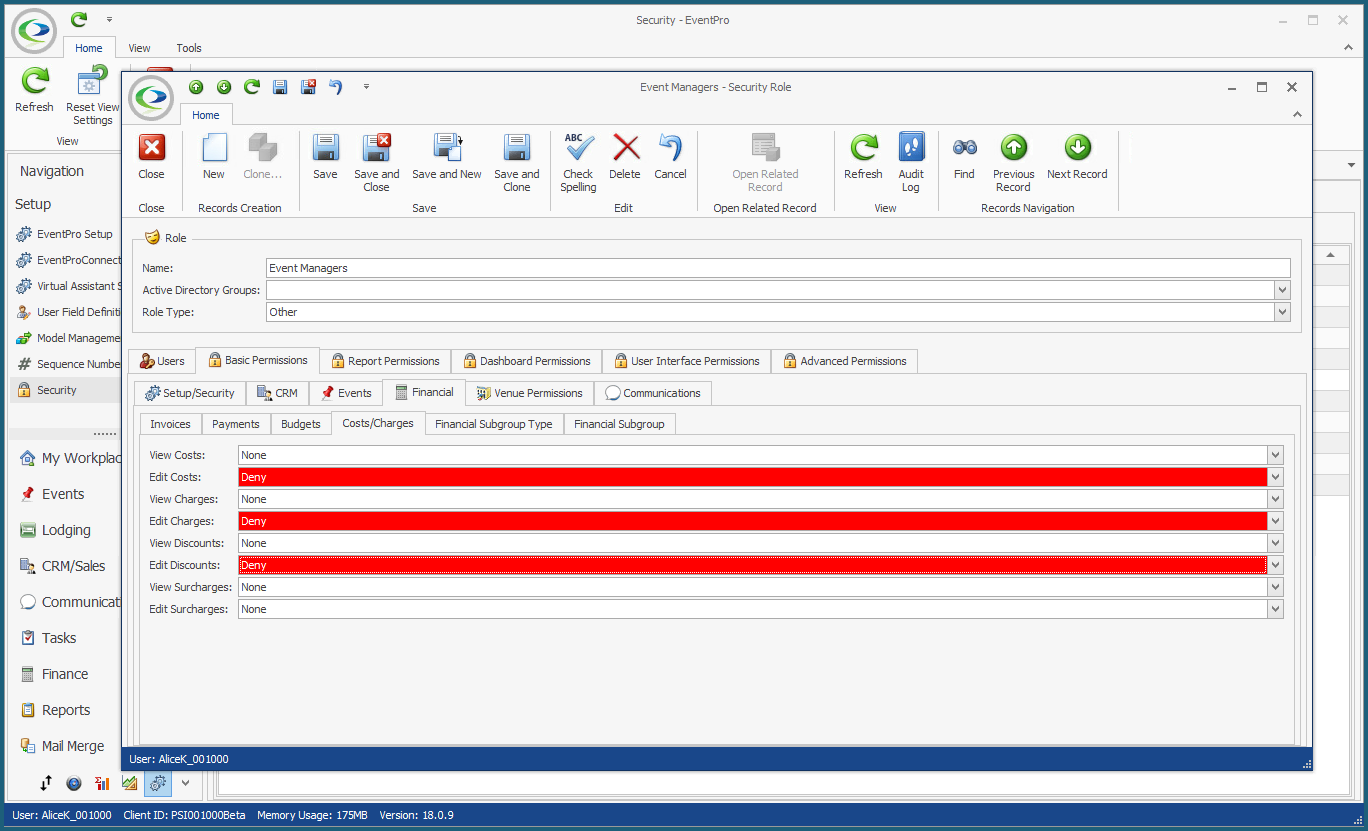 •Financial Subgroup Type: The process of defining permissions for Financial Subgroup Types is a bit more involved. You need to create a Security record for each Financial Subgroup Type, and define a set of permissions within each Security Financial Subgroup Type record. NOTE: Before defining these permissions, take note that if you do not set any permissions for Financial Subgroup Types, the default is to allow full access. In other words, if you want Users in this role to be able to view/edit the cost/charges/discounts/surcharges of ALL Financial Subgroup Types, you wouldn't have to define permissions for any of them...UNLESS the Users will be assigned another Security Role that denies access, and which you want to override. You can review the interaction of Deny/Allow in conflicting Roles in None, Deny, Allow above. 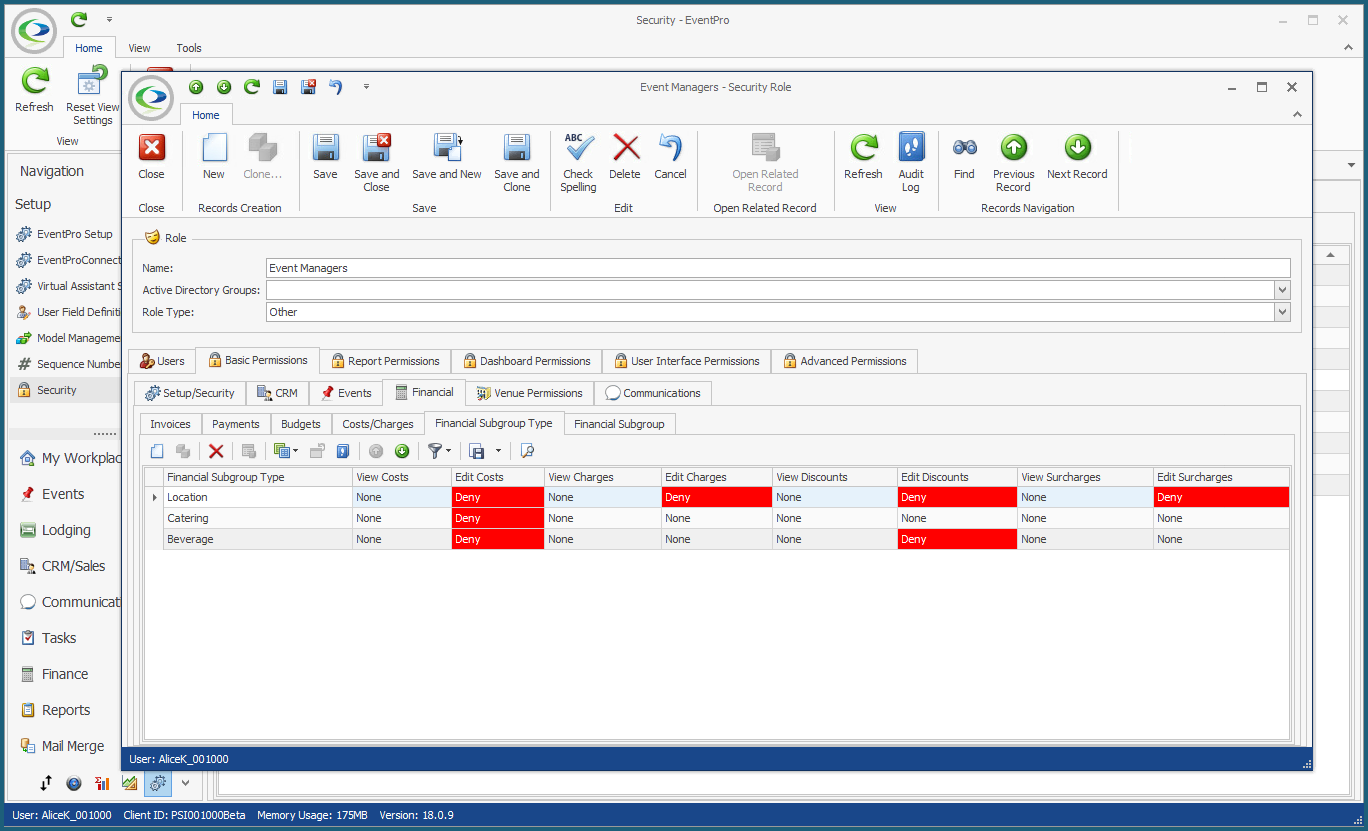 oStart a New record under the Financial Subgroup Type tab. oThe Security Financial Subgroup Type form opens. oSelect a Financial Subgroup Type from the drop-down. As you will recall from Setup Financial Subgroups, these Types are hard-coded in EventPro. oFor each action listed below - View Costs, Edit Costs, View Charges, etc. - select None, Deny, Allow, as applicable. 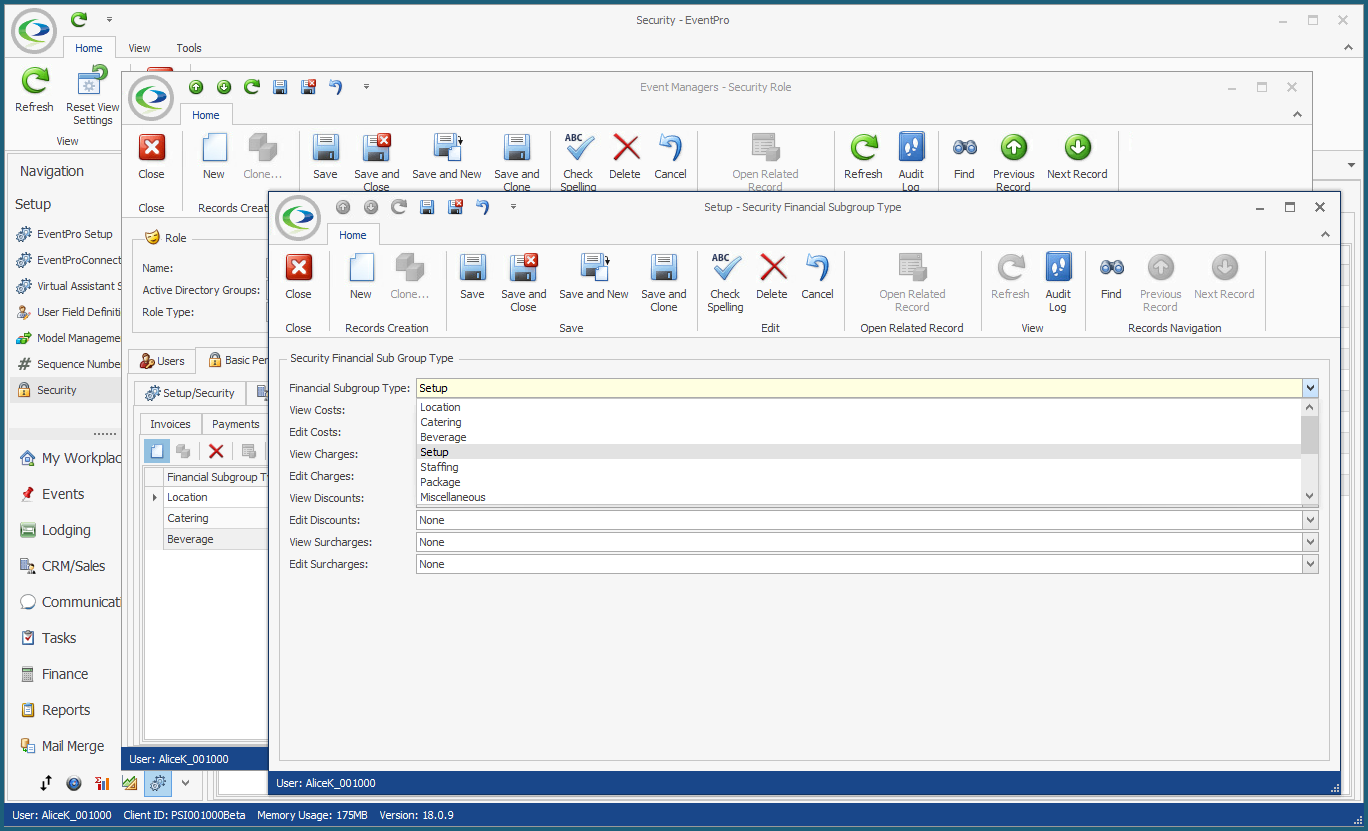 oWhen you are done, click Save and Close to return to the Financial Subgroup Type tab. oContinue adding and defining Security Financial Subgroup Type permissions for all the Financial Subgroup Types you require. •Financial Subgroup: This process is very similar to defining permissions for Financial Subgroup Types above. The main difference is that Financial Subgroup Types (the higher, broad categorization level) are hard-coded in EventPro, whereas you (the end user) defined the Financial Subgroups under each Type. You can review Financial Subgroups for more information. NOTE: Before defining these permissions, take note that if you do not set any permissions for Financial Subgroups, the default is to allow full access. In other words, if you want Users in this role to be able to view/edit the cost/charges/discounts/surcharges of ALL Financial Subgroups, you wouldn't have to define permissions for any of them...UNLESS the Users will be assigned another Security Role that denies access, and which you want to override. You can review the interaction of Deny/Allow in conflicting Roles in None, Deny, or Allow above. 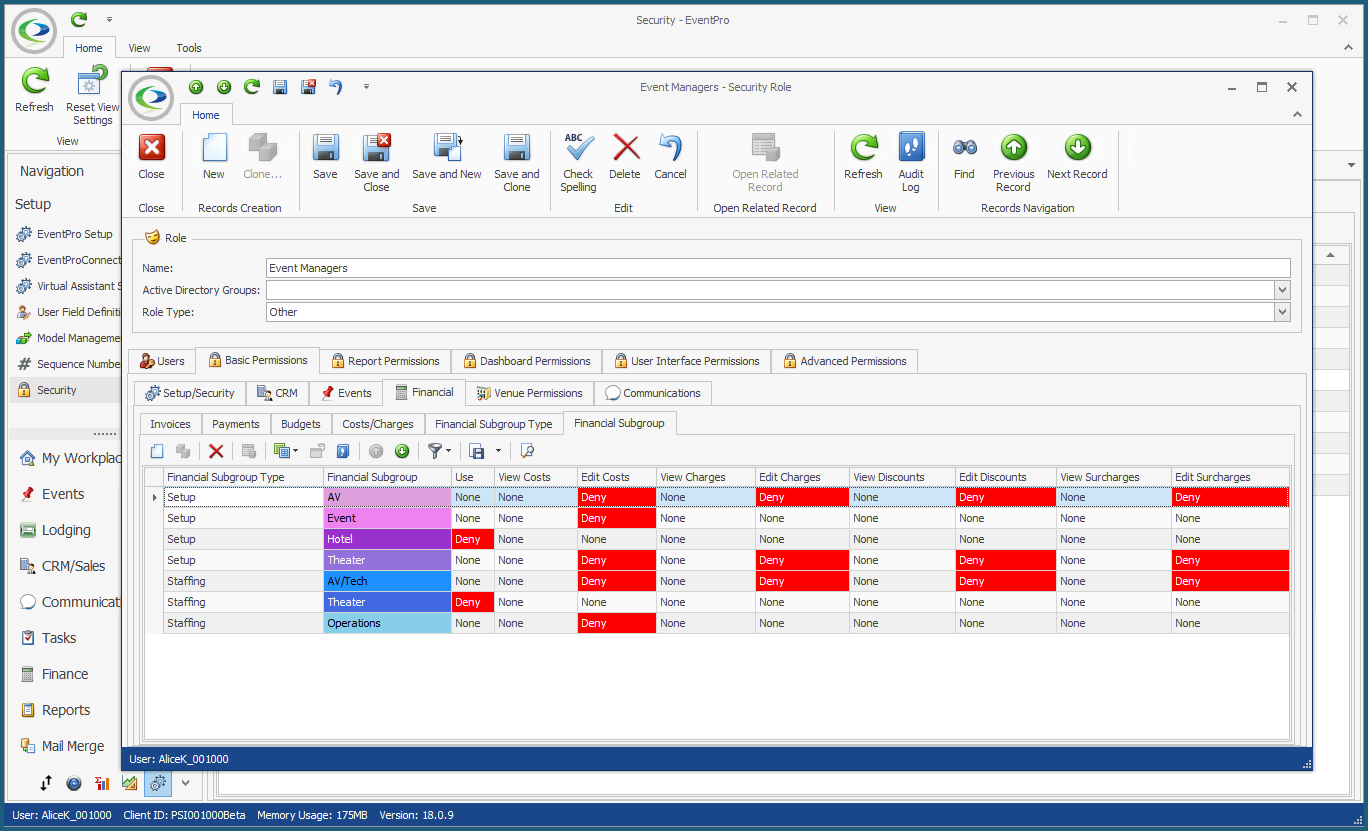 oStart a New record under the Financial Subgroup tab. oThe Security Financial Subgroup form opens. oSelect a Financial Subgroup from the drop-down. oFor each action listed - Use (a field that was not in the Security Financial Subgroup Type form above), View Costs, Edit Costs, etc. - select None, Deny, or Allow, as applicable. Note that if you select Deny for the "Use" field, all the other fields are rendered inactive. If the User is not allowed to use the Financial Subgroup at all, there's no need to define more specific access. 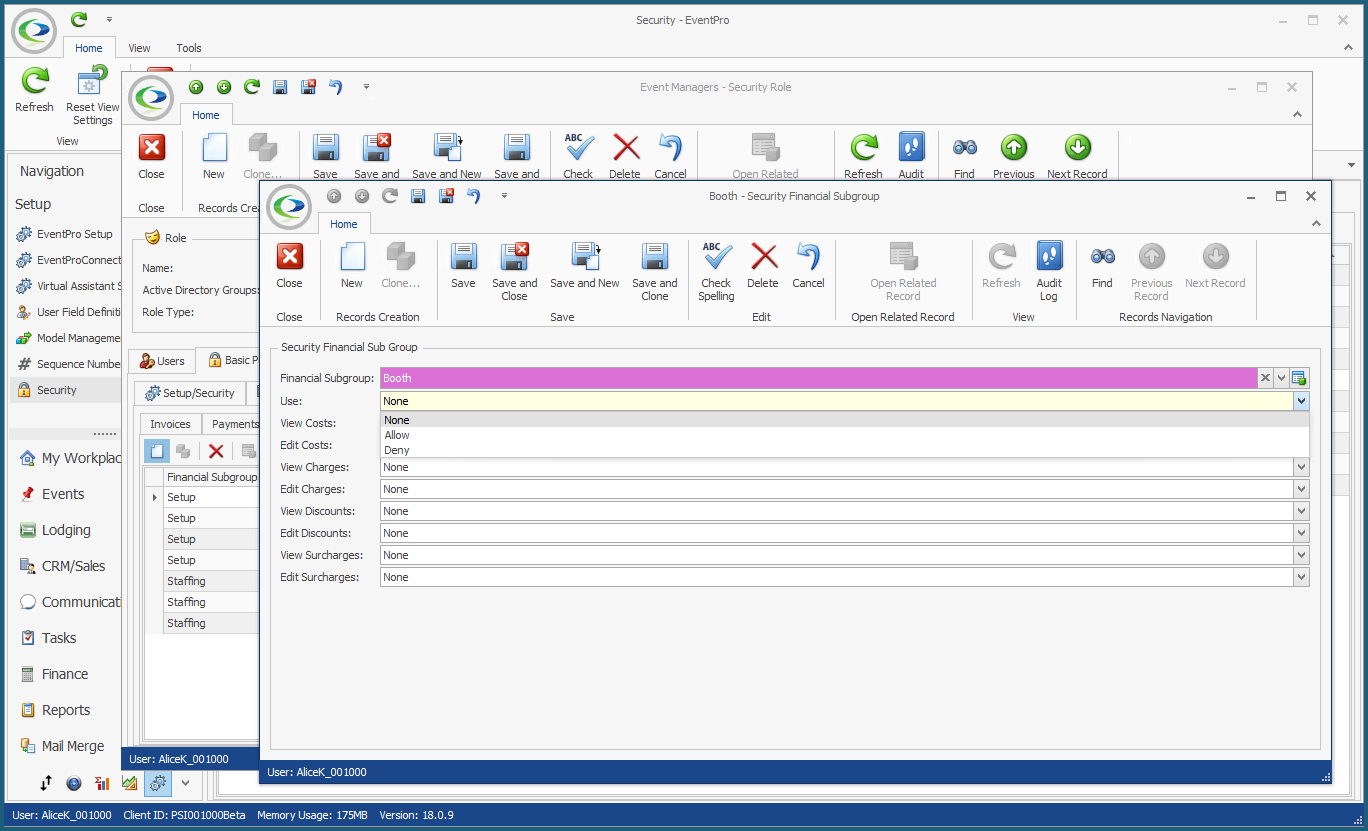 oWhen you are done, click Save and Close to return to the Financial Subgroup tab. oContinue adding and defining Security Financial Subgroup permissions for all the Financial Subgroups you require. |
These permissions control the User's ability to view, edit, create, and delete Events in the specified Venue Locations. You can even specify which Event Status the Events in a given Location must be in order for the User to view, edit, or delete the Event, or set the Event to that particular Event Status. (NOTE: You may have already set Permissions on Event Statuses earlier under Event Status Permissions. If so, remember to consider any intersecting Permissions when working in this area.) Because you can control Venue Permissions on each level, from overall Facility to Location Group to Subgroup to Location, and even to Event Status within Locations, the process can be a bit more involved, especially if you want to control access to multiple facilities and/or many locations. NOTE: Before defining these permissions, take note that if you do not set any permissions for Venues and Locations, the default is to allow full access. In other words, if you want Users in this role to have full access to a Venue, you wouldn't have to define permissions for it...UNLESS the Users will be assigned another Security Role that denies access, and which you want to override. You can review the interaction of Deny/Allow in conflicting Roles in None, Deny, or Allow above. •Click the New button under the Venue Permissions tab. 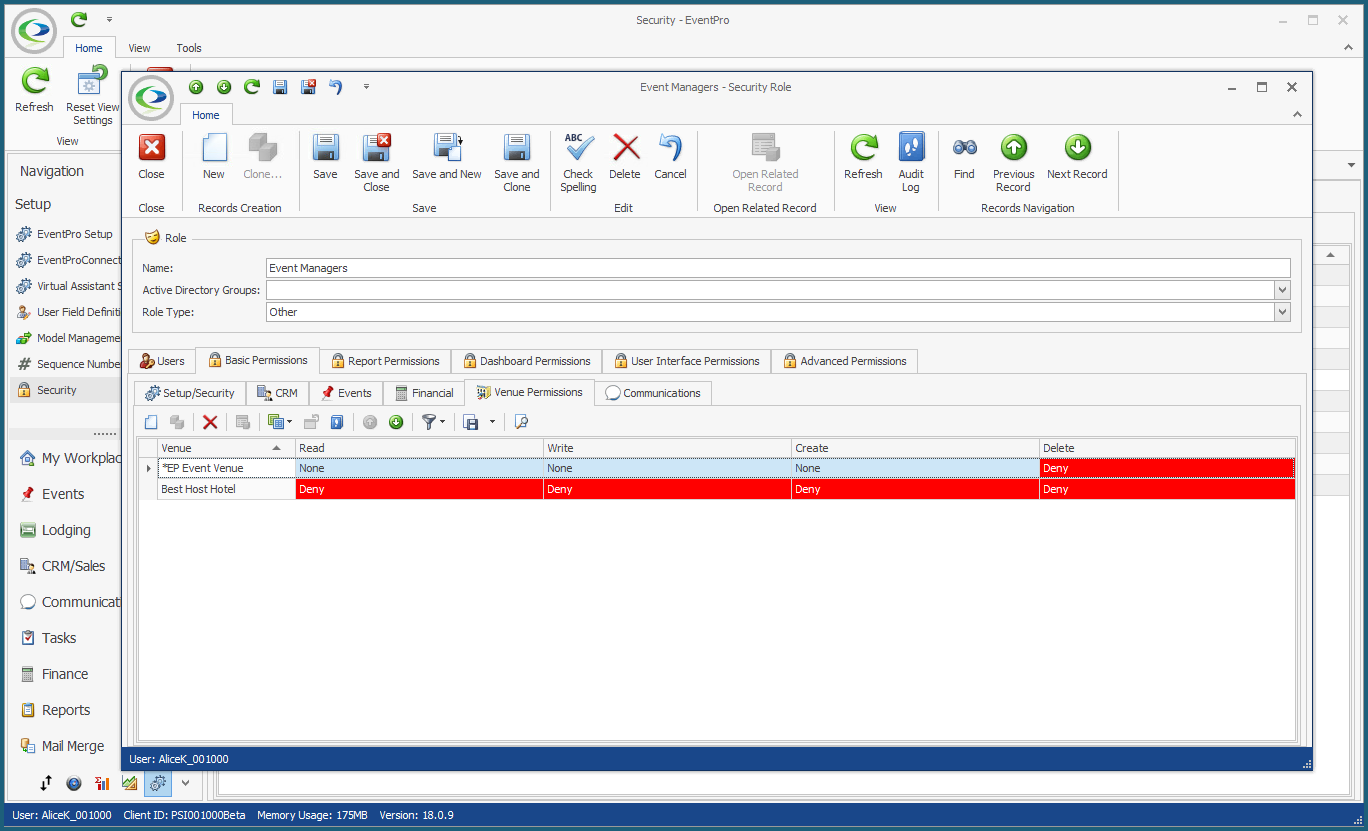 •The Security Venue edit form opens.  •Under Security Venue, select the relevant Venue from the drop-down. oThe Venue drop-down will be populated by Companies in your CRM marked as "Venues", which also appear under EventPro Setup > Facilities > Facilities. •When you select the venue, its Location Groups, Subgroups and Locations will appear in the Venue Locations grid below. •You can first set permissions for the overall Venue, in the Permissions area in the upper right corner. Select an option for the Read, Write, Create, and Delete Permissions. oThe permission level you set here will apply across the entire Venue - all the Location Groups, Subgroups and Locations - so it saves the time if permissions will be the same for all levels. oHowever, if you want to allow the Users in this Role to be able to access some locations, but not others, you need to set the permissions on each location individually. •To set permissions on the Location Groups, Subgroups and/or Locations individually, expand the menu tree in the Venue Locations grid so that you can see all Location Groups, Subgroups and Locations. oUse the drop-down lists under each column (Read, Write, Create and Delete) to indicate the permission level for each Location Group, Location Subgroup, and Location, as applicable. Note that if you set a permission for a Location Group, that permission applies to all Subgroups and Locations beneath it. 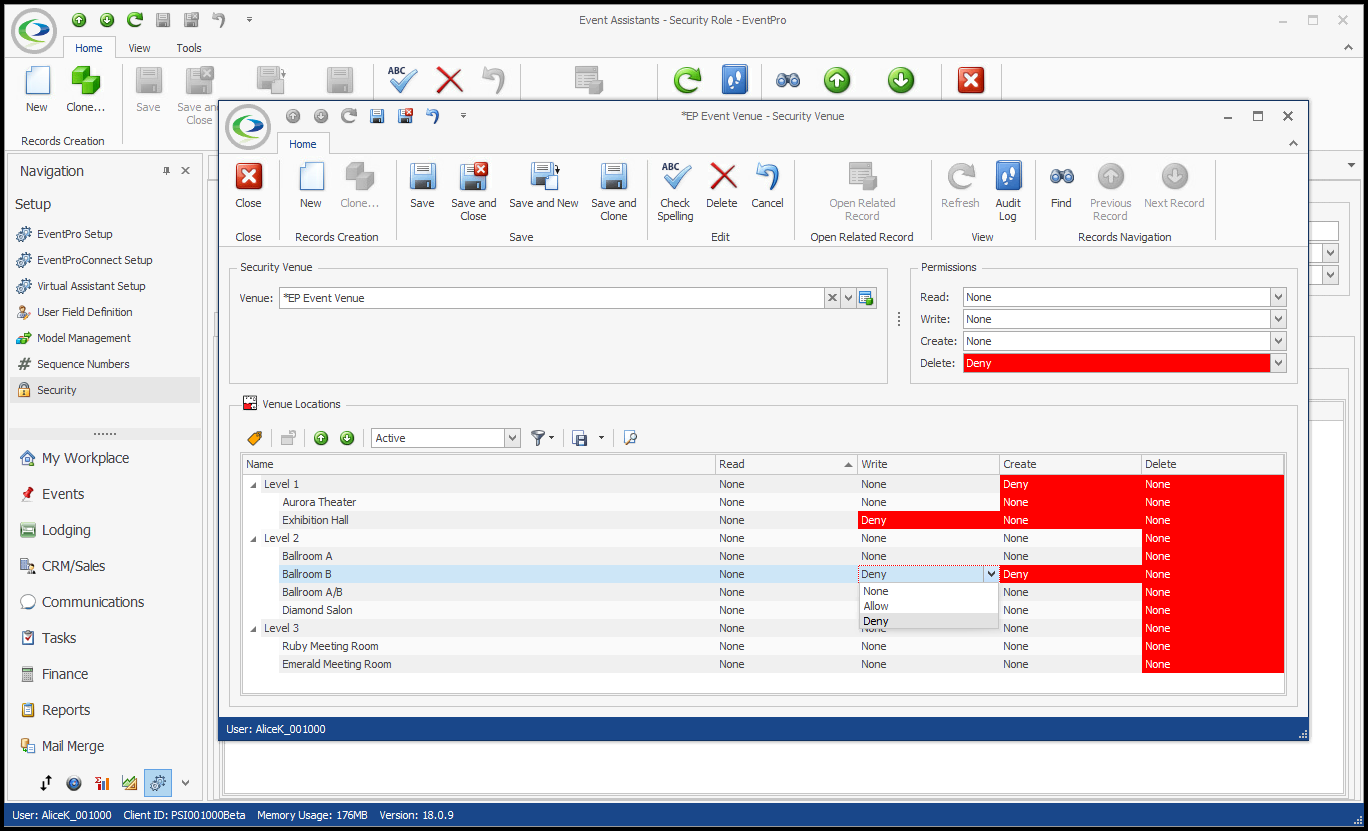 oWe will look at an example of setting permissions at the Location level, in order to explain what Read, Write, Create and Delete mean in this context. ▪Read: If you deny Read access to a Location, the User cannot see that Location on the Venue Calendar. If any of an Event's Booked Locations are in the Read-Denied Location, the User will not be able to see that Event in the Event List or Event Calendar; however, if the Event has Booked Locations in other permitted Locations, the User will be able to see them in the Venue Calendar, but will not be able to open/view the Event in the Event Screen. ▪Write: If you deny Write access to a Location, the User cannot edit Events that have one or more Booked Locations in that Write-Denied Location. ▪Create: If you deny Create access to a Location, the User cannot start a new booking in that Create-Denied Location, and cannot append that Create-Denied Location as a Booked Location to an existing Event. ▪Delete: If you deny Delete access to a Location, the User cannot delete Events booked in that Location. •You can also further set permissions for Venue Location Statuses on a Location Group, Location Subgroup, or Location Level. NOTE: You may have already set Permissions on Event Statuses earlier under Event Status Permissions. If so, remember to consider any intersecting Permissions when working in this area. oIn the Venue Locations grid of the Security Venue form, double-click the Location Group, Location Subgroup, or Location for which you want to set Status Permissions. oThe Security Venue Location edit form opens. We will use the example of an individual Location. 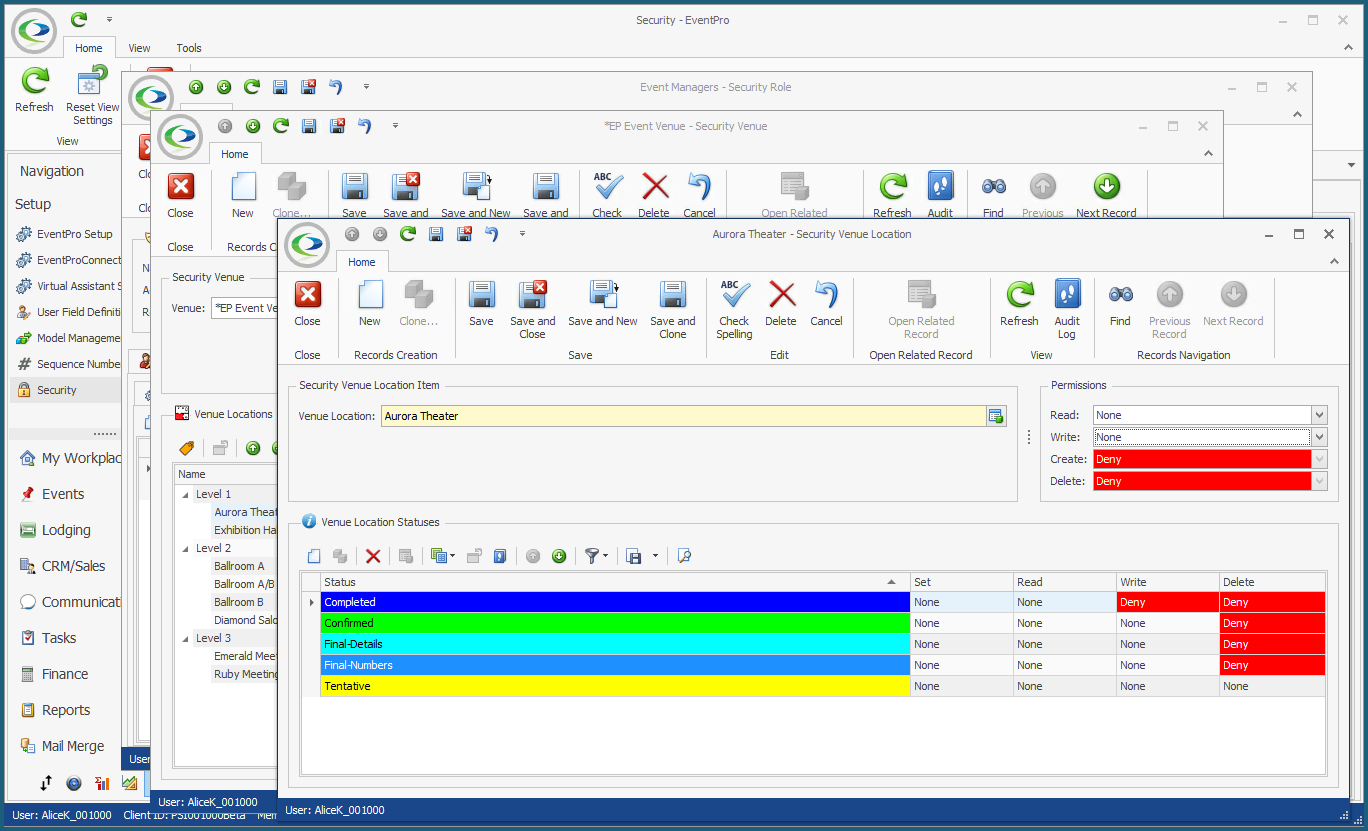 oIn the Venue Location Statuses grid at the bottom of the form, click the New button to open the Security Venue Location Status edit form. 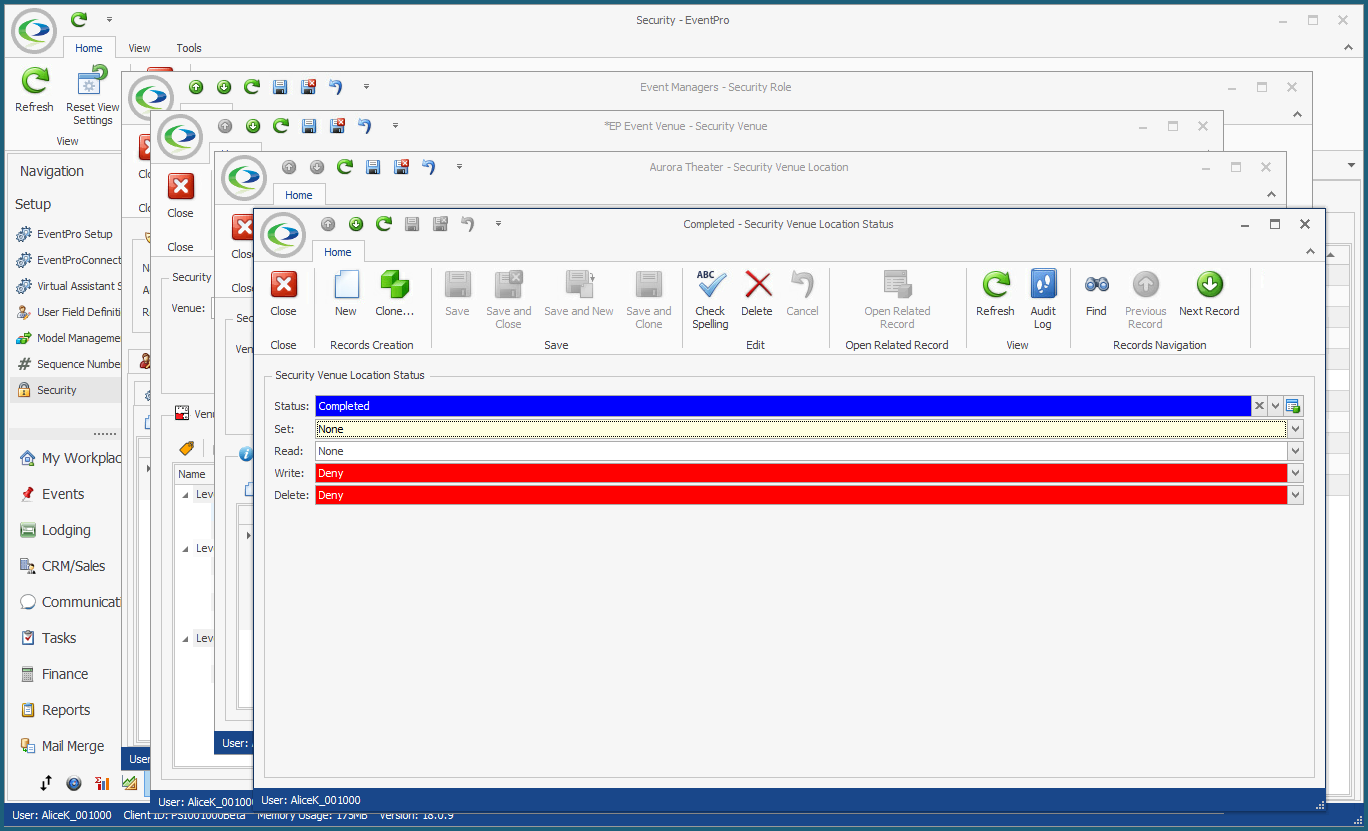 oSelect the applicable Status from the drop-down. These are the Event Statuses you defined under EventPro Setup > Events > Event Statuses. oFor the selected Event Status, indicate the permission level for Set, Read, Write, and Delete. By way of example, we will look at what these permissions would mean when applied to an Event Status for a Location. ▪Set: If you deny Set access to a Security Venue Location Status, the User cannot set Events in that particular Location to that selected Event Status. ▪Read: If you deny Read access to a Security Venue Location Status, the User cannot see Events that contain one or more Booked Locations of that Read-Denied Location/Status in the Event List or Event Calendar. However, if the Event has Booked Locations in other Read-permitted Locations/Statuses, the User will be able to see them in the Venue Calendar, but will not be able to open/view the Event in the Event Screen. ▪Write: If you deny Write access to a Security Venue Location Status, the User cannot edit Events that have one or more Booked Locations of that Write-Denied Location/Status. ▪Delete: If you deny Delete access to a Security Venue Location Status, the User cannot delete Events set to that Delete-Denied Location/Status, or delete Events containing a Booked Location of that Delete-Denied Location/Status. The Delete Location Event Status requires some special consideration, because you can only delete Event Locations set to a Cancelled status. So, for example, denying the ability to Delete a Confirmed Event is meaningless, as you couldn't delete a Confirmed Event anyway; EventPro would prompt you to set the Event to a Cancelled status in order to delete it. Therefore, you will want to focus on any "Cancelled"-type Event Statuses when determining whether the User can delete Events of a certain Status in a particular Location. oWhen you are done with the Security Venue Location Status edit form, click Save and Close to return to the Security Venue Location edit form. oContinue setting permissions for any other applicable Security Venue Location Statuses. •You can click Save and Close in the edit forms to get back to the Venue Permissions tab of the Security Role edit form. •Continue defining the permissions for as many Venues and Locations as you require for this Security Role. |
•Restriction security permissions were previously tied to Setup Permissions, but have now been moved into a separate tab for more flexible control over Restriction permissions. •For each restriction-related action listed under this tab, select None, Deny, or Allow. 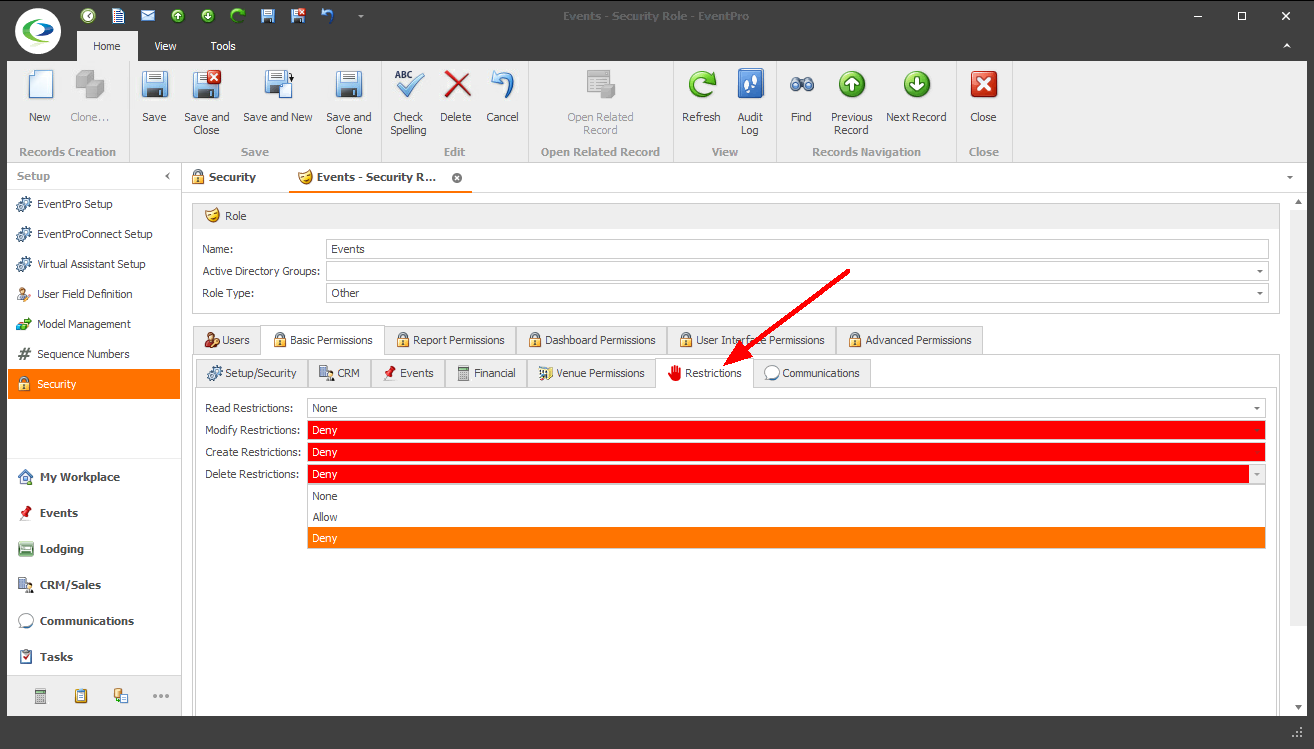 |
•Under the Communications tab, you can define permissions for DocuSign access, which will only be relevant if you own the DocuSign Module. 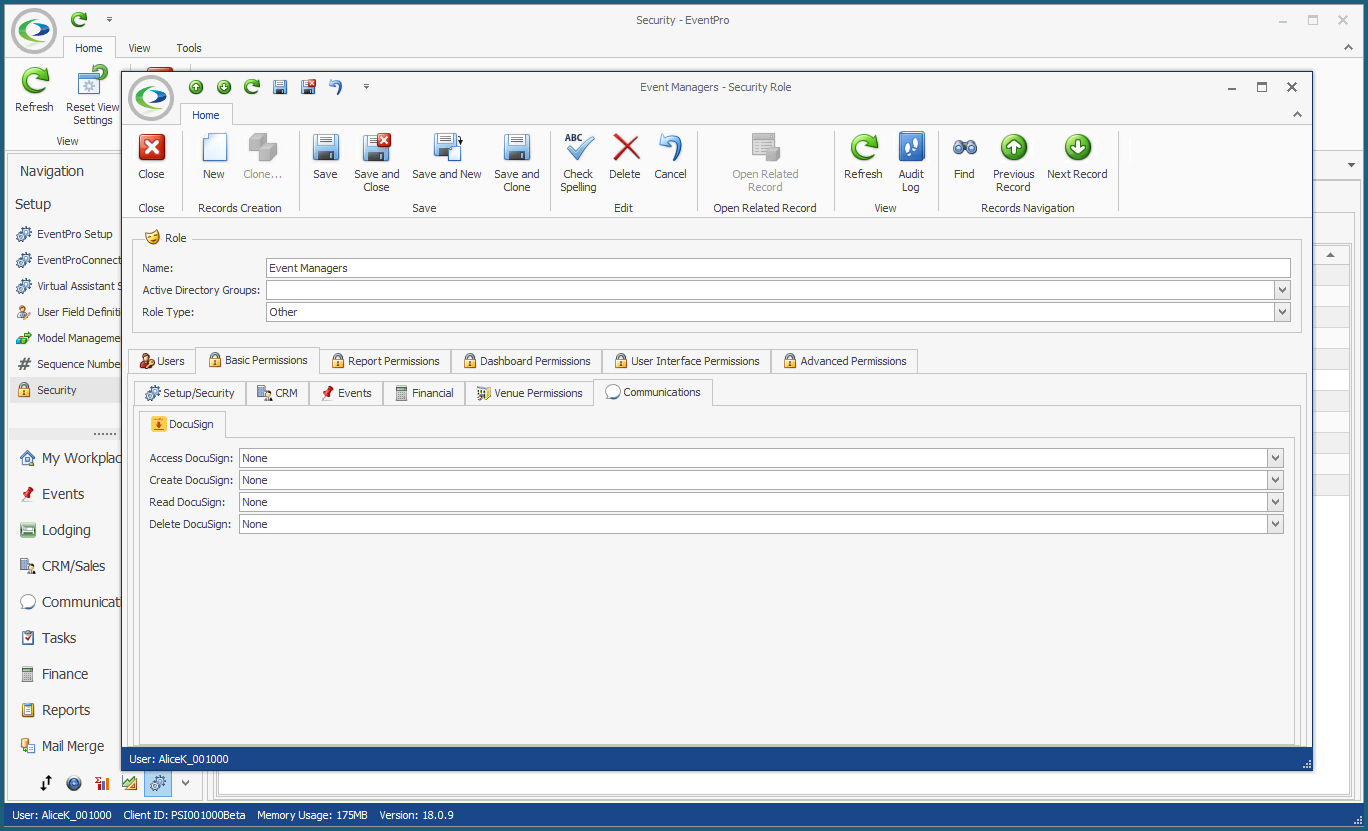 |
•While we won't look in detail at every individual Permission listed under Basic Permissions, there is one permission that is particularly important to note: Allow Open Object. •Throughout EventPro, larger records will contain references to other records. The Open Object command allows the User to access the related record from within the containing record. Review the topics Open Related Record & Open Object and Setup on the Fly for further explanation. •While the Open Object command is convenient if you want to edit a related record without closing down the current record, it can cause problems if Users don't realize that they are editing an actual record elsewhere in the program. Users can unintentionally change or delete important data. Therefore, the Allow Open Object Permission was added to the several areas under Basic Permissions (Setup/Security, CRM, Events, and Financial), so that you can limit the Users' ability to edit or even view related records in those particular areas. •For each Allow Open Object permission, you can choose Modify, View, or Deny. oModify: The User can open the object and edit it. oView: The User can open and view the object, but not edit it. The User will be able to add records to aggregated collections, but will not be able to edit or delete items in the collections. oDeny: The User cannot open the object. |
© 2023 EventPro Software, a wholly owned subsidiary of Profit Systems Inc. All Rights Reserved.