To add a new Attendee Registration Group for this Event, start a New record under the Attendee Registrations tab.
The Event Setup Attendee Registration Group edit form opens.
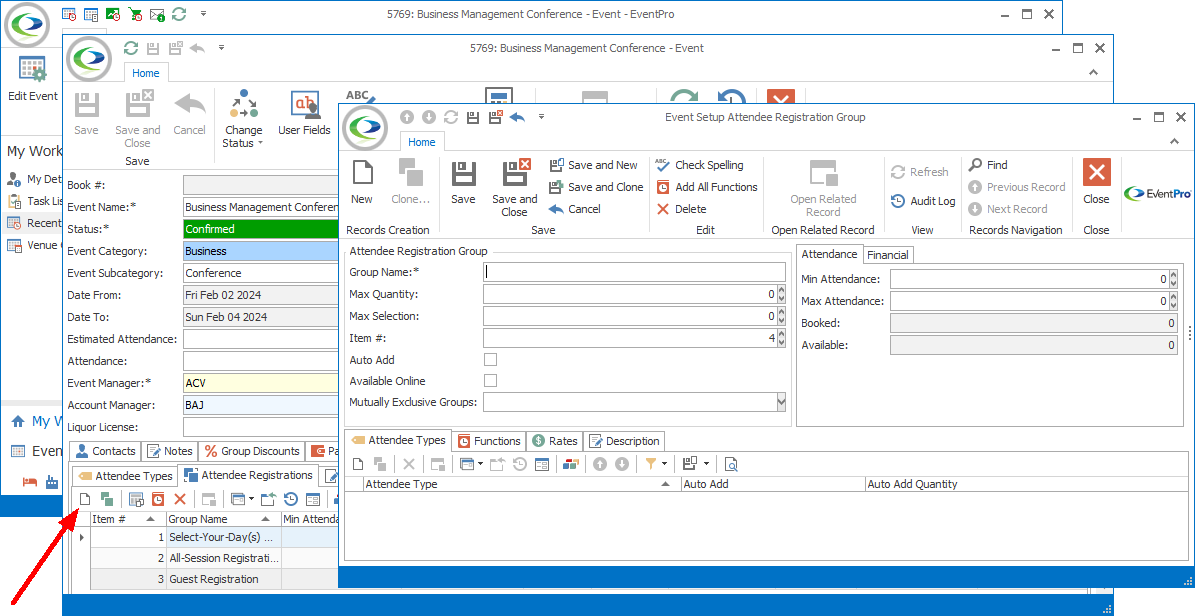
Figure 144: Adding Registration Group
There are several different areas and tabs in the Event Setup Attendee Registration Group edit form where you need to add information.
Follow the links below for each set of instructions:
Attendee Registration Group
1.Group Name: Enter a name for this Attendee Registration Group.
2.Max Quantity: Enter the maximum quantity of this Registration Group an Attendee can add to his/her registration. If you leave this at 0 (zero), the Attendee can add an unlimited number of this group to his/her registration.
3.Max Selection: Enter the maximum number of functions the Attendee can select from this Registration Group. If you leave this at 0 (zero), the Attendee can select an unlimited number of functions under this group.
4.Item #: The Item Number determines the group's position relative to other groups in the list when sorted by Item #. Change the Item # to change the group's position in the sort order.
5.Auto Add: Select this checkbox if you want this Registration Group to be automatically assigned to Attendees of certain Attendee Types by default when those Attendees are added to the Event. Later in this edit form, you will be able to set the specific Attendee Types to which this Registration Group will be automatically added, and how many to add per attendee.
6.Available Online: Select this checkbox if you would like this Attendee Registration Group to be available online.
7.Mutually Exclusive Groups: If you do not want to allow attendees to register in two registration groups at the same time, you can define the groups as "mutually exclusive". In the Mutually Exclusive Groups drop-down list, select the checkboxes next to the other registration groups in which attendees cannot register if they register in the group you are currently editing.
Attendance
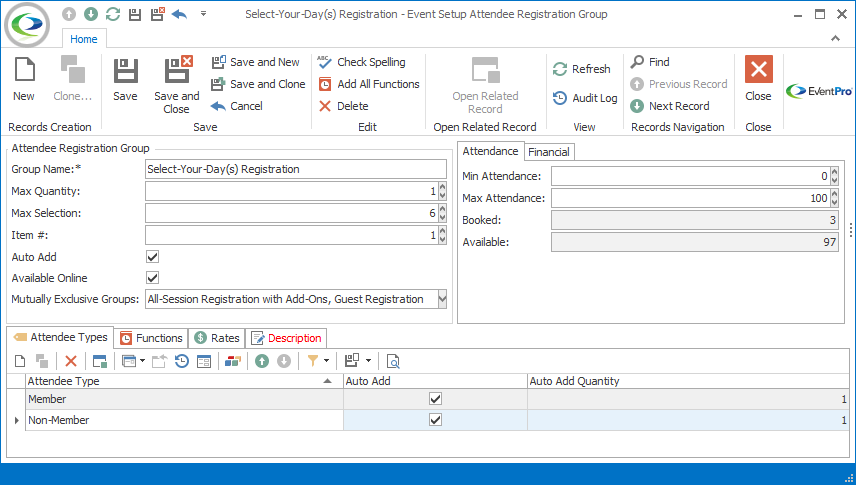
Figure 145: Editing Registration Group
1.Min Attendance: Choose the minimum number of registrations that can be received for this attendee Registration Group. If you leave the number at 0 (zero), there will be no limitations.
2.Max Attendance: Choose the maximum number of registrations that can be received for this attendee Registration Group. If you leave the number at 0 (zero), there will be no limitations.
3.Booked and Available: These read-only fields will later update automatically as attendees are registered in the group.
Financial
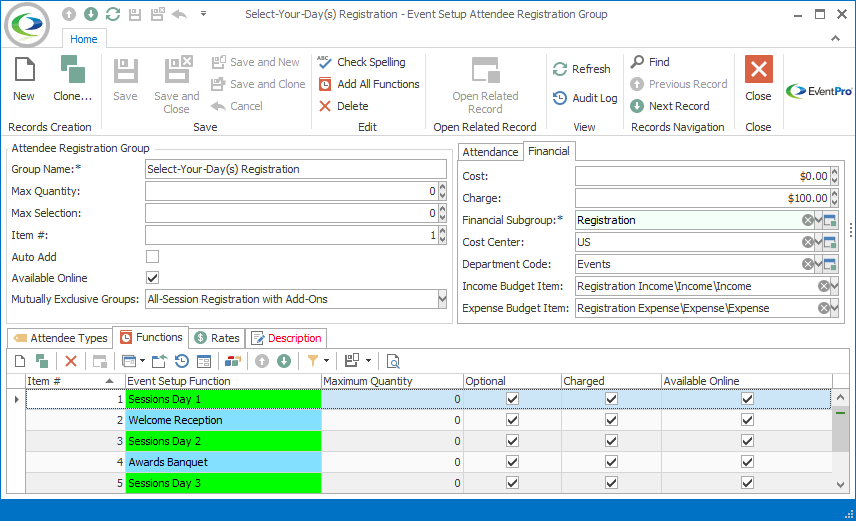
Figure 146: Editing Financial Information
1.Cost: If applicable, enter the default Cost for this Attendee Registration Group.
2.Charge: Enter the default Charge for this Attendee Registration Group. Later in this edit form, you will be able to assign variable Rates that depend on various criteria.
3.Financial Subgroup: Select the applicable Financial Subgroup for this Attendee Registration Group. Review the topic EventPro Setup / Financial / Financial Subgroups.
4.Cost Center: Select the applicable Cost Center for this Attendee Registration Group. Review the topic EventPro Setup / Financial / Cost Centers.
5.Department Code: Select the applicable Department Code for this Attendee Registration Group. Review the topic EventPro Setup / Financial / Department Codes.
6.Income Budget Item and Expense Budget Item: Select the applicable Income Budget Item and Expense Budget Item for this Attendee Registration Group. Review the topic EventPro Setup / Financial / Budget Configuration / Add Setup Budget Items to Category.
Attendee Types
Under this tab, you will indicate all the different Attendee Types to which this Registration Group can be assigned.
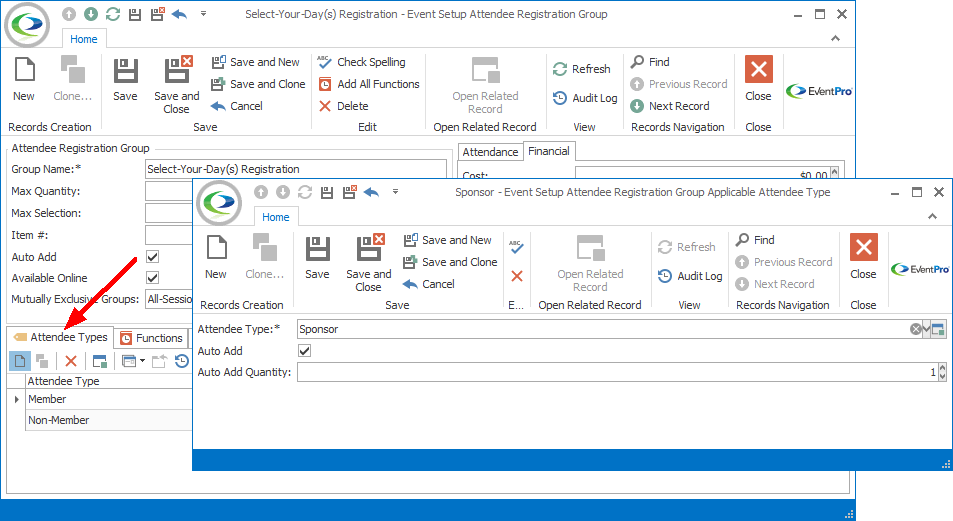
Figure 147: Adding Applicable Attendee Type
1.Start a New record under the Attendee Types tab.
2.The Event Setup Attendee Registration Group Applicable Attendee Type edit form will appear.
3.Attendee Type: Choose an Attendee Type to which this Registration Group can be assigned. This Attendee Type drop-down is populated by the Attendee Types you have already added to Edit Event; review Attendee Setup / Attendee Types above.
4.Auto Add: Select this checkbox if you want the Registration Group to be automatically assigned to Attendees of the selected Attendee Type when those attendees are added to the event. Note that in order to select the Auto Add checkbox here, the Auto Add checkbox in the Event Setup Attendee Registration Group edit form needs to be selected already.
5.Auto Add Quantity: If you selected the Auto Add checkbox above, enter a number to indicate the Quantity of Registration Groups that should be automatically assigned to each Attendee of the selected Attendee Type.
6.Click Save and Close to return to the Attendee Types tab.
7.You can continue to add as many Attendee Types as applicable.
Functions
You would have set up Functions earlier under Edit Event. Review Function Setup above.
Now, under this Functions tab, you can choose which of those Functions will be available in this Registration Group.
You can add the Functions to the Registration Group in one of two ways:
•All at once (Add All Functions)
•Individually (Add Individual Function)
Continue below to see instructions for both methods of adding Functions.
Add All Functions
1.Click the Add All Functions button at the top of the Event Setup Attendee Registration Group edit form.
2.The dialog will inform you that all Event Functions from Edit Event will be added to the selected Attendee Registration Group.
3.If you want to continue with that action, click Yes.
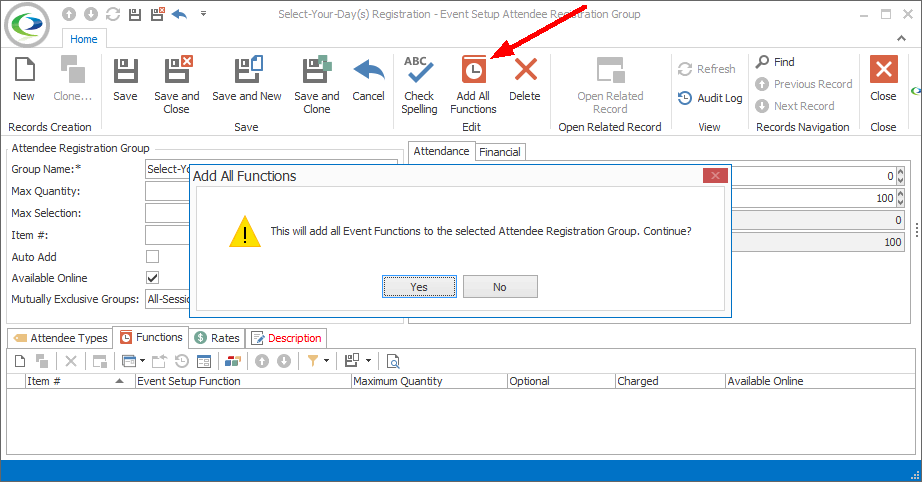
Figure 148: Adding All Functions
4.All of the Functions from Edit Event will be added to the Functions tab.

Figure 149: All Functions Added to Group
5.You can now edit the Functions individually, if required.
6.Double-click a Function in the selection grid to access its edit form.
Add Individual Function
1.Start a New record under the Functions tab.
2.The Event Setup Attendee Reg Group Function edit form opens.
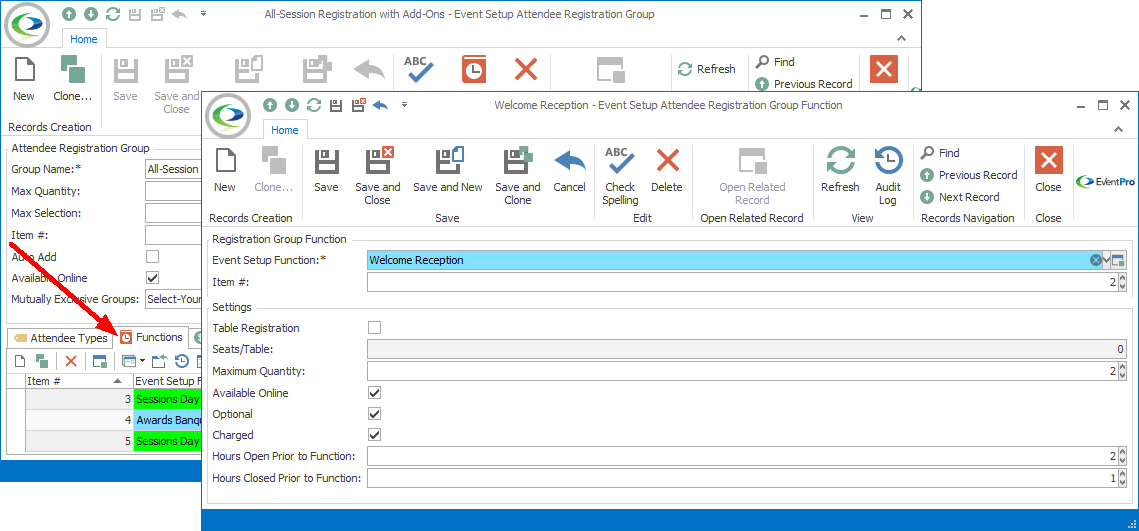
Figure 150: Adding Single Function
3.Function: Select a Function from the drop-down list. These are the functions you added to Edit Event earlier. Review the topic Function Setup.
4.Item #: Enter the Item # for this Function. Item numbers allow you to set a numerical sort order for items in a list, so you will later be able to sort the Functions under this tab by their Item numbers.
5.Maximum Quantity: Enter the maximum quantity of this Function for which an attendee can register. If you leave this number as 0 (zero), an attendee can register for this function an unlimited number of times.
6.Available Online: Select this checkbox if you want this Function to be available online.
7.Optional: Select this checkbox if this function is optional. If you leave this checkbox unselected, and an attendee registers for this registration group, the function will be mandatory (it will be selected within the registration group, and the attendee cannot un-select it).
8.Charged: Select this checkbox if you want to charge for this Function individually, in addition to the overall Registration Group charge, if applicable. The Rate Codes on the individual Function would have been set up earlier under Add New Event Function / Function Rates.
9.Click Save and Close.
You will return to the Functions tab of the Event Setup Attendee Registration Group edit form.
Continue adding many Functions as you require for this Registration Group.
Rates
Under this tab, you will set the Rate Codes applicable to this Registration Group.
Start a New record under the Rates tab.
The Event Setup Attendee Registration Group Rate edit form appears.
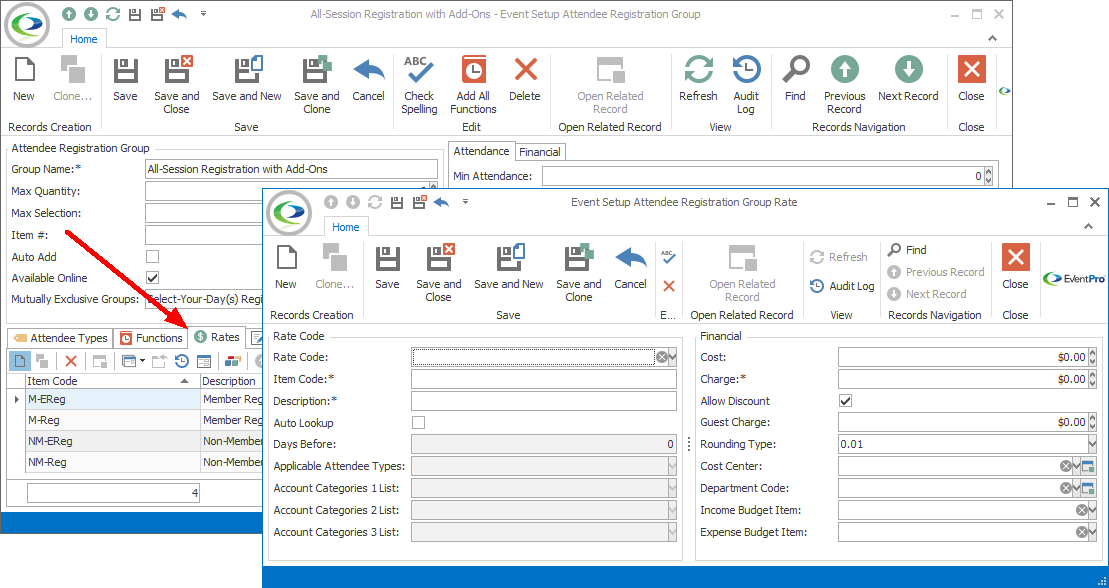
Figure 151: Adding Registration Group Rate
When assigning a Rate Code to a Registration Group, you have two choices:
•Select an existing defined Rate Code from Setup, and (optionally) edit it for this Event.
•Create a new Rate Code for this Event.
1.Rate Code:
a.If you're using an existing Rate Code, select the code from this drop-down, which is populated by Rate Codes set up in EventPro Setup / Attendees / Registration Group Rates.
b.If you're creating a new Rate Code, do not select anything from the Rate Code drop-down.
2.Item Code:
a.If you selected an existing Rate Code above, the Item Code and other field values will default in from Setup. You can, however, edit the Rate Code specifically for this Event.
b.If you're creating a new Rate Code, type in the Item Code.
3.Description: The Description will copy the Item Code by default, but you can edit it if you want.
4.Auto Lookup: Select the Auto Lookup checkbox if you want EventPro to automatically assign this Rate if the set criteria are fulfilled. You need to select this Auto Lookup checkbox if you want to specify Days Before, Attendee Types and/or Account Categories below.
5.Days Before: If you want this rate to take effect only if the attendee registers a certain number of days in advance (i.e. "Early Bird" pricing), enter the number of Days Before during which this particular rate applies.
6.Attendee Types: If you want this rate to only apply to Attendees of certain Types, select the checkboxes next to the applicable Attendee Types in the drop-down list. The drop-down list is populated by the Attendee Types you added to this Registration Group above.
7.Account Category 1, 2 and 3: If you want to restrict the availability of this rate to Accounts (Companies/Contacts) belonging to certain Account Categories, select the checkboxes next to the applicable categories in the relevant drop-down lists. The Account Category 1, 2 and 3 drop-down lists are populated by the Setup Account Categories you created under EventPro Setup / CRM / Account Categories.
8.Cost: Enter the cost for this Rate Code, if applicable.
9.Charge: Enter the amount charged for an Attendee Registration under this rate.
10.Guest Charge: This field allows you to define a different charge for an Attendee that is flagged as a "Guest", as well as meeting the other criteria for the Rate Code. If you want the Guest Charge to be the same as the regular Attendee Charge, simply leave this field as 0 (zero).
11.Allow Discount: Select this checkbox if you want to allow Users to discount this rate.
12.Rounding Type: If you allow discounts for this Rate Code, select the Rounding Type you want to apply for the discounted rate.
13.Cost Center: Select the applicable Cost Center for this Rate Code. Review the topic EventPro Setup / Financial / Cost Centers.
14.Department Code: Select the applicable Department Code for this Rate Code. Review the topic EventPro Setup / Financial / Department Codes.
15.Income Budget Item and Expense Budget Item: If applicable, you can select the income and expense Budget Items for this Registration Group Rate Code. The Budget Item drop-down lists are populated by Setup Budget Items created under EventPro Setup / Financial / Budget Configuration.
16.When you are done entering information in the Event Setup Attendee Registration Group Rate edit form, click Save and Close.
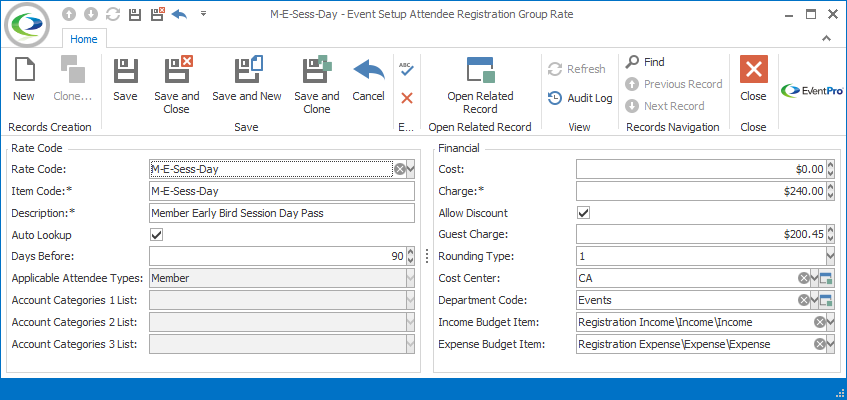
Figure 152: Editing Registration Group Rate
You will return to the Rates tab of the Event Setup Attendee Registration Group edit form.
Continue adding as many Rate Codes as you require for the Registration Group.
Description
Under the Description tab, you can enter an expanded description of the Registration Group.
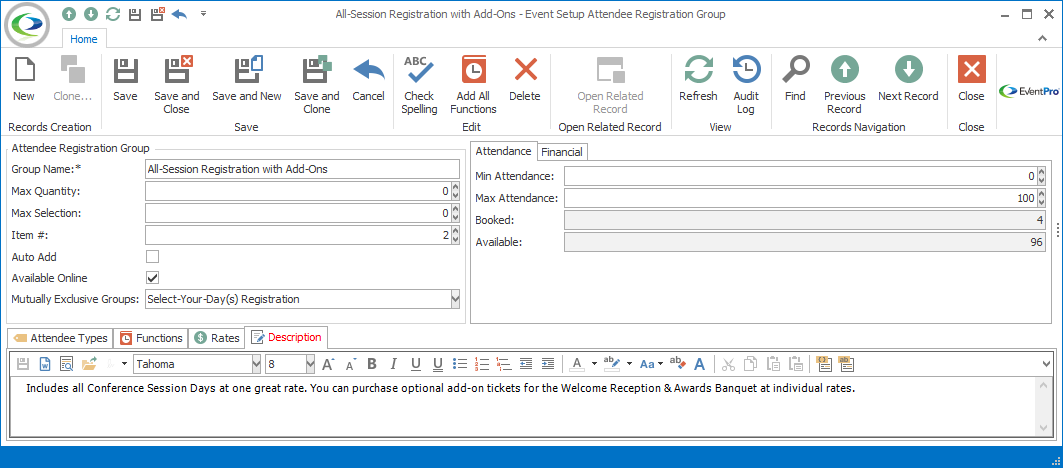
Figure 153: Adding Registration Description
Save & Close
When you are done, click Save and Close to return to the Attendee Registrations tab, or click Save and New to save the current group and begin another Attendee Registration Group.
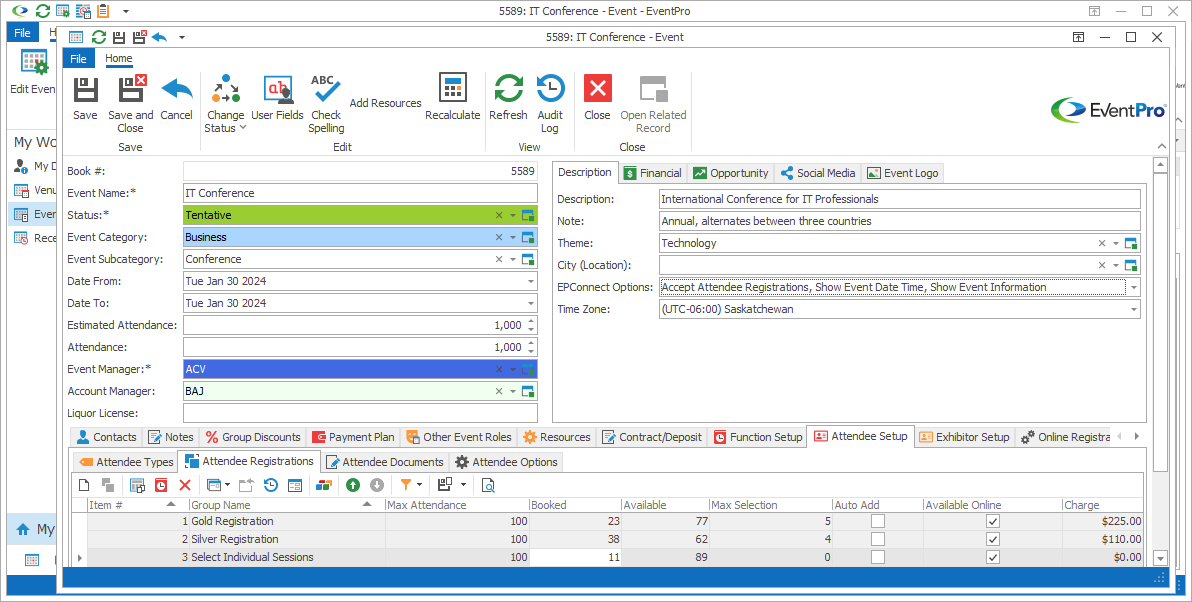
Figure 154: Event Setup Attendee Registration Groups
When you are done adding Attendee Registrations, make sure that you click Save at the top of the Edit Event window, as well.