If many of the Event Setup Booths will have similar characteristics, you may find it more convenient to add multiple booths simultaneously.
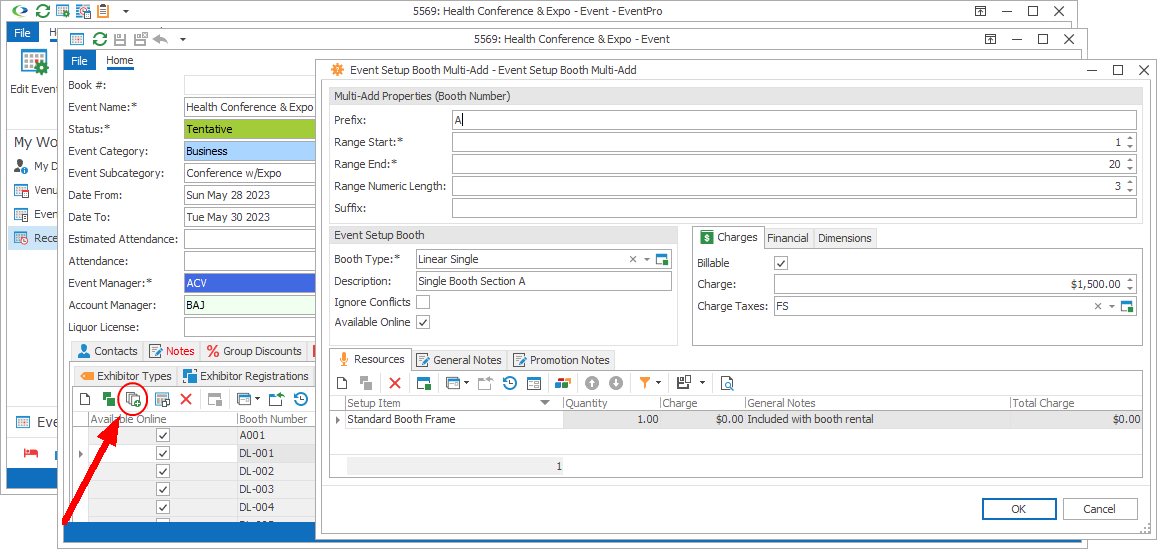
In the Edit Event window, under the Booths tab, click the Multi-Add button.
The Event Setup Booth Multi-Add edit form appears.

Figure 169: Multi-Adding Booths
Work your way through the multiple areas and tabs of the Multi-Add window:
•Multi-Add Properties (Booth Number)
•General Notes & Promotion Notes
Multi-Add Properties (Booth Number)
Prefix
Enter the Prefix you want appearing at the start of all Booth Numbers generated in this Multi-Add form.
Range Start
Enter the first Booth Number you want to create.
Range End
Enter the last Booth Number you want to create. EventPro will create as many Booths as there are numbers between the Range Start and End.
Numeric Length
Enter a number for the Numeric Length.
EventPro will add zeros to the beginning of the Booth Numbers to meet the Numeric Length you indicate.
For example, if you enter a Numeric Length of 3, Booths 1 and 2 will be 001 and 002.
Suffix
Enter the Suffix you want to appear at the end of all the Booth Numbers generated in this Multi-Add form.
Examples
So, for example, if you enter these values...
•Prefix: A
•Range Start: 1
•Range End: 5
•Numeric Length: 3
•Suffix: -I
... the resulting Booth Numbers would be:
•A001-I
•A002-I
•A003-I
•A004-I
•A005-I
Event Setup Booth
Booth Type
Select the Booth Type from the drop-down list, which is populated by the Setup Booth Types created under EventPro Setup / Exhibitors / Booth Types.
Description
Enter a description of the booths that will be generated from the multi-add process.
Ignore Conflicts
Select this checkbox if you want to allow more than one exhibitor to be assigned to one of these Booths at the same time.
Available Online
Select this checkbox if you would like these Booths to be available online.
Charges
Billable
Select the Billable checkbox to indicate that these Booths are billable by default.
You need to select the Billable checkbox if you want to enter a Charge below. Also, non-billable items will not show up in invoices.
Allow Discount
Select this checkbox if you want to allow Users to discount the Charge amount.
Charge
Enter the rental charge that applies to each of these Booths.
While this amount will act as the default Booth Charge, remember that you may have defined variable Event Setup Booth Rates earlier, which will be applied according to the criteria you indicated.
Charge Taxes
Select the taxes that apply to the Booth Charge.
The drop-down list is populated by the Setup Tax Configurations entered under EventPro Setup / Financial / Taxes.
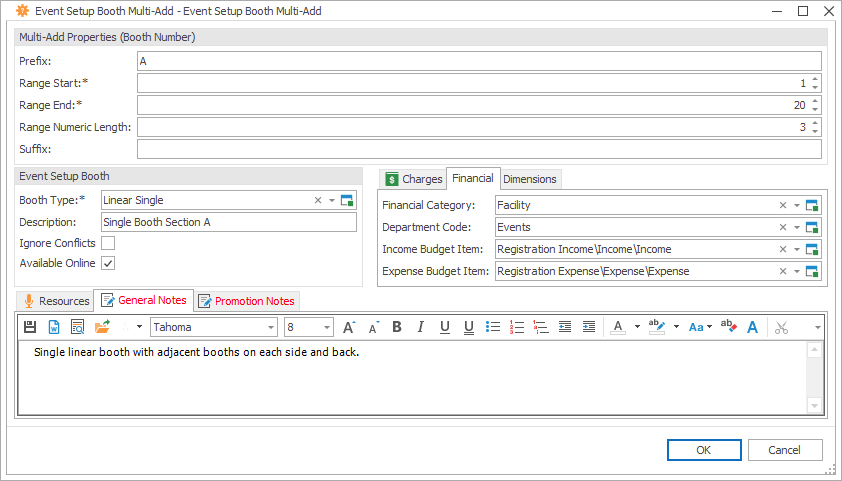
Financial

Figure 170: Setting Financials for Multi-Add Booths
Financial Category
Select a Financial Category from the drop-down list, which is populated by the Setup Financial Categories entered under EventPro Setup / Financial.
Department Code
Select a Department Code from the drop-down list, which is populated by the Setup Department Codes entered under EventPro Setup / Financial.
Income Budget Item and Expense Budget Item
If applicable, select the Income Budget Item and Expense Budget Item for these Booths.
You would have set up budget items under Budget Configuration in EventPro Setup > Financial.
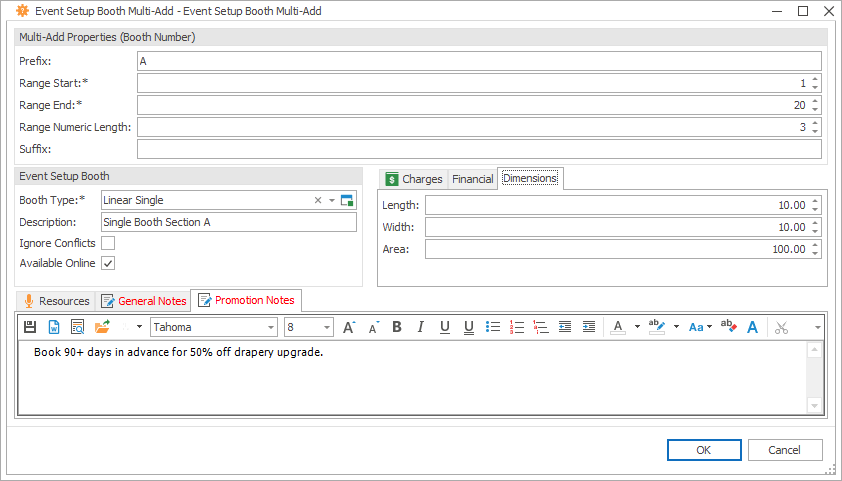
Dimensions

Figure 171: Settings Dimensions for Multi-Add Booths
Enter the Length and Width of the Booth space, and the Area will calculate automatically.
You can also enter the Area directly, for irregularly shaped booth spaces.
Resources
Under the Resources tab, you can add Setup Items to each Booth generated in the multi-add process.
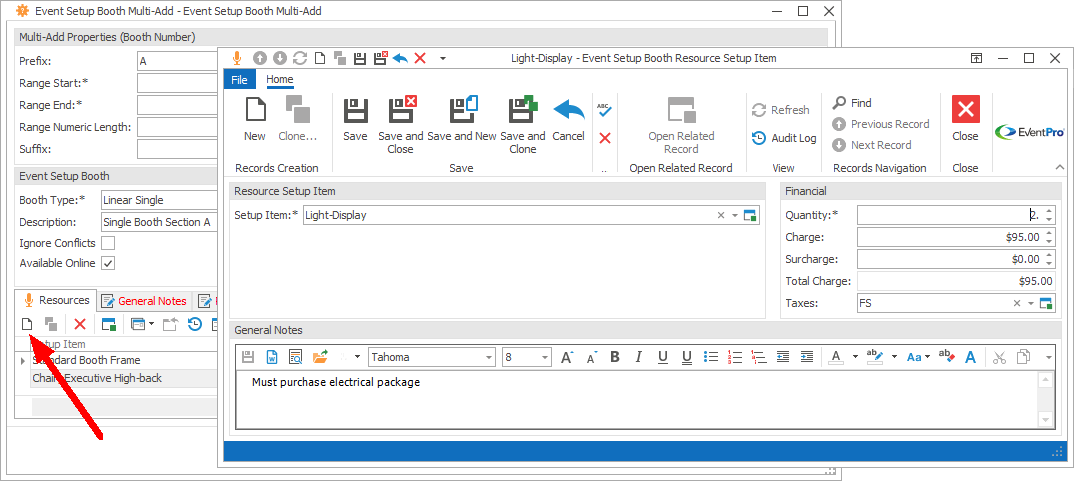
Start a New record under the Resources tab.

Figure 172: Adding Resource to Multi Booths
Event Setup Booth Resource Setup Item
The Event Setup Booth Resource Setup Item edit form appears.
Setup Item
Select a Setup Item from the drop-down list, which is populated by items created under EventPro Setup > Resources > Setup.
Quantity
Enter the quantity of the item you want to assign to each Booth.
Charge and Surcharge
The Charge and Surcharge will default in from the Setup Resource Setup Item, but you can enter different amounts that will apply for these particular Booths in this specific Event.
Total Charge
This total will calculate automatically.
Taxes
Select the Tax Configuration that applies to this Booth Setup Item. The drop-down list is populated by the Setup Tax Configurations entered under EventPro Setup > Financial.
General Notes
The General Notes will default in from the Setup Resource Setup Item, but you can edit the notes as required for these particular Booths in this specific Event.
When you are done, click Save and Close.
You will return to the Event Setup Booth Multi-Add window.
Continue adding any other Resources required for this batch of Booths.
General Notes & Promotion Notes

General Notes
Enter any General Notes about the Booths under this tab.
Promotion Notes
Enter any promotion-related notes under the Promotion Notes tab.
Finish Multi-Add
When you are done entering information for this batch of Booths, click OK at the bottom of the Event Setup Booth Multi-Add edit form.
The multiple Booths will be added under the Booths tab of the Edit Event window.
If you now need to edit some of the booths individually to add unique information, double-click a Booth to open the edit form and make the required changes.