In the Calendar Area Definition, you will define the appearance and functions of the online EPConnect Calendar page.
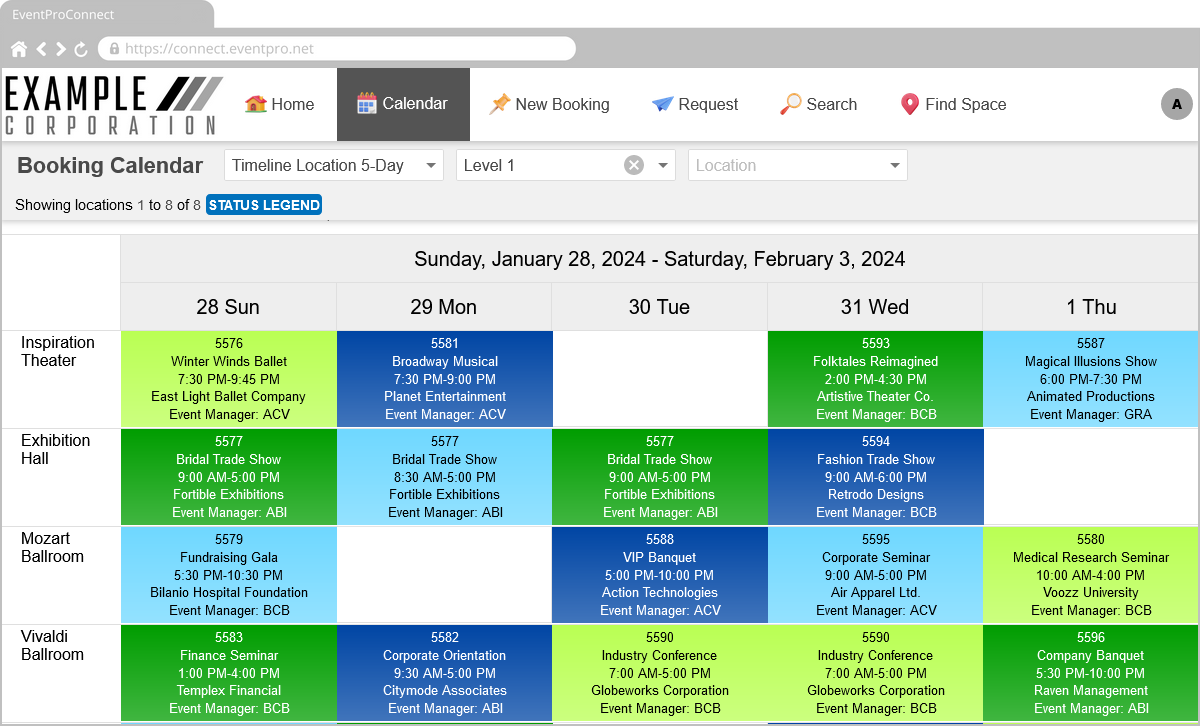
Figure 689: Sample EPConnect Calendar
NOTE: Whether users can access the online calendar, and what users can view on the calendar will depend on several factors.
•The Allow Anonymous Access setting in the Calendar - Area Definition.
•Whether the User is logged in or anonymous.
•The User's Security Permissions related to online activity, events, and locations. For example, the Online Security Permission called "Access Calendar" controls user access to the online EPConnect Calendar, but there are several other Security Permissions that control access to events and locations.
•Whether venue locations, event statuses, and restriction statuses have been marked as "Available Online".
•The EPConnect Options set for each event.
In this chapter:
oCalendar Settings (Area Definition)
oCalendar Settings (Calendar View)
oView
oCalendar Settings (Page Definition)
Calendar - Area Definition
To review how to add, edit, and delete an Area Definition, see Area Definitions: Add, Edit, Delete.
These instructions will begin from the opened Calendar - Area Definition edit form.
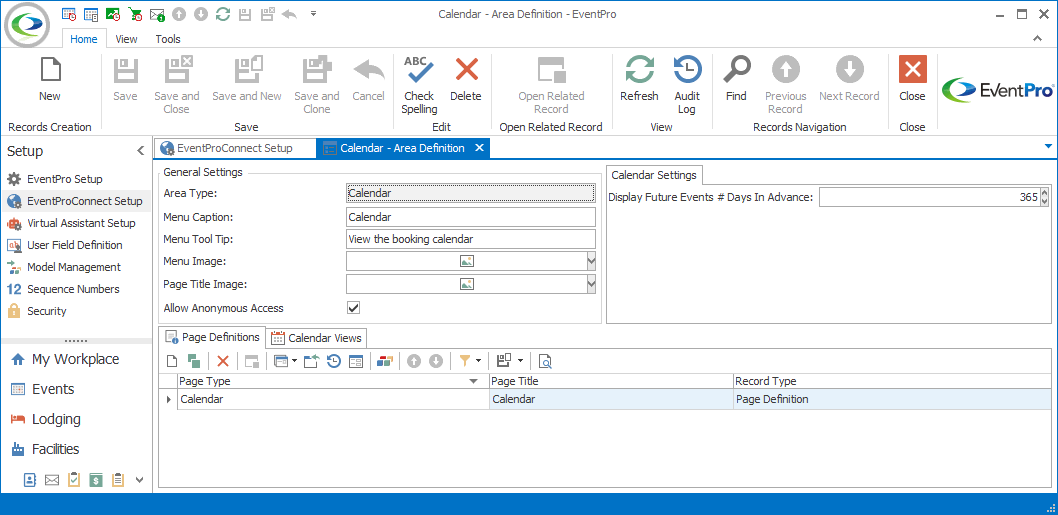
Figure 690: Defining Calendar Area Definition
In the Calendar Area Definition edit form, there are two types of settings: General Settings and Calendar Settings.
The General Settings are the same as those described in the topic General Settings under Area Definitions: Add, Edit, Delete.
Calendar Settings
The Calendar Settings tab is unique to the Calendar Area Definition edit form.
Display Future Events # Days in Advance
Indicate how far into the future (in Days) you want the online Calendar to display events.
Calendar Views
Under the Calendar Views tab, you can define different visual configurations for the Calendar, which the online user selects in the View drop-down of the online Calendar page.
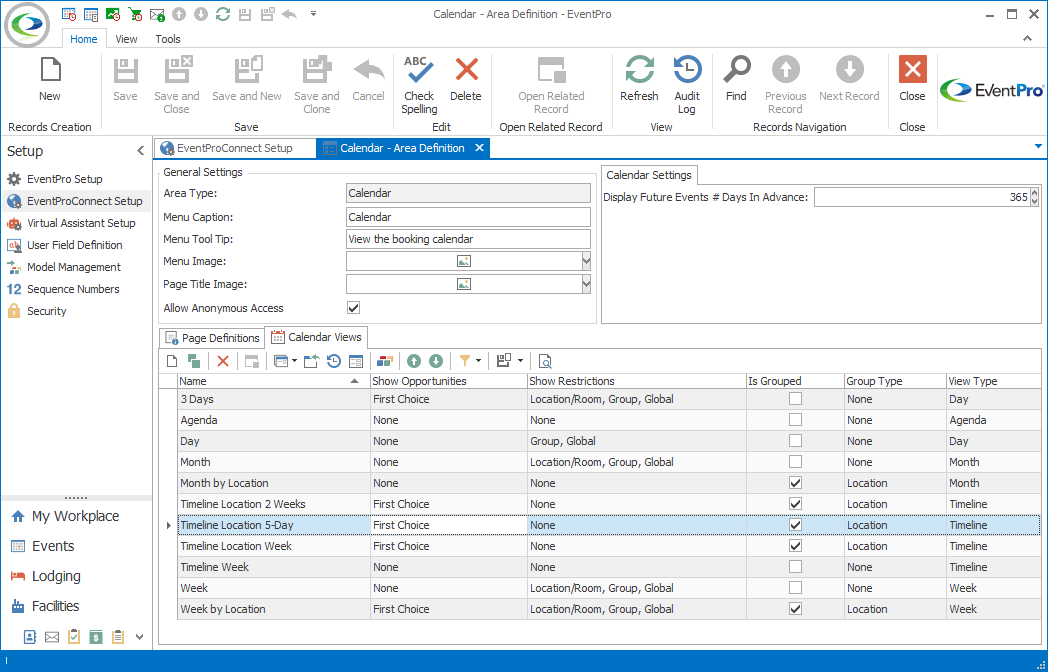
Figure 691: Defining EPConnect Calendar Views
There will already be several Calendar Views in the tab, but you can edit them and add more as necessary.
1.To define your own Calendar View, start a New record or Clone an existing record under the Calendar Views tab.
2.The Setup Calendar View EPConnect edit form opens.
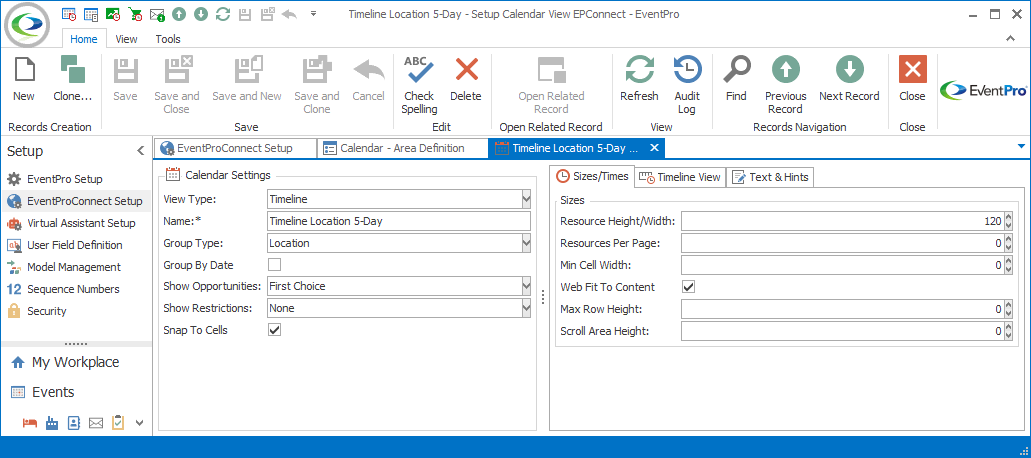
Figure 692: Creating a Calendar View
3.Adjust the settings as necessary.
a.Note that the settings will vary, depending on the View Type you select for this Calendar View.
b.Not all of the settings are applicable to all View Types, so you may not see some of these settings in the edit form.
c.The settings will be described in more detail below, organized in four general areas:
ii.Sizes/Times
iii.View
iv.Text & Hints
4.When you have entered all of the information you need for this Calendar View, you can click Save and Close in the Setup Calendar View EPConnect edit form.
Calendar Settings
Remember that not all settings will appear for every View Type. Some settings are only relevant for certain View Types.
View Type
Select the View Type from the drop-down list.
Name
Enter a name for the Calendar View.
If you define more than one View for a View Type, be sure to add descriptors to distinguish the Views.
Group Type
From the drop-down, choose how you want to group the Calendar events: None (no grouping) or by Location.
Group by Date
Select this checkbox if you also want to group the Calendar events by Date.
Show Opportunities
From the Show Opportunities drop-down, select the type of Opportunity Preferred Dates/Times you want to view (if any) on this calendar view - First Choice, Second Choice, and/or Third Choice - and click OK.
If you do not want to show any Opportunities in this calendar view, unselect all of the checkboxes and click OK.
Note that even if you choose to show Opportunities in this calendar view, certain Opportunity Statuses may not be "Available Online", and so Opportunities of those statuses will not be visible online. Review EventPro Setup / CRM / Opportunity Statuses.
Show Restrictions
From the Show Restrictions drop-down, select the type of Restrictions you want to view (if any) on this calendar view - Location/Room, Group and/or Global - and click OK.
If you do not want to show any Restrictions in this calendar view, unselect all of the checkboxes and click OK.
Note that even if you choose to show Restrictions in this calendar view, certain Restriction Statuses may not be "Available Online", and so Restrictions of those statuses will not be visible online. Review EventPro Setup / Facilities / Restriction Statuses.
Snap to Cells
Select the Snap to Cells checkbox if you want the appointments stretched to fill the cell width or height boundaries (depending on the type of view).
If you unselect this checkbox, each appointment's visible width or length is proportional to its duration.
Sizes/Times
Remember that settings vary according to View Type selected, so you may not see all of these settings in the view you are editing.
Resource Height/Width
Resource-related settings only appear if the Calendar View is grouped by Location.
The "Resources" referred to in this situation are the Locations that appear in the view.
When a view is grouped by Location, the Locations (i.e. Resources) will appear across the top of the Calendar in a row, or along the left side as a column.
This Resource Height/Width setting determines the minimum Height of the Location Row or the minimum Width of the Location Column, depending on the view.
Resources per Page
This determines the number of Locations (i.e. Resources) that appear per page.
If you leave the setting as 0 (zero), all applicable Locations (those that are available online) will appear on one page.
Min Cell Width
You can manually set the minimum cell width, but if you leave this number as 0 (zero), the cell width will automatically adjust to best fit the page.
Note that even if you set a Minimum Cell Width, the calendar view may not be able to respect the setting if it needs to fit a certain number of resources or days per page.
Row Height
For some of the View Types (Day, Work Week, Full Week), you can manually set the Row Height.
Web Fit to Content
If you select this checkbox, the row height will automatically adjust to the cell content.
This setting is applicable to the Week, Month, and Timeline view types.
Max Row Height
The Max Row Height allows you to set the maximum height a row can vertically expand to in order to display content.
For some of the View Types (Week, Month, Timeline), you will need to select in the Web Fit to Content checkbox in order to access the Maximum Row Height setting.
If you leave this as 0 (zero), the Row Height will adjust automatically according to the cell content.
Scroll Area Height
The Scroll Area Height determines the height of the container in which the online Calendar is displayed on the webpage.
If you set this to a particular number, the visible portion of the Calendar on the webpage will be limited to that container height (in this particular view). The user will need to use the container's scroll bar to move vertically through the Calendar.
If you leave this number as 0 (zero), the Calendar's full height will be visible on the webpage, although the user may still need to scroll vertically using the browser's scroll bar.
This setting is applicable to the Day, Work Week, Full Week, and Timeline view types.
Day View Time Scale
Select a Time Scale displayed in a day, if applicable for the View Type (Day, Work Week, or Full Week).
Visible & Work Times
If applicable for this Calendar View, you can set:
•Visible Start time and Visible End time (Day, Week, Work Week, Full Week, Month, Gantt, Year)
•Work Start time and Work End time (Day, Work Week, Full Week, Gantt)
View
The name of this View tab depends on the View Type you selected above. For example, if you selected Timeline as the View Type, this tab will be named Timeline View.
These instructions will describe the various options under the View tab, but remember that you may not see all of these settings, since they vary according to View Type.
Some of the View Types will not have this View tab at all. They will only have settings under the Sizes/Times and Text & Hints tabs.
Show Resource Group
This setting is applicable to Timeline and Gantt views grouped by Location.
As noted above, "Resources" in this situation refers to the Locations by which the calendar events are grouped. In EventPro Setup, Locations are created within Location Groups.
Select this Show Resource Group checkbox if you want the calendar view to display the "Resource Groups", i.e. the Location Groups. The Location Group will appear in its own row, above the Locations contained within that Group.
Appointment Auto Height
With regard to calendar views, an "Appointment" is the color-coded portion of the cell representing the event and/or booked event location.
If you want the appointment height to automatically adjust to best fit the text content and the cell space available, select this Appointment Auto Height checkbox. The calendar view will attempt to keep the color-coded appointments and cell text visible to the extent possible.
This setting is relevant for the Week, Month, Timeline, and Gantt view types.
Appointment Height
If you do not select the Auto Height option, you can manually enter the preferred height here.
The calendar view will keep all appointments at this set height, which may mean some cell text will be hidden.
Cells Auto Height Enabled
With auto-height enabled, the calendar will adjust cell heights relative to each other according to the appointments within the cells.
For example, if you have a row with a cell that contains multiple appointments, and another row with no appointments, the row without appointments will shrink down to the minimum height.
From the drop-down, choose the Auto Height mode used to calculate cell heights:
•None
•Limited
•Full
This setting is applicable to Timeline and Gantt view types.
Cells Auto Height Min Height
If you selected the Cell Auto Height Enabled checkbox, you can enter the Minimum Height for a cell that does not contain any appointments.
Note, however, that this setting may be overridden by the Web Fit to Content setting.
Day View Day Count
Enter the number of days you want displayed in this Day View.
This setting is applicable to the Day view type.
Show Weekend
If you want the weekends to be displayed on the calendar view, select this Month View Show Weekend checkbox.
If you want weekends hidden, unselect the Month View Show Weekend checkbox.
This setting is applicable to the Month view type.
Compress Weekend
If the weekends are visible, i.e. the Month View Show Weekend checkbox is selected, but you want the weekends to take up less room in the view, select the Month View Compress Weekend checkbox.
Month View Week Count
Enter the number of weeks you want displayed as a Month.
This setting is applicable to the Month view type.
Timeline View Day Interval Count
Enter the number of days you want displayed per interval in this Timeline view.
This setting is applicable to the Timeline view type.
Time Scales
This setting is applicable to the Timeline view type.
Use the New button above the Time Scale selection grid to add Time Scales to the Timeline view. When you add a Time Scale, select the Caption Visible checkbox if you want the time scale's caption visible in the online calendar.
Text & Hints
Under this tab, you can define and select custom Text and Hints for the calendar view.
•"Text" refers to the text visible in the appointments, i.e. the color-coded portions of the cells.
•"Hints" are the text boxes that pop up when you hover your mouse pointer over a particular cell.
There are already defaults set for Text and Hints, so you do not need to define any if you are satisfied with the defaults.
If you leave these Text or Hint fields blank, the calendar view will use the built-in defaults. You will be able to set the default Appointment Text in the Calendar Page Definition, described below.
If you want to display different information, you can create and customize your own Setup Calendar Text items.
However, note that if you want the most efficient calendar loading speed, it is recommended that you use the default text whenever possible, and use custom text only if necessary.
To select an existing custom Text/Hint, click the drop-down next to the relevant Text or Hint, and select the custom option you want to use.
To define a new Text/Hint:
1.Click the drop-down next to the relevant Text or Hint, and click the New button at the bottom of the drop-down.
a.Note that when you create a Text or Hint for a certain cell type, it will appear as an option in the drop-down list for both the Text and Hint of that cell type, in this view and any other views with that cell type available.
b.For example, if you create a new Event Location Text, it will be available for selection in both the Event Location Text and Event Location Hint drop-downs in the view you are currently creating, and when editing any other Calendar View that has Event Location Text and Event Location Hint available.
2.The Setup Calendar Text edit form opens.
3.Enter a Name for this text.
4.You will most likely want to add Merge Fields to the text to automatically pull in data from the Event, Location, etc., which means you need to work in the Word Processor.
a.Click the Word Processor button to open the Word Processor.
b.In the Word Processor, type in the text you require, and insert the Merge Fields you want to use from the panel along the right.
c.The table of Merge Fields available will vary, depending on the cell type for which you are defining text - Event Location, Venue Location, etc.
d.You can drag-and-drop the Merge Field from the panel into a place in the text, or you can place your cursor in the text where you want to insert the Merge Field, and double-click the relevant Merge Field in the panel.
e.When you are done with the Word Processor, click Save.
5.Back in the Setup Calendar Text edit form, you can click Save and Close to return to the Setup Calendar View EPConnect edit form.
To edit an existing Text/Hint:
1.Select the Text or Hint in the drop-down, and click the Open Object button to the right (if you have the applicable User Security Permissions).
2.You may be prompted to save the View edit form before you can open another record.
3.The Setup Calendar Text edit form will open, where you can make the changes you require.
4.Remember to Save and Close all edit forms as required.
Calendar - Page Definition
There is only one type of Page Definition in the Calendar - Area Definition edit form: Calendar.
To review how to add, edit, or delete a Page Definition within an Area Definition, see Page Definitions: Add, Edit, Delete.
These instructions will begin from the opened Calendar - Page Definition edit form.
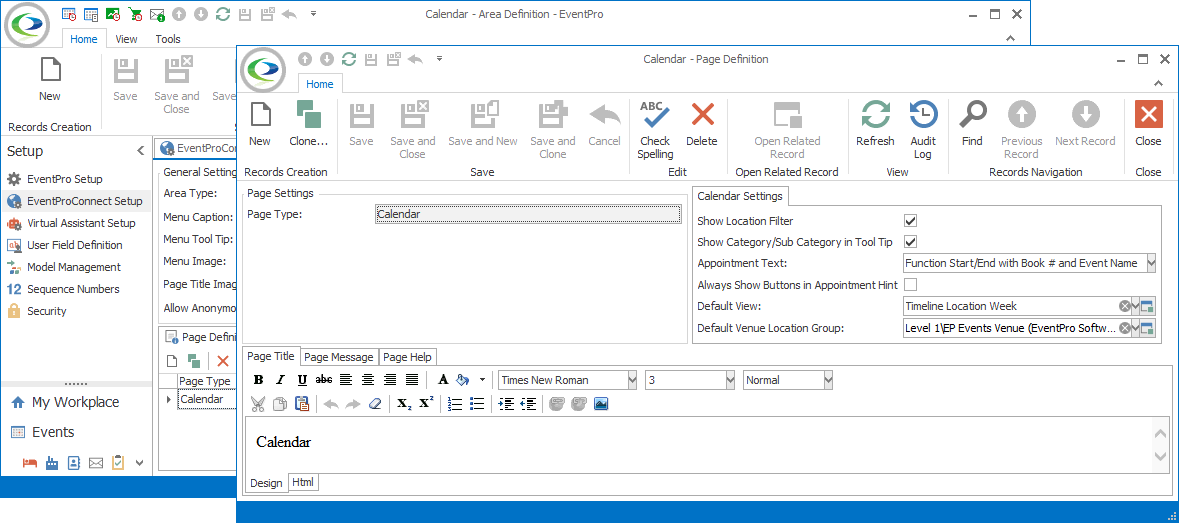
Figure 693: Editing Calendar Page Definition
The tabs at the bottom of the Calendar - Page Definition edit form are common tabs described earlier (Page Title, Page Message, and Page Help). Review the topic Common Page Tabs.
Calendar Settings
These settings are unique to the Calendar Page Definition.
Show Location Filter
Select this checkbox if you want the Location Filter to appear on the Calendar page. (The Location drop-down list appears above the calendar, next to the View and Location Group drop-down lists.)
Show Category/Subcategory in Tool Tip:
Select this checkbox if you want the Tool Tip (the explanatory text bubble that pops up when you hover over an event in the Calendar) to include the event's Subcategory and Category.
This will only work if the current calendar view is using default Hint content. If the view uses a custom Hint, the event category and subcategory will only appear if those fields are in the Hint content.
Appointment Text
From the drop-down, choose the default Appointment Text that will appear if you do not have Custom Text set for a particular Calendar View.
Default View
Choose the default View that is used when you first open the Calendar. You would have just defined these Calendar Views in the step above.
Default Venue Location Group
Choose the Default Venue Location Group to which the Calendar will initially open.