1.At the bottom of the Booked Location edit form, select the Beverages tab.
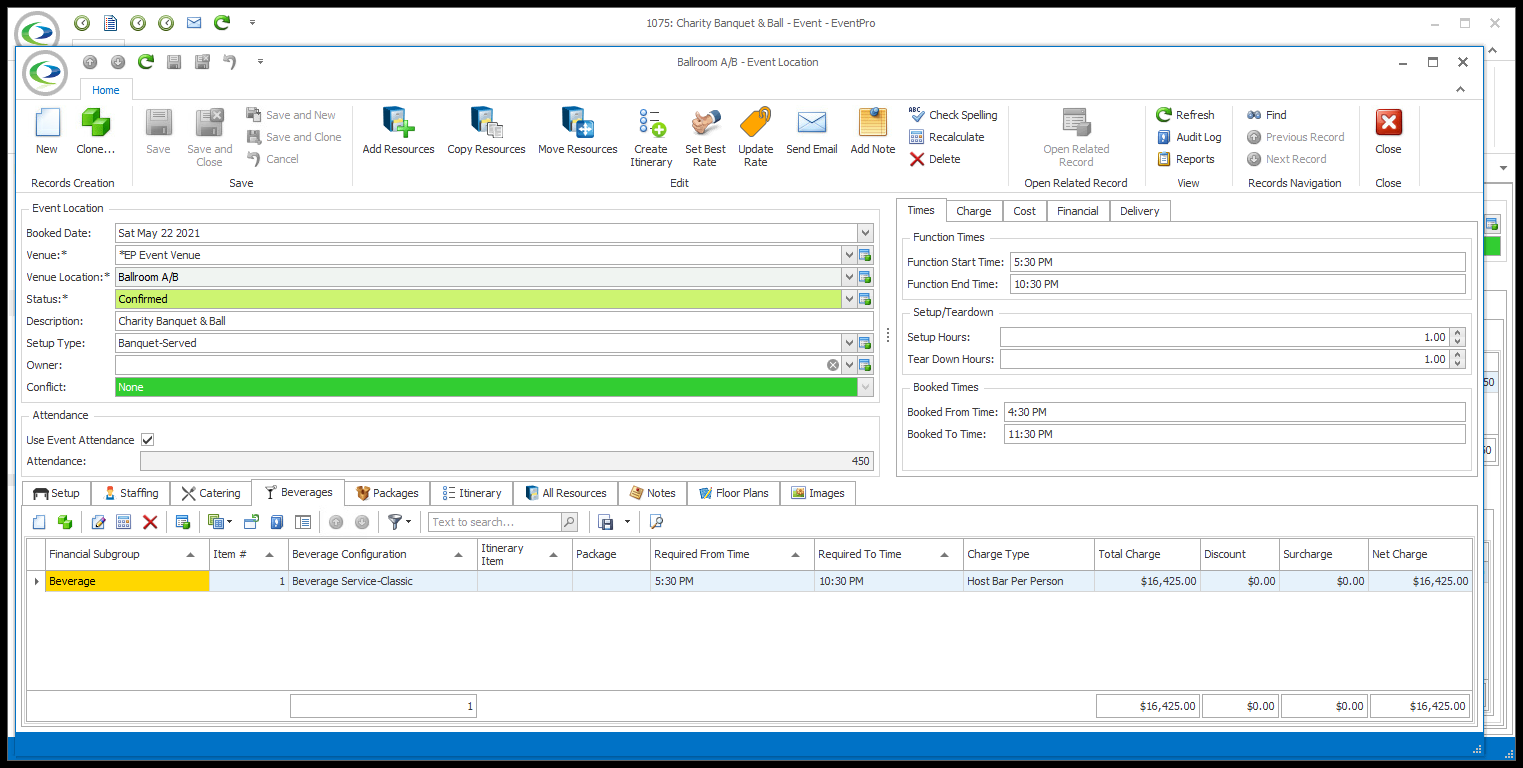
2.Start a New record under the Beverages tab.
3.The Event Resource Beverage edit form opens.
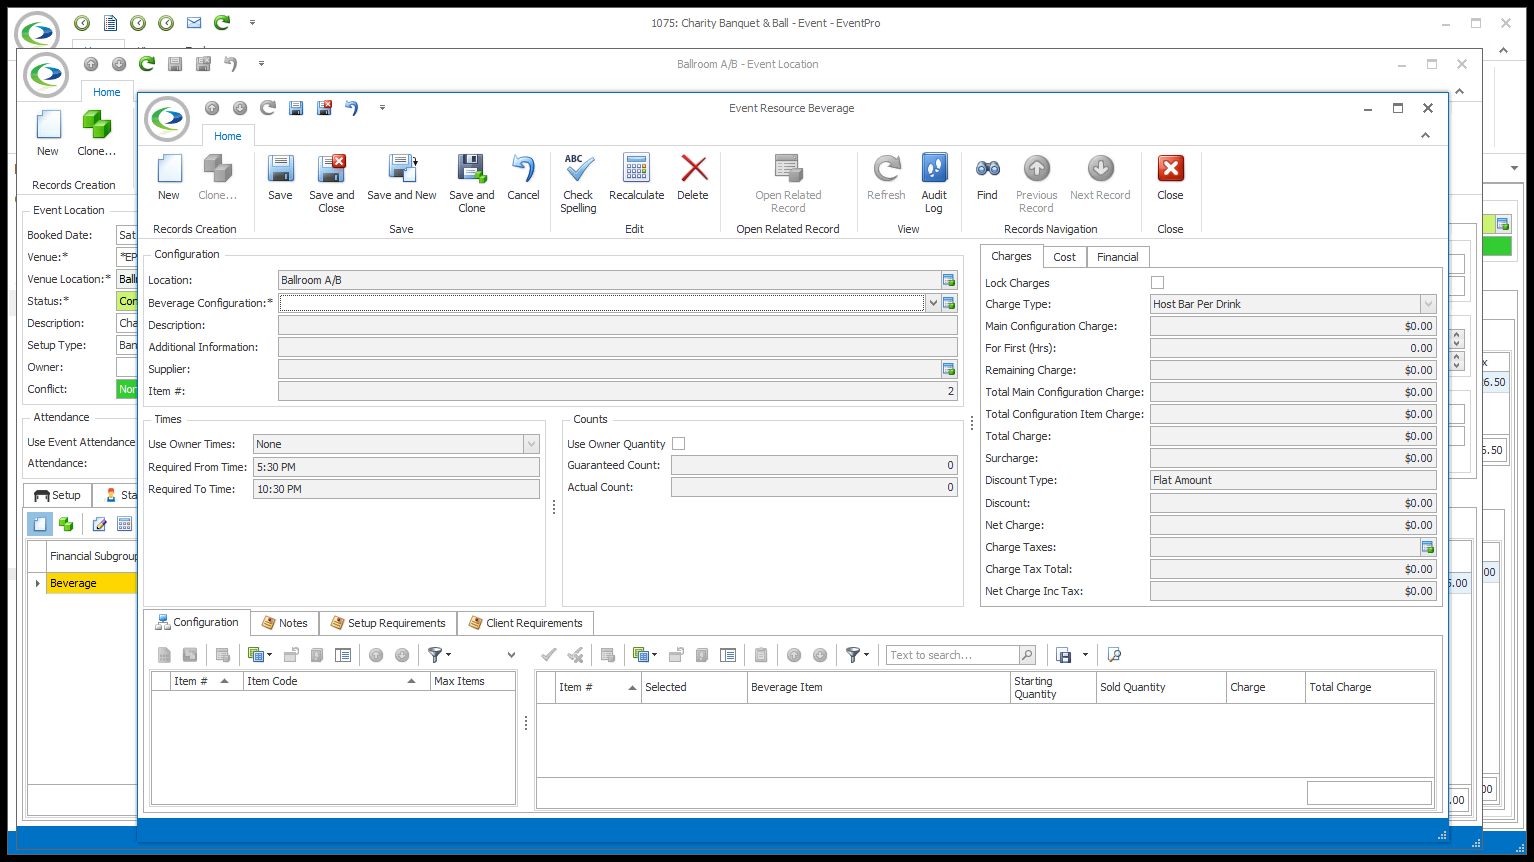
4.The Location will already be set to the Event Location.
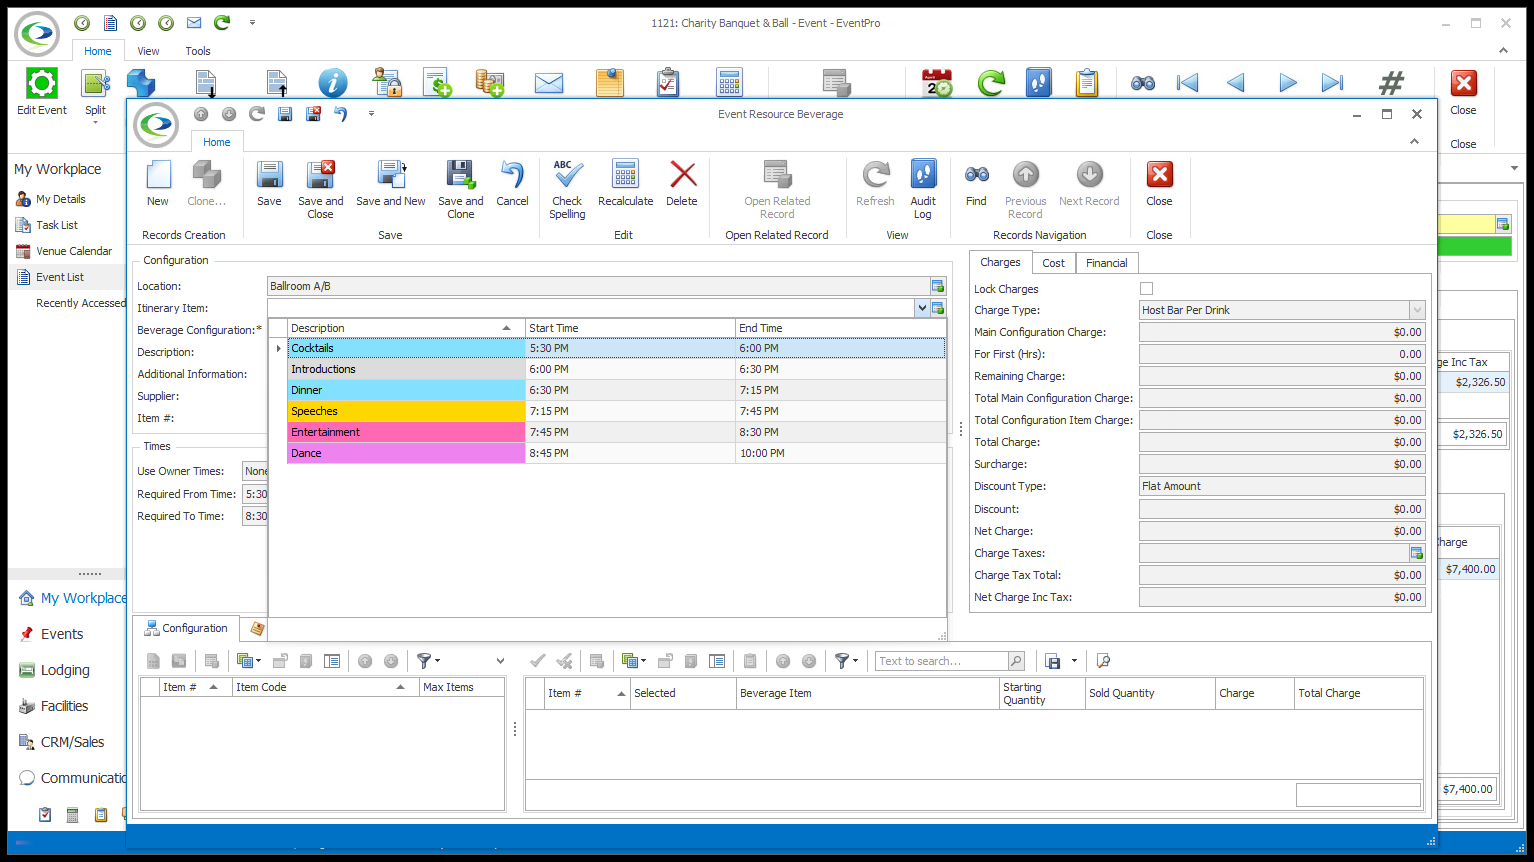
a.The Itinerary Item field will only appear if there is an Itinerary set up for the Event Location.
b.If there are no Itinerary Items set up on the Event Location, you won't see this field.
c.If you want to assign the Beverage Configuration to a specific Itinerary Item within the Event Location, select that Itinerary Item from the drop-down.
d.See also Organize Event Itinerary > Add Custom Itinerary > Itinerary Resources.
6.Select the configuration you want to add from the Beverage Configuration drop-down. The Beverage Configuration drop-down is populated by the configurations created under EventPro Setup > Resources > Beverages.
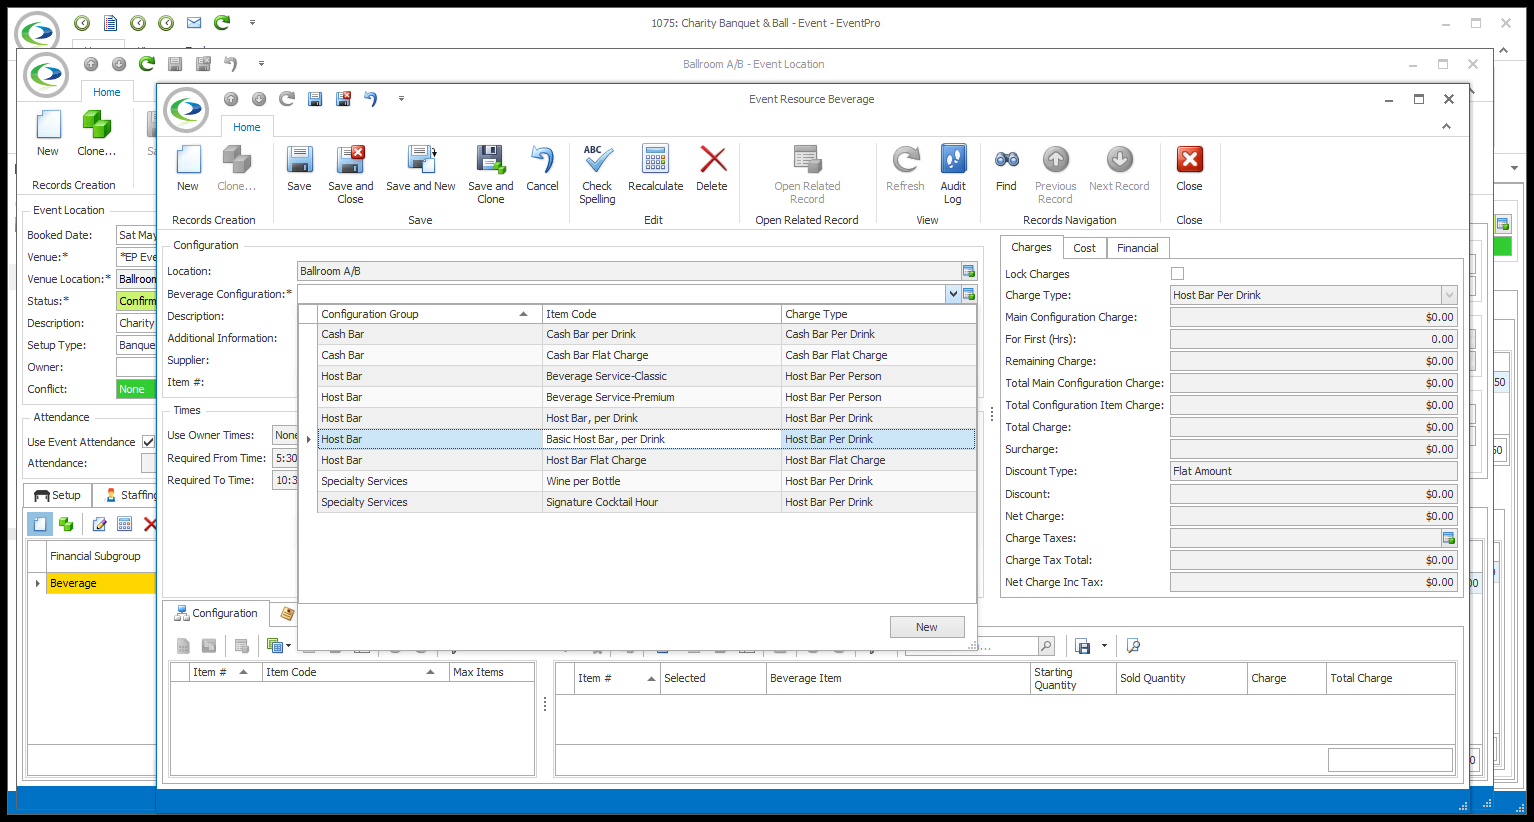
7.The fields in the Event Resource Beverage edit form will default to the information defined for the Beverage Configuration under EventPro Setup > Resources > Beverages > Create Setup Resource Beverage Configuration.

8.If you want to customize the Beverage Configuration for this event booked location, you can do so here in the Event Resource Beverage edit form. The changes you make to the Configuration here, in the Event Location, will not affect the Configuration back in Resource Setup.
9.To review how to edit the Beverage Configuration fields, see EventPro Setup > Resources > Beverages > Create Setup Resource Beverage Configuration.
These are some examples of common adjustments made when adding a Beverage Configuration to a booked location:
a.Item #: The Item # represents the item’s position in the list of items on selection grids and on printed reports. If there will be multiple items in the grid, and you want this item to appear higher or lower, you can enter a new Item #. Whether the Item # defaults to 0 (zero) or the next number in the sequence depends on the "Auto-Increment Resource Item Sort Orders" system setting under EventPro Setup > Resources > Resources System Settings.
b.Times: Depending on the Default Times of the Setup Beverage Configuration, and the Use Setup Resource Times for Event Resources System Setting, the Times may default to certain options. When adding the beverage configuration to a booked location, you can change the time selections and/or manually enter the required times, if you wish.
i.The times may default to one of the "Use Owner Times" options, Function Times or Booked Times, possibly with a certain number of Minutes Before.
ii.The times could also default to the Required From Time and Required To Time manually set in Setup.
iii.Even if there are default times set for this Beverage Configuration, the Use Setup Resource Times for Event Resources system setting determines whether the Beverage Configuration always uses the Setup Default Times, never uses them, or prompts you to choose each time.
c.Configuration Counts: If you don't default the Configuration Count to the Booked Location Attendance ("Use Owner Quantity"), you can manually enter the Guaranteed Count and Actual Count.
NOTE: Whether EventPro uses the greater of the Guaranteed or Actual Attendance numbers to calculate Beverage costs depends on the "Calculate Cost on Greater of Guaranteed and Actual" system setting under EventPro Setup > Resources > Resources System Settings.
d.Lock Charges: Selecting the Lock Charges checkbox will lock the Charges at the set amounts and prevent changes to any of the Counts.
e.Charge & Cost: The Charge and Cost will depend on several factors, including the Charge Type and Cost Calculation selected in Setup. Review EventPro Setup > Resources > Beverages > Beverage Configurations > Charge & Cost and Configuration Detail (Categories & Items).
f.Discount: If permitted for this Beverage Configuration (check Setup), you may want to add a Discount.
i.Discount Type: Choose the type of discount you want to apply: None, Flat Amount, Percentage, To Cost.
ii.Discount Percentage: If you chose Percentage, enter the percentage number here. The discount amount will be rounded according to the Discount Rounding setting for this Beverage Configuration in Setup.
iii.Discount: If you chose Flat Amount, enter the discount amount here.
g.Notes:
i.There may already be notes under the Notes and Setup Requirements tabs, if notes were entered for the Setup Beverage Configuration. You can add or edit notes for the purposes of this event.
ii.You can also now add notes specific to the Event Client under the Client Requirements tab.
10.Selecting Items and Entering Sold Quantities:
a.Depending on how the Beverage Configuration was set up, Beverage Items may already be Selected under the Configuration tab. However, if you need to select more/any of the Beverage items, you can do so under the Configuration tab of the Event Resource Beverage edit form.
b.You can also enter the Sold Quantity for each Beverage Item, which you may need to track in order to calculate the Charge for this Beverage Configuration. Even if the configuration is based on a flat or per-person charge, you may still want to track the number of beverages sold.
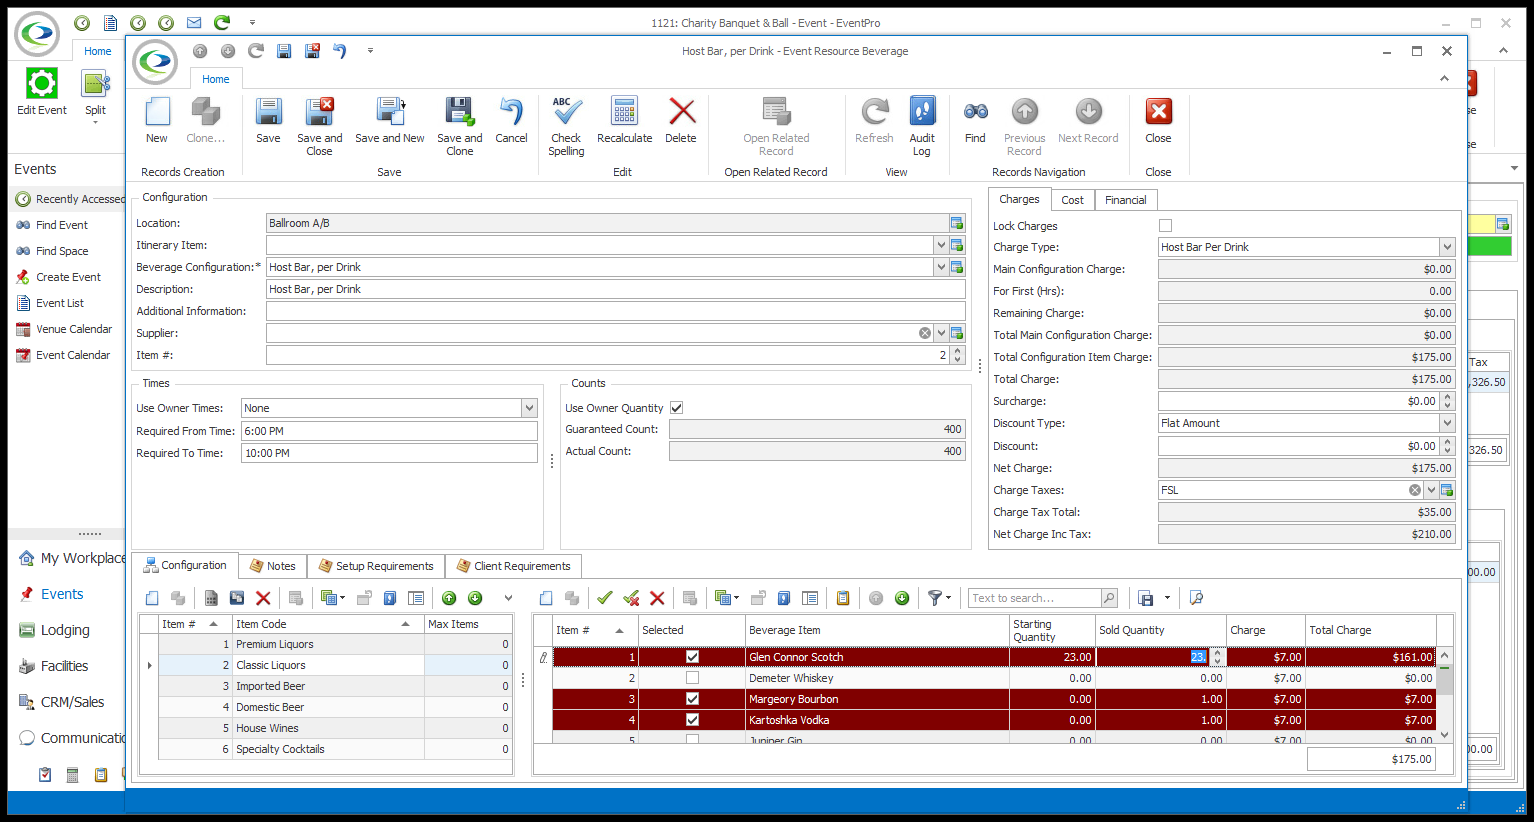
c.Under the Configuration tab, select a Category from the left selection grid.
d.In the Item selection grid to the right, check the Selected checkboxes next to the items you want to add (or select the record and click the green Select checkmark icon above the grid).
Remember that you may be limited to selecting only a certain number of items per category if you set a Max Items number when setting up Categories in your Beverage Configurations. (Review Add Beverage Config Categories in Setup.)
e.If you need to enter a Sold Quantity for a selected Beverage Item, click the Item record and click again in the Sold Quantity field. Enter the sold quantity for the item.
You will note that the Sold Quantity for the selected Item defaults to 1 (one) if you have activated the "Catering Beverage Default Item Count" System Setting under EventPro Setup > Resources > Resources System Settings.
f.To make any changes to any of the Beverage Items - including to the Selected and Sold Quantity fields - you can also double-click on the Item in the selection grid to open the Resource Beverage Configuration Item edit form.
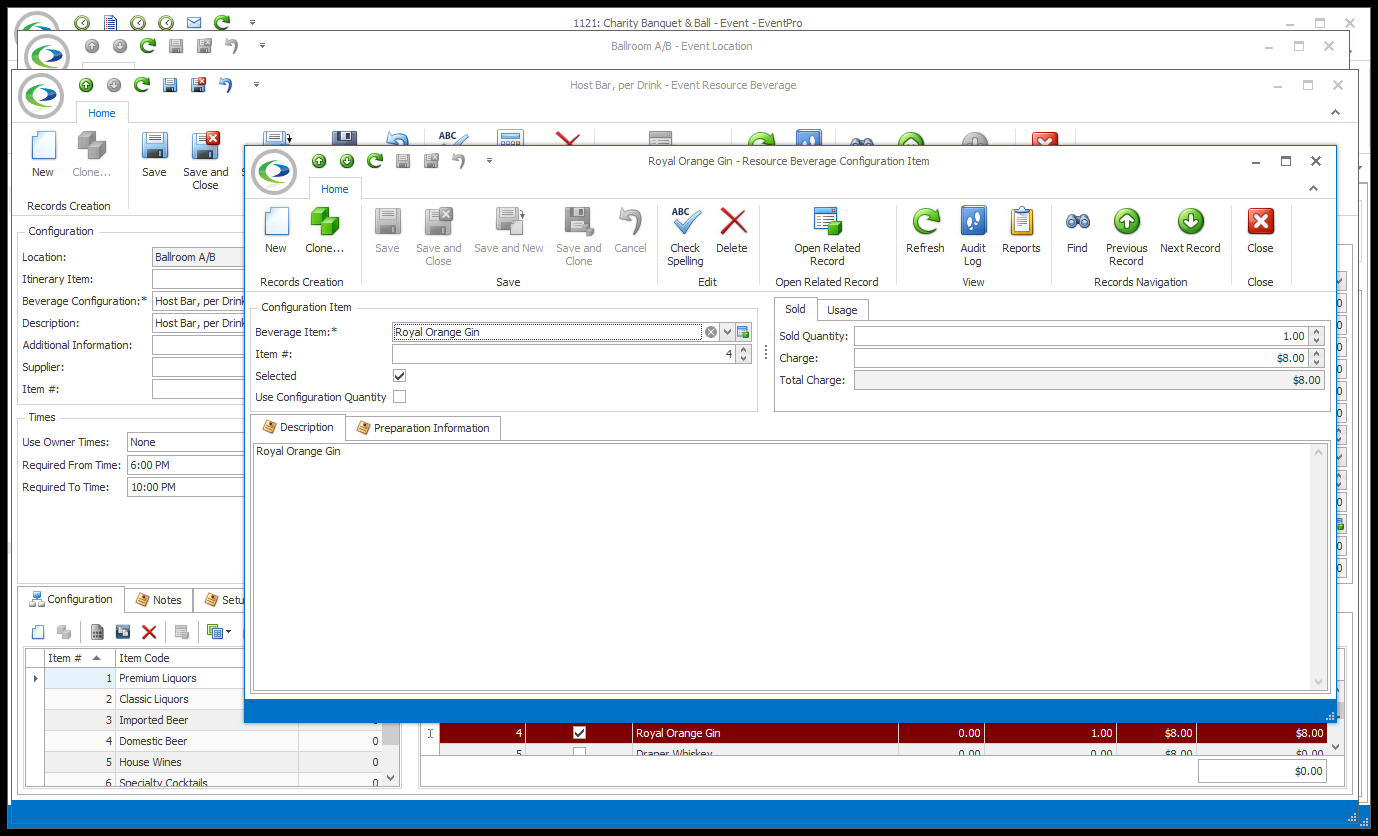
i.Under the Usage tab, you can track more detailed beverage numbers, including Starting Quantity, Additional Quantity, and Ending Quantity.
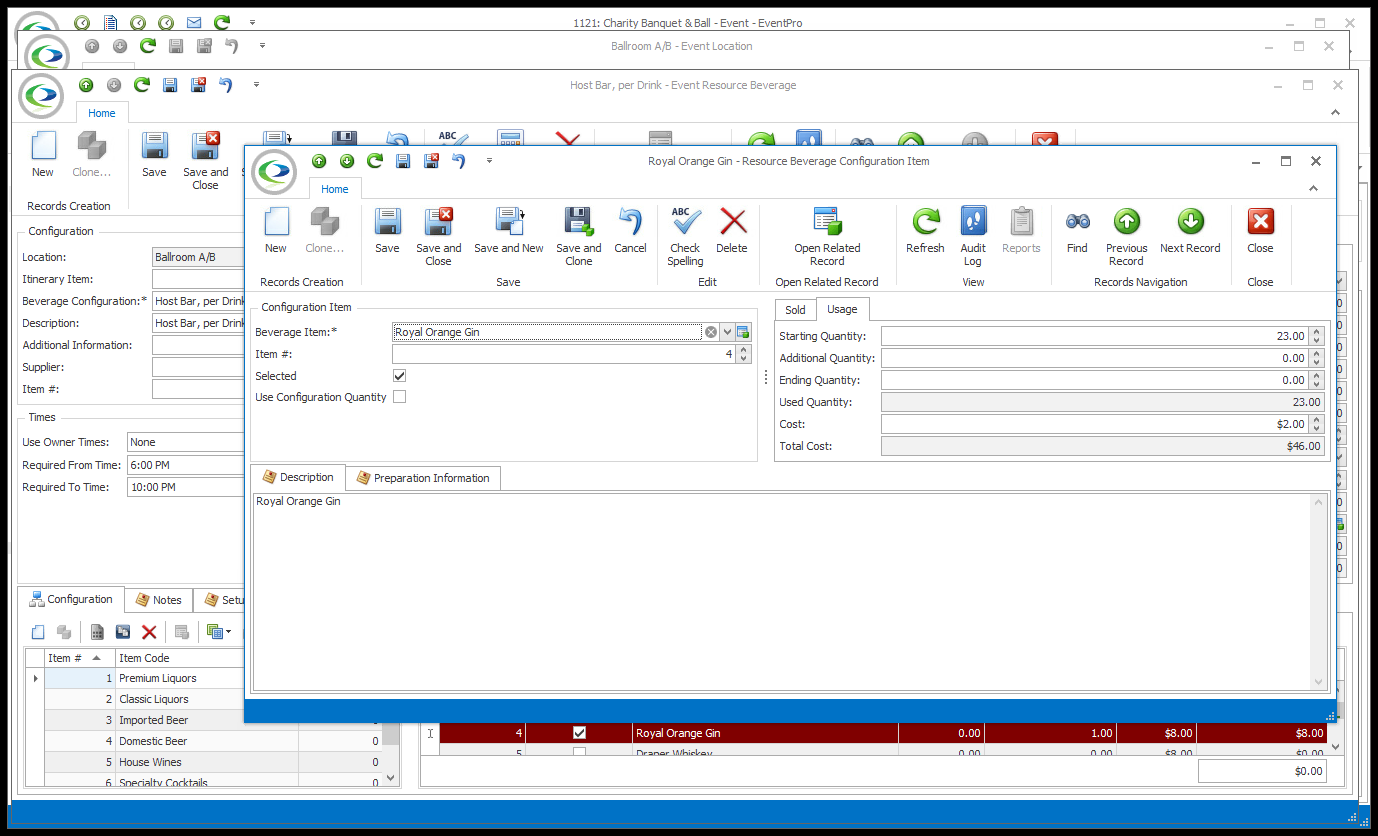
ii.Starting Quantity: The number of beverages you open or start with.
iii.Additional Quantity: The number of beverages added to the starting number of beverages.
iv.Ending Quantity: The number of beverages left unused at the end of the event.
v.Used Quantity = Starting + Additional - Ending.
vi.If you only want to keep track of alcohol used, you can simply manually enter the number in the Used field. However, the Starting/Additional/Ending fields are useful if there is a discrepancy in the amount charged to the client and the actual amount used, i.e. if you charge a client for a certain rounded-up amount of alcohol, while there are still some amounts remaining in the inventory, which could be used at a different event.
vii.For example, say that you sell wine to event clients per 12-bottle case. An event client requests that you begin with 6 bottles of wine on the table, so your Starting figure would be 6. Over the course of the event, the client asks for 5 more bottles, so the Additional number is 5. Since the event guests only consumed 1 out of 12 bottles, the Ending number would be 1. Therefore, the Used number of bottles equals 11. You may still charge the client for the case of wine, but there is one bottle of wine left over in your inventory.
viii.You could also use the Usage fields to record how many bottles of hard liquor you use for an event. For example, you may estimate that you require two 750 ml bottles of liquor for an event, each containing approximately 17 servings (Opening = 34). At the end of the event, there are still 4 servings remaining (Ending = 4) so that the total number of liquor servings Used = 30. You may still charge the client for both bottles, as they were both opened, but you can record precisely how much alcohol was used.
g.When you are done in the Resource Beverage Configuration Item edit form, click Save and Close to return to the Beverage Configuration in the Event Resource Beverage edit form.
h.To otherwise add or edit categories and items in the Beverage Configuration, review EventPro Setup > Resources > Beverages > Create Setup Resource Beverage Configurations > Configuration Detail.
11.If you need to edit anything else in the Beverage Configuration, review EventPro Setup > Resources > Beverages > Create Setup Resource Beverage Configuration.
12.When the Event Beverage Configuration is adjusted to your satisfaction, click Save and Close in the Event Resource Beverage edit form.
13.You will return to the Event Location edit form.
14.In the Event Location edit form, the Beverage Configuration will be added under the Beverages tab.