•This Settings tab includes several important fields for the proper functioning of your Calendar Assistant. Note that you will not necessarily see all of the fields described below, depending on your selections.
1.Export: Choose how you want EventPro to export the events to the other Calendar: Event Days, Event Locations, or Event.
Depending on which Export option you selected, the options and fields below will vary.
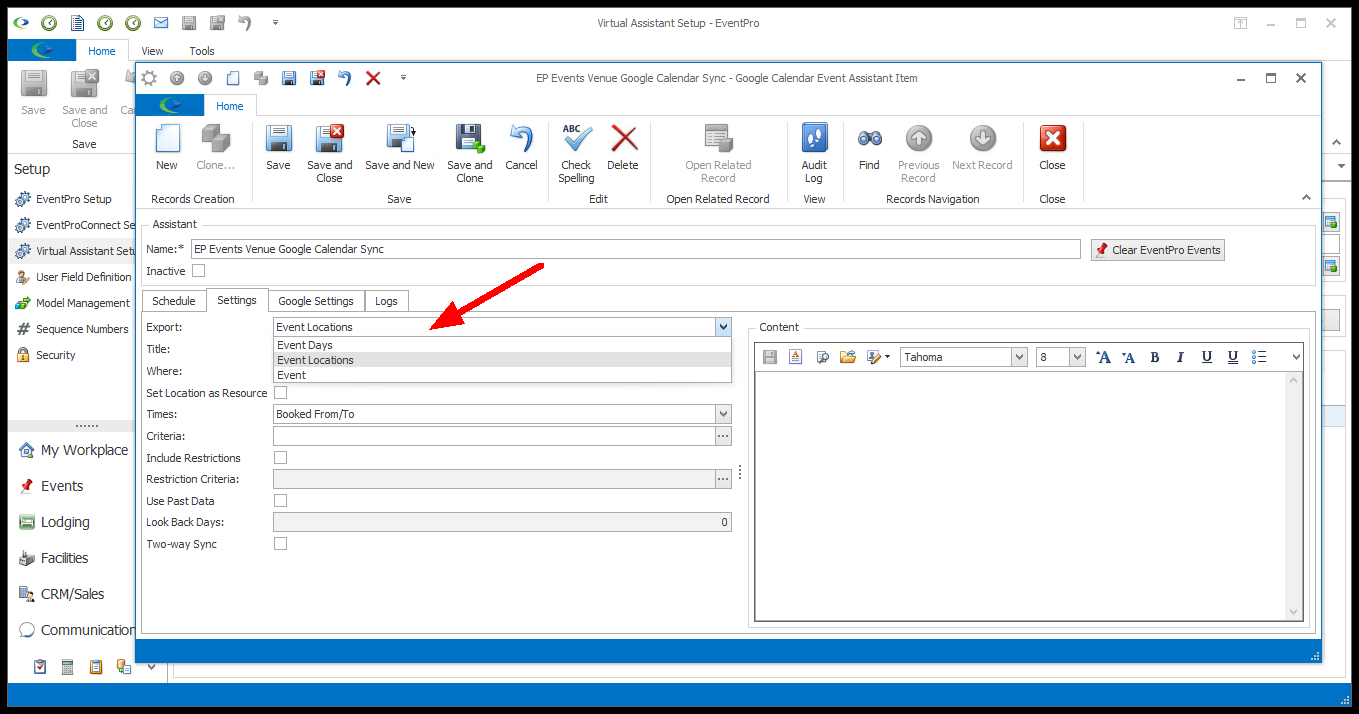
a.Event Days: This export option generates one appointment per day for the days on which the event occurs. Even if there are multiple booked locations on a given day, the calendar will display only one appointment on that day, from the start time of the earliest booked location to the end time of the latest booked location.
b.Event Locations: This export option will generate an appointment for each booked location in the event, which will result in multiple appointments in a day if there are multiple booked locations on that day.
i.IMPORTANT: If you want to use Two-Way Sync and/or the Set Location as Resource option for this calendar (Google or Exchange only), you need to select Event Locations for the Export option.
c.Event: This export option generates one appointment that runs continuously from the start time of the earliest booked location to the end time of the last booked location.
To see how the Export options would be displayed on different calendars, you can view the Google Calendar Examples, Exchange Calendar Examples, and Outlook Calendar Examples below.
2.Title: This field determines what will appear as the Event Title (Google, Exchange) or Subject (Outlook) when published to the other calendar.
Note that the Title field is not available for 2-Way Sync.
a.The Title field will default to the Event Name merge field, which will pull in the name of each Event exported.
b.If you want, you can add other merge fields to change what is displayed. You could, for example, add the Booking # to the Title.
c.In another example, if using the Event Locations export, you could add or use the Booked Locations' Description in addition to, or instead of, the Event Name.
i.So, for example, let's say you have a multi-location event named "Business Seminar", but the individual location descriptions are "Session 1", "Session 2", and "Session 3".
ii.Using the Event Name merge field will cause all three calendar appointments to be titled "Business Seminar", whereas using the Description merge field will cause the calendar appointments to be titled "Session 1", "Session 2", and "Session 3", respectively.
iii.However, depending on how you edited your Event, the Event Name and Description could be the same. If you open the Event in the Event Screen, you can compare the Event Name in the header to the Descriptions on the locations under the Event Detail > Booked Locations tab.
d.To add a merge field to the Title field, place the cursor in the position where you want the merge field to be. Click the ellipsis to the right of the field to open the merge field window. Double-click on the field you want to use, and click OK.

e.The merge field will be added to the Title. You can add characters like colons, commas, periods, and spaces.
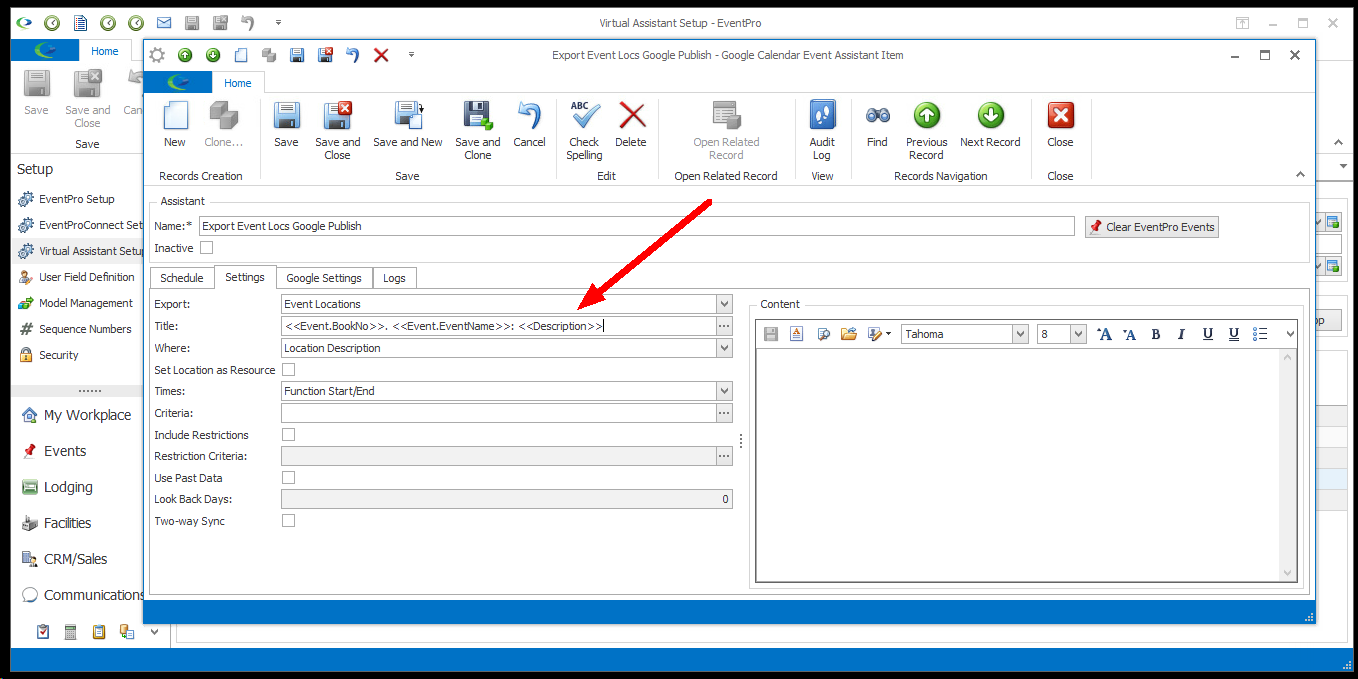
f.To delete a merge field in the Title field, click to highlight the field, and press Delete.
To see how different Title options would be displayed, you can see Google Calendar Examples and Outlook Calendar Examples below.
3.Where: From the drop-down list, choose what you want displayed as the Event's Location in the Google, Exchange, or Outlook calendar.
The options for this field will vary, depending on which Export option you selected. For the Event Days and Event exports, you can only select from Event City or License Address. For the Event Location export, you can select from Location Address, Location Name, Location Description, License Address, Event City, or Location External ID.
Location versus Room/Resource: Note that in a Google or Exchange Calendar, the Location and Room/Resource are two different fields. The Google/Exchange event's Location is determined by this Where field selection. The Google/Exchange event's Room/Resource is set by the linked EventPro Venue Locations (review Linked Locations & Rooms).
a.Event City: You can find the Event City in the Event Edit window; review Event Management > Event Edit Window > Description.
b.License Address: The License Address is from your EventPro software license. You can view the address in the About dialog; review Navigation and User Interface > EventPro - About.

c.Location Name, Location Description, and Location Address: These values are defined for the individual Venue Locations in Venue Setup. Review EventPro Setup > Facilities (Venue/Hotel) > Venue Information > Venue Locations > Add Location.
d.Location External ID: The External ID is a specialized field on the Setup Venue Location edit form that is only visible if the edit form has been customized. If the External ID field is not visible, and you require assistance with customizing the form, please contact EventPro Support or your EventPro Trainer. If the External ID field has been made available, and you have entered IDs on the Venue Locations, they can be used for the "Where" field of the calendar appointments.
IMPORTANT: If you are using this Assistant for 2-Way Sync between EventPro and Google or Exchange without setting Locations as Resources (see below), you need to use Location Name or Location External ID.

To see how different Where options would be displayed, you can see the Google Calendar Examples and Outlook Calendar Examples below.
4.Set Location as Resource: This field is only available for the Event Location Export type, and only for an Exchange or Google Calendar Assistant.
The following points will explain the effect of having the “Set Location as Resource” setting on or off when the Virtual Assistant is publishing events to a Google/Exchange calendar or retrieving events from a Google/Exchange Calendar.
a.Set Location as Resource ON:
IMPORTANT: In order to use the “Set Location as Resource” setting, your EventPro Venue Locations need to be connected to the Rooms in your Google/Exchange Calendar; review Linked Locations & Rooms.
i.Publishing events to Google/Exchange Calendar: In the Google/Exchange Calendar, the event's Room is set to the Google/Exchange Room linked to the EventPro Venue Location. (The Location field of the Google/Exchange appointment will be set to the option you selected for the Where field. The Room/Resource and Location are two different fields.)
ii.Syncing events back to EventPro: When booking the appointment in the Google/Exchange Calendar, you will be able to select a Room from a list. If set up correctly, those Rooms are connected to the corresponding EventPro Venue Locations, and the new event booking will be assigned to the correct Venue Location in EventPro. (You can see an example of how this works at Sync Location/Room Examples.)
(See also the Two-Way Sync setting below.)
b.Set Location as Resource OFF:
i.Publishing events to Google/Exchange Calendar: In the Google/Exchange calendar, the event's Location will be set to whatever was selected for the Virtual Assistant's Where field, e.g. Event City, Location Name, Location Description, etc.
ii.Syncing events back to EventPro: Even if the “Set Location as Resource” setting is turned off, you can still have Google/Exchange appointments sync back to the correct EventPro locations, but you need to manually enter the Location instead of selecting a Room from a list.
When booking the appointment in the Google/Exchange calendar, you will manually type the EventPro Location Name or External ID into the appointment's Location field. As noted above, if you intend to sync event locations with this method, you should set the assistant's Where field to Location Name or Location External ID. The Location Name or External ID you type has to exactly match how it appears in EventPro Setup, including case sensitivity. You may want to review the Location Names or External IDs you intend to use; see EventPro Setup > Facilities (Venue/Hotel) > Venue Information > Venue Locations > Add Location.
If the manually entered Location Name or External ID matches the EventPro Venue Location, EventPro will sync the Google/Exchange event booking into the correct EventPro location.
(See also Two-Way Sync below.)
a.If you selected Event Days or Event Locations as the export type above, use this drop-down list to indicate whether you want to use the Function Start/End times (the Function Start Time/Function End Time within the booked location (which will exclude any setup or teardown time), or the Booked From/To times (the start and end times for the event booking, including any setup time before and teardown time after the function). If necessary, you can review the difference between Function and Booked times under Booking Events > Terminology: Events, Booked Locations & Functions.
b.For the Event export type, you cannot select the Times used. They will be set to Booked From/To.
To see how different Times would be displayed, you can see the Google Calendar Examples, Exchange Calendar Examples, and Outlook Calendar Examples below.
6.Criteria: You can filter the events to be exported, which allows you to create multiple calendars displaying different information. For example, you could create a calendar that displays only events of a certain Status, or events booked in certain Locations.
a.Click the ellipsis (...) to the right of the Criteria field.
b.The Advanced Filtering window opens.
c.Make your selections under the Locations and/or Events tabs, as you require.
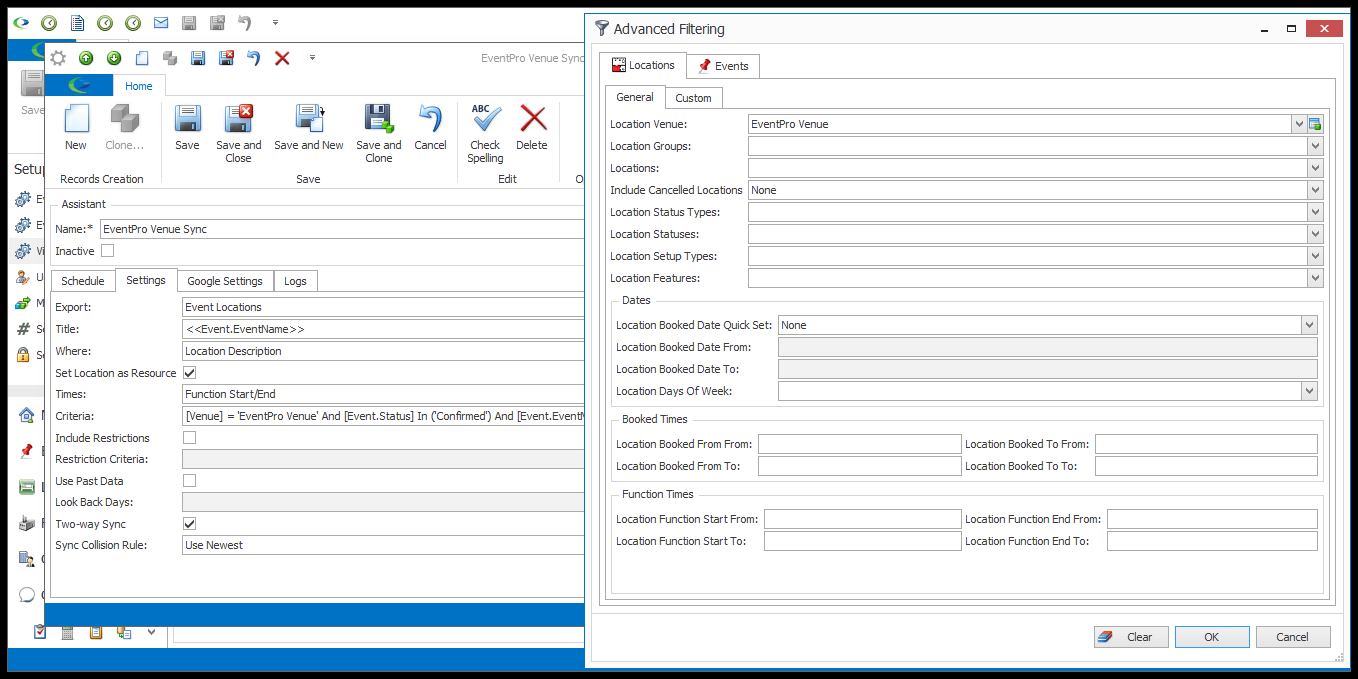
d.If you want to remove all criteria selections and start over, click the Clear button.
e.Click OK to return to the Calendar Event Assistant Item edit form. You will see the filtering selections in the Criteria field.
7.Include Restrictions: If you want the calendar to display any Restrictions from your EventPro Calendar, select this checkbox.
8.Restrictions Criteria: If you choose to display Restrictions, you can also set filtering Criteria on them so that only certain Restrictions appear.
a.Click the ellipsis (...) in the Restriction Criteria field.
b.The Advanced Filtering window opens.
c.Enter the filter conditions you want to apply, referring back to the instructions under Common Procedures | Construct Filters, if required.
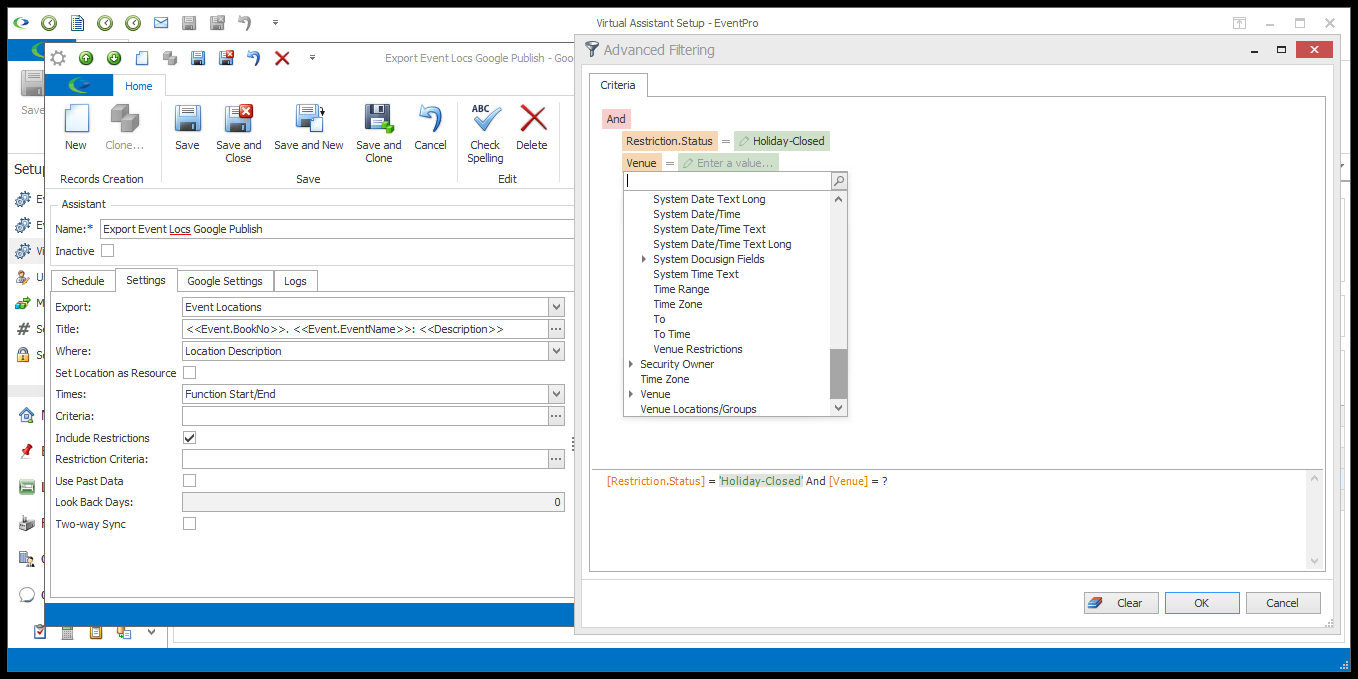
d.Click OK to return to the Calendar Event Assistant Item edit form. You will see the filtering selections in the Restriction Criteria field.
9.Use Past Data: Select this checkbox if you want the calendar to display past events. If you do not select this checkbox, the calendar will only display events from the current date forward.
10.Look Back Days: If you selected the Use Past Data checkbox above, select the number of days back from the current date for which the calendar will display events.
11.Content: The text you enter in this Content area will be displayed in the event description in a Google or Exchange Calendar, or the appointment memo field in an Outlook Calendar.
a.You can type directly into the Content memo space, or click the Word Processor button to open the full Word Processor.
b.In the Word Processor, you will see the Merge Fields available for the Export type you selected (Event Location, Event Day, or Event). To review how to add Merge Fields to a document, see Document Management > Letter Templates > Content & Merge Fields. When you are done with the Word Processor and want to return to the Calendar Event Assistant Item edit form, click Save.
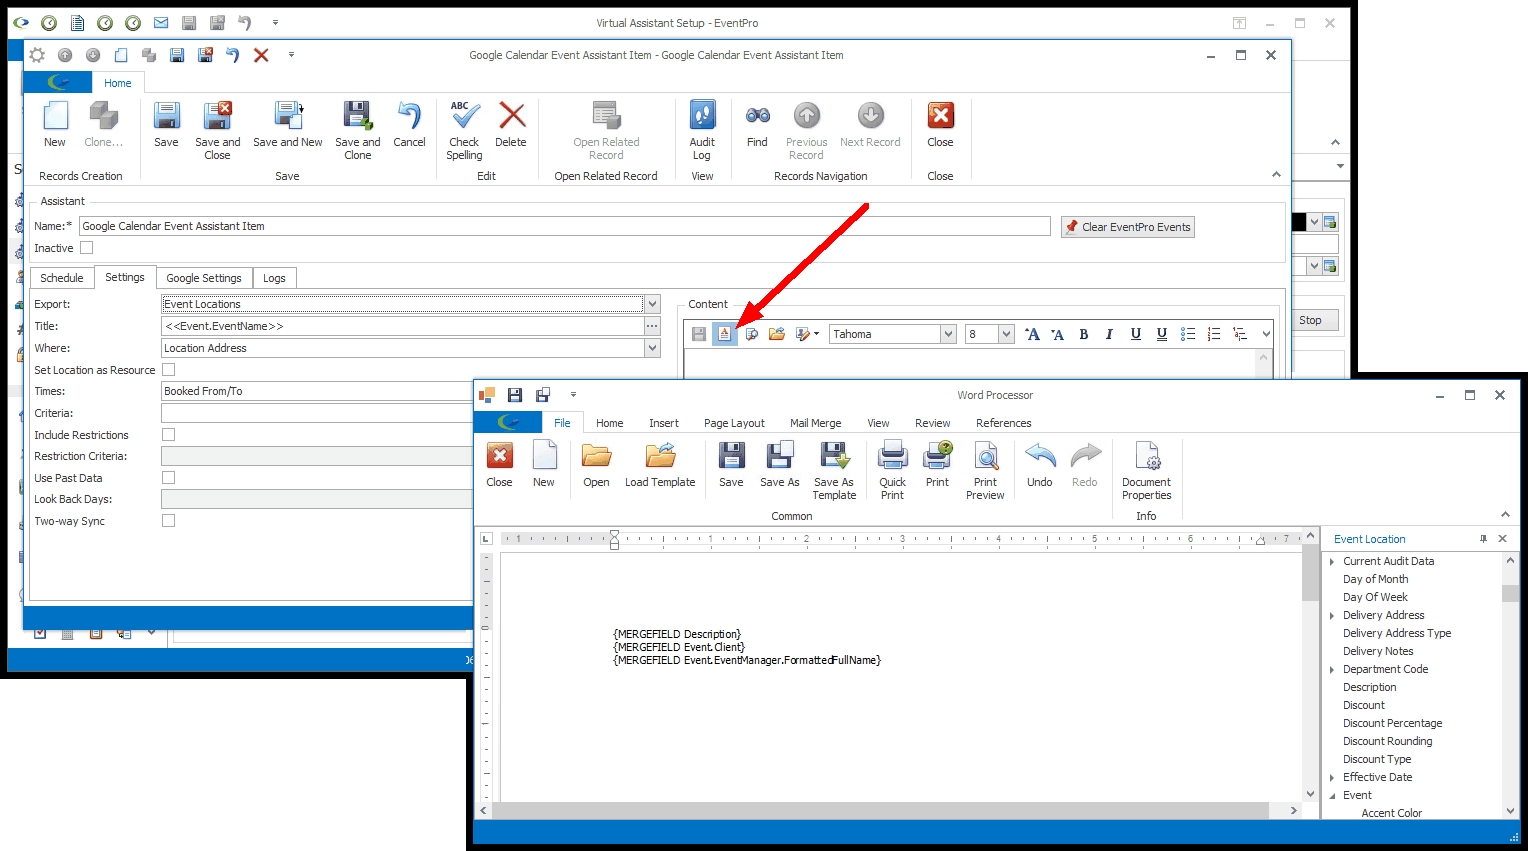
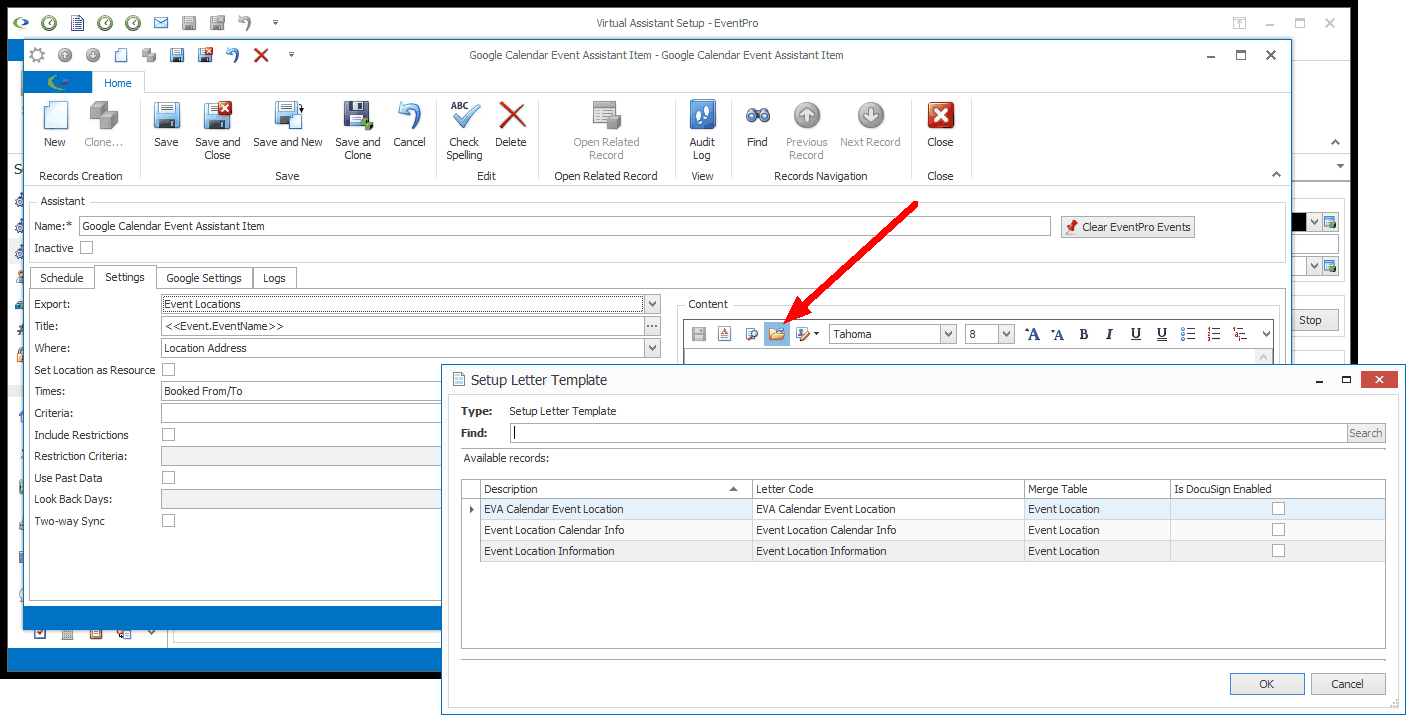
c.For the Export types Event Location or Event, you also have the option to Load an existing Letter Template from Setup, if you have any Letter Templates prepared for the relevant Merge Table: Event Location or Event. Click the Load Template button, select the template you want to use from the Setup Letter Template window, and click OK. If you don't see any templates available, it most likely means that no templates have been created for the relevant Merge Table. To review how to create letter templates, see Document Management > Letter Templates.
d.Note that this Content field will be unavailable if you activate Two-Way Sync.
To see an example of merged Content in an online calendar, you can view the Google Calendar Examples and Outlook Calendar Examples below.
12.Two-Way Sync: This field is only available if you selected the Event Location export type, and only for an Exchange or Google calendar. Note that this functionality is part of the EVA-Calendar Sync Assistant, not EVA-Calendar Publish.
a.Select this checkbox to enable 2-way sync, which will pull event locations booked from a Google or Exchange Calendars back into EventPro.
13.Sync Collision Rule: If you have enabled Two-Way Sync, this setting determines what happens when an Event is edited differently from both EventPro and the other calendar, i.e. whether the Event will use the information entered from EventPro (Use EventPro), from the other calendar (Use Calendar), or the most recent information (Use Newest).
For example, let's say one person changes the Event Name from EventPro, and another person changes the Event Name from the Google Calendar. On the next sync, the Sync Collision Rule determines which Event Name will prevail:
a.Use EventPro: The Event Name entered from EventPro.
b.Use Calendar: The Event Name entered from the Google Calendar.
c.Use Newest: Whichever Event Name was entered last.
14.Next, you will go to the tab containing settings specific to the type of Calendar you are using:
c.Transfer Settings (Typically for Outlook, but this Calendar Assistant can publish events to a variety of calendar applications that accept an iCal subscription.)