This Process Overview demonstrates the Attendee New Registration process as viewed by a user in an internet browser.
A typical registration process will work through these pages, although not necessarily all of them in every situation:
If you allow group registrations for Attendees, the group registration wizard has many of the same pages as the individual registration wizard, since the wizards are controlled by the same Page Definitions.
However, there are two specialized pages for group registrations:
•Registration Attendees (Group)
Also, even though they are controlled by the same Page Definitions, the group registration versions of these two pages look different from the corresponding pages in the individual registration wizard, since the group registration wizard needs to display information for multiple attendees:
The screenshots below provide examples of what the web pages could look like, but remember that your pages will look different for several reasons:
•You customized the logo, icons, color scheme, and other components.
•You selected different options (e.g. showing/hiding components, changing caption/message text, etc.) for the New Attendee Registration Area Definition and the Page Definitions within.
•Your web pages will display the registration groups, requirements, etc. from your EventPro data.
Start Registration (From Home Page)
Note that your Attendees will not start the registration wizard at this point if you sent them a New Attendee EPConnect Link that bypasses the login process.
The Attendee selects New Attendee Registration from the Attendee menu option, which is controlled by the Attendees Area Definition.
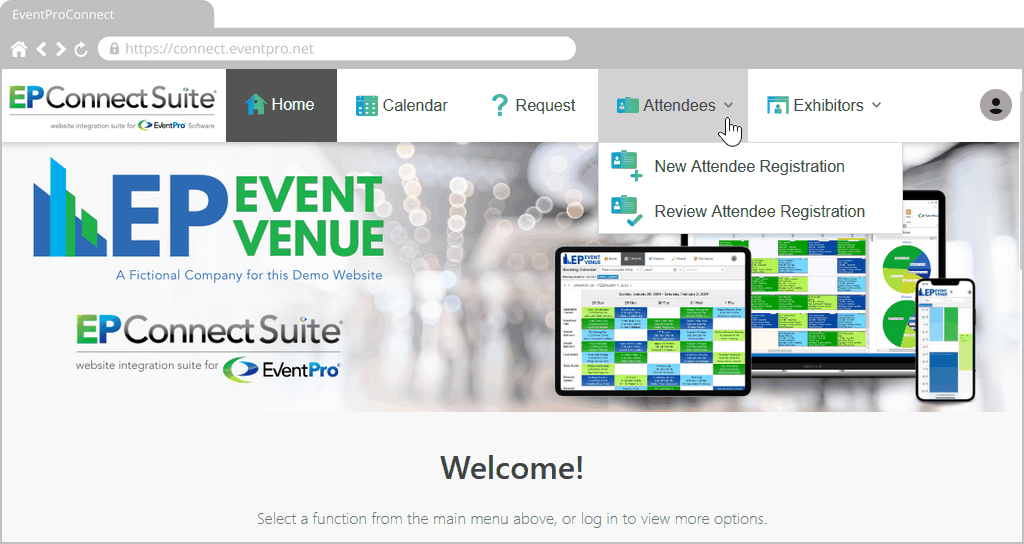
Figure 706: Start a New Attendee Registration
Select Event
The Attendee enters the relevant Booking # and Password, and clicks Continue.
Again, Attendees may bypass this page if you sent them a New Attendee EPConnect Link containing this information.
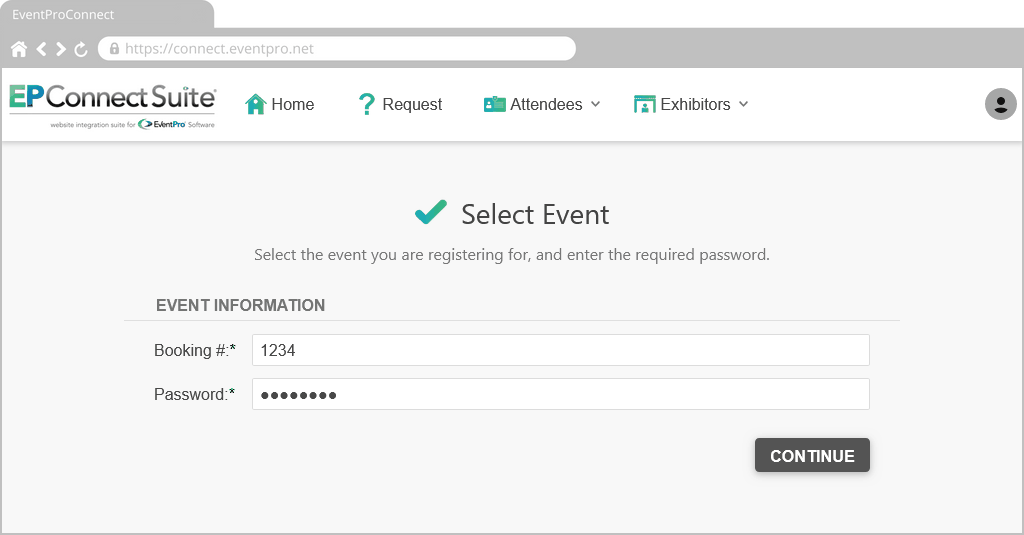
Figure 707: Select the Event to Register For
Welcome (Begin Wizard)
Page Definition: New Attendee Welcome
The online registrant clicks Next to begin the online registration wizard.
Typically, the online registration will be directed to one of the following pages:
•If this is an individual registration, the online registrant will go the Attendee Type page, unless that page has been deliberately hidden, in which case, they will go to the Contact Information page.
•If this is a group registration, the online registrant will go to the New Registration Attendees page, i.e. the Group Registration Attendees page.
Remember that your registration wizard may be set up differently than these examples, and can even vary for each event.
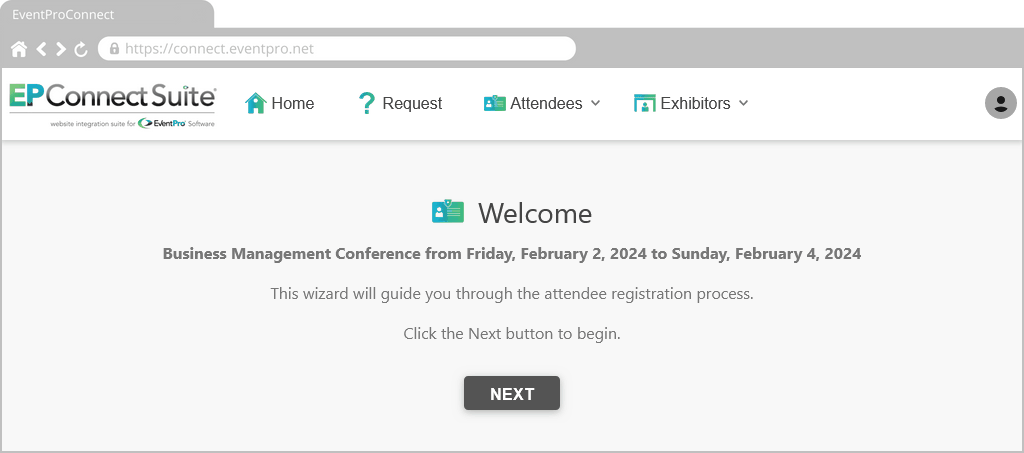
Figure 708: Begin the Registration Wizard
Attendee Type
Page Definition: New Attendee Type
The Attendee selects the relevant Attendee Type from the drop-down list and clicks Next.
If the Attendee has logged in from a provided link, the applicable Attendee Type may already be selected by default.
If this page has been hidden by the event organizer, the Attendee will proceed directly to the Contact Information page.
Selecting an Attendee Type is an important step of the registration process, since the Attendee Type can be used to determine:
•The availability of Registrations and Accommodations, and which variable rate codes to apply.
•Whether certain Contact Information fields appear.
Note that the Attendee Type drop-down list is hard-coded, so you do not need to add or adjust it in the corresponding Page Definition.
However, in order to populate the drop-down list with the relevant Attendee Types, ensure that:
•Attendee Types have been added to Attendee Setup in the corresponding Event. Review the topic Attendee Types under Event Management / Edit Event Window / Attendee Setup.
•Those Attendee Types are set as "Available Online". Review the topic Add New Event Attendee Types under Event Management / Edit Event Window / Attendee Setup.
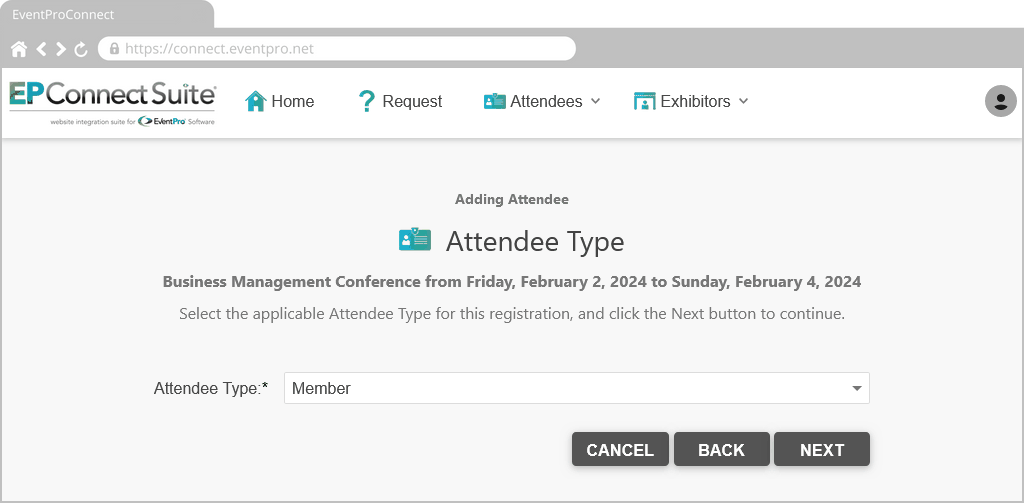
Figure 709: Select an Attendee Type
Contact Information
Page Definition: New Attendee Contact
The Attendee enters their contact information.
Note that different Contact Information fields may appear on this page, depending on the Attendee Type selected above. In the Contact Page Definition, you can set Applicable Attendee Types for Form Field Groups.
When done, the Attendee clicks Next to continue.
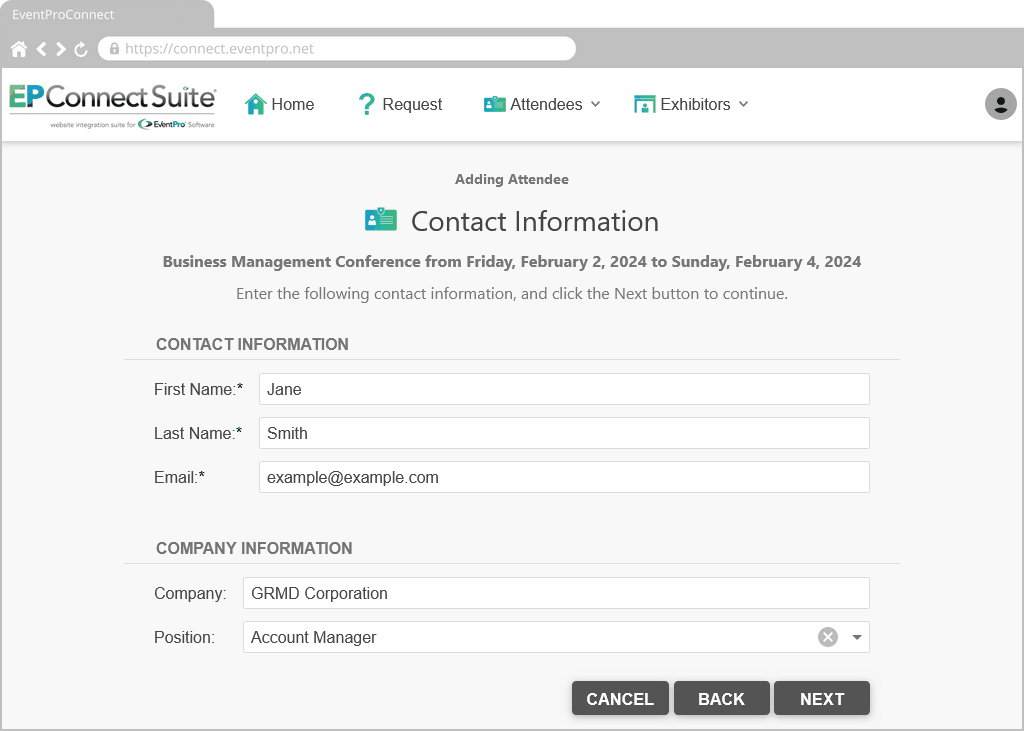
Figure 710: Add Contact Information
If the Show Attach Documents setting has been turned on in the New Attendee Contact - Page Definition, this hard-coded Documents form field group appears at the bottom of the Attendee Contact page.
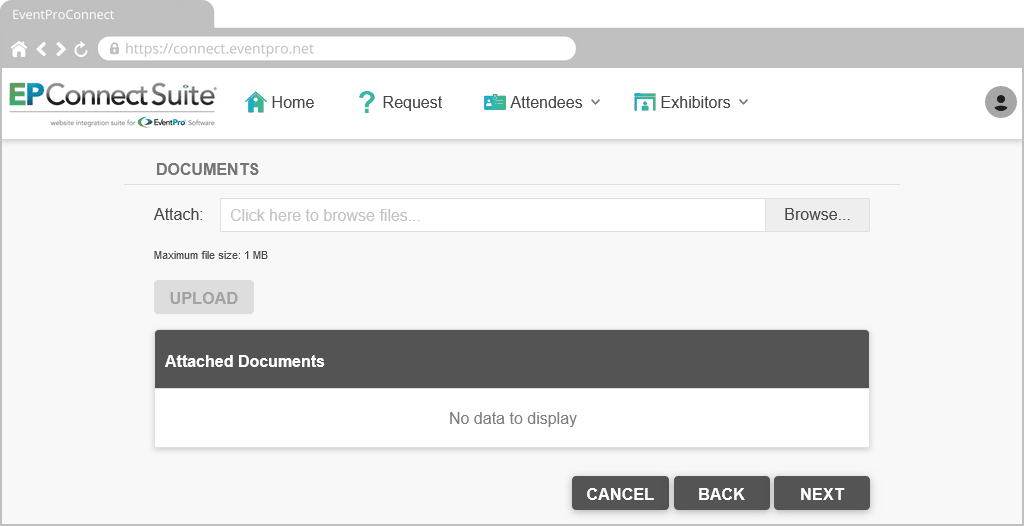
Figure 711: Upload Contact Document
Registration Details
Page Definition: New Attendee Details
The Registrations grid on this page is populated by the Registration Groups you defined for the Event under Event Management / Edit Event Window / Attendee Setup / Attendee Registrations.
•A Registration Group will only appear online if its Available Online setting has been selected.
•A Registration Group will only be visible to registrants belonging to an applicable Attendee Type for that Group. This is one of the reasons Attendee Type is particularly important in the online registration process.
The Registrations grid is mostly hard-coded, but you can determine the appearance of some components in the New Attendee Details - Page Definition.
The online registrant selects the checkboxes next to the Groups and/or Items they want to register for.
The visibility and appearance of certain elements on this page (e.g. Group Descriptions visibility, or Avail column appearance) will depend on settings under the Groups tab in the New Attendee Details - Page Definition.
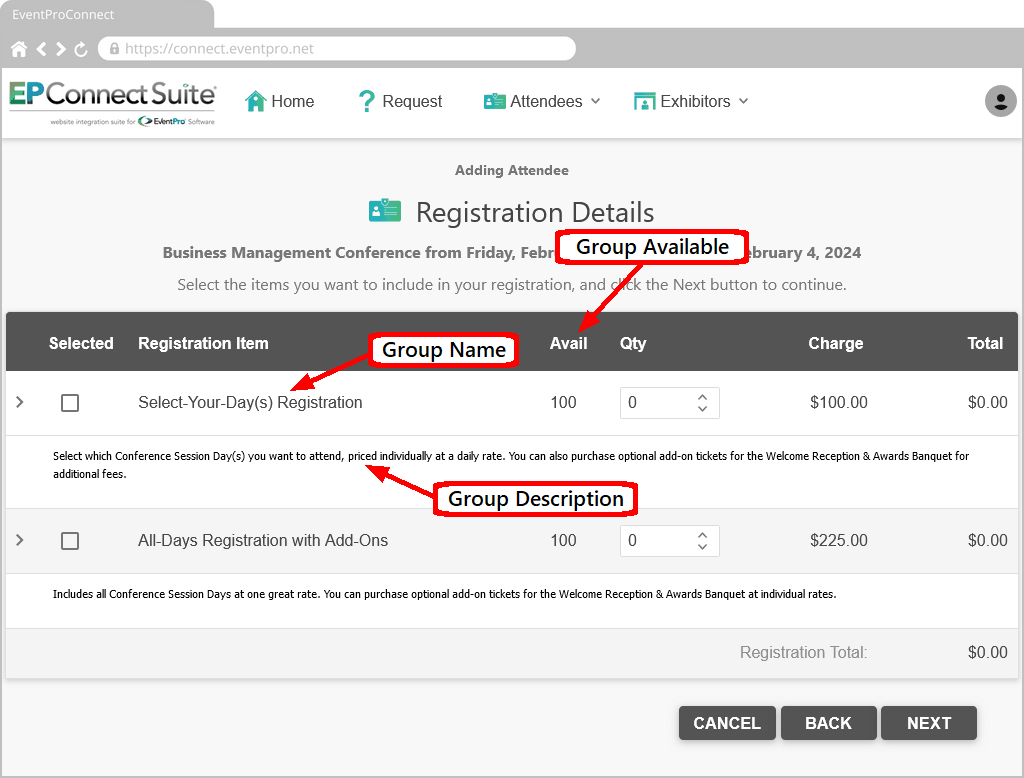
Figure 712: Select Registration Groups
The online registrant may need to expand the registration groups to view the functions/items within.
The visibility and appearance of certain elements on this page (e.g. Item Descriptions/Times visibility, or Avail column appearance) will depend on settings under the Functions/Items tab in the New Attendee Details - Page Definition.
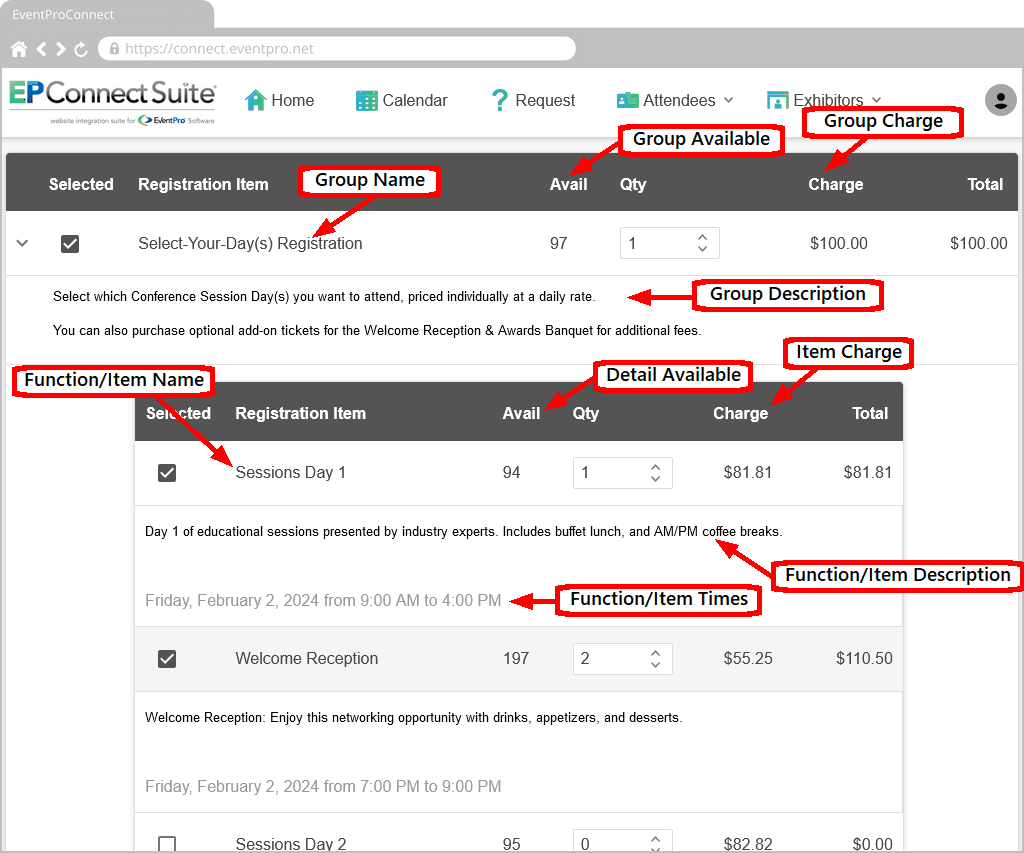
Figure 713: Expand Registration Groups to View Functions
Depending on how you set up the registrations for the event, Attendees may be able to select a registration group in which:
•the functions are all automatically included,
•the functions are optional, and can be selected individually, and/or
•there is a combination of pre-selected/mandatory functions and optional functions.
If the Quantity column is visible, the Attendee can enter quantities for each Item.
When the Attendee is done with this page, they click Next.
If Attendee registration is mandatory for an event, and the Attendee attempts to continue the wizard without choosing any registrations, they will receive a warning dialog.
The mandatory setting is determined in the Event's Online Registration Settings. Review the topic Attendee Settings under Edit Event Window / Online Registration Settings.
The message in the dialog is defined in the New Attendee Details - Page Definition.

Figure 714: Mandatory Registration Message
Accommodations
Page Definition: New Attendee Accommodations
The Accommodations page will initially display the Enter Accommodation Information checkbox, and possibly, the Share Accommodations with Another Attendee checkbox.
Whether one or both checkboxes appear depends on the "Allow Accommodation Sharing" setting in the Page Definition.
•If the "Allow Accommodation Sharing" setting is turned on, the Attendee will see both the Share Accommodations with Another Attendee and Enter Accommodation Information checkboxes.
•If the "Allow Accommodation Sharing" setting is turned off, the Attendee will only see the Enter Accommodation Information checkboxes.
After the Attendee selects a checkbox, the corresponding information and fields will appear below.
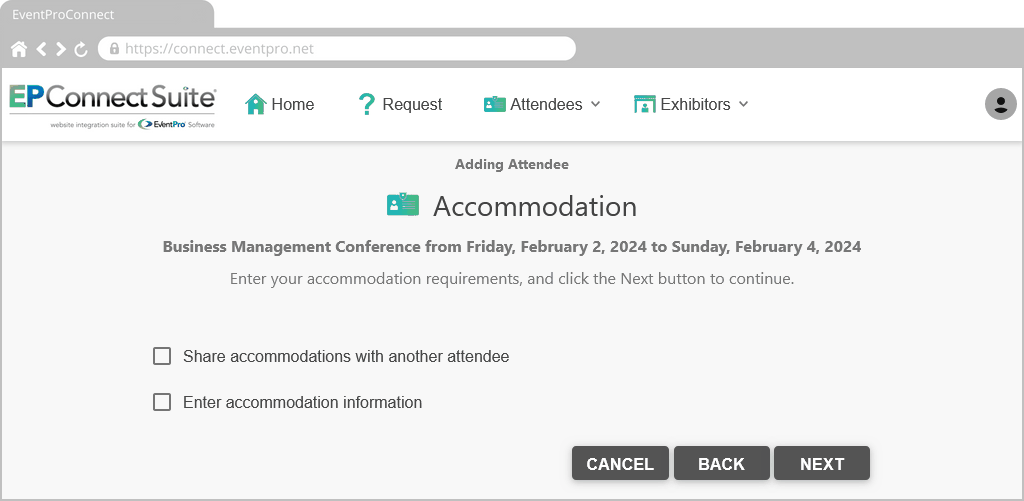
Figure 715: Accommodation Options
Share Accommodations
If the Attendee selects the Share Accommodations with Another Attendee checkbox, the Sharing With field appears below.
The Attendee enters the name of the other Attendee, and clicks Next.
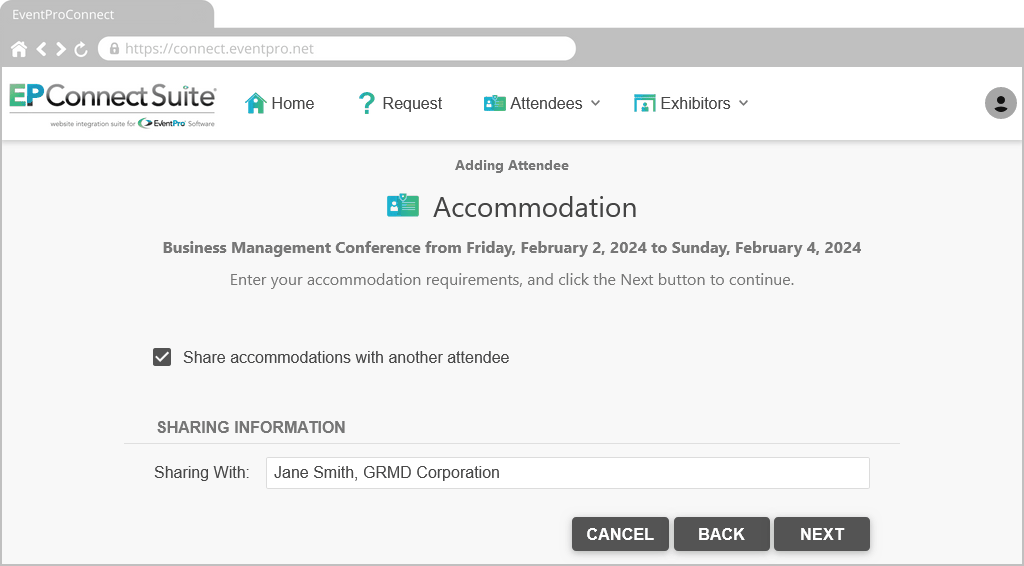
Figure 716: Sharing Accommodations
Enter Accommodation Information
If the Attendee selects the Enter Accommodation Information checkbox, there are two possible outcomes, depending on the "Show Accommodation Selection" setting in the Page Definition.
•Select: If the "Show Accommodation Selection" setting is turned on, the Attendee can select an option from existing accommodation reservations in the Event.
•Enter: If the "Show Accommodation Selection" setting is turned off, the Attendee can enter their accommodation information or requirements manually.
Select
On this version of the Accommodations page, the Attendee selects a Check In Date and Check Out Date to view Accommodation Reservations available for those dates.
The Accommodation Reservations grid displays the Room Types available under each Hotel.
•The reservations would have been set up in the event under Accommodation Room Blocks.
•Note that the reservations need to be marked as "Available Online", and made available to the applicable Attendee Types.
•Review the topic Room Blocks under Accommodations Management.
The Attendee chooses a reservation by clicking on the corresponding row, which is then highlighted.
When done with this page, the Attendee clicks Next.
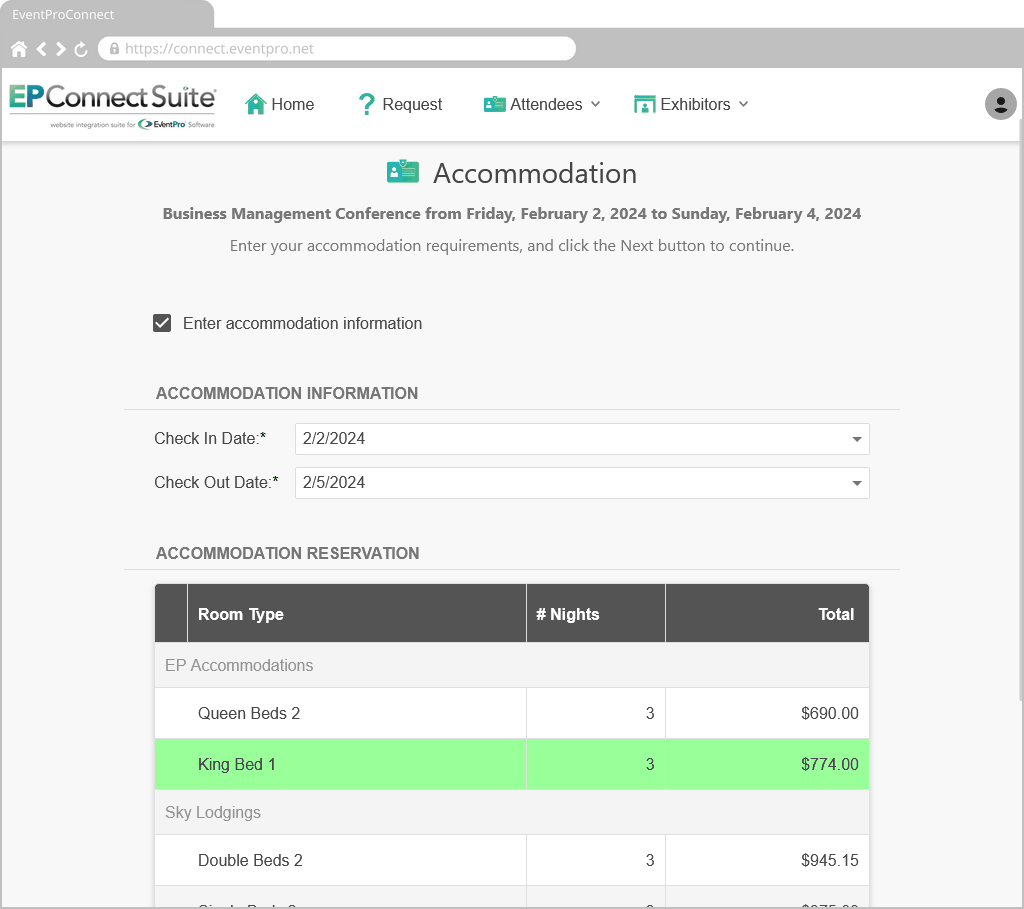
Figure 717: Select Accommodations
Enter
In this version of the Accommodations page, the Attendee enters their own accommodation arrangements or requirements, using the drop-down lists and fields below.
•The Hotel drop-down selection list is populated by those Companies assigned the Relationship Type of "Hotel" in your EventPro CRM and Facilities Setup.
•The Rooms Types were set up for each Hotel under EventPro Setup / Accommodations / Accommodation Room Types.
When the Attendee is done with the Accommodations page, they click Next.
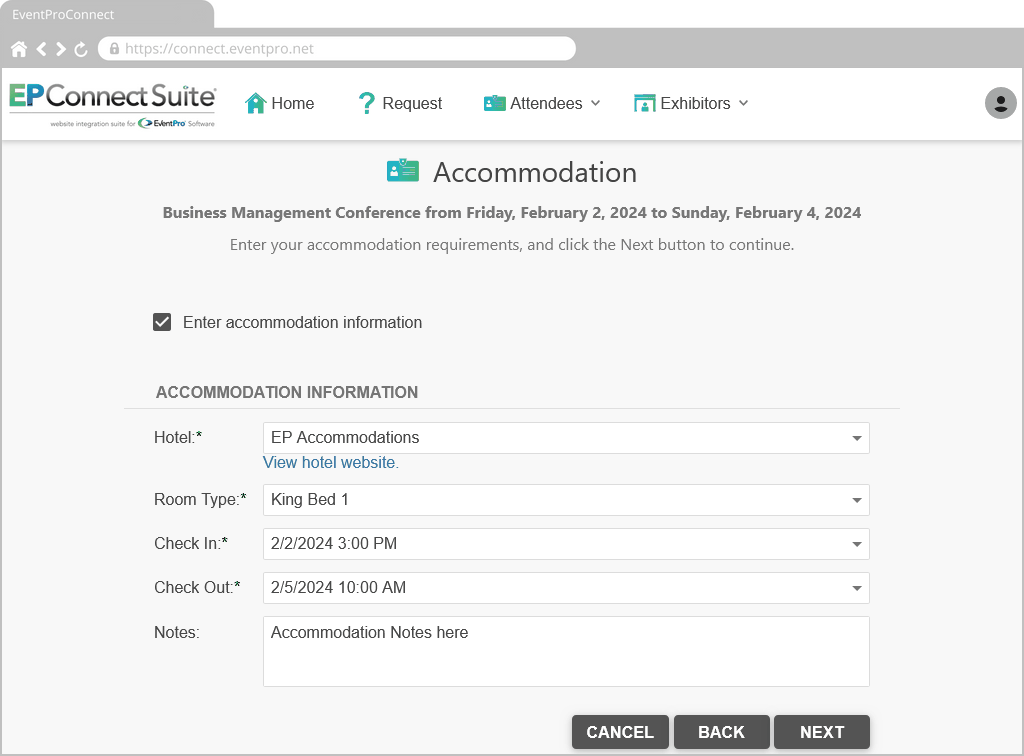
Figure 718: Enter Accommodation Information
Travel
Page Definitions: New Attendee Travel and New Attendee Travel Edit
On the Travel page, the Attendee can enter travel arrangements or requirements.
The grid displayed on this page is defined by the Travel Grid in the New Attendee Travel - Page Definition.
On the Travel page, the Attendee clicks the relevant button: Add Arrival, Add Departure, Add Arrival Connection, or Add Departure Connection.
•The Add Arrival and Add Departure buttons will always be visible.
•However, the Add Arrival Connection and Add Departure Connection buttons will only appear if the Allow Travel Connections checkbox is selected in the page definition.
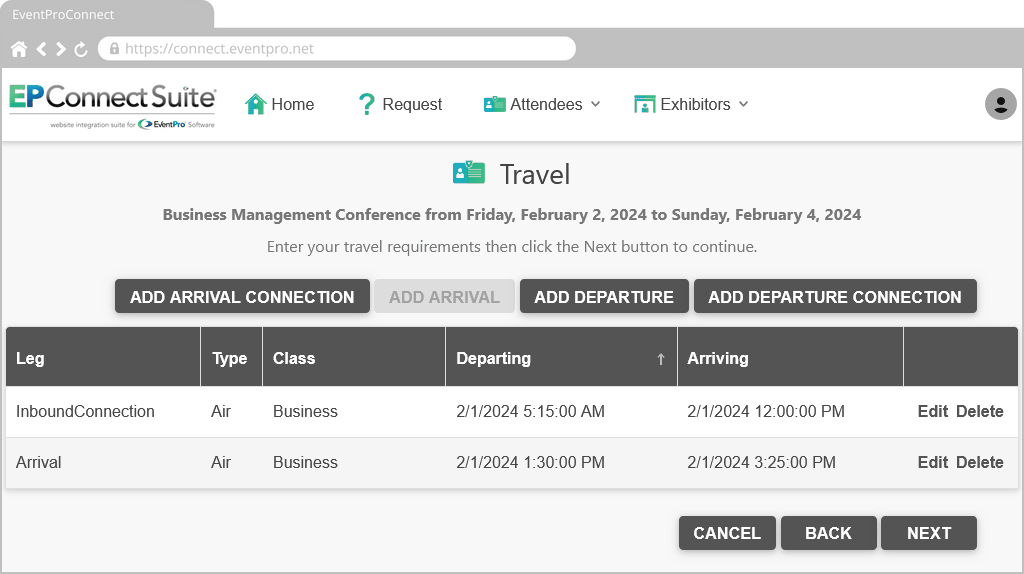
Figure 719: Enter Travel Requirements
The Attendee will be directed to the Edit Travel Leg page, where they can enter the relevant travel information.
The entry fields on this page are determined by the Form Field Group set up in the New Attendee Travel Edit - Page Definition.
The fields on your page may be slightly different, but these are some commonly used fields with drop-down lists populated by existing records in EventPro:
•Travel Type & Travel Class: Review the topic Travel Types.
•Carrier: Review the topic Relationship Types under Add New Company. To appear in this drop-down list, a Company has to be marked as a "Carrier".
•Departing & Arriving: Review the topic Terminals.
Note that the records need to be marked as "Available Online" in order to appear in EPConnect.
When the Attendee is done entering Travel Leg information, they click Submit to return to the Travel page, where the Travel Leg will now appear in the grid.
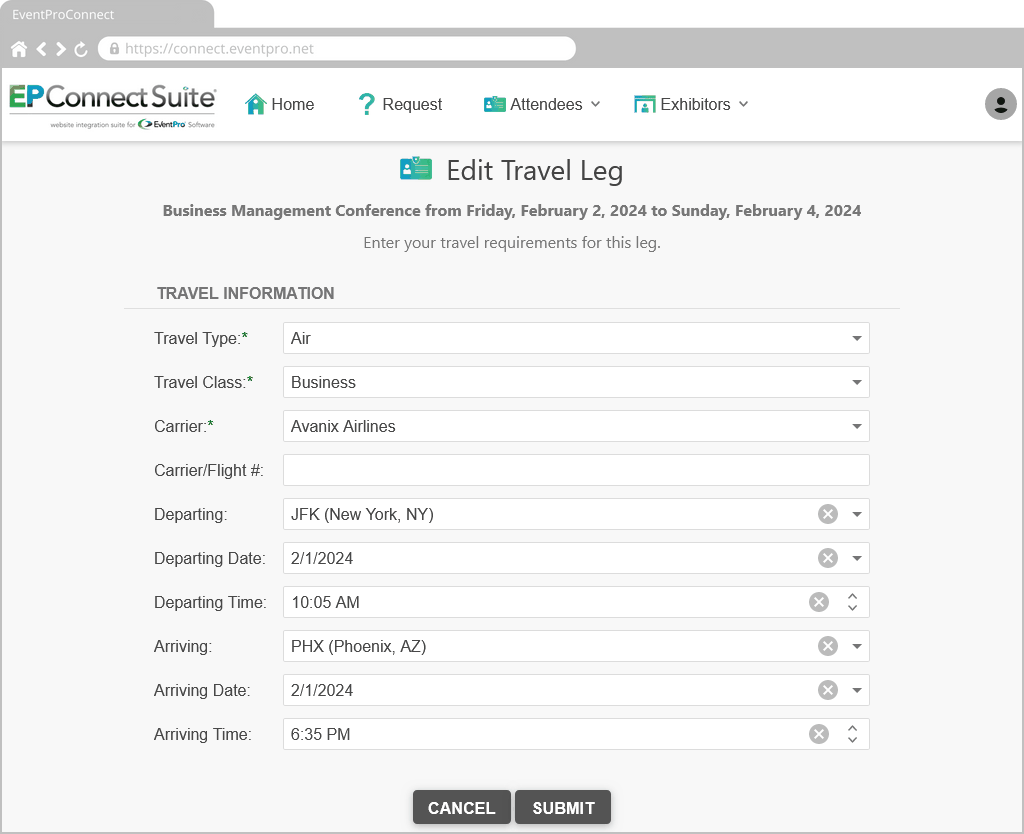
Figure 720: Edit Travel Leg
Back in the Travel page, the Attendee can continue adding Travel Legs as required.
When done adding and reviewing records on the Travel page, the Attendee clicks Next.
Requirements
Page Definition: New Attendee Requirements
This Requirements page allows the Attendee to add resource items to their registration.
The Attendee clicks the Add Requirements button to open the Resource Edit window.
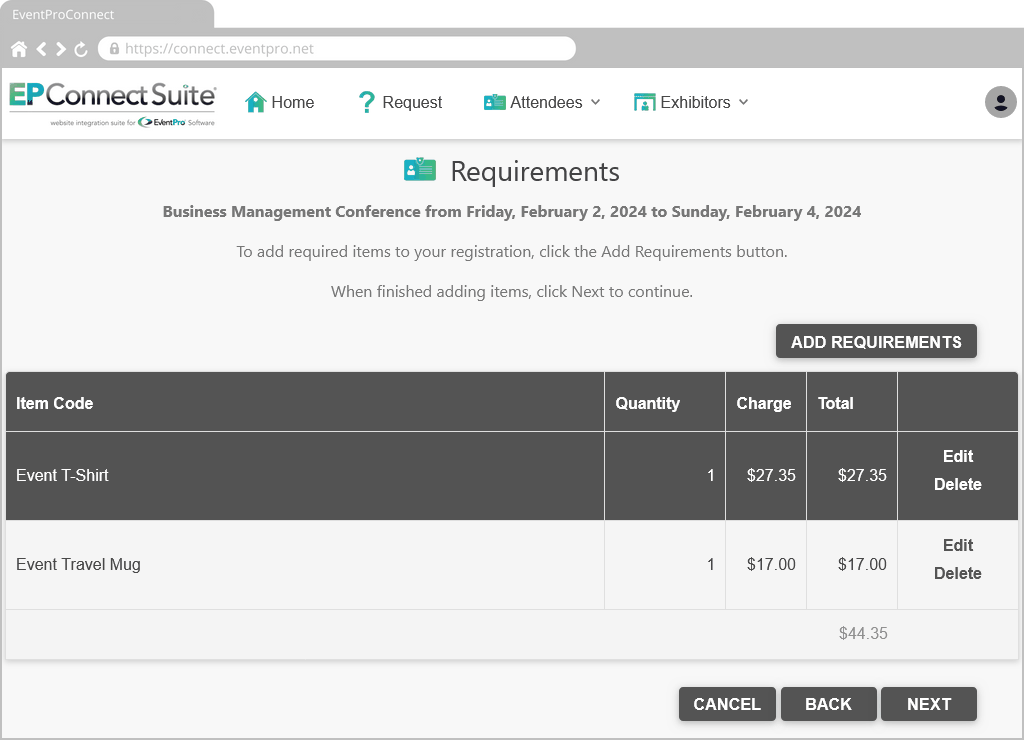
Figure 721: Attendee Requirements Page
In the Resource Edit window, the Attendee selects a Resource Item, and enters the Quantity,
Note that the Resource Item drop-down list is populated by Setup Resource Items marked as Available Online.
The Attendee clicks Submit, which returns them to the Requirements page.
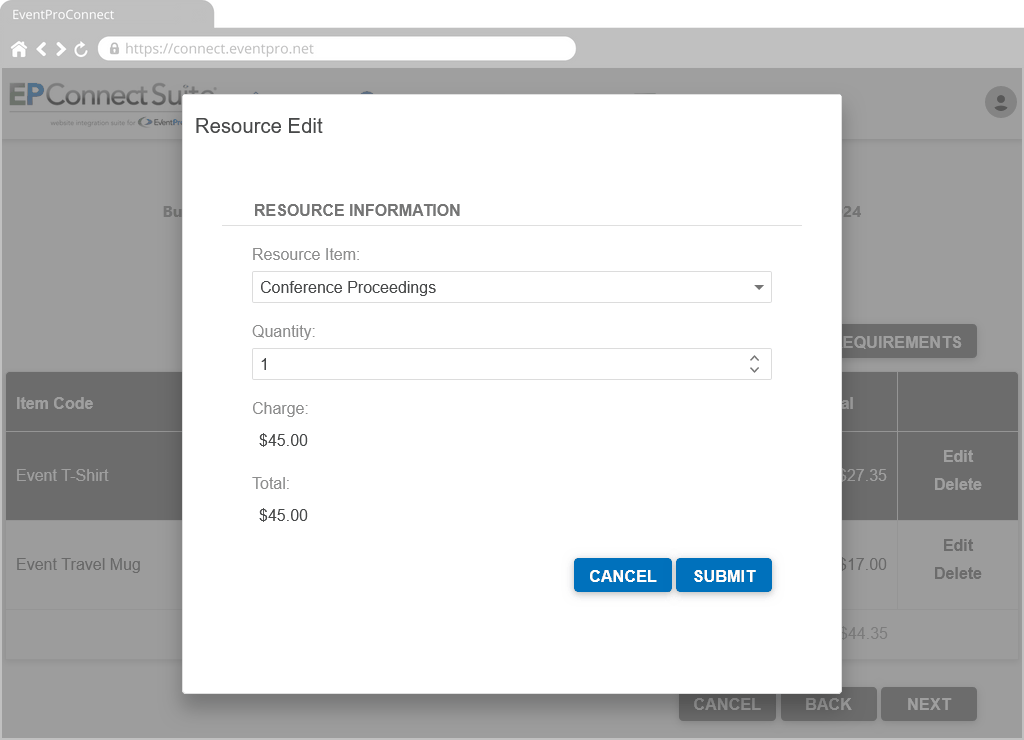
Figure 722: Select Resource Item
Back in the Requirements page, the selected Resource Item will be added to the grid.
The Attendee can repeat the Add Requirements process to add more resource items to the Requirements page.
When the Attendee has added all the resource items they want to the Requirements page, they click Next to continue the wizard.
Guests
Page Definition: New Attendee Guests
Adding a Guest to the Main Attendee is a multi-step process.
•On the Guests page, the Attendee clicks the Add Guest button.
•This starts the Adding Guest wizard, which is essentially the same as the online Attendee registration wizard, except that it has a few Guest-specific elements.
•When the Attendee completes the Adding Guest wizard and click Submit, they will return to the Guests page, where the newly entered Guest will now appear in the grid.
Now let's look at the process in more detail.
"Adding Guest" Wizard
First, the Attendee clicks the Add Guest button, which takes them to the Adding Guest wizard.
Note that "Add Guest" is the default caption for the button, but you can define custom caption text using the Guest Caption setting in the New Attendee Guests - Page Definition.
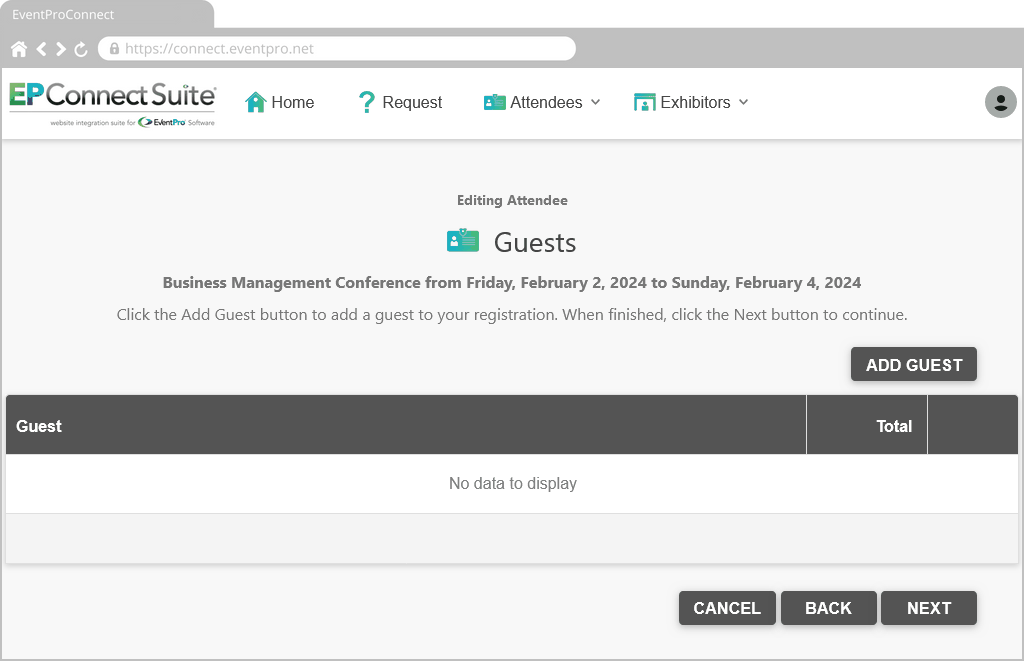
Figure 723: Add Attendee Guests
Guest Attendee Type
The Adding Guest wizard begins with the Attendee Type page, like the regular attendee registration wizard.
However, the default Attendee Type may be different for Guests, depending on the Event's Online Attendee Settings. Review the topic Attendee Settings under Edit Event Window / Online Registration Settings.
The Attendee clicks Next to continue the Adding Guest wizard.
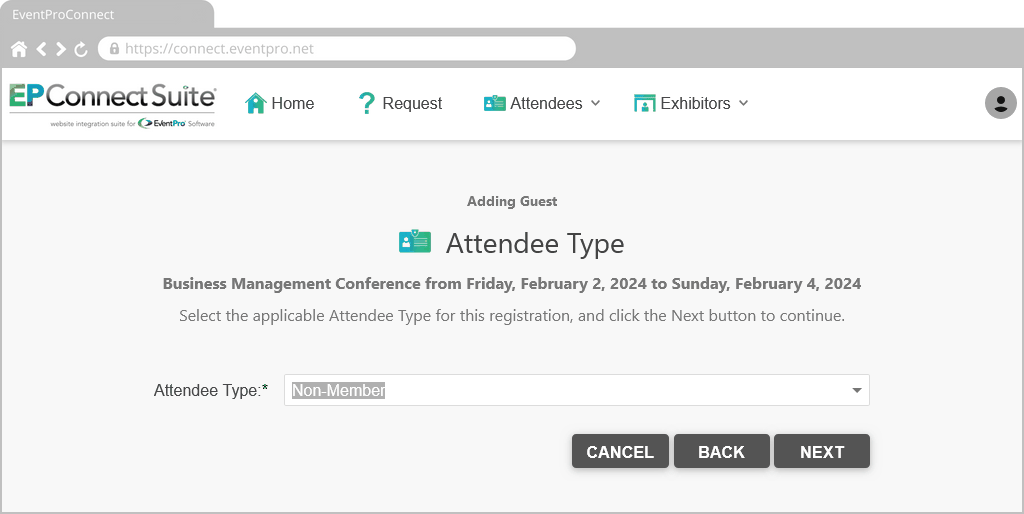
Figure 724: Attendee Guest Registration Wizard
Guest Contact Information
The next page is Contact Information, which may be the same as the Attendee Contact Information page.
However, when defining this page, you had the option to set Applicable Attendee Types for Form Field Groups.
This means that a Form Field Group could appear on the Contact Information form for the Main Attendee, but not for the Guest, who is a different Attendee Type. So, the Contact Information page may not be exactly the same for this Attendee's Guest.
The Attendee enters the Guest's contact information, and clicks Next to continue.
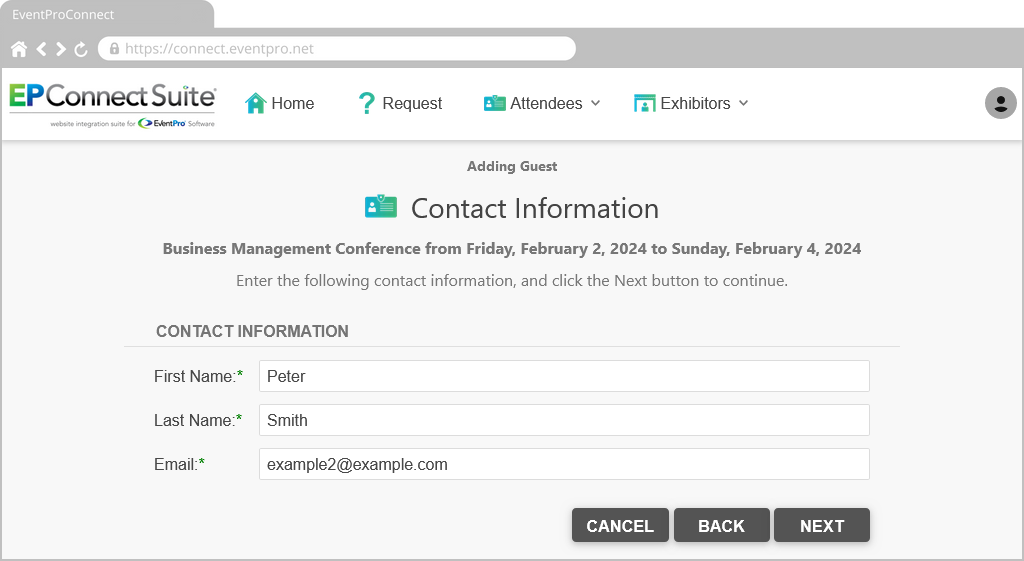
Figure 725: Attendee Guest Contact Information
Guest Registration Details
The Registration page will look similar, but the available registration selections will depend on how you set up the Event's Registrations for Attendees and Guests.
•If the Guest is a different Attendee Type than the Main Attendee, they may have different Registration options, since you can restrict Registration Groups to certain applicable Attendee Types. Review the topic Add New Attendee Registrations under Edit Event Window / Attendee Setup.
•However, there is also the possibility that the Guest's registrations will already be set by default to the same items as the Main Attendee. This depends on the setting, Default Guest Registrations from Main Attendee, in the New Attendee Guests Page Definition. The Attendee can still make different registration selections for the Guest.
When the Attendee is done selecting the Guest's registration items, they click Next.
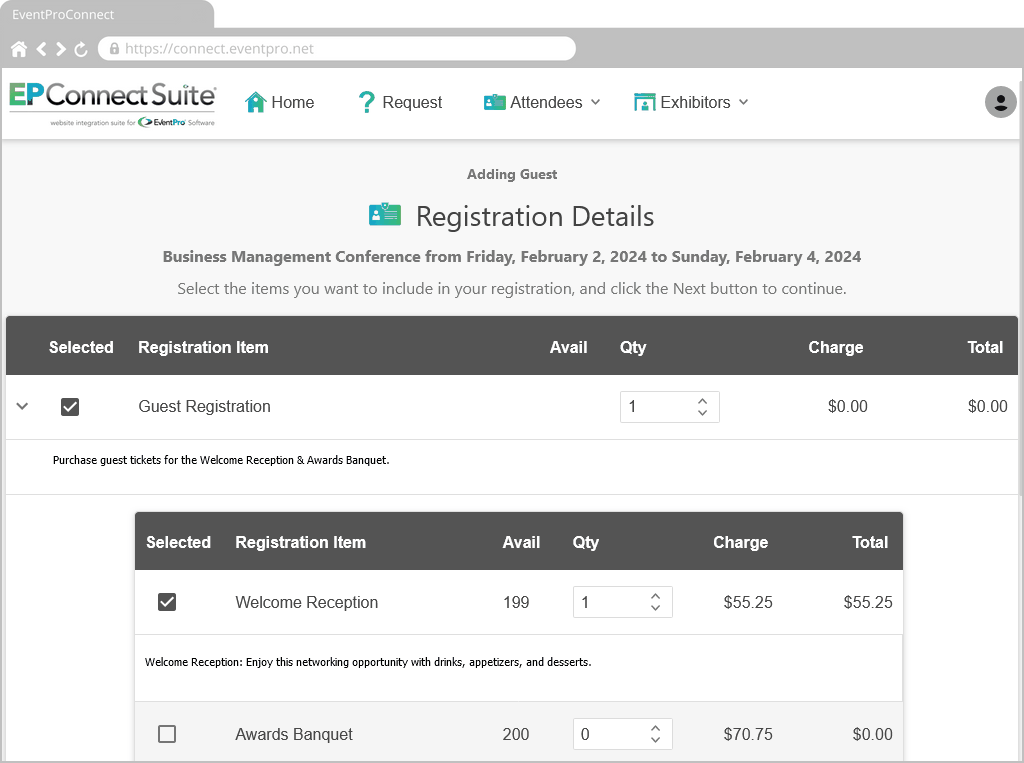
Figure 726: Attendee Guest Registration Items
Guest Accommodations
The Guest Accommodations page has two checkbox options:
•Share Accommodations with Main Attendee
•Enter Accommodation Information
The Share Accommodations with Main Attendee option is unique to Guest registration. If the Attendee selects this option for their Guest, they can just click Next to continue.
If the Attendee selects the Enter Accommodation Information option for their Guest, they can enter or select Accommodations for the Guest in the same manner as their own, depending on how you set up the Accommodations page. Remember, however, that the Attendee and Guest may be different Attendee Types, and the Room Blocks may be limited to certain Applicable Attendee Types. Review the topic Room Blocks under Accommodations Management.
When finished, the Attendee clicks Next.
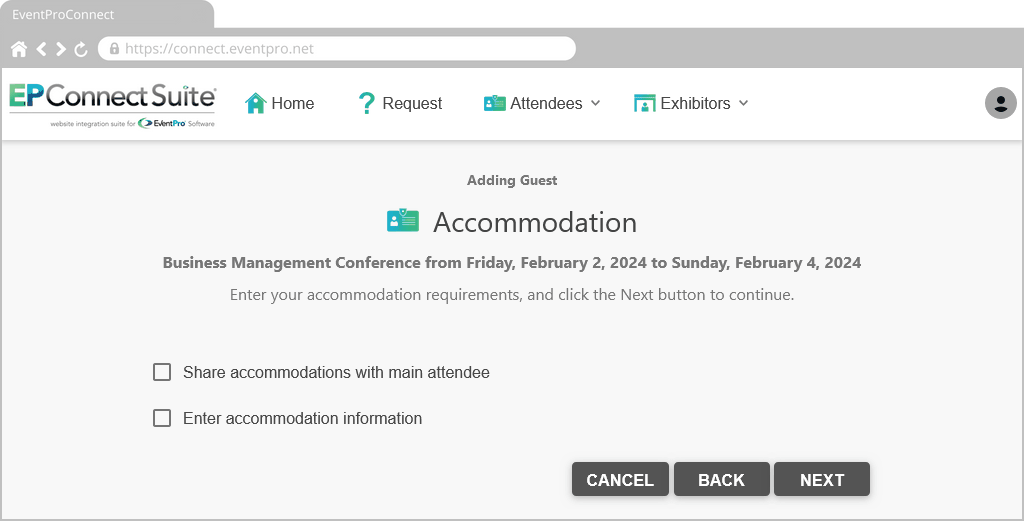
Figure 727: Attendee Guest Accommodations
Guest Travel
The next page is Travel, which will be the same as the Attendee Travel page.
The Attendee enters the Guest's travel requirements, and clicks Next to continue.
The next page is Requirements, which will be the same as the Attendee Requirements page.
The Attendee selects any items required for the Guest, and clicks Next to continue.
Guest Required Documents
The next page is Required Documents. The page will look and operate the same way, but the Attendee may need to submit different documents for a Guest.
When defining Attendee Required Documents in the Event, you could specify whether the documents were required for (main) Attendees, Guests, or All Attendees. Review the topic Attendee Documents under Edit Event Window / Attendee Setup.
When done uploading the documents for the Guest, the Attendee clicks Next.
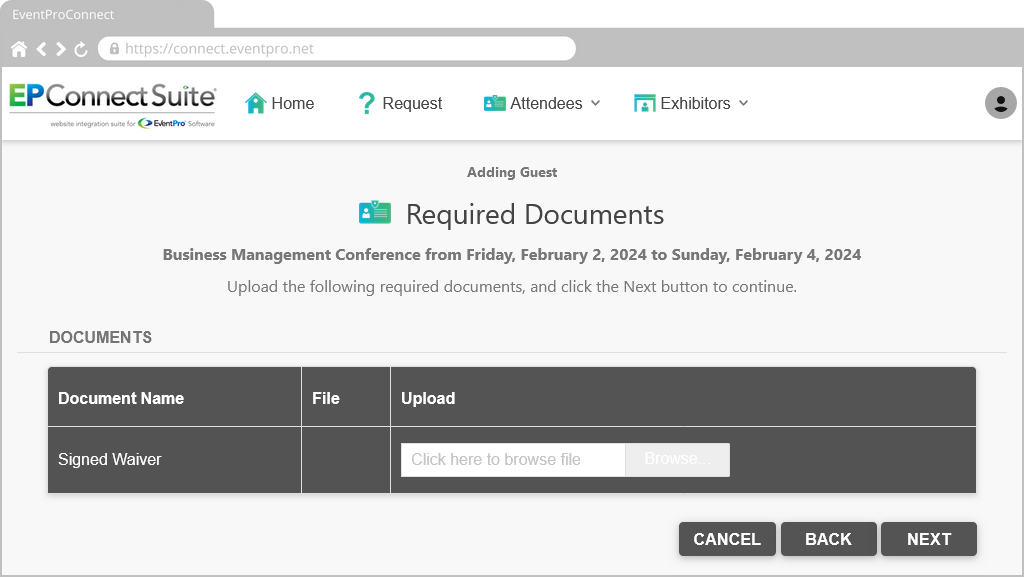
Figure 728: Attendee Guest Required Documents
Guest Summary
The Attendee arrives at the Guest's Summary page.
They can review the information, scroll down to the bottom of the page, and click Submit.
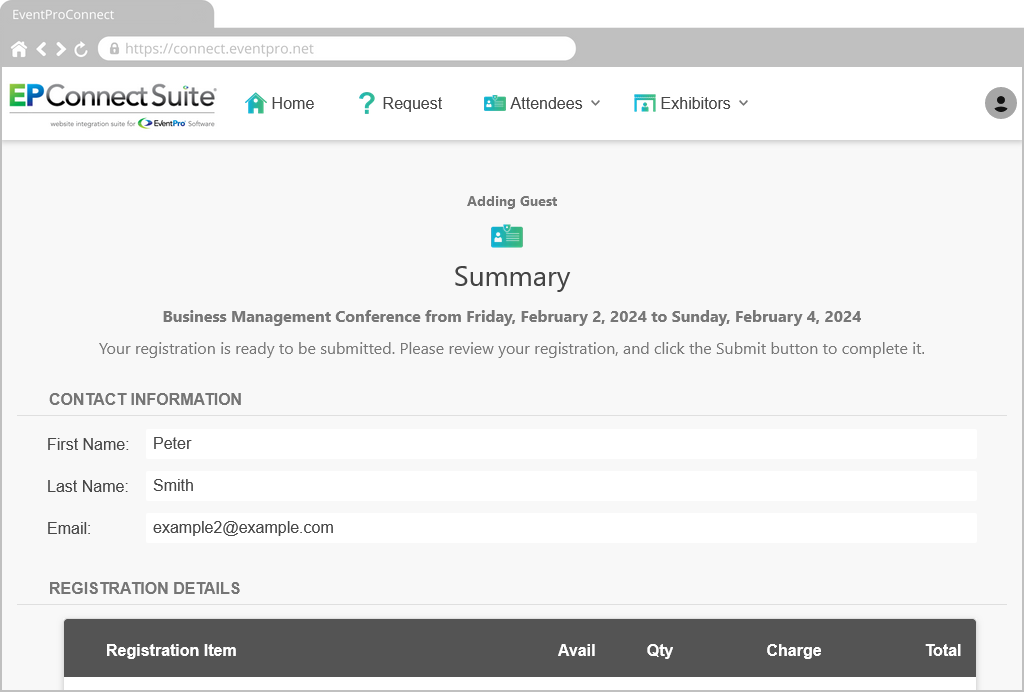
Figure 729: Attendee Guest Summary
After submitting the Guest's registration, the Attendee will return to the Guests page, where the newly added Guest now appears in the grid.
The Attendee can add more Guests, if required.
When finished with the Guests page, the Attendee clicks Next to continue.
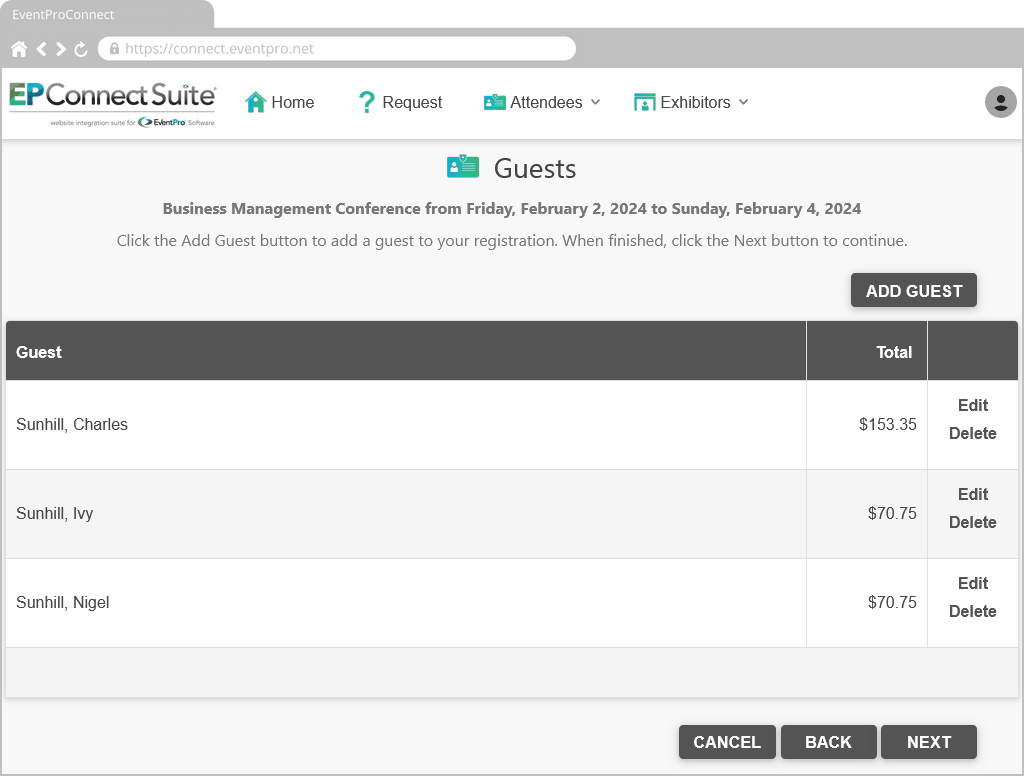
Figure 730: Guests Added to Registration
The Attendee will now continue with their own registration wizard.
Required Documents
Page Definition: New Attendee Required Documents
The grid displays the documents that the Attendee is requested to provide for the event.
These Required Documents are defined in the Event's Attendee Setup. Review the topic Attendee Documents under Edit Event Window / Attendee Setup.
In a Document row, the Attendee clicks the Browse button under the Upload column.
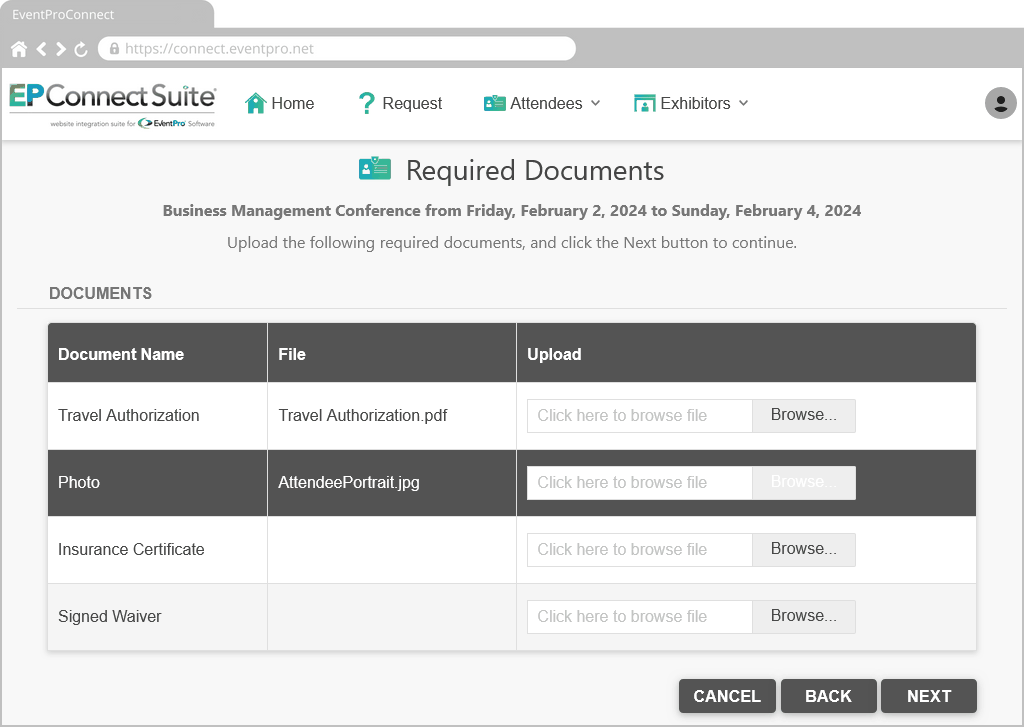
Figure 731: Attendee Required Documents Page
The file selection window appears.
The Attendee selects the applicable file, and clicks Open, which returns them to the Required Documents page.
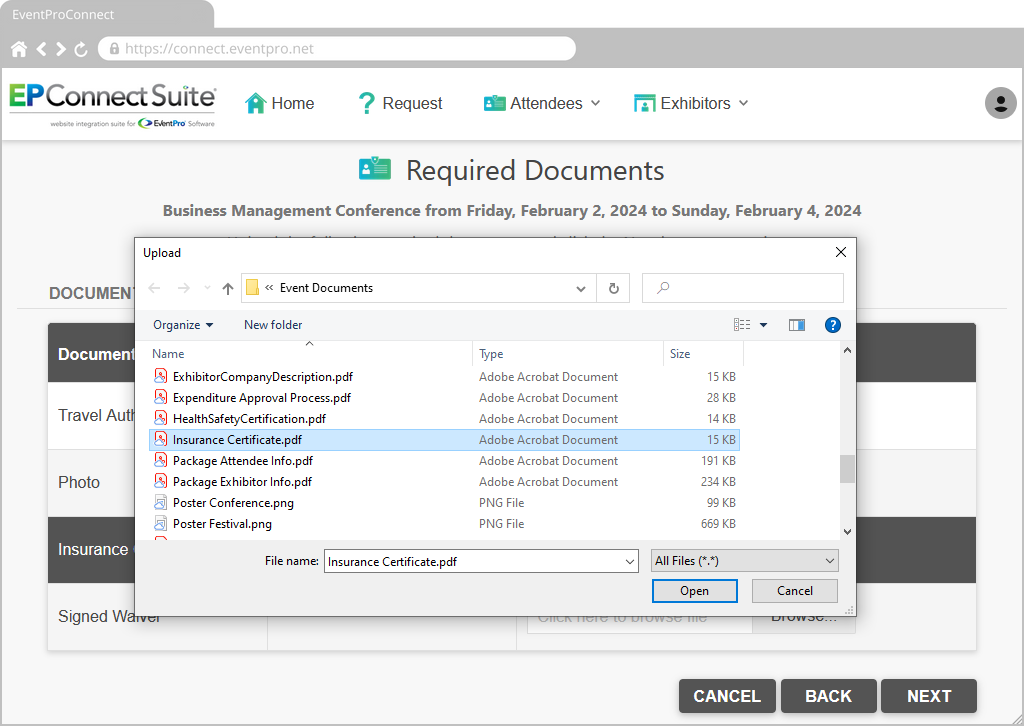
Figure 732: Select Document to Upload
Back in the Required Documents page, the selected file appears in the grid under the File column for the corresponding Document Name.
The Attendee can repeat the file upload process for each Document Name row in the grid.
When the Attendee has uploaded all of the required files, they click Next to continue the wizard.
Summary
Page Definition: New Attendee Summary
On this page, the Attendee reviews the registration they are about to submit.
Scrolling down to the bottom of the page, the Attendee may have a few different options:
•Click Cancel to cancel the entire registration.
•Click Back to go back through the wizard pages to make edits.
•Click Submit to submit the registration, which will send the information to your EventPro database.
•Click Submit and Pay Now to submit the registration and go directly to the online payment form. This button will only appear if online payments have been allowed via these two settings:
oThe Allow Payments setting in the New Attendee Registration Area Definition.
oThe Show Payment Button in the New Attendee Summary Page Definition.
If the Attendee clicks one of the Submit buttons, they will be directed to the Success page.
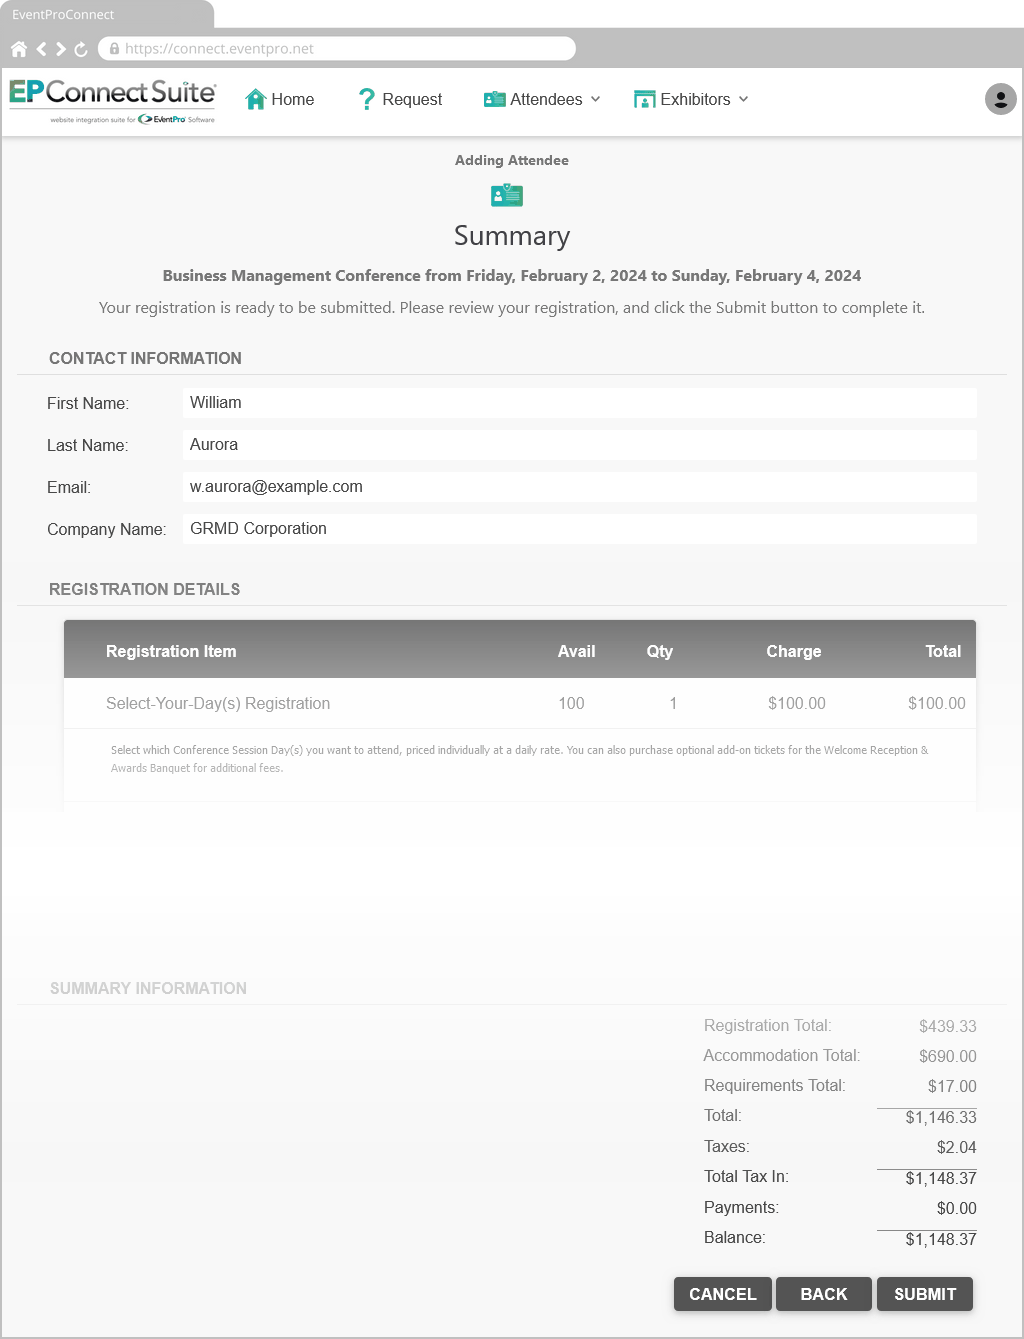
Figure 733: View Registration Summary
Success
Page Definition: New Attendee Success
The Attendee's registration has been submitted, and will be entered in your EventPro program.
The Attendee should record their Confirmation Number/Registration Password, which can be used to review their registration later.
Note that the Attendee Confirmation Number is generated automatically, unless you opted to keep the Confirmation # blank by default. Review your Attendee System Settings under EventPro Setup.
The caption and URL of the Return to Main Page button at the bottom of the page are defined under the Return Button Settings in the New Attendee Registration - Area Definition.
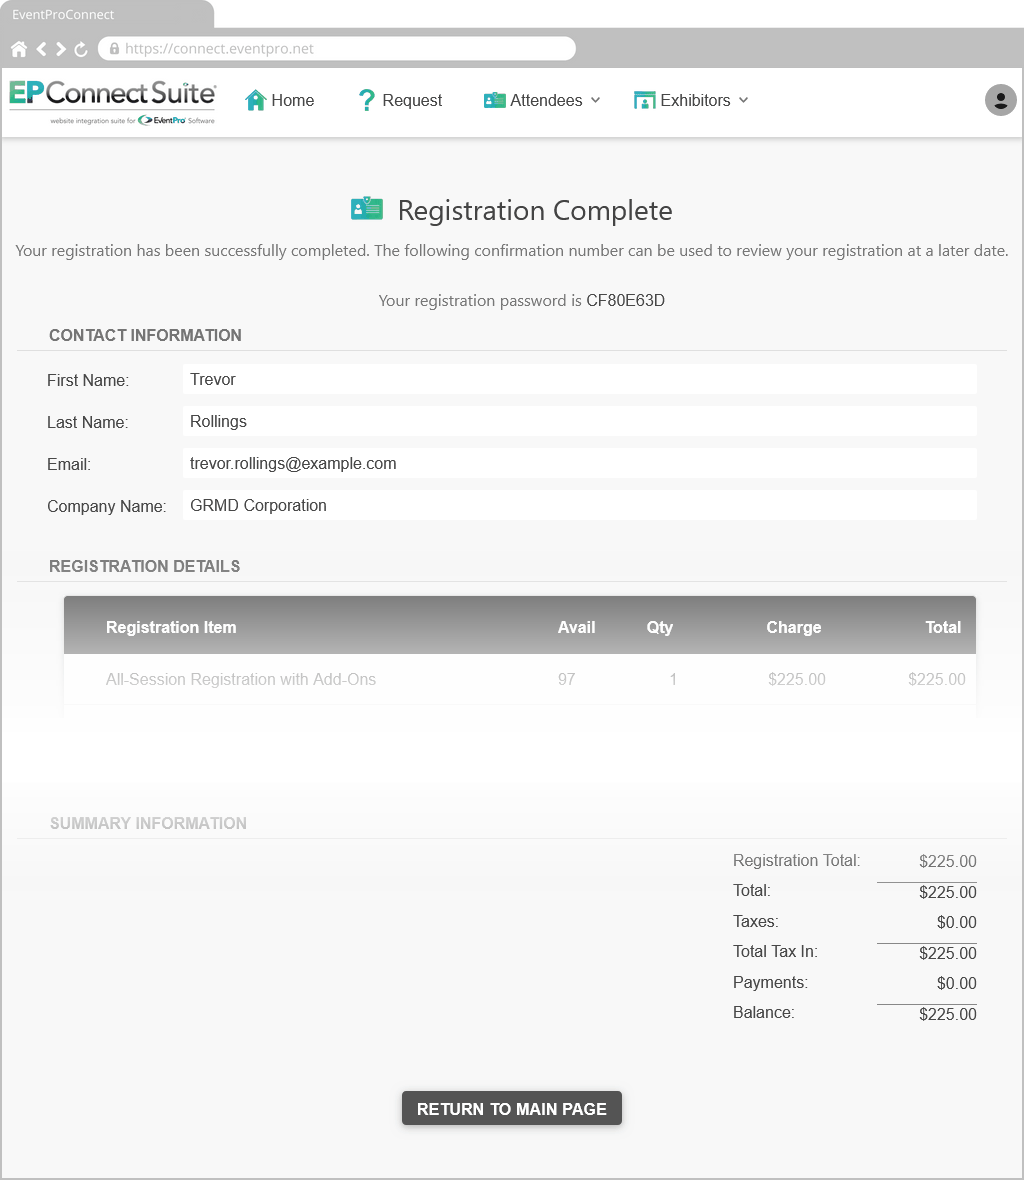
Figure 734: Registration Success
Registration Attendees (Group)
Page Definition: New Registration Attendees
The online registrant will only arrive at this page (after clicking Next on the Welcome page) if you have allowed Group Registrations.
This is determined by the "Allow Group Registrations" setting in the Registrations Settings of the New Attendee Registration Area Definition.
On this page, the online registrant clicks the Add Attendee button.
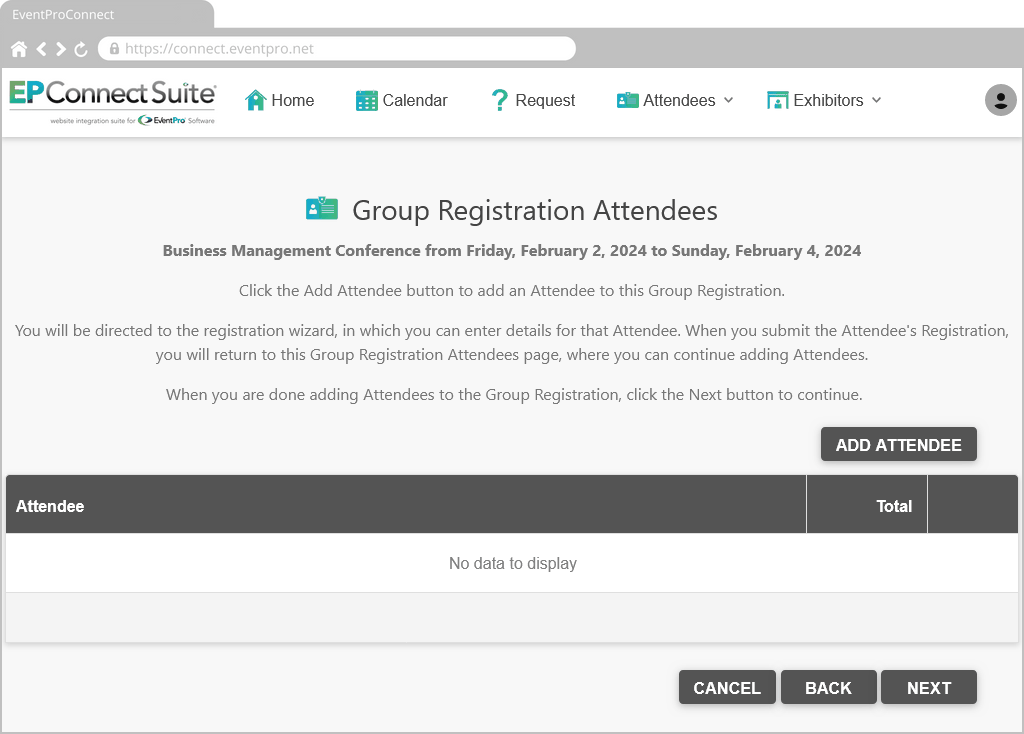
Figure 735: Add Attendees to Group Registration
This starts the online attendee group registration wizard.
The registrant will work through all of the same pages as described for an individual Attendee Registration - Attendee Type, Contact Information, Registration Details, etc., as described above in this Process Overview - through to the Summary page.
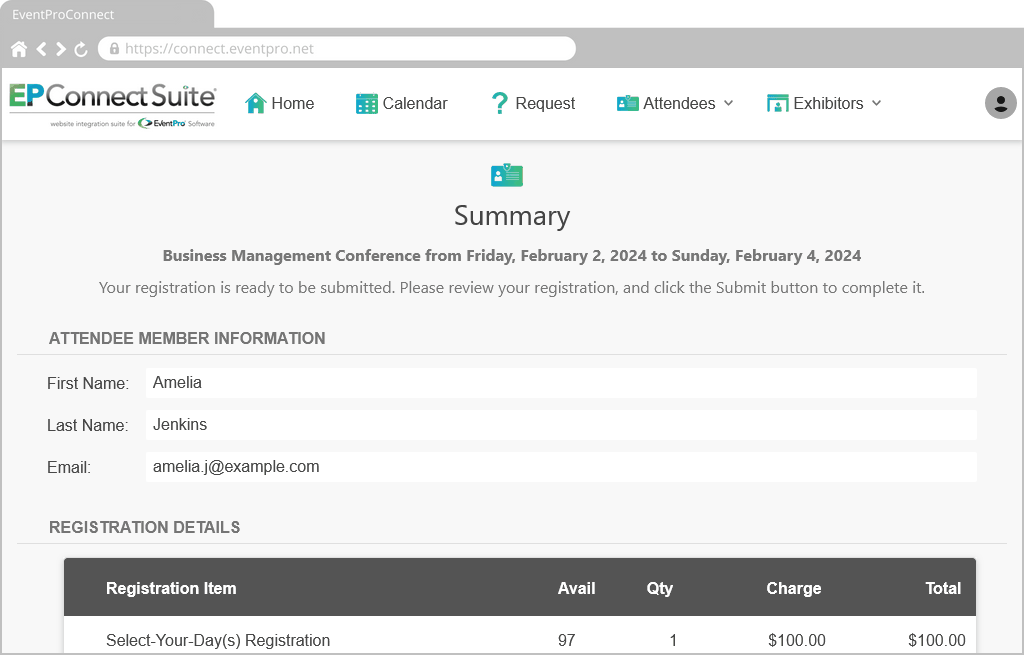
Figure 736: Group Registration Attendee Summary
However, after the Summary page, this group registration differs from an individual registration.
When the registrant clicks the Submit button at the bottom of the Summary page, the wizard will return the registrant to the New Registration Attendees page.
The newly added Attendee will now appear in the Attendees grid.
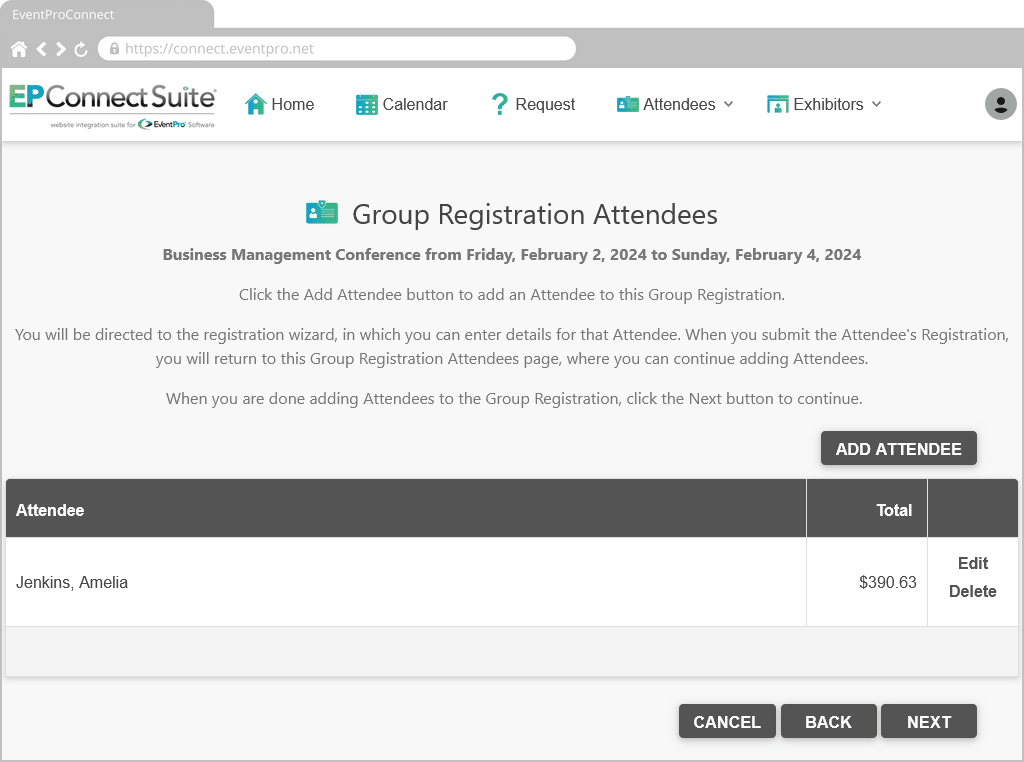
Figure 737: Attendee Added to Group Registration
The registrant can continue adding Attendees to the Group Registration, returning to this New Registration Attendees page each time.
When done adding Attendees to the Group Registration, the registrant clicks the Next button.
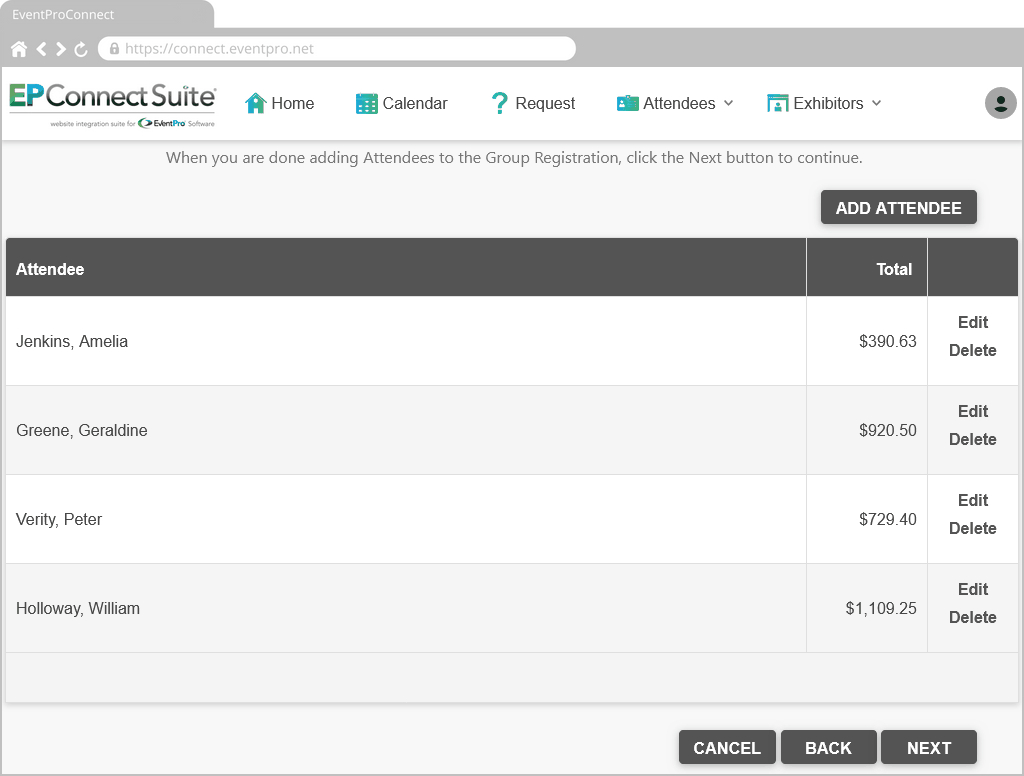
Figure 738: Multiple Attendees Added to Registration
They will be directed to the Billing Information page.
Billing Info (Group)
Page Definition: New Attendee Billing Info
There are three options for billing a Group Registration.
The options have default names, but you can define custom descriptions in the Registration Billing Info Settings of the New Attendee Billing - Page Definition.
The registrant selections an option from the Bill drop-down list:
1.Each Attendee: If the registrant selects Each Attendee, they can just click Next to proceed.
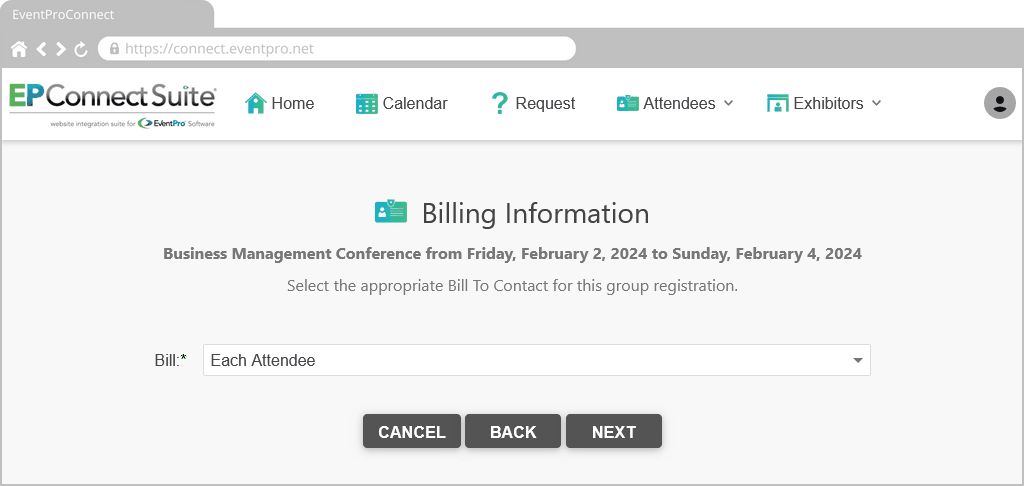
Figure 739: Billing Registration to Each Attendee
2.One Attendee: If the registrant selects One Attendee, they need to choose the bill-to Attendee from the Attendee Selection drop-down list, and then click Next to proceed.
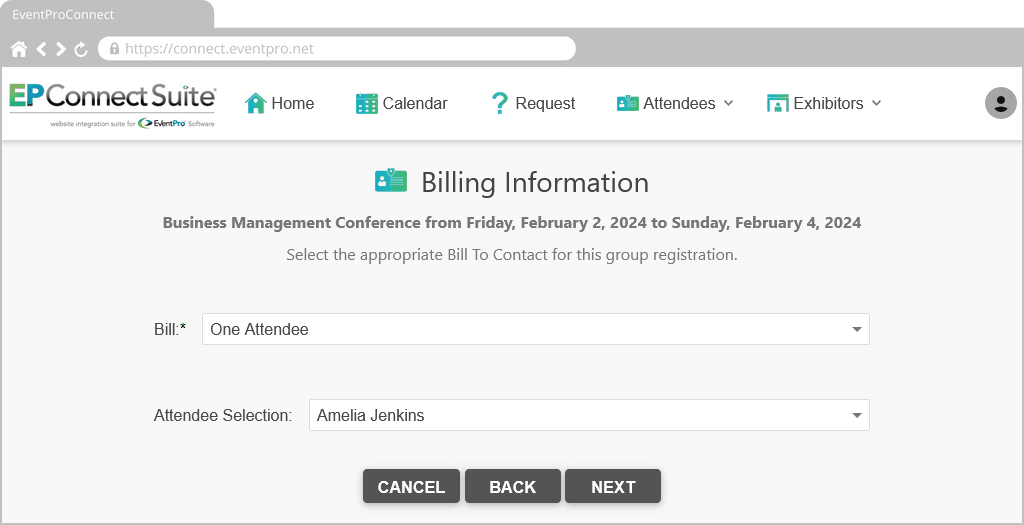
Figure 740: Billing Registration to One Attendee
3.New Contact: If the registrant selects New Contact, they need to fill in the Contact Information form fields below, and then click Next to proceed. (The fields in this Contact Information form are determined by the Form Field Groups in the New Attendee Billing - Page Definition.)
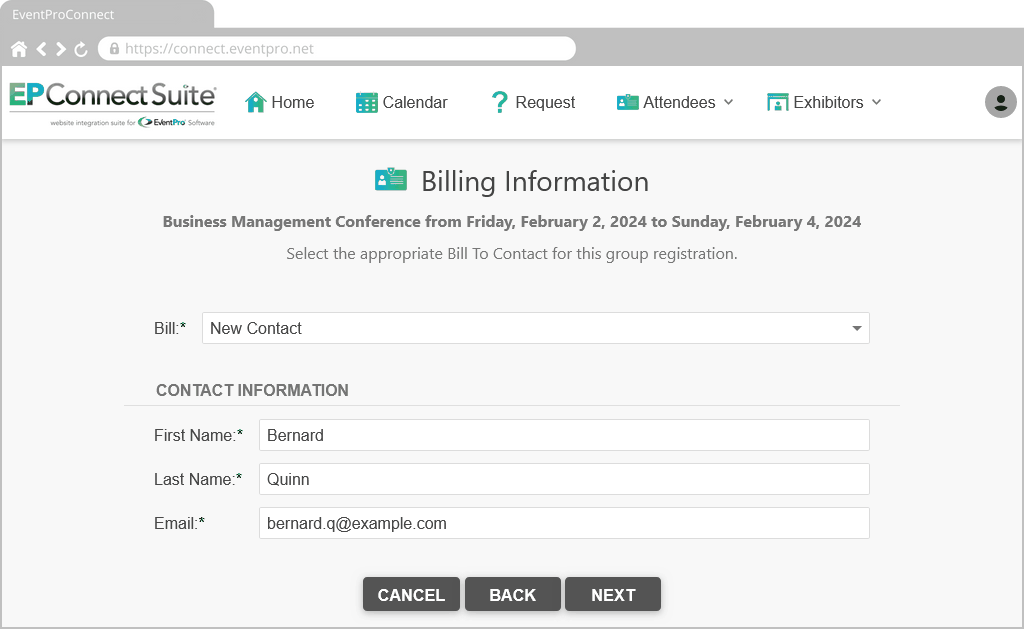
Figure 741: Billing Registration to New Contact
The registrant will proceed to the Summary page.
Summary (Group)
Although they are controlled by the same Page Definition (New Attendee Summary), the Group Registration Summary page will look somewhat different from the individual Registration Summary page:
•The Attendees registered in the group will appear in the page's Attendee grid.
•To view each Attendee's registration information, the online registrant clicks the Details link in the corresponding row.
•The selected Billing Type and bill-to entity will be listed below the Attendee grid.
Much of the group Summary page is hard-coded, so you don't need to define the Attendee grid, Billing Type listing, or Details links.
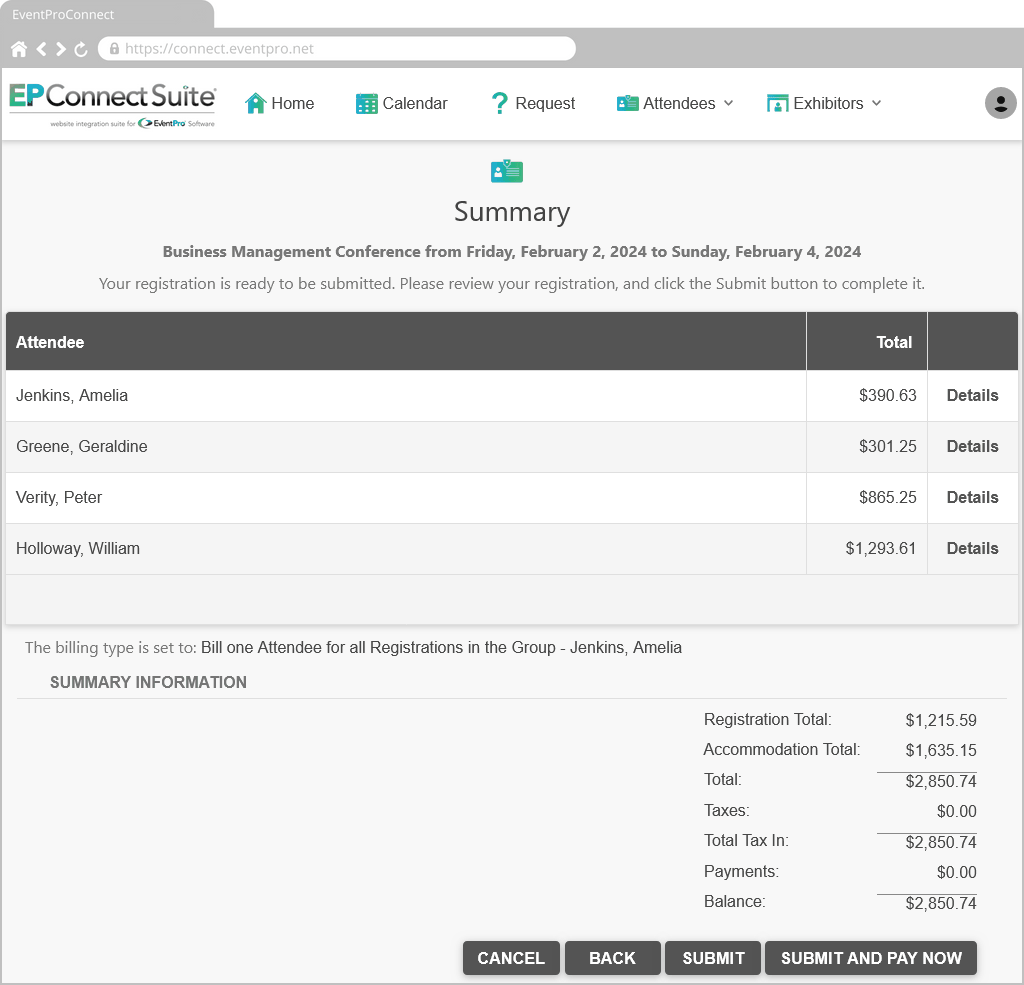
Figure 742: Group Registration Summary
Scrolling down to the bottom of the page, the registrant will see a few different buttons, depending on the settings:
•Click Cancel to cancel the entire registration.
•Click Back to go back through the wizard pages to make edits.
•Click Submit to submit the group registrations, which will send the information to your EventPro database.
•Click Submit and Pay Now to submit the registration and go directly to the online payment form. This button will only appear if online payments have been allowed via these two settings:
oThe Allow Payments setting in the New Attendee Registration Area Definition.
oThe Show Payment Button in the New Attendee Summary Page Definition.
After clicking one of the Submit buttons, the registrant will proceed to the group Success page.
Success (Registration Complete - Group)
Although they are controlled by the same Page Definition (New Attendee Success), the Group Registration Success page will look somewhat different from the individual Registration Success page:
•The registered Attendees, now each assigned a Confirmation Number, will appear in the page's Attendee grid.
•To view each Attendee's registration information, the online registrant clicks the Details link in the corresponding row.
•The selected Billing Type and bill-to entity will be listed below the Attendee grid.
Much of the group Success page is hard-coded, so you don't need to define the Attendee grid, Billing Type listing, or Details links.
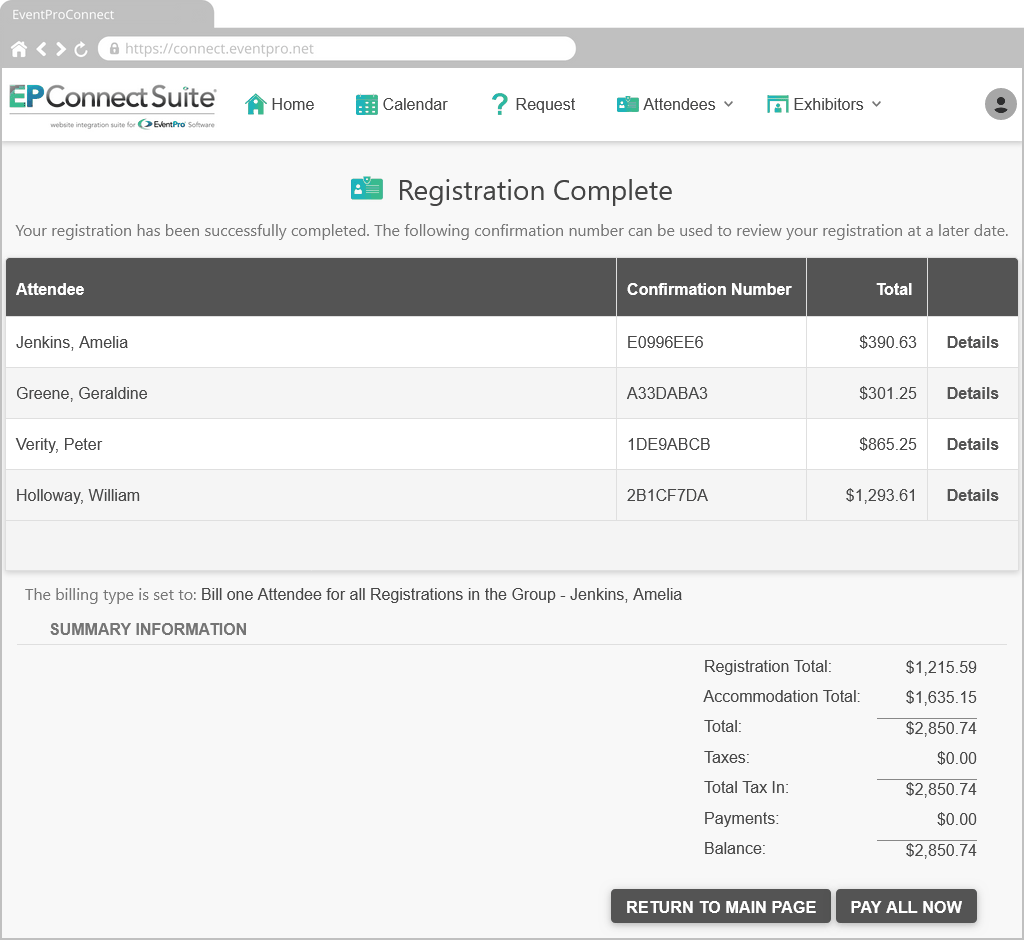
Figure 743: Group Registration Completed
The registrant will see one or two buttons at the bottom of this page, depending on settings in the New Attendee Registration - Area Definition:
•Return to Main Page - This button's caption and link are defined under the Return Button Settings.
•Pay All Now - This button only appears if the Allow Payments checkbox has been selected.